文本分类作为自然语言处理中的基础任务,能够帮助我们将海量医学摘要自动归类到具体疾病领域中。本文将基于NVIDIA NeMo框架,构建一个用于医学疾病摘要分类的深度学习应用,支持将摘要划分为三类:癌症类疾病、神经系统疾病及障碍、以及其他类型。我们将通过命令行和配置文件快速完成训练,也将深入探讨PyTorch Lightning的核心机制,手动实现训练过程,以便更灵活地调试与扩展模型。
文章目录
- 1 NeMo和PyTorch Lightning
- 2 从命令行进行文本分类
- 2.1 准备数据
- 2.2 配置文件
- 2.3 训练模型
- 3 PyTorch Lightning详解
- 3.1 LightningModule、Trainer和exp_manager
- 3.2 脚本解析
- 4 总结
1 NeMo和PyTorch Lightning
NeMo是一个用于构建对话式AI应用程序的开源工具包。NeMo是围绕神经模块(Neural Modules)构建的,它们是神经网络的概念模块,接受类型化输入并产生类型化输出。这些模块通常表示数据层、编码器、解码器、语言模型、损失函数或激活组合方法。
NeMo深度学习框架基于PyTorch Lightning,这是一个PyTorch的封装器,用于组织神经网络训练代码。PyTorch Lightning提供了简单且高性能的多GPU/多节点混合精度训练选项。
使用PyTorch Lightning创建一个深度神经网络项目通常需要两个主要组件:
- LightningModule:将PyTorch代码组织为训练、验证和测试所需的计算、优化器和循环。该抽象层使深度学习实验更容易理解和复现。
- Trainer:可以接收
LightningModule并自动完成深度学习训练所需的所有内容。
2 从命令行进行文本分类
我们要解决的问题是:给定一个医学疾病摘要,该摘要是关于癌症、神经系统疾病,还是其他?
2.1 准备数据
上一篇文章中,我们已经探索了NCBI-disease corpus,回忆一下,文本分类数据文件由制表符分隔的摘要和标签组成,并带有标题行。
# 设置数据目录变量
TC3_DATA_DIR = './data/NCBI_tc-3'
# 列出所有 .tsv 文件
!ls $TC3_DATA_DIR/*.tsv
输出如下:
/dli/task/data/NCBI_tc-3/dev.tsv   /dli/task/data/NCBI_tc-3/train.tsv
/dli/task/data/NCBI_tc-3/test.tsv
大致看一下文件内容:
print("*****\ntrain.tsv sample\n*****")
!head -n 3 $TC3_DATA_DIR/train.tsv
print("\n\n*****\ndev.tsv sample\n*****")
!head -n 3 $TC3_DATA_DIR/dev.tsv
print("\n\n*****\ntest.tsv sample\n*****")
!head -n 3 $TC3_DATA_DIR/test.tsv
部分输出:

数据的几个特征:
-
预处理后数据已符合文档中规定的格式:
[单词][空格][单词][空格][单词][TAB][标签] -
标题行需要删除:标题行不是训练数据,它会干扰模型的学习。
-
文本较长,因此训练时需要考虑
max_seq_length值。
首先移除标题行,我们可以使用bash流编辑器sed:
# 删除每个文件的第一行(标题),生成新格式文件
!sed 1d $TC3_DATA_DIR/train.tsv > $TC3_DATA_DIR/train_nemo_format.tsv
!sed 1d $TC3_DATA_DIR/dev.tsv > $TC3_DATA_DIR/dev_nemo_format.tsv
!sed 1d $TC3_DATA_DIR/test.tsv > $TC3_DATA_DIR/test_nemo_format.tsv
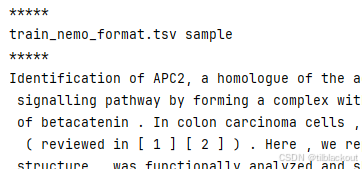
# 查看新生成的训练、验证、测试文件(无标题)
print("*****\ntrain_nemo_format.tsv sample\n*****")
!head -n 3 $TC3_DATA_DIR/train_nemo_format.tsv
print("\n\n*****\ndev_nemo_format.tsv sample\n*****")
!head -n 3 $TC3_DATA_DIR/dev_nemo_format.tsv
print("\n\n*****\ntest_nemo_format.tsv sample\n*****")
!head -n 3 $TC3_DATA_DIR/test_nemo_format.tsv
部分输出如下,可以看到已经去掉了标题行:
2.2 配置文件
模型训练的所有配置参数都在text_classification_config.yaml中。注意键的层次结构,特别是三个顶层键:trainer、model和exp_manager。
trainer:gpus:num_nodes:max_epochs:...model:nemo_path:tokenizer:  language_model:classifier_head:...exp_manager:...
# 查看 YAML 配置文件内容
CONFIG_DIR = "/dli/task/nemo/examples/nlp/text_classification/conf"
CONFIG_FILE = "text_classification_config.yaml"
!cat $CONFIG_DIR/$CONFIG_FILE
必须修改的参数
| 参数 | 位置 | 作用 |
|---|---|---|
dataset.num_classes | model.dataset | 设置分类的类别数(如2表示二分类) |
train_ds.file_path | model.train_ds | 指定训练数据的路径 |
validation_ds.file_path | model.validation_ds | 指定验证数据的路径 |
test_ds.file_path | model.test_ds | 指定测试数据的路径 |
建议修改的参数
| 参数 | 位置 | 作用 | 修改建议和原因 |
|---|---|---|---|
dataset.max_seq_length | model.dataset | 输入文本的最大长度,默认是256 | 修改为128,以减少内存使用,适合资源有限的设备 |
infer_samples | model.infer_samples | 用于训练完成后测试模型效果的示例句子 | 替换为疾病相关句子,更贴合目标应用领域 |
trainer.max_epochs | trainer | 最大训练轮数 | 设置为较小值(如3-10),便于快速测试验证训练流程是否通顺 |
这些参数在初次运行时可以先使用默认值,后续根据效果再微调:
trainer.devices(当前已设置为1)trainer.precision(默认32,也可根据硬件支持设为16)trainer.gradient_clip_val、accumulate_grad_batches等优化细节参数exp_manager的所有项(如exp_dir,create_tensorboard_logger等)
2.3 训练模型
Hydra是一个用于配置管理的Python框架,它允许用户轻松地从命令行覆盖配置文件(如.yaml)中的参数,而无需手动修改配置文件本身。所以这个脚本可以通过命令行灵活地传入配置参数来运行,比如更改训练集路径、模型参数等。
下面是我们训练的python脚本text_classification_with_bert.py的部分内容:
import lightning.pytorch as pl
from omegaconf import DictConfig, OmegaConf  # 用于处理 Hydra 加载的配置对象
from nemo.core.config import hydra_runner    # 用于接入 Hydra 的装饰器# 使用 hydra_runner 装饰器加载配置文件
# config_path 指向配置文件目录(如 conf/),config_name 是配置文件名(不带 .yaml 后缀)
@hydra_runner(config_path="conf", config_name="text_classification_config")
def main(cfg: DictConfig) -> None:  # cfg 是通过 Hydra 加载的配置对象# 打印当前加载的配置,便于调试和确认print(OmegaConf.to_yaml(cfg))...# 访问配置中任意字段,如:# cfg.model.train_ds.file_path# cfg.trainer.max_epochs...if __name__ == '__main__':main()
该脚本使用Hydra管理配置文件,也就是说我们可以通过命令行直接覆盖想要修改的值:
%%time
# 训练大约耗时 2 分钟# 设置模型所在目录
TC_DIR = "/dli/task/nemo/examples/nlp/text_classification"# 设置我们要覆盖的值
NUM_CLASSES = 3
MAX_SEQ_LENGTH = 128
PATH_TO_TRAIN_FILE = "/dli/task/data/NCBI_tc-3/train_nemo_format.tsv"
PATH_TO_VAL_FILE = "/dli/task/data/NCBI_tc-3/dev_nemo_format.tsv"
PATH_TO_TEST_FILE = "/dli/task/data/NCBI_tc-3/test_nemo_format.tsv"
# 推理样本对应类别应分别为 0, 1, 2
INFER_SAMPLES_0 = "In contrast no mutations were detected in the p53 gene suggesting that this tumour suppressor is not frequently altered in this leukaemia "
INFER_SAMPLES_1 = "The first predictive testing for Huntington disease  was based on analysis of linked polymorphic DNA markers to estimate the likelihood of inheriting the mutation for HD"
INFER_SAMPLES_2 = "Further studies suggested that low dilutions of C5D serum contain a factor or factors interfering at some step in the hemolytic assay of C5 rather than a true C5 inhibitor or inactivator"
MAX_EPOCHS = 3# 运行训练脚本并通过命令行覆盖默认配置参数
!python $TC_DIR/text_classification_with_bert.py \model.dataset.num_classes=$NUM_CLASSES \model.dataset.max_seq_length=$MAX_SEQ_LENGTH \model.train_ds.file_path=$PATH_TO_TRAIN_FILE \model.validation_ds.file_path=$PATH_TO_VAL_FILE \model.test_ds.file_path=$PATH_TO_TEST_FILE \model.infer_samples=["$INFER_SAMPLES_0","$INFER_SAMPLES_1","$INFER_SAMPLES_2"] \trainer.max_epochs=$MAX_EPOCHS
每次训练实验开始时,都会打印实验配置的日志,包括通过命令行添加或覆盖的参数。它还会显示一些附加信息,例如可用GPU、日志保存位置、数据集样本及其对应的模型输入。日志中还提供了数据集中序列长度的统计信息。
每个训练epoch结束后,会输出一张验证集指标表,包括准确率、召回率和F1分数。F1分数同时考虑了假阳性和假阴性,被认为比单纯的准确率更有意义。
训练结束后,NeMo会将最后的检查点保存在model.nemo_file_path指定的路径。由于我们使用的是默认值,它应该已保存在.nemo格式的工作区中。
# 列出当前目录下的 .nemo 模型文件
!ls *.nemo# 输出 text_classification_model.nemo
上面代码的结果可能不是很好,但仅需微调几个参数,就可以很容易尝试另一个实验。通过延长训练时间、调整学习率以及更改训练和验证集的batch size都可能提升结果。
试着做以下优化,再运行一次代码:
- 设置混合精度
amp_level为 “O1”,precision为16,这样模型运行更快,精度下降很小甚至不下降。 - 将训练epoch数调高,以取得更好的结果。
- 略微提升学习率,使模型权重更新时对误差响应更敏感。
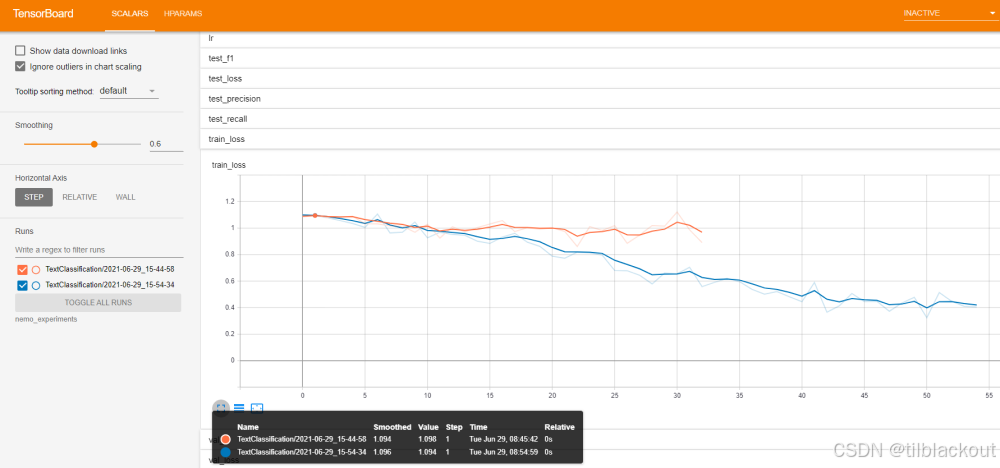
下面用TensorBoard可视化一下训练的过程,我们选择训练损失标量。图中的橙色是第一次运行,蓝色是第二次运行。可以看到第二次的loss更小。
更换语言模型
运行以下单元格查看NeMo支持的BERT类语言模型列表:
# 查看支持的预训练语言模型列表
from nemo.collections import nlp as nemo_nlp
nemo_nlp.modules.get_pretrained_lm_models_list()
我们还可以通过修改yaml中的PRETRAINED_MODEL_NAME字段来选择一个新的语言模型,例如megatron-bert-345m-cased。
- 为了节省GPU显存,你还可以将
batch_size降到32、16甚至8,将max_seq_length(每条文本的token长度) 降到64。
3 PyTorch Lightning详解
虽然NeMo提供了诸如text_classification_with_bert.py的训练脚本,能够通过配置文件一键完成模型训练、评估和推理。但在需要更灵活控制训练流程的场景下(例如自定义模型结构、修改损失函数或逐步调试训练过程),你可以跳出NeMo的封装,直接采用PyTorch Lightning的原生工作方式:手动构建Trainer、初始化模型、并调用fit()、test()等方法,实现对整个训练过程的精细化掌控。
import lightning.pytorch as pl
from omegaconf import DictConfig, OmegaConffrom nemo.collections.nlp.models.text_classification import TextClassificationModel
from nemo.collections.nlp.parts.nlp_overrides import NLPDDPStrategy
from nemo.core.config import hydra_runner
from nemo.utils import logging
from nemo.utils.exp_manager import exp_manager@hydra_runner(config_path="conf", config_name="text_classification_config")
def main(cfg: DictConfig) -> None:try:strategy = NLPDDPStrategy(find_unused_parameters=True)except (ImportError, ModuleNotFoundError):strategy = 'auto'trainer = pl.Trainer(strategy=strategy, **cfg.trainer)exp_manager(trainer, cfg.get("exp_manager", None))if not cfg.model.train_ds.file_path:raise ValueError("'train_ds.file_path' need to be set for the training!")model = TextClassificationModel(cfg.model, trainer=trainer)trainer.fit(model)if cfg.model.nemo_path:model.save_to(cfg.model.nemo_path)logging.info(f'Model is saved into `.nemo` file: {cfg.model.nemo_path}')# We evaluate the trained model on the test set if test_ds is set in the config fileif cfg.model.test_ds.file_path:trainer.test(model=model, ckpt_path=None, verbose=False)# perform inference on a list of queries.if "infer_samples" in cfg.model and cfg.model.infer_samples:logging.info("Starting the inference on some sample queries...")# max_seq_length=512 is the maximum length BERT supports.results = model.classifytext(queries=cfg.model.infer_samples, batch_size=16, max_seq_length=512)for query, result in zip(cfg.model.infer_samples, results):logging.info(f'Query : {query}')logging.info(f'Predicted label: {result}')if __name__ == '__main__':main()
3.1 LightningModule、Trainer和exp_manager
1.LightningModule:定义模型逻辑
LightningModule,它是你定义模型逻辑的地方,也是Lightning框架解耦模型代码与工程代码的关键。
LightningModule是PyTorch Lightning的核心类,用于封装模型结构与训练逻辑,它是对原生PyTorch中nn.Module的扩展。你在其中实现所有与模型有关的逻辑,包括:
- 模型结构定义(如BERT、CNN等)
- 前向传播 (
forward) - 损失函数计算(在
training_step中定义) - 验证与测试流程
- 优化器和学习率调度器配置
在原生PyTorch中,训练逻辑分散在多个位置:
- 模型结构定义在
nn.Module子类中 - 训练循环手动写
- 损失函数、优化器单独配置
- 日志记录、GPU分发、checkpoint都要手动处理
随着模型规模变大,这种方式变得难以维护和复现。PyTorch Lightning提出了解耦思想:模型逻辑(做什么)放在LightningModule里,工程控制(怎么做)交给Trainer自动处理。
以下是一个典型的LightningModule模板:
import pytorch_lightning as pl
import torch.nn as nn
import torchclass MyModel(pl.LightningModule):def __init__(self):super().__init__()self.model = nn.Linear(128, 3)self.loss_fn = nn.CrossEntropyLoss()def forward(self, x):return self.model(x)def training_step(self, batch, batch_idx):x, y = batchlogits = self(x)loss = self.loss_fn(logits, y)self.log("train_loss", loss)return lossdef validation_step(self, batch, batch_idx):...def test_step(self, batch, batch_idx):...def configure_optimizers(self):return torch.optim.Adam(self.parameters(), lr=1e-3)
你只需实现5个核心函数:
| 函数名 | 作用 |
|---|---|
__init__() | 定义模型结构和初始化组件 |
forward() | 定义前向传播逻辑 |
training_step() | 每个batch的训练逻辑(计算loss等) |
validation_step() / test_step() | 验证与测试时的逻辑 |
configure_optimizers() | 定义优化器和学习率调度策略 |
NeMo中的LightningModule应用
在NVIDIA NeMo框架中,有这样的代码:
from nemo.collections.nlp.models import TextClassificationModel
这里的TextClassificationModel就是一个LightningModule的子类。你无需手写training_step()、configure_optimizers()等逻辑,NeMo已为你封装好。
但如果你需要:修改损失函数、替换语言模型结构或添加多任务损失或自定义输出,你就需要深入理解LightningModule,并可能继承它进行扩展。
2. trainer:训练控制器
trainer是PyTorch Lightning提供的核心组件,用于统一控制整个训练流程。它将训练的细节如设备管理、训练轮数、分布式训练、混合精度等都统一封装,用户只需通过配置指定参数,即可自动完成这些操作。
Lightning的设计理念之一就是将工程代码与模型代码解耦,使用户只关注模型结构和损失函数等核心内容,而不必重复编写训练循环、GPU分发、日志记录等代码。
| 模块 | 你要做的事 | Lightning自动帮你做 |
|---|---|---|
| 模型结构 | 写forward() | Lightning自动调用 |
| 损失计算 | 实现training_step() | Lightning自动收集loss |
| Optimizer | 实现configure_optimizers() | 自动调用优化器、scheduler |
| 训练逻辑 | 不写for循环 | Lightning管理训练轮、batch |
| GPU训练 | 设置gpus=1 | 自动.cuda()、分布式训练 |
| 日志记录 | 用self.log() | 自动写入TensorBoard |
| Checkpoint | 不手写保存代码 | 自动保存/加载ckpt |
| 混合精度 | precision=16 | 自动使用AMP |
pl.Trainer提供了以下核心功能:
- 控制训练轮数(
max_epochs) - 管理硬件资源(
gpus,tpus,strategy等) - 自动支持分布式训练(
DDP) - 启用混合精度训练(
precision=16) - 控制日志频率、验证频率(
log_every_n_steps,val_check_interval) - 梯度累计与裁剪(
accumulate_grad_batches,gradient_clip_val) - 自动断点恢复(
resume_from_checkpoint)
一般使用如下方式创建trainer实例:
import pytorch_lightning as pltrainer = pl.Trainer(**config.trainer)
其中config.trainer是通过YAML配置文件或者OmegaConf加载后的字典结构,定义了所有训练相关参数。
例如,YAML配置中可能包含:
trainer:gpus: 1max_epochs: 5precision: 16amp_level: O1log_every_n_steps: 10
3. exp_manager:实验管理器
exp_manager是NeMo特有的实验管理工具,其主要目的是为训练过程提供自动化的日志记录、模型checkpoint保存、目录结构管理等功能。它是对PyTorch Lightning的日志系统的进一步封装与增强。
在机器学习项目中,随着实验的增多,如何规范地组织日志、模型文件、超参数记录,成为一个影响效率的问题。exp_manager正是为了解决这一问题而设计。它有如下功能:
- 自动创建实验目录
- 自动保存训练日志(TensorBoard, MLFlow, WandB等可选)
- 自动保存模型checkpoint(包括last.ckpt和best.ckpt)
- 支持从上一次训练中断处恢复
- 自动记录超参数(写入hparams.yaml)
- 管理日志命名规则(按模型类型、时间戳、版本号分类)
调用方式如下:
from nemo.utils.exp_manager import exp_managerexp_manager(trainer, config.exp_manager)
其中config.exp_manager是包含日志和实验设置的配置段。例如:
exp_manager:exp_dir: nullname: TextClassificationModelcreate_tensorboard_logger: truecreate_checkpoint_callback: true
如果exp_dir设置为null,则会默认创建nemo_experiments/<model_name>/version_x/目录结构。
运行完一个训练流程后,输出目录可能如下:
nemo_experiments/└── TextClassificationModel/└── version_0/├── checkpoints/│ ├── TextClassificationModel--val_loss=0.432.ckpt├── hparams.yaml└── events.out.tfevents... (TensorBoard 日志)
这样,每次实验都有完整的、隔离的输出记录,方便追踪、对比和复现。
3.2 脚本解析
现在我们就来看一下这个训练脚本到底做了什么。执行以下单元格以重启内核,清除变量和GPU内存。
# 重启 Notebook 内核,释放内存与资源
import IPython
app = IPython.Application.instance()
app.kernel.do_shutdown(True)
我们首先导入所需模块:NeMo NLP模块、实验管理器、PyTorch Lightning、OmegaConf。
# 导入必需模块
from nemo.collections import nlp as nemo_nlp
from nemo.utils.exp_manager import exp_managerimport torch
import pytorch_lightning as pl
from omegaconf import OmegaConf
这里我们用OmegaConf(使用python配置yaml字段) 来修改配置对象,然后将其传递给Trainer、exp_manager和TextClassificationModel。如果你想使用非默认语言模型,可添加以下代码:
PRETRAINED_MODEL_NAME = 'bert-base-cased'
config.model.language_model.pretrained_model_name = PRETRAINED_MODEL_NAME
# 载入 YAML 配置文件
TC_DIR = "/dli/task/nemo/examples/nlp/text_classification"
CONFIG_FILE = "text_classification_config.yaml"
config = OmegaConf.load(TC_DIR + "/conf/" + CONFIG_FILE)# 设置训练所需参数
NUM_CLASSES = 3
MAX_SEQ_LENGTH = 128
PATH_TO_TRAIN_FILE = "/dli/task/data/NCBI_tc-3/train_nemo_format.tsv"
PATH_TO_VAL_FILE = "/dli/task/data/NCBI_tc-3/dev_nemo_format.tsv"
PATH_TO_TEST_FILE = "/dli/task/data/NCBI_tc-3/test_nemo_format.tsv"# 设置推理样本(标签应分别为 0, 1, 2)
INFER_SAMPLES = ["Germline mutations in BRCA1 are responsible for most cases of inherited breast and ovarian cancer ","The first predictive testing for Huntington disease  was based on analysis of linked polymorphic DNA markers to estimate the likelihood of inheriting the mutation for HD","Further studies suggested that low dilutions of C5D serum contain a factor or factors interfering at some step in the hemolytic assay of C5 rather than a true C5 inhibitor or inactivator"
]MAX_EPOCHS = 5
AMP_LEVEL = 'O1'
PRECISION = 16
LR = 5.0e-05# 使用 OmegaConf 修改配置对象
config.model.dataset.num_classes = NUM_CLASSES
config.model.dataset.max_seq_length = MAX_SEQ_LENGTH
config.model.train_ds.file_path = PATH_TO_TRAIN_FILE
config.model.validation_ds.file_path = PATH_TO_VAL_FILE
config.model.test_ds.file_path = PATH_TO_TEST_FILE
config.model.infer_samples = INFER_SAMPLES
config.trainer.max_epochs = MAX_EPOCHS
config.trainer.amp_level = AMP_LEVEL
config.trainer.precision = PRECISION
config.model.optim.lr = LR
现在配置完成,初始化Trainer和实验管理器:
# 初始化 Trainer 和实验管理器
trainer = pl.Trainer(**config.trainer)
exp_manager(trainer, config.exp_manager)
# 使用更新后的 config 初始化文本分类模型
model = nemo_nlp.models.TextClassificationModel(config.model, trainer=trainer)
%%time
# 开始训练并保存模型
trainer.fit(model)
model.save_to(config.model.nemo_path)
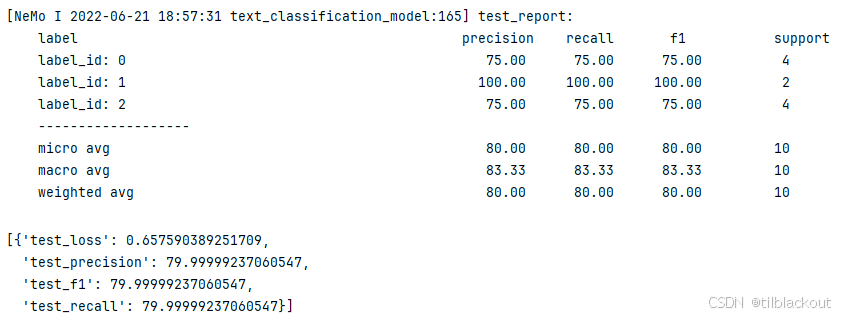
训练完成后,使用测试集进行评估:
# 使用 test 集评估模型
trainer.test(model=model, verbose=False)
输出如下:
现在运行推理,对配置中设置的句子进行分类:
# 查看推理样本
print(config.model.infer_samples)
# 对推理样本执行文本分类
model.classifytext(queries=config.model.infer_samples, batch_size=64, max_seq_length=128)
batch_size控制每次推理处理的文本数量,可根据显存和并发需求灵活设置。max_seq_length控制输入文本的最大截断长度,但不能超过模型支持的上限(如BERT的512)和训练时的最大值
如果你想对新的文本做推理,不必将其添加到配置文件中,可以直接传入列表:
# 设置你自己的推理语句列表
my_queries = ['Clustering of missense mutations in the ataxia-telangiectasia gene in a sporadic T-cell leukaemia','Myotonic dystrophy protein kinase is involved in the modulation of the Ca2+ homeostasis in skeletal muscle cells.','Constitutional RB1-gene mutations in patients with isolated unilateral retinoblastoma.','Hereditary deficiency of the fifth component of complement in man. I. Clinical, immunochemical, and family studies.'
]
运行推理:
model.classifytext(queries=my_queries, batch_size=16, max_seq_length=64)
理想结果应为 [0, 1, 2, 2],但输出如下,说明模型准确率还有提高空间。
[2, 1, 2, 2]
4 总结
通过本篇实践,我们不仅完成了一个医学文本分类器的搭建,还深入理解了NeMo与PyTorch Lightning的协作关系。NeMo的封装加速了模型落地,而Lightning的模块化设计则为进一步定制打下基础。未来你可以基于该框架轻松扩展至多分类、多语言模型或其他医学NLP任务,构建更具实际价值的AI应用。

)


大规模语言模型浅析)


——Depth AF)


