Torch-Pruning(TP)是一个结构化剪枝框架,源码地址:https://github.com/VainF/Torch-Pruning,最新发布版本v1.6.0,License为MIT。
TP支持对各种深度神经网络进行结构化剪枝。与通过掩码将参数设置为零的torch.nn.utils.prune不同,TP部署了一种名为DepGraph的算法来分组和移除耦合参数(coupled parameter)。
TP仅依赖PyTorch和Numpy,并且与PyTorch 1.x和2.x兼容,在Anaconda虚拟环境上通过pip安装v1.6.0版本,执行以下命令:
pip install torch-pruning==1.6.0在结构化剪枝中,移除单个参数可能会影响多个层。例如,剪枝线性层的输出维度将需要移除下一个线性层中相应的输入维度。层之间的这种依赖关系使得手动剪枝复杂网络变得非常困难。TP通过引入一种名为DepGraph的基于图的算法来解决这个问题,该算法可以自动识别依赖关系并收集需要剪枝的组。
这里以 https://blog.csdn.net/fengbingchun/article/details/149307432 中的数据集为例,使用DenseNet进行分类,测试代码如下:
1. 对之前生成的分类模型进行剪枝:注:保存剪枝后的模型使用torch.save(model,name),不能使用torch.save(model.state_dict(),name)
def model_pruning(model_name, classes_number, prune_amount):# https://github.com/VainF/Torch-Pruning/blob/master/examples/torchvision_models/torchvision_global_pruning.pymodel = models.densenet121(weights=None)model.classifier = nn.Linear(model.classifier.in_features, classes_number)# print("before pruning, model:", model)model.load_state_dict(torch.load(model_name, weights_only=False, map_location="cpu"))orininal_size = tp.utils.count_params(model)model.cpu().eval()for p in model.parameters():p.requires_grad_(True)ignored_layers = []for m in model.modules():if isinstance(m, nn.Linear):ignored_layers.append(m)print(f"ignored_layers: {ignored_layers}")example_inputs = torch.randn(1, 3, 224, 224)# build network prunersimportance = tp.importance.MagnitudeImportance(p=1)pruner = tp.pruner.MagnitudePruner(model,example_inputs=example_inputs,importance=importance,iterative_steps=1,pruning_ratio=prune_amount,global_pruning=True,round_to=None,unwrapped_parameters=None,ignored_layers=ignored_layers,channel_groups={})# pruninglayer_channel_cfg = {}for module in model.modules():if module not in pruner.ignored_layers:if isinstance(module, nn.Conv2d):layer_channel_cfg[module] = module.out_channelselif isinstance(module, nn.Linear):layer_channel_cfg[module] = module.out_featurespruner.step()# print("after pruning, model", model)result_size = tp.utils.count_params(model)print(f"model: original size: {orininal_size}; result_size: {result_size}")# testingwith torch.no_grad():out = model(example_inputs)print("test out:", out)torch.save(model, "new_structured_prune_melon_classify.pt") # cann't bu used: torch.save(model.state_dict(), "")剪枝前后,模型的改动如下图所示:
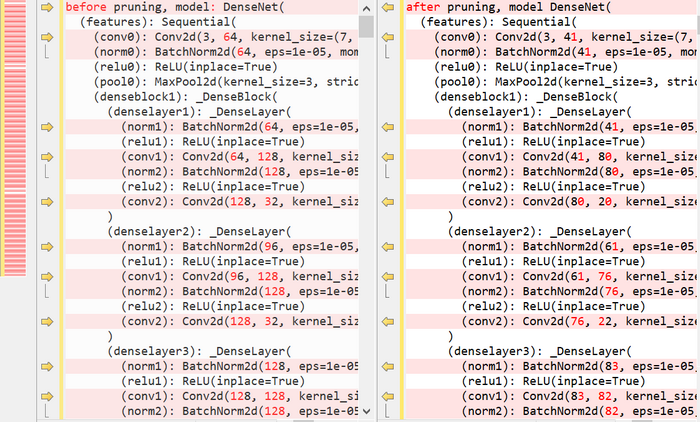
剪枝前模型大小约为27.1MB,剪枝后模型大小约为14.0M。
2. 模型剪枝后需要对其进行微调,即重新训练:
def _load_dataset(dataset_path, mean, std, batch_size):mean = _str2tuple(mean)std = _str2tuple(std)train_transform = transforms.Compose([transforms.CenterCrop(224),transforms.ToTensor(),transforms.Normalize(mean=mean, std=std), # RGB])train_dataset = ImageFolder(root=dataset_path+"/train", transform=train_transform)print(f"train dataset length: {len(train_dataset)}; classes: {train_dataset.class_to_idx}; number of categories: {len(train_dataset.class_to_idx)}")train_loader = DataLoader(train_dataset, batch_size, shuffle=True, num_workers=0)val_transform = transforms.Compose([transforms.CenterCrop(224),transforms.ToTensor(),transforms.Normalize(mean=mean, std=std), # RGB])val_dataset = ImageFolder(root=dataset_path+"/val", transform=val_transform)print(f"val dataset length: {len(val_dataset)}; classes: {val_dataset.class_to_idx}")assert len(train_dataset.class_to_idx) == len(val_dataset.class_to_idx), f"the number of categories int the train set must be equal to the number of categories in the validation set: {len(train_dataset.class_to_idx)} : {len(val_dataset.class_to_idx)}"val_loader = DataLoader(val_dataset, batch_size, shuffle=True, num_workers=0)return len(train_dataset), len(val_dataset), train_loader, val_loaderdef fine_tuning(dataset_path, epochs, mean, std, model_name):device = torch.device("cuda" if torch.cuda.is_available() else "cpu")model = torch.load(model_name, weights_only=False)model.to(device)train_dataset_num, val_dataset_num, train_loader, val_loader = _load_dataset(dataset_path, mean, std, 4)optimizer = optim.Adam(model.parameters(), lr=0.00001) # set the optimizercriterion = nn.CrossEntropyLoss() # set the losshighest_accuracy = 0.minimum_loss = 100.new_model_name = "fine_tuning_melon_classify.pt"for epoch in range(epochs):epoch_start = time.time()train_loss = 0.0train_acc = 0.0val_loss = 0.0val_acc = 0.0model.train() # set to training modefor _, (inputs, labels) in enumerate(train_loader):inputs = inputs.to(device)labels = labels.to(device)optimizer.zero_grad() # clean existing gradientsoutputs = model(inputs) # forward passloss = criterion(outputs, labels) # compute lossloss.backward() # backpropagate the gradientsoptimizer.step() # update the parameterstrain_loss += loss.item() * inputs.size(0) # compute the total loss_, predictions = torch.max(outputs.data, 1) # compute the accuracycorrect_counts = predictions.eq(labels.data.view_as(predictions))acc = torch.mean(correct_counts.type(torch.FloatTensor)) # convert correct_counts to floattrain_acc += acc.item() * inputs.size(0) # compute the total accuracy# print(f"train batch number: {i}; train loss: {loss.item():.4f}; accuracy: {acc.item():.4f}")model.eval() # set to evaluation modewith torch.no_grad():for _, (inputs, labels) in enumerate(val_loader):inputs = inputs.to(device)labels = labels.to(device)outputs = model(inputs) # forward passloss = criterion(outputs, labels) # compute lossval_loss += loss.item() * inputs.size(0) # compute the total loss_, predictions = torch.max(outputs.data, 1) # compute validation accuracycorrect_counts = predictions.eq(labels.data.view_as(predictions))acc = torch.mean(correct_counts.type(torch.FloatTensor)) # convert correct_counts to floatval_acc += acc.item() * inputs.size(0) # compute the total accuracyavg_train_loss = train_loss / train_dataset_num # average training lossavg_train_acc = train_acc / train_dataset_num # average training accuracyavg_val_loss = val_loss / val_dataset_num # average validation lossavg_val_acc = val_acc / val_dataset_num # average validation accuracyepoch_end = time.time()print(f"epoch:{epoch+1}/{epochs}; train loss:{avg_train_loss:.6f}, accuracy:{avg_train_acc:.6f}; validation loss:{avg_val_loss:.6f}, accuracy:{avg_val_acc:.6f}; time:{epoch_end-epoch_start:.2f}s")if highest_accuracy < avg_val_acc and minimum_loss > avg_val_loss:torch.save(model, new_model_name)highest_accuracy = avg_val_accminimum_loss = avg_val_lossif avg_val_loss < 0.0001 or avg_val_acc > 0.9999:print(colorama.Fore.YELLOW + "stop training early")torch.save(model, new_model_name)break微调时迭代几次即可满足要求,执行结果如下图所示:

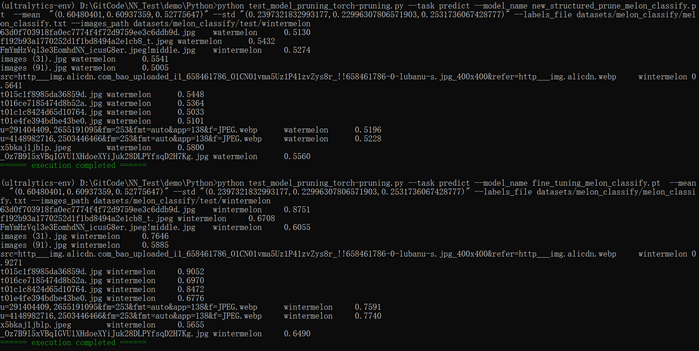
3. 使用剪枝后的模型和微调后的模型进行预测:注:加载模型使用torch.load(model_name, weights_only=False),不能使用model.load_state_dict(torch.load(model_name, weights_only=False, map_location="cpu"))
def _parse_labels_file(labels_file):classes = {}with open(labels_file, "r") as file:for line in file:idx_value = []for v in line.split(" "):idx_value.append(v.replace("\n", "")) # remove line breaks(\n) at the end of the lineassert len(idx_value) == 2, f"the length must be 2: {len(idx_value)}"classes[int(idx_value[0])] = idx_value[1]return classesdef _get_images_list(images_path):image_names = []p = Path(images_path)for subpath in p.rglob("*"):if subpath.is_file():image_names.append(subpath)return image_namesdef predict(model_name, labels_file, images_path, mean, std):classes = _parse_labels_file(labels_file)assert len(classes) != 0, "the number of categories can't be 0"image_names = _get_images_list(images_path)assert len(image_names) != 0, "no images found"mean = _str2tuple(mean)std = _str2tuple(std)device = torch.device("cuda" if torch.cuda.is_available() else "cpu")model = torch.load(model_name, weights_only=False)model.to(device)model.eval()with torch.no_grad():for image_name in image_names:input_image = Image.open(image_name)preprocess = transforms.Compose([transforms.CenterCrop(224),transforms.ToTensor(),transforms.Normalize(mean=mean, std=std) # RGB])input_tensor = preprocess(input_image) # (c,h,w)input_batch = input_tensor.unsqueeze(0) # create a mini-batch as expected by the model, (1,c,h,w)input_batch = input_batch.to(device)output = model(input_batch)probabilities = torch.nn.functional.softmax(output[0], dim=0) # the output has unnormalized scores, to get probabilities, you can run a softmax on itmax_value, max_index = torch.max(probabilities, dim=0)print(f"{image_name.name}\t{classes[max_index.item()]}\t{max_value.item():.4f}")执行结果如下图所示:微调前的模型准确率非常低,微调后的模型准确率非常高
GitHub:https://github.com/fengbingchun/NN_Test


![[Linux]如何設置靜態IP位址?](http://pic.xiahunao.cn/[Linux]如何設置靜態IP位址?)


_笔记)

)
:日志监控)

)
