常用类库
类库作用
类库可以帮助我们快速实现项目业务的开发与功能的实现, 帮助我们解放劳动力提高生产效率, 前端中的类库与框架都是由原生javascript编写, 提供给其他开发者应用于某一业务环境或者需求。一般有开发者/团队开源维护. 优秀的类库需要具备高度封装可用, 稳定, 广兼容, 易扩展 等特性.
简单来说 用的人多的类库基本是好类库,
分类
类库种类非常多,主要分为
-
UI库
对CSS 和 HTML 组合进行封装 能够快速批量化实现 页面的布局与美化
例如: easyUI / layerUI / H5UI / weUI / mUI /bootstrap / 等
-
工具库
主要方法工具库 和 函数库 用于解决日常开发业务中的常见问题或者提供常见工具方法
例如: underscore.js / lodash.js /Colors.js / URI.js / Smoke.js /funclib.js / I18n.js / day.js / Brief Intro / validate.js 等
-
DOM 组件/功能库
主要用于提供封装好的功能性组件, 特效组件 控制组件等
例如: select2 / swiper / echart / touch / iscroll.js / layout / 等
jquery
jQuery是一个快速、简洁的JavaScript框架,是继Prototype之后又一个优秀的JavaScript代码库(或JavaScript框架)。jQuery设计的宗旨是“write Less,Do More”,即倡导写更少的代码,做更多的事情。它封装JavaScript常用的功能代码,提供一种简便的JavaScript设计模式,优化HTML文档操作、事件处理、动画设计和Ajax交互。 jQuery的核心特性可以总结为:具有独特的链式语法和短小清晰的多功能接口;具有高效灵活的css选择器,并且可对CSS选择器进行扩展;拥有便捷的插件扩展机制和丰富的插件。jQuery兼容各种主流浏览器,如IE 6.0+、FF 1.5+、Safari 2.0+、Opera 9.0+等。
官方地址:
jquery官网
国内文档:
jquery国内文档
优势
兼容性 jquery 解决DOM开发的兼容问题
代码量少 结构性强 更方便
统一的方案 不利于代码的换人维护和管理 (代码风格 业务具体实现操作)
推荐版本
版本 1.12.1,一般用jquery是为了兼容ie浏览器。
1x 兼容到IE6
2xIE8兼容 过渡移动端
3x 抛弃IE8 服务移动端
Visual jQuery插件
JQuery Code Snippets:语法提示
案例
选项卡切换
<!DOCTYPE html>
<html lang="zh-cn"><head><meta charset="UTF-8"><meta name="viewport" content="width=device-width, initial-scale=1.0"><title>tab Swtich</title><style>* {margin: 0;padding: 0;}html,body {height: 100%;}body {display: flex;justify-content: center;align-items: center;}ul {list-style: none;}.wrap {display: flex;flex-direction: column;justify-content: flex-start;width: 400px;height: 180px;box-shadow: 0 0 4px #222;}.wrap .title {display: flex;height: 45px;line-height: 45px;background-color: pink;}.wrap .title span {padding: 0 20px;text-align: center;border-right: 1px solid #222;cursor: pointer;}.wrap .content {position: relative;flex: 1;}.wrap .content li {display: none;position: absolute;width: 100%;text-align: center;line-height: 100px;}.wrap .title .active {background-color: red;color: #fff;}.wrap .content .on {display: block;}</style>
</head><body><div class="wrap"><div class="title"><span class="active">国际新闻</span><span>国内新闻</span><span>体育新闻</span></div><ul class="content"><li class="on">国际新闻的内容</li><li>国内新闻的内容</li><li>体育新闻的内容</li></ul></div><script src="https://cdn.bootcdn.net/ajax/libs/jquery/1.12.1/jquery.min.js"></script><script>var $title = $('.title');var $tits = $('.title span');var $contents = $('.content li');$title.on('click', 'span', function (e) {var idx = $(this).index();//span的jquery集合对象 的 第(idx)个 . 添加类名('active'). 兄弟们(span兄弟).删除类名('active')$tits.eq(idx).addClass('active').siblings('span').removeClass('active');$contents.eq(idx).addClass('on').siblings('li').removeClass('on');})</script>
</body>
</html>
原生js实现如下,代码量大,且querySelector和addEventListener对ie存在兼容性问题
<script>const oTitle = document.querySelector('.title')const  aTit = oTitle.querySelectorAll('span')const aContent = document.querySelectorAll('.content li');let index = 0;oTitle.addEventListener('click', function (e = window.event) {if (e.target.tagName.toLowerCase() === 'span') {let target = e.target;aTit[index].classList.remove('active');aContent[index].classList.remove('on');index = Array.prototype.indexOf.call(aTit, target);aTit[index].classList.add('active');aContent[index].classList.add('on');}}, false);
</script>
easyUI
easyui为Web开发人员提供了易于使用的组件,它构建在流行的jquery核心和html5之上。这些使您能够轻松的做出符合html5标准的web应用程序。
官方地址:
easyUI官方地址
国内文档:
easyUI国内文档
layerUI
经典模块化前端框架
layui(谐音:类UI) 是一款采用自身模块规范编写的前端 UI 框架,遵循原生 HTML/CSS/JS 的书写与组织形式,门槛极低,拿来即用。其外在极简,却又不失饱满的内在,体积轻盈,组件丰盈,从核心代码到 API 的每一处细节都经过精心雕琢,非常适合界面的快速开发。layui 首个版本发布于 2016 年金秋,她区别于那些基于 MVVM 底层的 UI 框架,却并非逆道而行,而是信奉返璞归真之道。准确地说,她更多是为服务端程序员量身定做,你无需涉足各种前端工具的复杂配置,只需面对浏览器本身,让一切你所需要的元素与交互,从这里信手拈来。
官方地址:
layerUI官方地址
swiper
Swiper常用于移动端网站的内容触摸滑动 轮播图插件
Swiper是纯javascript打造的滑动特效插件,面向手机、平板电脑等移动终端。
官方地址:
swiper官方地址
模板引擎
在没有模板引擎之前,非MVM框架下,或者ajax获取数据,实现后台数据在前端界面渲染的标准流程,案例如下:
<!DOCTYPE html>
<html lang="en"><head><meta charset="UTF-8"><meta name="viewport" content="width=device-width, initial-scale=1.0"><title>小米商城</title>
</head>
<style>* {margin: 0;padding: 0;}body,html {background-color: whitesmoke;font-size: 12px;}ul {list-style: none;}li {display: inline-block;padding: 0 10px;background: white;}h3 {text-align: center;}p {text-align: center;}.title {font-size: 16px;font-weight: 400;color: #333;line-height: 42px;}.desc {color: #b0b0b0;}.price {color: #444;line-height: 58px;}span {color: red;}
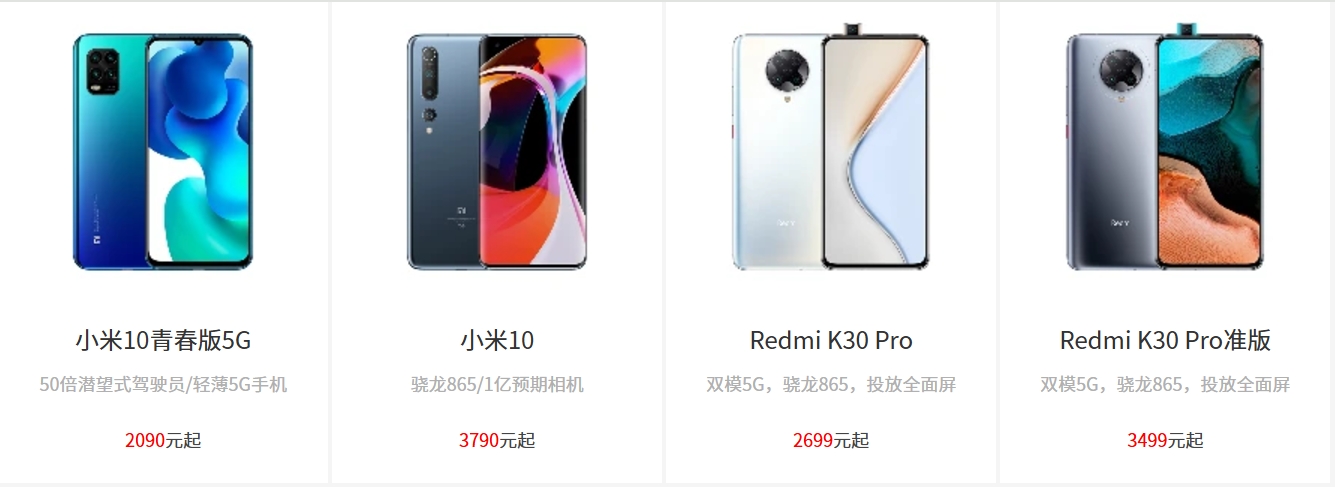
</style><body><ul id="product-list"></ul><script>const productData = {title: '小米手机',list: [{productImgUrl: 'img/1.webp',productCUID: '088722478239',productTitle: 'PTD16-小米10青春版5G',productDesc: '50倍潜望式驾驶员/轻薄5G手机',productPrice: 209000,productCount: 999}, {productImgUrl: 'img/2.webp',productCUID: '088789478639',productTitle: 'PTD16-小米10', //productDesc: '骁龙865/1亿预期相机',productPrice: 379000, //3790.50 一般会直接传带小数的数字,因为前端的计算是有问题的,像购物车总数,价格之类的都不允许在前端进行计算productCount: 999 //所以一般数字类型是乘百发送,或者数字以字符串的形式发送过来}, {productImgUrl: 'img/3.webp',productCUID: '088789478339',productTitle: 'PTD16-Redmi K30 Pro',productDesc: '双模5G,骁龙865,投放全面屏',productPrice: 269900,productCount: 0}, {productImgUrl: 'img/4.webp',productCUID: '088789471239',productTitle: 'PTD16-Redmi K30 Pro准版',productDesc: '双模5G,骁龙865,投放全面屏',productPrice: 349900,productCount: 99}]};class TempRender {constructor(data = {}, parentEle = '') {this.parentEle = document.querySelector(parentEle);this.originalData = data;this.list = this.formatData(this.originalData.list)this.templateHtml = this.getTemplate(this.data);this.renderHtml();}//第一步:数据的格式化处理formatData(list = []) {if (list.length === 0) {return [];}list = list.map(({ productImgUrl, productTitle, productDesc, productPrice }) => {productPrice = productPrice / 100;productTitle = productTitle.replace(/PTD16-/gi, '');//把PTD16-替换掉 productImgUrl = productImgUrl ?? 'img/1.webp';productTitle = productTitle ?? '暂无信息'; //??设置默认值productDesc = productDesc ?? '暂无信息';productPrice = productPrice ?? '暂无信息';return {productImgUrl,productTitle,productDesc,productPrice}})return list;}// 第二部:数据模板getTemplate() {let template = '';for (let i = 0, len = this.list.length; i < len; i++) {let item = this.list[i];template += ` <li><img src="${item?.productImgUrl}" alt=""><h3 class="title">${item?.productTitle}</h3> <p class="desc">${item?.productDesc}</p><p class="price"><span>${item?.productPrice}</span>元起</p></li>`;}return template;}// 第三部:渲染数据renderHtml() {this.parentEle.innerHTML += this.templateHtml;}}new TempRender(productData, '#product-list');</script>
</body></html>
这只是一个其中的列表,一个项目中肯定不止一个列表,也不止这一种数据结构,也会有很多数据的绑定方式,如果每一次都要重新写一个getTemplate数据模板,该模板里面结构、变量都是写死的,复用性几乎为0,如果能把模板当参数传进来,当我们要渲染另一套模板,效率就比较好,这时候我们就要借用模板引擎
模板引擎可以让(网站)程序实现界面与数据分离,业务代码与逻辑代码的分离,这就大大提升了开发效率,良好的设计也使得代码重用变得更加容易。
模板引擎实现以上案例
<!DOCTYPE html>
<html lang="en"><head><meta charset="UTF-8"><meta name="viewport" content="width=device-width, initial-scale=1.0"><title>小米商城</title>
</head>
<style>* {margin: 0;padding: 0;}body,html {background-color: whitesmoke;font-size: 12px;}ul {list-style: none;}li {display: inline-block;padding: 0 10px;background: white;}h3 {text-align: center;}p {text-align: center;}.title {font-size: 16px;font-weight: 400;color: #333;line-height: 42px;}.desc {color: #b0b0b0;}.price {color: #444;line-height: 58px;}span {color: red;}
</style><body><ul id="product-list"></ul><script src="js/template-web.js"></script>//模板引擎插件 <script type="text/template" id="testTemp">{{each list}}<li><img src="{{$value.productImgUrl}}" alt=""><h3 class="title">{{$value.productTitle}} {{$index}}</h3><p class="desc">{{$value.productDesc}}</p><p class="price"><span>{{$value.productPrice}}</span>元起</p></li>{{/each}}</script><script>const productData = {title: '小米手机',list: [{productImgUrl: 'img/1.webp',productCUID: '088722478239',productTitle: 'PTD16-小米10青春版5G',productDesc: '50倍潜望式驾驶员/轻薄5G手机',productPrice: 209000,productCount: 999}, {productImgUrl: 'img/2.webp',productCUID: '088789478639',productTitle: 'PTD16-小米10', //productDesc: '骁龙865/1亿预期相机',productPrice: 379000, //3790.50productCount: 999}, {productImgUrl: 'img/3.webp',productCUID: '088789478339',productTitle: 'PTD16-Redmi K30 Pro',productDesc: '双模5G,骁龙865,投放全面屏',productPrice: 269900,productCount: 0}, {productImgUrl: 'img/4.webp',productCUID: '088789471239',productTitle: 'PTD16-Redmi K30 Pro准版',productDesc: '双模5G,骁龙865,投放全面屏',productPrice: 349900,productCount: 99}]};let oUl = document.querySelector('#product-list');let templateHtml = template('testTemp', formatData(productData));oUl.innerHTML = templateHtml;function formatData(data) {let list = data.list;data.list = list.map(({ productImgUrl, productTitle, productDesc, productPrice, productCount }) => {productPrice = productPrice / 100;productTitle = productTitle.replace(/PTD16-/gi, '');productImgUrl = productImgUrl || 'img/1.webp';productTitle = productTitle ?? '暂无信息';productDesc = productDesc || '暂无信息';productPrice = productPrice || '暂无信息';return {productImgUrl,productTitle,productDesc,productPrice,productCount}})return data;}</script>
</body></html>
常见模板工具
jade.js doT.js tpl.js art-template.js handlebars
模板引擎工具的主要用法,就是给数据给模板,然后返回结果.
学习模板引擎主要学习模板引擎的语法
art-template:号称是性能最快的模板引擎art-template地址
handlebars:handlebars地址
模板语法
模板引擎本质上是通过特定标识符号和语句嵌入HTML文本中 , 通过输入数据 的到 嵌套好数据的HTML文本内容用于生产页面 数据+模板 = 结构内容 , 其中模板语法为核心 下面用art-template语法演示
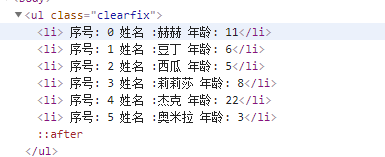
<ul class="clearfix">{{each target}}<li> 序号: {{$index}} 姓名 :{{$value.name}} 年龄: {{$value.age}}</li>{{/each}}
</ul>
渲染方法
模板工具会提供模板渲染方法, 调用传参 数据 与 模板 返回生成的结构内容结果字符串
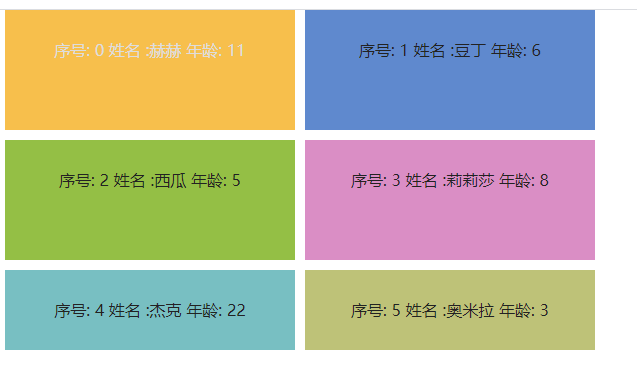
let html = template('testTemp', { target: [{ name: '赫赫', age: 11 }, { name: '豆丁', age: 6 }, { name: '西瓜', age: 5 }, { name: '莉莉莎', age: 8 }, { name: '杰克', age: 22 }, { name: '奥米拉', age: 3 }] })document.body.innerHTML = html;
效果
原生模板实现
原理就是正则替换内容
原理步骤:
-
正则替换 规定标识符内容
普通标签
<%= %> 内容替换成变量的值
<% %> 内容替换成js代码
-
动态生成渲染函数 new Function(函数字符串)
-
通过正则格式化模板内容
-
拼接返回格式化模板内容代码字符串
<!DOCTYPE html>
<html lang="zh-cn"><head><meta charset="UTF-8"><meta name="viewport" content="width=device-width, initial-scale=1.0"><title>商品</title>
</head><body><script type="text/template" id="temp"><h2><%= data.title %></h2><ul><% for(let i=0; i < data.list.length; i++) { %><li data-index=<%=i%>><%= data.list[i] %><% if(data.list[i].length>3) {%><%= '哈哈哈' %><% } %> </li><% } %></ul></script><script>function getTempScript(id) {let script = document.querySelector(`#${id}[type="text/template"]`); return `${script.innerHTML}`}function compile(id) {let template = getTempScript(id);let evalExp = /<%=(.+?)%>/g,expr = /<%([\s\S]+?)%>/g;template = template.replace(evalExp, '`) \n echo($1) \n echo(`').replace(expr, '`) \n $1 \n echo(`');template = 'echo(`'+template +'`)';let funcStr = `let html = '';function echo(content) {html += content;}${template}return html;`return funcStr;}let funStr = compile('temp');let comp1 = new Function('data',funStr);document.body.innerHTML += comp1({ title: '标题', list: ['糖醋鱼', '香辣蟹', '红烧排骨'] })</script>
</body></html>
CSS 预处理器
CSS 自诞生以来,基本语法和核心机制一直没有本质上的变化,在很长一段时间内,它的发展几乎全是表现力层面上的提升。
最开始 CSS 在网页中的作用只是辅助性的装饰,轻便易学是最大的需求;然而如今网站的复杂度已经不可同日而语,原生 CSS 已经让开发者力不从心。
当一门语言的能力不足而用户的运行环境又不支持其它选择的时候,这门语言就会沦为 “编译目标” 语言。开发者将选择另一门更高级的语言来进行开发,然后编译到底层语言以便实际运行。于是,在前端领域,天降大任于斯人也,CSS 预处理器应运而生。
CSS 预处理器是一个能让你通过预处理器自己独有的语法来生成 CSS 的程序。
市面上有很多 CSS 预处理器可供选择,且绝大多数 CSS 预处理器会增加一些原生 CSS 不具备或不完善的高级特性,这些特性让 CSS 的结构更加具有可读性且易于维护。当前社区代表的 CSS 预处理器 主要有一下几种:
- Sass:2007 年诞生,最早也是最成熟的 CSS 预处理器,拥有 Ruby 社区的支持和 Compass 这一最强大的 CSS 框架,目前受 LESS 影响,已经进化到了全面兼容 CSS 的 SCSS。
- Less:2009年出现,受 SASS 的影响较大,但又使用 CSS 的语法,让大部分开发者和设计师更容易上手,在 Ruby 社区之外支持者远超过 SASS,其缺点是比起 SASS 来,可编程功能不够,不过优点是简单和兼容 CSS,反过来也影响了 SASS 演变到了 SCSS 的时代,著名的 Twitter Bootstrap 就是采用 LESS 做底层语言的。
- Stylus:Stylus 是一个CSS的预处理框架,2010 年产生,来自 Node.js 社区,主要用来给 Node 项目进行 CSS 预处理支持,所以 Stylus 是一种新型语言,可以创建健壮的、动态的、富有表现力的 CSS。比较年轻,其本质上做的事情与 SASS/LESS 等类似,
优点
虽然各种预处理器功能强大,但使用最多的,还是以下特性:变量(variables),代码混合( mixins),嵌套(nested rules)以及 代码模块化(Modules)。
接下来以 Sass 为例,展示一下这几个主要特性在预处理器中的实现:
Variables and Operators (+, -, *, /, %)
$font-size: 10px;
$font-family: Helvetica, sans-serif;body {font: $font-size $font-family;
}.mark{font-size: 1.5 * $font-size;
}
Mixins
@mixin clearfix {&:after {display: block;content: '';clear: both;}
}.sidebar{@include clearfix;
}
Nesting
// menu
.nav {> li {> a:hover {background-color: red;}}
}
Modules
@import './common';
@import './github-markdown';
@import './mixin';
@import './variables';
缺点或不足
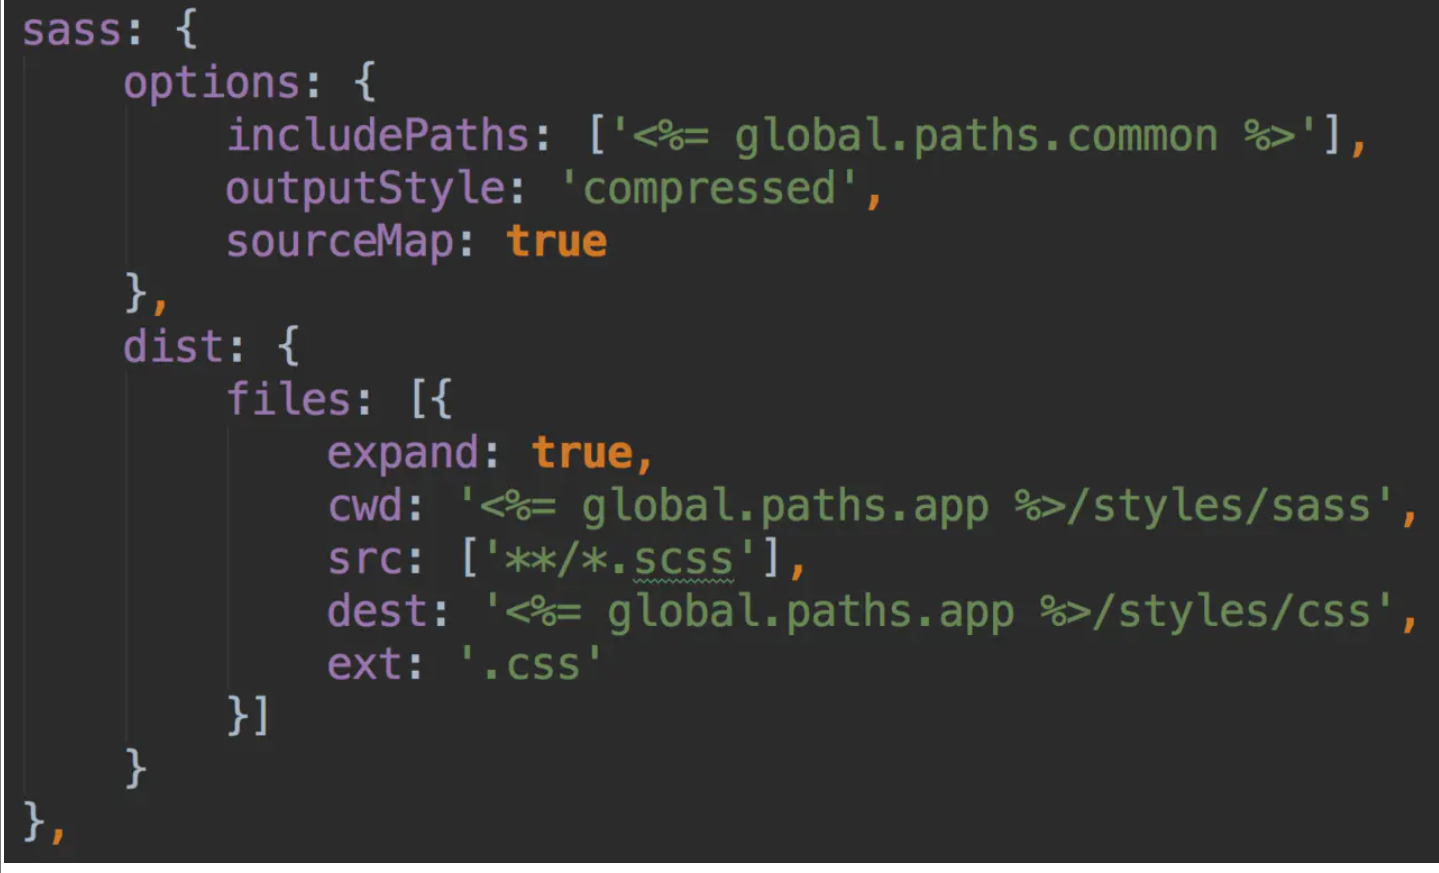
额外的编译配置
在写样式前需要做一些额外的编译配置工作,sass-node 安装以及编译的配置就能卡住一批前端新手。
编译成本
每次修改代码都需要重新编译,占用时间和 CPU。
学习成本
不同的 CSS 预处理器语法不同,增加学习成本。在同一个团队甚至项目里,可能同时使用了好几种样式预处理器。
// Sass
$color: #f00;
$images: "../img";
@mixin clearfix {&:after {content: " ";display: block;clear: both;}
}
body {color: $color;background: url("#{images}/1.png");@include clearfix;
}// Less
@color: #f00;
@images: "../img";
.clearfix() {&:after {content: " ";display: block;clear: both;}
}
body {color: @color;background: url("@{images}/1.png");.clearfix;
}
sass
安装
sass安装
vscode插件
Sass Lint 语法格式化,帮助开发者提升代码质量,确保代码风格的一致性。目前该插件不能用,vscode判定有侵入式的bug,禁用了,后缀所有代Lint都是格式化类型的工具
Sass 能够识别sass文件的内容和语法
Easy Sass :保存sass文件会自动生成css文件
Easy Sass安装完成后还需要配置才能生效,ctrl+shift+p,输入settings.json,进行以下配置配置
"sass.andStared": [  //代表什么时候去识别语法"active","focus", "hover","nth-child"
],
"easysass.compileAfterSave": true, //true为保存自动编译为css文件"easysass.excludeRegex": "",//正则个性化修改,一般用不上"easysass.formats": [//nested: 嵌套缩进的css代码//expanded: 没有缩进 扩展的css代码//compact: 简洁格式的css代码//compressed: 压缩后的css代码{"format": "expanded","extension": ".css" //输出什么样的类型文件,设置编译输出的文件后缀},{"format": "compressed","extension": ".min.css" //设置编译输出的文件后缀}],"easysass.targetDir": "./css/" //提供css输出路径的设置(可以绝对或者相对)
变量
SASS允许使用变量,所有变量以$开头。
$blue : #1875e7
div color : $blue
不允许有花括号和分号
如果变量需要镶嵌在字符串之中,就必须需要写在#{}之中。
$side : left.rounded border-#{$side}-radius: 5px
计算功能
SASS允许在代码中使用算式:
$font-size: 10px
body margin: (14px/2)top: 50px + 100pxright: $var * 10%font-size: 1.2 *10px
注意:sass的语法非常严格,:后面必须更空格再跟值,否则会报错
嵌套
SASS允许选择器嵌套。比如,下面的CSS代码:
div h1 { color : red;
}
可以写成:
div hi color:red
在嵌套的代码块内,可以使用&引用父元素。比如a:hover伪类,可以写成:
a &:hover color: #ffb3ff
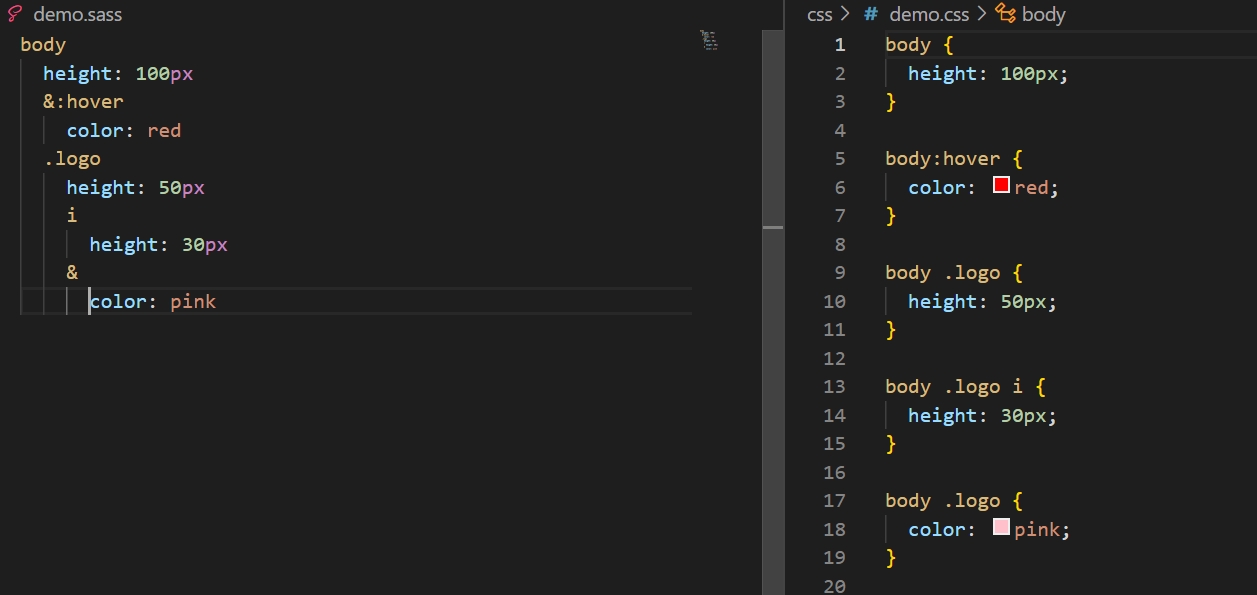
在伪元素中用得比较多

注释
SASS共有两种注释风格。
标准的CSS注释 /* comment */ ,会保留到编译后的文件。
单行注释 // comment,只保留在SASS源文件中,编译后被省略。
在/*后面加一个感叹号,表示这是"重要注释"。即使是压缩模式编译,也会保留这行注释,通常可以用于声明版权信息。
/*!重要注释!
*/// 单行注释 只保留在SASS源文件中,编译后被省略
代码的重用
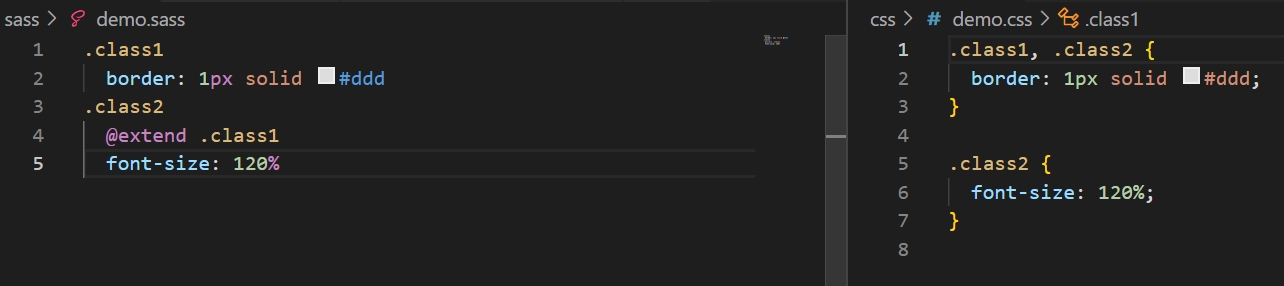
继承
SASS允许一个选择器,继承另一个选择器。比如,现有class1:
.class1 border: 1px solid #ddd
class2要继承class1,就要使用@extend命令:
.class2 @extend .class1font-size:120%
Mixin混入
Mixin有点像C语言的宏(macro),是可以重用的代码块。
使用@mixin命令,定义一个代码块。
有些代码我希望复用,但我不希望是继承于某个人的
@mixin left float: leftmargin-left: 10px
使用@include命令,调用这个mixin。
div @include left
mixin的强大之处,在于可以指定参数和缺省值。
@mixin left($value: 10px) //默认值10px,变量一定要以$开头float: leftmargin-right: $value
使用的时候,根据需要加入参数:
div @include left(20px);
下面是一个mixin的实例,用来生成浏览器前缀。
@mixin rounded($vert, $horz, $radius: 10px) border-#{$vert}-#{$horz}-radius: $radius;-moz-border-radius-#{$vert}#{$horz}: $radius;-webkit-border-#{$vert}-#{$horz}-radius: $radius;使用的时候,可以像下面这样调用:
#navbar li @include rounded(top, left)#footer @include rounded(top, left, 5px)
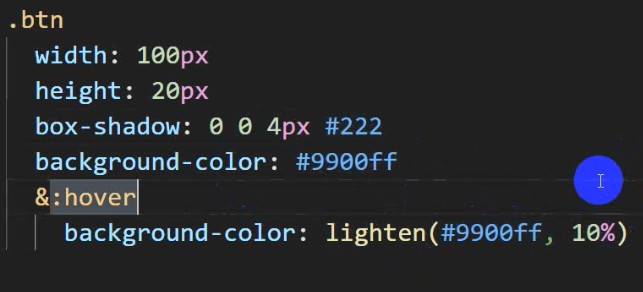
颜色函数
SASS提供了一些内置的颜色函数,以便生成系列颜色。
lighten(#cc3, 10%) // #d6d65c 通过改变颜色的亮度值(0% - 100%),让颜色变亮,创建一个新的颜色。
darken(#cc3, 10%) // #a3a329 通过改变颜色的亮度值(0% - 100%),让颜色变暗,创建一个新的颜色。
grayscale(#cc3) // #808080 将一个颜色变成灰色
complement(#cc3) // #33c  返回一个补充色
//用这个生成的颜色直接是处理后的颜色值,以前一般用opacity,给个透明度,但是要知道实际的色彩还得自己去量。
生成是:
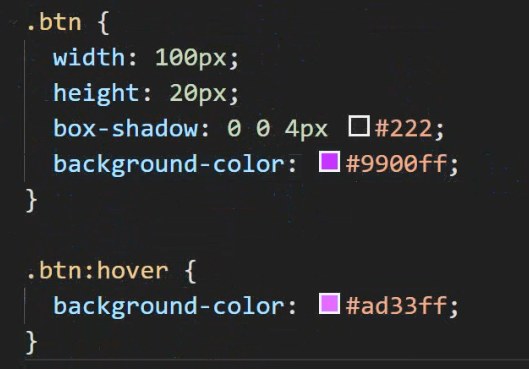
插入文件
因为一个项目页面很多,我们不可能把变量全部写到一个sass里面,我们可以单独使用一个文件来存放变量,当需要用到这个变量的时候可以把这个文件引入进来。
有的文件可以放变量,有的放组建,需要用到再引入,这样方便管理和调度
@import命令,用来插入外部文件。
@import path/filename;
如果插入的是.css文件,则等同于css的import命令。
@import "foo.css";
高级用法
条件语句
@if可以用来判断:
注意,判断只有==,没有===
p @if 1 + 1 == 2 border: 1px solid@if 5 < 3 border: 2px dotted配套的还有@else命令:
@if lightness($color) > 30% background-color: #000
@else background-color: #fff
//反向开关
@if $color == redcolor: blue
@else $color: color
大部分情况都不会用到if-else,因为我们会尽量避免css中有分支,一般用js来处理,如选项卡切换,一般来说是改类名,而不是改css。css是预处理文件,不会随着你点击的时候去响应。生成完css文件结果就确定了,不会跟着页面事件响应内容走。
循环语句
SASS支持for循环:
ul
@for $i from 1 to 10 li:nth-of-type(#{$i})height: 10px * $i&:after:content: '第#{$i}个li'
也支持while循环:
$i: 6;@while $i > 0 {.item-#{$i} { width: 2em * $i; }$i: $i - 2;
}
each命令,作用与for类似:
$bgColor: #432,#413,#564,#865//这个变量是一个数组 ul@each $bgc in $bgColor //$bgc是具体的每一个值//@each $bgc in #432,#413,#564,#865 //如果不用变量也可以直接写数组值$c: index($bgColor,$bgc) //$拿到下标li:nth-of-type(#{$c})height: 10px * $cbackground-color: $bgc&:after:content: '第#{$i}个li'
循环和条件混用
ul@for $i from 1 to 10@if $i%2 == 0li:nth-of-type(#{$i})height: 10px* $i//生成
ul li:nth-of-type(2) {height: 20px;
}ul li:nth-of-type(4) {height: 40px;
}ul li:nth-of-type(6) {height: 60px;
}ul li:nth-of-type(8) {height: 80px;
}
自定义函数
SASS允许用户编写自己的函数。
@function double($n) {@return $n * 2;
}#sidebar {width: double(5px);
}
sass的缺点
不能兼容css文件的书写格式,不能加括号,分号,从而退出scss文件,scss目的就是兼容css的写法,但是scss又只能用css的写法,所以都不推荐,stylus两种方式都兼容。
stylus
安装
确保之前已经安装 nodejs
$ npm install stylus
安装之后,运行 stylus -h 可查看帮助。
运行 stylus example.styl 可将 demo.styl 文件编译成 example.css 文件。
vscode 插件
Live Stylus Compiler
language-stylus
settings.json
"stylusCompile.settings.formats": [{"extensionName": ".css","savePath": "./css/"}]
官网
管网
中文文档
stylus中文文档
stylus官方中文文档
前缀空间
bodyheight 100px+prefix-classes('demo-')//在这之后的,都会自动加demo-的前缀.calendar-itemheadermargin-bottom 1remdisplay flexalign-items centerjustify-content center
body {height: 100px;
}
.demo-calendar-item header {margin-bottom: 1rem;display: flex;align-items: center;justify-content: center;
}指南)

)
)


)


)


