一听到三维的RTT(Render To Texture),似乎很神秘,但从底层实现一看,其实也就那样,设计API的哪些顶级家伙已经帮你安排的明明白白了,咱们只需要学会怎么用就可以了。我认为得从WebGL入手,把整件事讲明白就够了。WebGL再下一层那是浏览器和硬件(显卡)的事了,再再往下就到类似于“利用电器的物理特性”就到底了,这严重超出应用层该懂的范畴了。WebGL上层就是Cesium,我感觉Cesium就像是一只漂亮的大象,我就像是个盲人在摸。说的有些远,接下来我主要阐述RTT的底层原理以及Cesium的实现,不想看原理的小伙伴可直接阅读《三、实现》部分,等有时间了再回过头来查看原理部分,我觉得我差不多讲明白了。
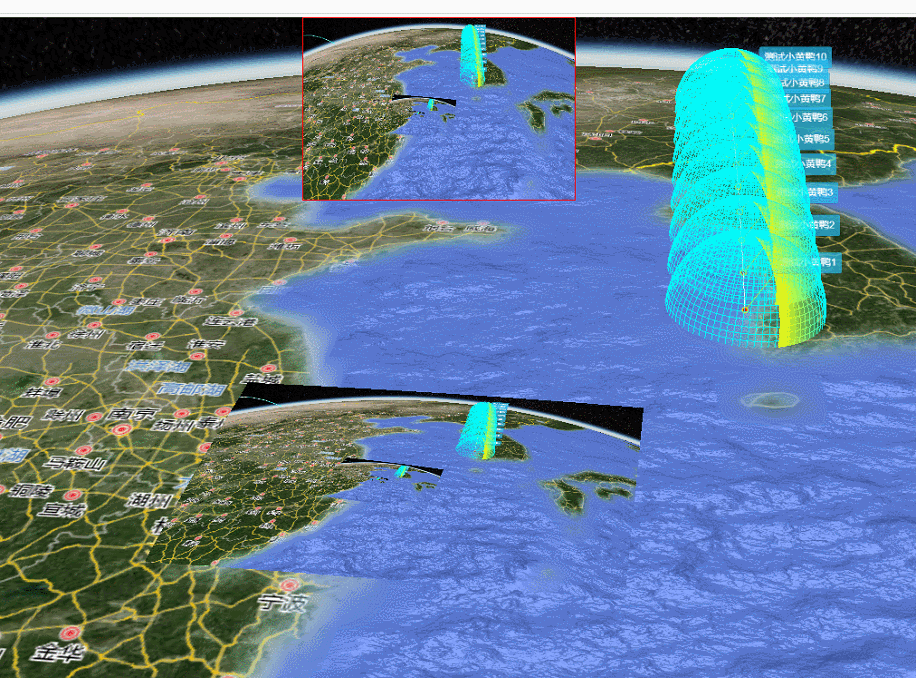
一、效果
上面是渲染到Canvas,下面是渲染到纹理。
二、原理
要讲原理,必须得提一嘴WebGL的常规渲染流程,Cesium是对WebGL的高级封装,下图是WebGL的渲染流程,同样适用于Cesium。
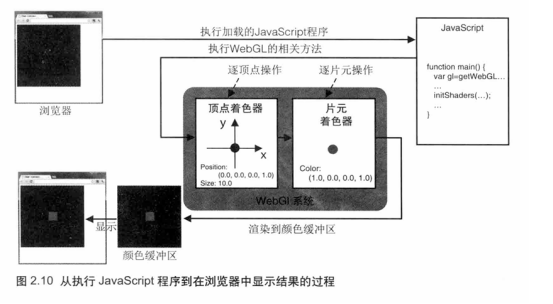
我们看到画面的渲染顺序是源码程序->着色器处理->颜色缓存区->浏览器这么一个过程,着色器经过数据加载、图元装配、栅格化、深度隐藏等处理后,将数据扔进颜色缓存区,浏览器自动从颜色缓存区读取数据并显示到Canvas上,最后我们就看到画面,这是常规的渲染流程。如果将着色器处理好的数据不扔进颜色缓存区,而是输出到别的地方如作为Geometry纹理图像或Canvas的ImageData呢?
针对这个需求,WebGL引入了FBO(frame buffer object)帧缓存区对象,FBO可以用来代替颜色缓存区或深度缓存区,如下图所示:
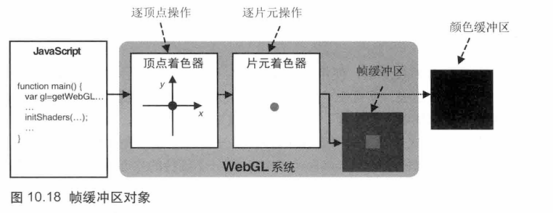
绘制到FBO中的数据不会直接被浏览器显示出来,如何没有后续的处理,它只是存在一块内存中的数据而已,我们可以将这块数据渲染到纹理(render to texture RTT),或者渲染到其他的Canvas上(离屏渲染)下一节讲。如何将数据渲染到FBO里呢?我们先看看WebGL的实现:
1.新建FBO。
2.切换到FBO。
上面提到了应为WebGL默认会把数据渲染到颜色缓存区,所以得需要切换到FBO。
3.绘制
该绘制什么就绘制什么,比如想绘制一个矩形,那就去do it,这时绘制的数据就存放到FBO里面了。
4.切回颜色缓存区
如果我想绘制到浏览器上显示(颜色缓存区),那就需要调用gl.bindFramebuffer(gl.FRAMEBUFFER, null);,第二个参数传空就好了。
有了以上的基础,那么就有了渲染到纹理的实现思路:
- 创建FBO。
- 切换到FBO。
- 绘制一个物体A。
- 切回到颜色缓存区。
- 绘制另一个物体B(以物体A作为纹理)。
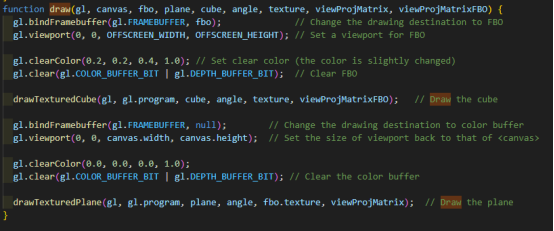
上面的第2、3、4、5都发生在一次DC当中,没错,这就是WebGL指南中所给出的例子:

一次绘制的过程
WebGL运行例子效果
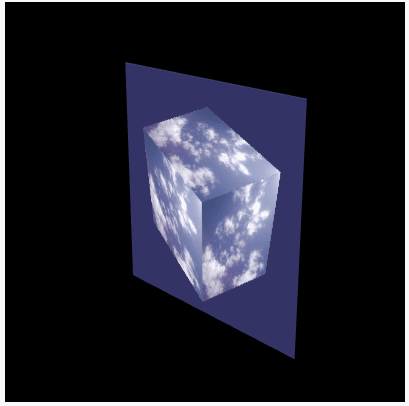
这个例子是将一个带纹理的正方体作为纹理绘制到一个平面上,具体代码实现可查《WebGL编程指南》中第10章的FramebufferObject.html例子,如没有《WebGL编程指南》的电子书和例子代码的小伙伴可留言,我看到了就会发给你。
这里大概介绍一下WebGL创建FBO的过程:
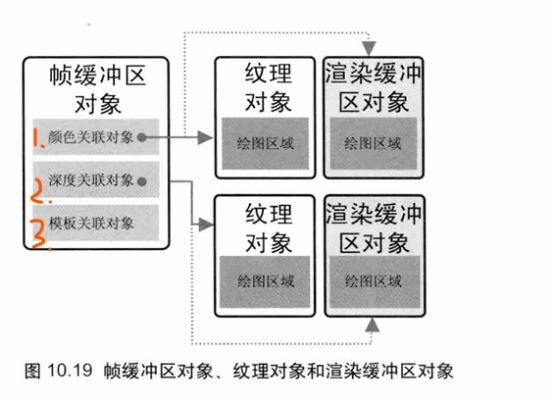
FBO包含了颜色关联对象、深度关联对象和模板关联对象三个关联对象,每个关联对象又分为纹理对象和渲染缓存对象,如下图所示他们的关系:
创建FBO的过程如下:
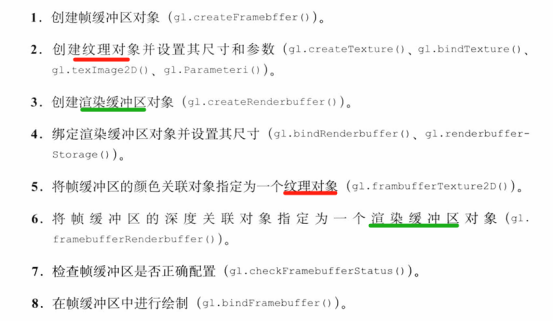
WebGL例子代码
创建了一个纹理对象和一个渲染缓存区对象并指定给了FBO,此时一个FBO创建完毕并切换完成,渲染的数据就会流入的FBO中。
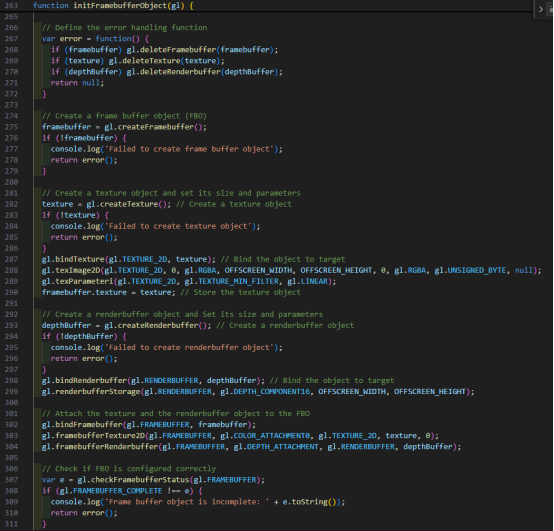
上面说了WebGL的实现,我们再看看Cesium的实现,大家知道Cesium是对WebGL的高级封装,Cesium有单独一个Framebuffer.js的文件封装了FBO:
Framebuffer.js
import Check from "../Core/Check.js";
import defaultValue from "../Core/defaultValue.js";
import defined from "../Core/defined.js";
import destroyObject from "../Core/destroyObject.js";
import DeveloperError from "../Core/DeveloperError.js";
import PixelFormat from "../Core/PixelFormat.js";
import ContextLimits from "./ContextLimits.js";
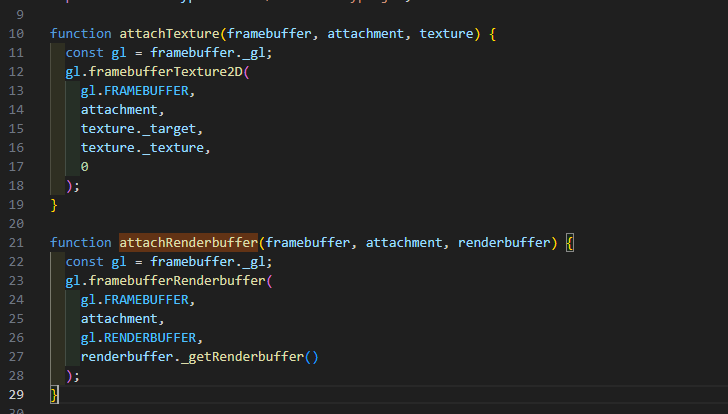
import PixelDatatype from "./PixelDatatype.js";function attachTexture(framebuffer, attachment, texture) {const gl = framebuffer._gl;gl.framebufferTexture2D(gl.FRAMEBUFFER,attachment,texture._target,texture._texture,0);
}function attachRenderbuffer(framebuffer, attachment, renderbuffer) {const gl = framebuffer._gl;gl.framebufferRenderbuffer(gl.FRAMEBUFFER,attachment,gl.RENDERBUFFER,renderbuffer._getRenderbuffer());
}/*** Creates a framebuffer with optional initial color, depth, and stencil attachments.* Framebuffers are used for render-to-texture effects; they allow us to render to* textures in one pass, and read from it in a later pass.** @param {Object} options The initial framebuffer attachments as shown in the example below. <code>context</code> is required. The possible properties are <code>colorTextures</code>, <code>colorRenderbuffers</code>, <code>depthTexture</code>, <code>depthRenderbuffer</code>, <code>stencilRenderbuffer</code>, <code>depthStencilTexture</code>, <code>depthStencilRenderbuffer</code>, and <code>destroyAttachments</code>.** @exception {DeveloperError} Cannot have both color texture and color renderbuffer attachments.* @exception {DeveloperError} Cannot have both a depth texture and depth renderbuffer attachment.* @exception {DeveloperError} Cannot have both a depth-stencil texture and depth-stencil renderbuffer attachment.* @exception {DeveloperError} Cannot have both a depth and depth-stencil renderbuffer.* @exception {DeveloperError} Cannot have both a stencil and depth-stencil renderbuffer.* @exception {DeveloperError} Cannot have both a depth and stencil renderbuffer.* @exception {DeveloperError} The color-texture pixel-format must be a color format.* @exception {DeveloperError} The depth-texture pixel-format must be DEPTH_COMPONENT.* @exception {DeveloperError} The depth-stencil-texture pixel-format must be DEPTH_STENCIL.* @exception {DeveloperError} The number of color attachments exceeds the number supported.* @exception {DeveloperError} The color-texture pixel datatype is HALF_FLOAT and the WebGL implementation does not support the EXT_color_buffer_half_float extension.* @exception {DeveloperError} The color-texture pixel datatype is FLOAT and the WebGL implementation does not support the EXT_color_buffer_float or WEBGL_color_buffer_float extensions.** @example* // Create a framebuffer with color and depth texture attachments.* const width = context.canvas.clientWidth;* const height = context.canvas.clientHeight;* const framebuffer = new Framebuffer({* context : context,* colorTextures : [new Texture({* context : context,* width : width,* height : height,* pixelFormat : PixelFormat.RGBA* })],* depthTexture : new Texture({* context : context,* width : width,* height : height,* pixelFormat : PixelFormat.DEPTH_COMPONENT,* pixelDatatype : PixelDatatype.UNSIGNED_SHORT* })* });** @private* @constructor*/
function Framebuffer(options) {options = defaultValue(options, defaultValue.EMPTY_OBJECT);const context = options.context;//>>includeStart('debug', pragmas.debug);Check.defined("options.context", context);//>>includeEnd('debug');const gl = context._gl;const maximumColorAttachments = ContextLimits.maximumColorAttachments;this._gl = gl;this._framebuffer = gl.createFramebuffer();this._colorTextures = [];this._colorRenderbuffers = [];this._activeColorAttachments = [];this._depthTexture = undefined;this._depthRenderbuffer = undefined;this._stencilRenderbuffer = undefined;this._depthStencilTexture = undefined;this._depthStencilRenderbuffer = undefined;/*** When true, the framebuffer owns its attachments so they will be destroyed when* {@link Framebuffer#destroy} is called or when a new attachment is assigned* to an attachment point.** @type {Boolean}* @default true** @see Framebuffer#destroy*/this.destroyAttachments = defaultValue(options.destroyAttachments, true);// Throw if a texture and renderbuffer are attached to the same point. This won't// cause a WebGL error (because only one will be attached), but is likely a developer error.//>>includeStart('debug', pragmas.debug);if (defined(options.colorTextures) && defined(options.colorRenderbuffers)) {throw new DeveloperError("Cannot have both color texture and color renderbuffer attachments.");}if (defined(options.depthTexture) && defined(options.depthRenderbuffer)) {throw new DeveloperError("Cannot have both a depth texture and depth renderbuffer attachment.");}if (defined(options.depthStencilTexture) &&defined(options.depthStencilRenderbuffer)) {throw new DeveloperError("Cannot have both a depth-stencil texture and depth-stencil renderbuffer attachment.");}//>>includeEnd('debug');// Avoid errors defined in Section 6.5 of the WebGL specconst depthAttachment =defined(options.depthTexture) || defined(options.depthRenderbuffer);const depthStencilAttachment =defined(options.depthStencilTexture) ||defined(options.depthStencilRenderbuffer);//>>includeStart('debug', pragmas.debug);if (depthAttachment && depthStencilAttachment) {throw new DeveloperError("Cannot have both a depth and depth-stencil attachment.");}if (defined(options.stencilRenderbuffer) && depthStencilAttachment) {throw new DeveloperError("Cannot have both a stencil and depth-stencil attachment.");}if (depthAttachment && defined(options.stencilRenderbuffer)) {throw new DeveloperError("Cannot have both a depth and stencil attachment.");}//>>includeEnd('debug');///////////////////////////////////////////////////////////////////this._bind();let texture;let renderbuffer;let i;let length;let attachmentEnum;if (defined(options.colorTextures)) {const textures = options.colorTextures;length = this._colorTextures.length = this._activeColorAttachments.length =textures.length;//>>includeStart('debug', pragmas.debug);if (length > maximumColorAttachments) {throw new DeveloperError("The number of color attachments exceeds the number supported.");}//>>includeEnd('debug');for (i = 0; i < length; ++i) {texture = textures[i];//>>includeStart('debug', pragmas.debug);if (!PixelFormat.isColorFormat(texture.pixelFormat)) {throw new DeveloperError("The color-texture pixel-format must be a color format.");}if (texture.pixelDatatype === PixelDatatype.FLOAT &&!context.colorBufferFloat) {throw new DeveloperError("The color texture pixel datatype is FLOAT and the WebGL implementation does not support the EXT_color_buffer_float or WEBGL_color_buffer_float extensions. See Context.colorBufferFloat.");}if (texture.pixelDatatype === PixelDatatype.HALF_FLOAT &&!context.colorBufferHalfFloat) {throw new DeveloperError("The color texture pixel datatype is HALF_FLOAT and the WebGL implementation does not support the EXT_color_buffer_half_float extension. See Context.colorBufferHalfFloat.");}//>>includeEnd('debug');attachmentEnum = this._gl.COLOR_ATTACHMENT0 + i;attachTexture(this, attachmentEnum, texture);this._activeColorAttachments[i] = attachmentEnum;this._colorTextures[i] = texture;}}if (defined(options.colorRenderbuffers)) {const renderbuffers = options.colorRenderbuffers;length = this._colorRenderbuffers.length = this._activeColorAttachments.length =renderbuffers.length;//>>includeStart('debug', pragmas.debug);if (length > maximumColorAttachments) {throw new DeveloperError("The number of color attachments exceeds the number supported.");}//>>includeEnd('debug');for (i = 0; i < length; ++i) {renderbuffer = renderbuffers[i];attachmentEnum = this._gl.COLOR_ATTACHMENT0 + i;attachRenderbuffer(this, attachmentEnum, renderbuffer);this._activeColorAttachments[i] = attachmentEnum;this._colorRenderbuffers[i] = renderbuffer;}}if (defined(options.depthTexture)) {texture = options.depthTexture;//>>includeStart('debug', pragmas.debug);if (texture.pixelFormat !== PixelFormat.DEPTH_COMPONENT) {throw new DeveloperError("The depth-texture pixel-format must be DEPTH_COMPONENT.");}//>>includeEnd('debug');attachTexture(this, this._gl.DEPTH_ATTACHMENT, texture);this._depthTexture = texture;}if (defined(options.depthRenderbuffer)) {renderbuffer = options.depthRenderbuffer;attachRenderbuffer(this, this._gl.DEPTH_ATTACHMENT, renderbuffer);this._depthRenderbuffer = renderbuffer;}if (defined(options.stencilRenderbuffer)) {renderbuffer = options.stencilRenderbuffer;attachRenderbuffer(this, this._gl.STENCIL_ATTACHMENT, renderbuffer);this._stencilRenderbuffer = renderbuffer;}if (defined(options.depthStencilTexture)) {texture = options.depthStencilTexture;//>>includeStart('debug', pragmas.debug);if (texture.pixelFormat !== PixelFormat.DEPTH_STENCIL) {throw new DeveloperError("The depth-stencil pixel-format must be DEPTH_STENCIL.");}//>>includeEnd('debug');attachTexture(this, this._gl.DEPTH_STENCIL_ATTACHMENT, texture);this._depthStencilTexture = texture;}if (defined(options.depthStencilRenderbuffer)) {renderbuffer = options.depthStencilRenderbuffer;attachRenderbuffer(this, this._gl.DEPTH_STENCIL_ATTACHMENT, renderbuffer);this._depthStencilRenderbuffer = renderbuffer;}this._unBind();
}Object.defineProperties(Framebuffer.prototype, {/*** The status of the framebuffer. If the status is not WebGLConstants.FRAMEBUFFER_COMPLETE,* a {@link DeveloperError} will be thrown when attempting to render to the framebuffer.* @memberof Framebuffer.prototype* @type {Number}*/status: {get: function () {this._bind();const status = this._gl.checkFramebufferStatus(this._gl.FRAMEBUFFER);this._unBind();return status;},},numberOfColorAttachments: {get: function () {return this._activeColorAttachments.length;},},depthTexture: {get: function () {return this._depthTexture;},},depthRenderbuffer: {get: function () {return this._depthRenderbuffer;},},stencilRenderbuffer: {get: function () {return this._stencilRenderbuffer;},},depthStencilTexture: {get: function () {return this._depthStencilTexture;},},depthStencilRenderbuffer: {get: function () {return this._depthStencilRenderbuffer;},},/*** True if the framebuffer has a depth attachment. Depth attachments include* depth and depth-stencil textures, and depth and depth-stencil renderbuffers. When* rendering to a framebuffer, a depth attachment is required for the depth test to have effect.* @memberof Framebuffer.prototype* @type {Boolean}*/hasDepthAttachment: {get: function () {return !!(this.depthTexture ||this.depthRenderbuffer ||this.depthStencilTexture ||this.depthStencilRenderbuffer);},},
});Framebuffer.prototype._bind = function () {const gl = this._gl;gl.bindFramebuffer(gl.FRAMEBUFFER, this._framebuffer);
};Framebuffer.prototype._unBind = function () {const gl = this._gl;gl.bindFramebuffer(gl.FRAMEBUFFER, null);
};Framebuffer.prototype.bindDraw = function () {const gl = this._gl;gl.bindFramebuffer(gl.DRAW_FRAMEBUFFER, this._framebuffer);
};Framebuffer.prototype.bindRead = function () {const gl = this._gl;gl.bindFramebuffer(gl.READ_FRAMEBUFFER, this._framebuffer);
};Framebuffer.prototype._getActiveColorAttachments = function () {return this._activeColorAttachments;
};Framebuffer.prototype.getColorTexture = function (index) {//>>includeStart('debug', pragmas.debug);if (!defined(index) || index < 0 || index >= this._colorTextures.length) {throw new DeveloperError("index is required, must be greater than or equal to zero and must be less than the number of color attachments.");}//>>includeEnd('debug');return this._colorTextures[index];
};Framebuffer.prototype.getColorRenderbuffer = function (index) {//>>includeStart('debug', pragmas.debug);if (!defined(index) ||index < 0 ||index >= this._colorRenderbuffers.length) {throw new DeveloperError("index is required, must be greater than or equal to zero and must be less than the number of color attachments.");}//>>includeEnd('debug');return this._colorRenderbuffers[index];
};Framebuffer.prototype.isDestroyed = function () {return false;
};Framebuffer.prototype.destroy = function () {if (this.destroyAttachments) {// If the color texture is a cube map face, it is owned by the cube map, and will not be destroyed.let i = 0;const textures = this._colorTextures;let length = textures.length;for (; i < length; ++i) {const texture = textures[i];if (defined(texture)) {texture.destroy();}}const renderbuffers = this._colorRenderbuffers;length = renderbuffers.length;for (i = 0; i < length; ++i) {const renderbuffer = renderbuffers[i];if (defined(renderbuffer)) {renderbuffer.destroy();}}this._depthTexture = this._depthTexture && this._depthTexture.destroy();this._depthRenderbuffer =this._depthRenderbuffer && this._depthRenderbuffer.destroy();this._stencilRenderbuffer =this._stencilRenderbuffer && this._stencilRenderbuffer.destroy();this._depthStencilTexture =this._depthStencilTexture && this._depthStencilTexture.destroy();this._depthStencilRenderbuffer =this._depthStencilRenderbuffer &&this._depthStencilRenderbuffer.destroy();}this._gl.deleteFramebuffer(this._framebuffer);return destroyObject(this);
};
export default Framebuffer;
这源码有点长,我们只看构造函数,一开始定义了
颜色的纹理对象和渲染缓存区对象
深度的纹理对象和渲染缓存区对象
模板的纹理对象和渲染缓存区对象
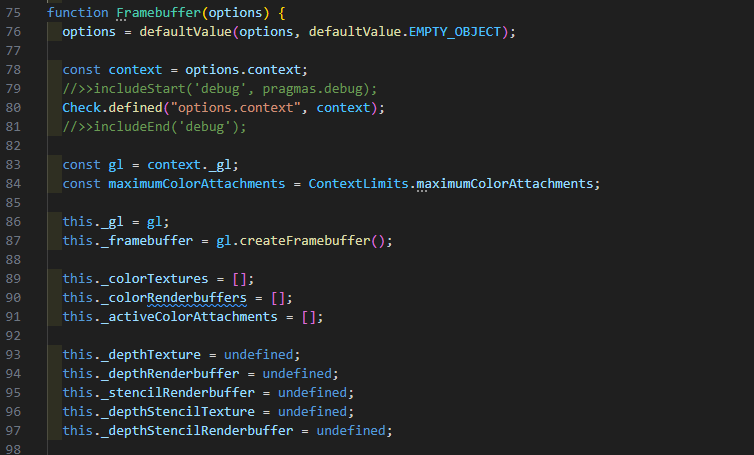
看的出来这和WebGL的FBO的简创建过程相呼应,继续往下看发现在一堆数据的校验过后切换到FBO:
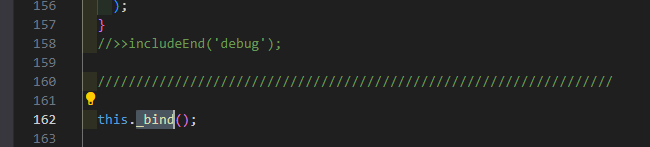

可见FBO切换的时机在Framebuffer的构造中就完成了,再往下看发现后面多次调用下面这个两个函数为FBO的颜色关联对象和深度关联对象的纹理对象和渲染缓存区对象指定对象:
当我们简单的 new Cesium.Framebuffer({...})的时候,就完成了上文提交的WebGL中的FBO创建的过程。
到这里关于底层的原理部分就写完了,让我喘口气,又是截图又是配解说词的,快冒烟了(-:
三、实现
上面的原理解说,我们再来简单看看Cesium是如何来完成上面这个过程的,Cesium渲染到纹理分为以下四个步骤:
1、创建几何体
这里我创建一个矩形primitive,用于展示FBO渲染到纹理的效果
let geometryInstance = new Cesium.GeometryInstance({geometry: new Cesium.RectangleGeometry({rectangle: Cesium.Rectangle.fromDegrees(120.0,30.0,125.0,33.0),height: 1000,}),attributes: {color: Cesium.ColorGeometryInstanceAttribute.fromColor(Cesium.Color.BLUE),},});var appearance = new Cesium.MaterialAppearance({material: new Cesium.Material({fabric: {uniforms: {textureRTT: "/data/300.png",},source: `czm_material czm_getMaterial(czm_materialInput materialInput) {czm_material material = czm_getDefaultMaterial(materialInput);vec2 v_st = materialInput.st;vec4 textColor = texture2D(textureRTT, v_st);material.diffuse =textColor.rgb;material.alpha = 1.0;return material;}`,},translucent: true}),translucent: true,flat: true,faceForward: false});this.viewer.scene.primitives.add(new Cesium.Primitive({geometryInstances: geometryInstance,appearance: appearance,}));
2、创建FBO
createFrameBuffer(context) {let framebuffer = new Cesium.Framebuffer({context: context,colorTextures: [new Cesium.Texture({context: context,width: context.drawingBufferWidth,height: context.drawingBufferHeight,pixelFormat: Cesium.PixelFormat.RGBA,}),]});return framebuffer;}3、渲染到FBO
renderToFbo(fbo, scene) {const frameState = scene._frameState;const context = scene.context;const us = context.uniformState;const view = scene._defaultView;scene._view = view;scene.updateFrameState();frameState.passes.render = true;frameState.passes.postProcess = scene.postProcessStages.hasSelected;frameState.tilesetPassState = scene.renderTilesetPassState;let backgroundColor = Cesium.defaultValue(scene.backgroundColor, Cesium.Color.BLACK);if (scene._hdr) {backgroundColor = Cesium.Color.clone(backgroundColor, scene.scratchBackgroundColor);backgroundColor.red = Cesium.Math.pow(backgroundColor.red, scene.gamma);backgroundColor.green = Cesium.Math.pow(backgroundColor.green, scene.gamma);backgroundColor.blue = Cesium.Math.pow(backgroundColor.blue, scene.gamma);}frameState.backgroundColor = backgroundColor;frameState.atmosphere = scene.atmosphere;scene.fog.update(frameState);us.update(frameState);const shadowMap = scene.shadowMap;if (Cesium.defined(shadowMap) && shadowMap.enabled) {if (!Cesium.defined(scene.light) || scene.light instanceof Cesium.SunLight) {// Negate the sun direction so that it is from the Sun, not to the SunCesium.Cartesian3.negate(us.sunDirectionWC, scene._shadowMapCamera.direction);} else {Cesium.Cartesian3.clone(scene.light.direction, scene._shadowMapCamera.direction);}frameState.shadowMaps.push(shadowMap);}scene._computeCommandList.length = 0;scene._overlayCommandList.length = 0;const viewport = view.viewport;viewport.x = 0;viewport.y = 0;viewport.width = context.drawingBufferWidth;viewport.height = context.drawingBufferHeight;const passState = view.passState;passState.framebuffer = fbo;passState.blendingEnabled = undefined;passState.scissorTest = undefined;passState.viewport = Cesium.BoundingRectangle.clone(viewport, passState.viewport);if (Cesium.defined(scene.globe)) {scene.globe.beginFrame(frameState);}scene.updateEnvironment();scene.updateAndExecuteCommands(passState, backgroundColor);scene.resolveFramebuffers(passState);passState.framebuffer = undefined;//executeOverlayCommands(scene, passState);if (Cesium.defined(scene.globe)) {scene.globe.endFrame(frameState);if (!scene.globe.tilesLoaded) {scene._renderRequested = true;}}context.endFrame();scene.globe.show = true;}4、将FBO作为纹理赋值给几何体
let colorTexture = Cesium.Texture.fromFramebuffer({context: this.viewer.scene.context,framebuffer: fbo})appearance.material.uniforms.textureRTT = colorTexture;通过上面四个步骤,最终在矩形几何体上显示出了当前场景,我们看到任何东西,不管它如何的复杂、如何的高深莫测,它都是离不开核心的东西,所谓万变不离其宗,Cesium是基于WebGL封装的,所以它再怎么封装、再怎么抽象都离不开底层原理的。Cesium作为一款出色的大象,我们得慢慢的摸它。
如没有《WebGL编程指南》的电子书和例子代码同学请留言,我看到了会第一时间发给你。
码字不易,请各位看官点个赞+关注,我会持续分享一些实用的东西。

方式导入 C++动态库.dll方法总结)

入库管理)


——判断推理(重点回顾))


洛谷 P13551 ももいろの鍵 题解)
.)


