大家好,我是潘Sir,持续分享IT技术,帮你少走弯路。《鸿蒙应用开发从入门到项目实战》系列文章持续更新中,欢迎关注!
随着鸿蒙(HarmonyOS)生态发展,越来越多的APP需要进行鸿蒙适配。本文以快递APP寄件中的收货地址识别功能为例,探讨HarmonyOS鸿蒙版本的开发和适配。
一、需求分析
1、应用场景
随着互联网的发展,网购已成为大家日常生活中不可或缺的一部分。网购涉及到发货和收货操作,为了简化操作、提升APP的使用效率,各大APP都融入了AI能力。在AI赋能下,从传统的文字输入交互方式,逐步拓展到人脸识别、指纹识别、图片识别、语言识别等方式,降低了APP使用门槛的同时极大提高了交互效率。
本文研究以支付宝APP里边的“菜鸟裹裹”寄件场景为例,通过粘贴文字或者图片识别进行收货地址自动识别填充。在鸿蒙操作系统(HarmonyOS)上借助HarmonyOS SDK 提供的AI能力,开发鸿蒙原生应用APP功能,完成上述功能。
ps:相信大家都寄过快递,如果没操作过可以先了解一下。
2、实现效果
| 主页 | 拍照 | 识别 | 保存 |
|---|---|---|---|
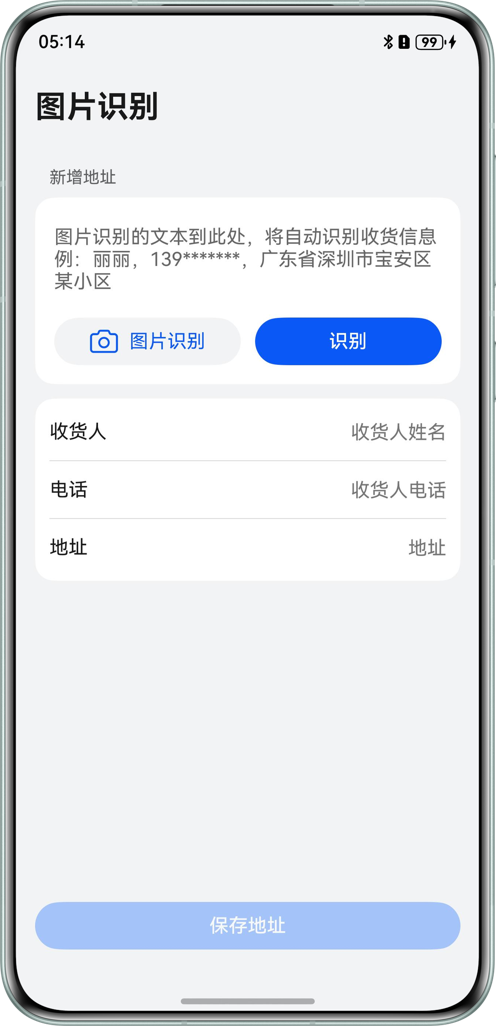 | 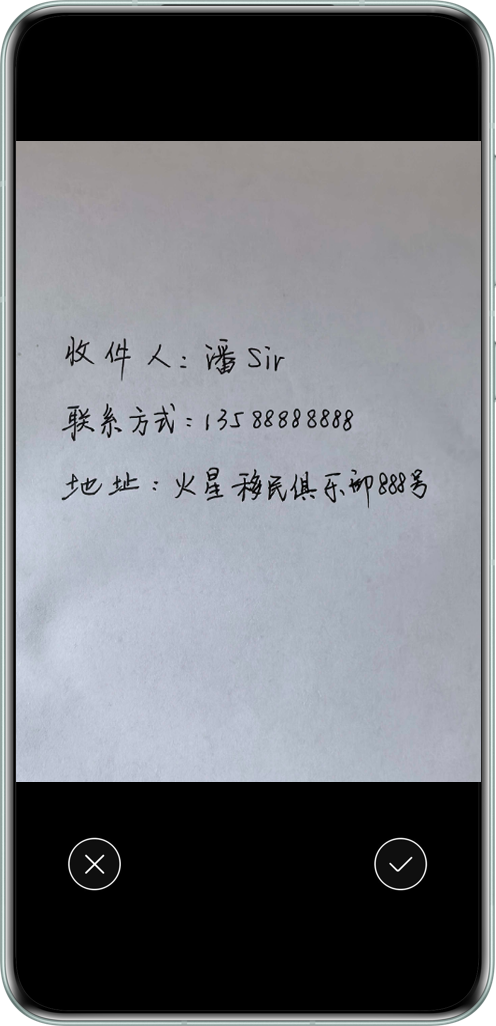 | 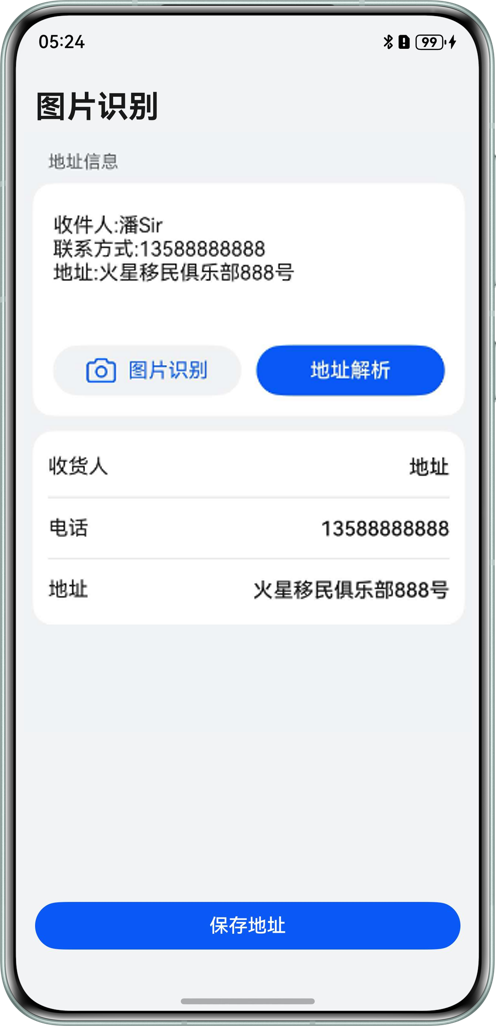 | 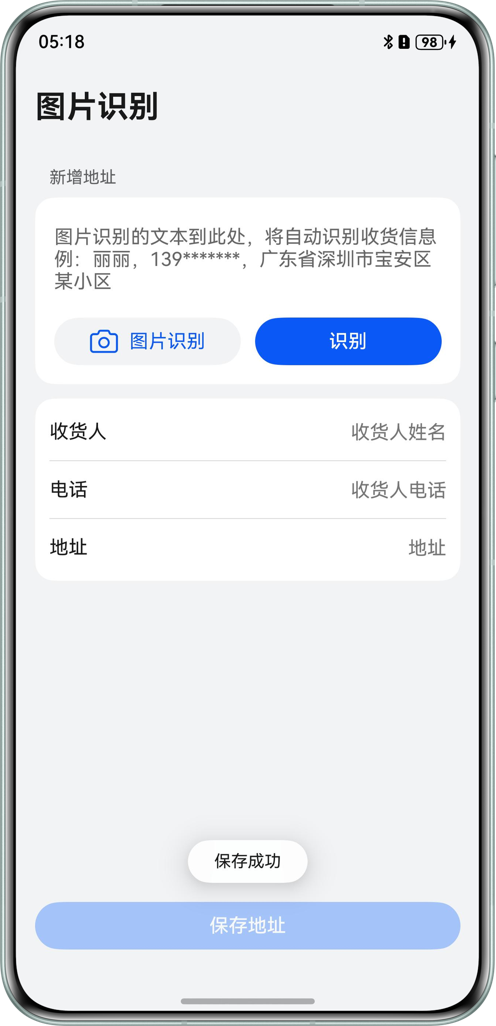 |
ps:由于编写的提取规则中,名字为2-4个中文,因此上边的名字“潘Sir”包含了1个英文,故未识别正确。如果改为2-4个汉字则可以正确识别。这就是传统的用规则来匹配的弊端,更好的方法是使用AI大模型或NLP工具来提取地址信息。
读者可以直接运行提供的代码查看效果。由于使用了视觉服务,需要真机运行。
使用说明:
- 点击
图片识别按钮,拉起选择图片获取方式的弹窗,选择拍照方式,通过对要识别的文字进行拍照获得要识别的图片。也可以选择相册方式,在图库中直接选择需要识别的图片。 - 识别出图片包含的文本信息后,会自动将文本内容填充到文本输入框。
- 点击`地址解析按钮,会将文本框中的信息提取为结构化数据,显示到按钮下方的列表中。
- 点击
保存地址按钮,提示保存成功,文本框旧的内容会自动清空。
3、技术分析
基于HarmonyOS SDK提供的基础视觉服务(CoreVisionKit),使用@kit.CoreVisionKit提供的通用文字识别能力,通过拍照(CameraPicker)或者相册(PhotoViewPicker)方式,将印刷品文字(如:收货信息)转化为图像信息,再利用文字识别技术将图像信息转化为设备可以使用的文本字符,最后可以根据实际业务规则提取结构化数据。
二、界面制作
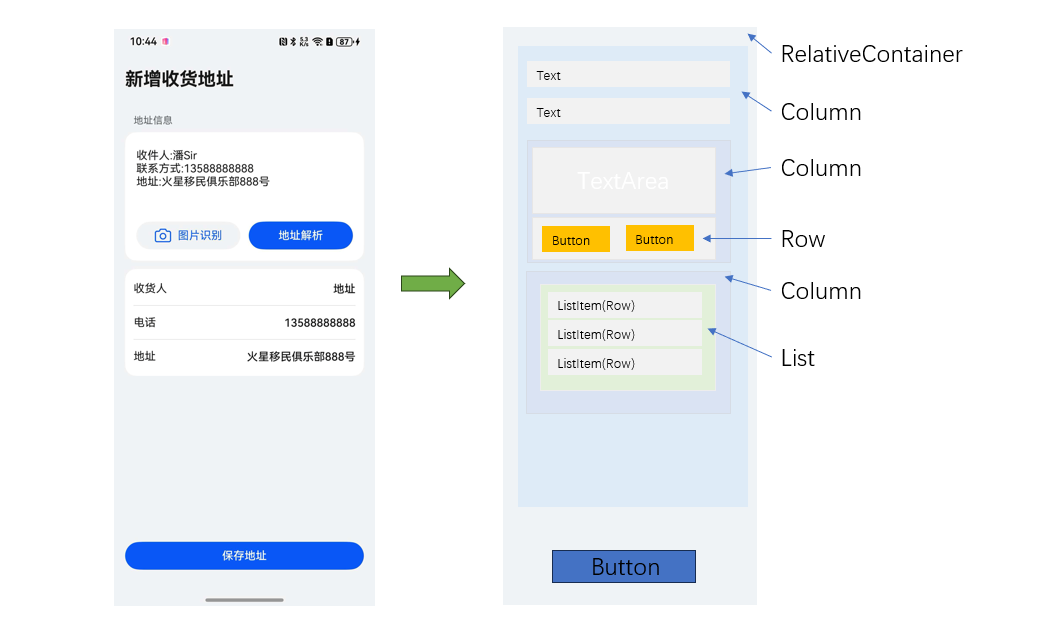
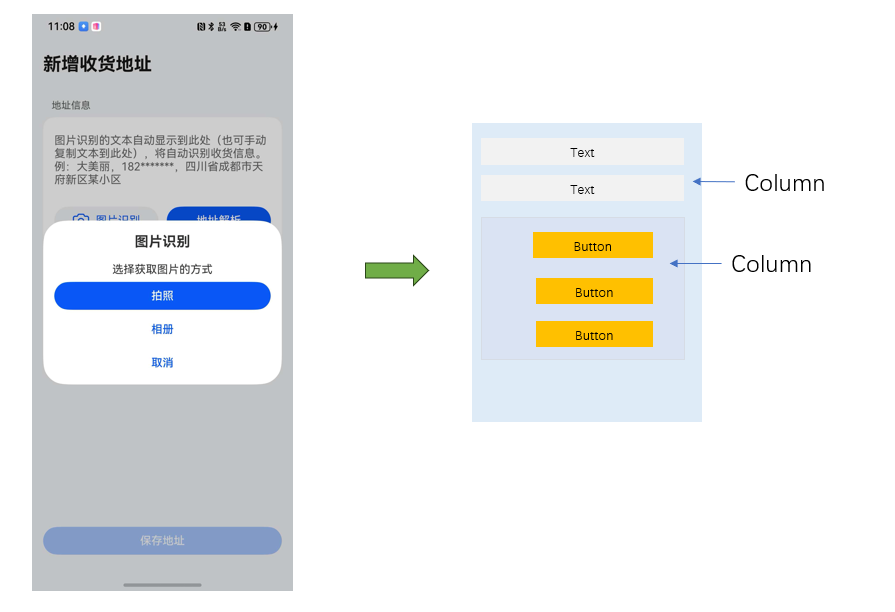
1、布局分析
主界面布局分析:
弹窗界面布局分析:
2、界面制作
开发环境说明:DevEco Studio5.0.4 Release、 HarmonyOS5.0.4(API 16)
通过DevEco Studio创建项目,项目名称为:ExtractAddress,删除Index.ets文件中默认的代码。
2.1 制作主界面
为了便于代码复用和程序扩展,将收货人信息的界面上的每一行显示的数据,抽取为一个对象,该对象类型为ConsigneeInfo类。在ets目录下新建viewmodel目录,新建DataModel.ets文件,内容如下:
// 收货人信息界面视图模型
@ObservedV2
export class ConsigneeInfo {label: ResourceStr;       //标签名称placeholder: ResourceStr; //提示语@Trace value: string;     //输入值constructor(label: ResourceStr, placeholder: ResourceStr, value: string) {this.label = label;this.placeholder = placeholder;this.value = value;}
}
有了此类,在主界面上就只需要实例化3个对象,通过列表进行循环渲染即可,避免了重复臃肿的代码。接下来制作主界面,Index.ets文件内容如下:
import { ConsigneeInfo} from '../viewmodel/DataModel';@Entry
@Component
struct Index {@State consigneeInfos: ConsigneeInfo[] = []; //收货人信息界面视图@State saveAvailable: boolean = false; //保存按钮是否可用aboutToAppear(): void {this.consigneeInfos = [new ConsigneeInfo('收货人', '收货人姓名', ''),new ConsigneeInfo('电话', '收货人电话', ''),new ConsigneeInfo('地址', '地址', ''),];}build() {RelativeContainer() {// 界面主体内容Column() {Text('新增收货地址').id('title').width('100%').font({ size: 26, weight: 700 }).fontColor('#000000').opacity(0.9).height(64).align(Alignment.TopStart)Text('地址信息').width('100%').padding({ left: 12, right: 12 }).font({ size: 14, weight: 400 }).fontColor('#000000').opacity(0.6).lineHeight(19).margin({ bottom: 8 })// 识别或填写区域Column() {TextArea({placeholder: '图片识别的文本自动显示到此处(也可手动复制文本到此处),将自动识别收货信息。例:大美丽,182*******,四川省成都市天府新区某小区',}).height(100).margin({ bottom: 12 }).backgroundColor('#FFFFFF')Row({ space: 12 }) {Button() {Row({ space: 8 }) {Text() {SymbolSpan($r('sys.symbol.camera')).fontSize(26).fontColor(['#0A59F2'])}Text('图片识别').fontSize(16).fontColor('#0A59F2')}}.height(40).layoutWeight(1).backgroundColor('#F1F3F5')Button('地址解析').height(40).layoutWeight(1)}.width('100%').padding({left: 16,right: 16,})}.backgroundColor('#FFFFFF').borderRadius(16).padding({top: 16,bottom: 16})// 收货人信息Column() {List() {//列表渲染,避免重复代码ForEach(this.consigneeInfos, (item: ConsigneeInfo) => {ListItem() {Row() {Text(item.label).fontSize(16).fontWeight(400).lineHeight(19).textAlign(TextAlign.Start).fontColor('#000000').opacity(0.9).layoutWeight(1)TextArea({ placeholder: item.placeholder, text: item.value }).type(item.label === '收货人' ? TextAreaType.PHONE_NUMBER : TextAreaType.NORMAL).fontSize(16).fontWeight(500).lineHeight(21).padding(0).borderRadius(0).textAlign(TextAlign.End).fontColor('#000000').opacity(0.9).backgroundColor('#FFFFFF').heightAdaptivePolicy(TextHeightAdaptivePolicy.MIN_FONT_SIZE_FIRST).layoutWeight(2).onChange((value: string) => {item.value = value;//判断保存按钮是否可用(均填写即可保存)if (this.consigneeInfos[0].value && this.consigneeInfos[1].value && this.consigneeInfos[2].value) {this.saveAvailable = true;} else {this.saveAvailable = false;}})}.width('100%').constraintSize({ minHeight: 48 }).justifyContent(FlexAlign.SpaceBetween)}}, (item: ConsigneeInfo, index: number) => JSON.stringify(item) + index)}.width('100%').height(LayoutPolicy.matchParent).scrollBar(BarState.Off).divider({ strokeWidth: 0.5, color: '#33000000' }).padding({left: 12,right: 12,top: 4,bottom: 4}).borderRadius(16).backgroundColor('#FFFFFF')}.borderRadius(16).margin({ top: 12 }).constraintSize({ minHeight: 150, maxHeight: '50%' }).backgroundColor('#FFFFFF')}// 保存按钮if (this.saveAvailable) {// 可用状态Button("保存地址", { stateEffect: true }).width('100%').alignRules({bottom: { anchor: '__container__', align: VerticalAlign.Bottom }})} else {// 不可用状态Button("保存地址", { stateEffect: false }).width('100%').alignRules({bottom: { anchor: '__container__', align: VerticalAlign.Bottom }}).opacity(0.4).backgroundColor('#317AFF')}}.height('100%').width('100%').padding({left: 16,right: 16,top: 24,bottom: 24}).backgroundColor('#F1F3F5').alignRules({left: { anchor: '__container__', align: HorizontalAlign.Start }}).expandSafeArea([SafeAreaType.SYSTEM], [SafeAreaEdge.TOP, SafeAreaEdge.BOTTOM])}
}
该界面中通过RelativeContainer进行相对布局,保存按钮通过相对布局定位到界面底部,主要内容区域使用Column布局。在aboutToAppear周期函数中,初始化收货人列表数据,界面中通过List列表渲染完成显示。至此,主界面的静态效果就实现了。
但主界面代码依然较多,可以考虑将List列表渲染部分抽取为单独的组件,提取到单独文件中。在ets目录下新建components目录,在该目录下新建ConsigneeInfoItem.ets文件,将主界面列表渲染部分的内容拷贝进去并进改造。
ConsigneeInfoItem.ets文件内容:
import { ConsigneeInfo } from '../viewmodel/DataModel';@Builder
export function ConsigneeInfoItem(item: ConsigneeInfo, checkAvailable?: () => void) {Row() {Text(item.label).fontSize(16).fontWeight(400).lineHeight(19).textAlign(TextAlign.Start).fontColor('#000000').opacity(0.9).layoutWeight(1)TextArea({ placeholder: item.placeholder, text: item.value }).type(item.label === '收货人' ? TextAreaType.PHONE_NUMBER : TextAreaType.NORMAL).fontSize(16).fontWeight(500).lineHeight(21).padding(0).borderRadius(0).textAlign(TextAlign.End).fontColor('#000000').opacity(0.9).backgroundColor('#FFFFFF').heightAdaptivePolicy(TextHeightAdaptivePolicy.MIN_FONT_SIZE_FIRST).layoutWeight(2).onChange((value: string) => {item.value = value;//判断保存按钮是否可用(均填写即可保存)checkAvailable?.();})}.width('100%').constraintSize({ minHeight: 48 }).justifyContent(FlexAlign.SpaceBetween)}
Index.ets改造
import  {ConsigneeInfoItem} from '../components/ConsigneeInfoItem'
...
ListItem() {//抽取为组件ConsigneeInfoItem(item,() => {if (this.consigneeInfos[0].value && this.consigneeInfos[1].value && this.consigneeInfos[2].value) {this.saveAvailable = true;} else {this.saveAvailable = false;}})}
...
主界面效果实现完成
2.2 图片识别弹窗
点击“图片识别”按钮,弹出获取图片方式选择框。接下来完成该界面制作。
为了弹出框管理更加方面,封装弹窗口管理工具类PromptActionManager,在ets目录新建utils目录,新建PromptActionManager.ets文件,内容如下:
import { promptAction } from '@kit.ArkUI';/*** Dialog管理类*/
export class PromptActionManager {static ctx: UIContext;static contentNode: ComponentContent<Object>;static options: promptAction.BaseDialogOptions;static setCtx(ctx: UIContext) {PromptActionManager.ctx = ctx;}static setContentNode(contentNode: ComponentContent<Object>) {PromptActionManager.contentNode = contentNode;}static setOptions(options: promptAction.BaseDialogOptions) {PromptActionManager.options = options;}static openCustomDialog() {if (!PromptActionManager.contentNode) {return;}try {PromptActionManager.ctx.getPromptAction().openCustomDialog(PromptActionManager.contentNode,PromptActionManager.options)} catch (error) {}}static closeCustomDialog() {if (!PromptActionManager.contentNode) {return;}try {PromptActionManager.ctx.getPromptAction().closeCustomDialog(PromptActionManager.contentNode)} catch (error) {}}
}
不同的弹出界面可能需要不同的样式控制,因此为弹出框的控制定义参数类型Params。在DataModel.ets文件中新加类Params,代码如下:
...
export class Params {uiContext: UIContext;textAreaController: TextAreaController;     //识别信息的TextArealoadingController: CustomDialogController;  //识别过程中的加载提示框constructor(uiContext: UIContext, textAreaController: TextAreaController, loadingController: CustomDialogController) {this.uiContext = uiContext;this.textAreaController = textAreaController;this.loadingController = loadingController;}
}
接下来制作弹出框组件界面,在components目录新建dialogBuilder.ets文件
import { Params } from '../viewmodel/DataModel'
import { PromptActionManager } from '../common/utils/PromptActionManager'@Builder
export function dialogBuilder(params: Params): void {Column() {Text('图片识别').font({ size: 20, weight: 700 }).lineHeight(27).margin({ bottom: 16 })Text('选择获取图片的方式').font({ size: 16, weight: 50 }).lineHeight(21).margin({ bottom: 8 })Column({ space: 8 }) {Button('拍照').width('100%').height(40)Button('相册').width('100%').height(40).fontColor('#0A59F2').backgroundColor('#FFFFFF')Button('取消').width('100%').height(40).fontColor('#0A59F2').backgroundColor('#FFFFFF').onClick(() => {PromptActionManager.closeCustomDialog();})}}.size({ width: 'calc(100% - 32vp)', height: 235 }).borderRadius(32).backgroundColor('#FFFFFF').padding(16)
}
修改Index.ets文件,为“图片识别”按钮绑定事件,点击时弹出自定义对话框。
...
import { PromptActionManager } from '../common/utils/PromptActionManager';
import { ComponentContent, LoadingDialog } from '@kit.ArkUI';
import { ConsigneeInfo,Params} from '../viewmodel/DataModel';
import { dialogBuilder } from '../components/dialogBuilder';...
private uiContext: UIContext = this.getUIContext();
private resultController: TextAreaController = new TextAreaController();
private loadingController: CustomDialogController = new CustomDialogController({builder: LoadingDialog({content: '图片识别中'}),autoCancel: false});
private contentNode: ComponentContent<Object> =new ComponentContent(this.uiContext, wrapBuilder(dialogBuilder),new Params(this.uiContext, this.resultController, this.loadingController));
...//图片识别按钮
.onClick(() => {PromptActionManager.openCustomDialog();})
静态界面制作完成。
三、功能实现
1、通用功能封装
创建OCR识别管理类OCRManager,需要用到HarmonyOS SDK中的AI和媒体两类Kit。在utils目录下新建OCRManager.ets,封装相关方法。
import { textRecognition } from '@kit.CoreVisionKit';
import { camera, cameraPicker } from '@kit.CameraKit';
import { photoAccessHelper } from '@kit.MediaLibraryKit';
import { image } from '@kit.ImageKit';
import { fileIo as fs } from '@kit.CoreFileKit';export class OCRManager {static async recognizeByCamera(ctx: Context, loadingController: CustomDialogController): Promise<string> {// The configuration information of cameraPickerlet pickProfile: cameraPicker.PickerProfile = {cameraPosition: camera.CameraPosition.CAMERA_POSITION_UNSPECIFIED};try {let result: cameraPicker.PickerResult =await cameraPicker.pick(ctx, [cameraPicker.PickerMediaType.PHOTO], pickProfile);if (!result || !result.resultUri) {return '';}loadingController.open();return OCRManager.recognizeText(result.resultUri);} catch (error) {loadingController.close();return '';}}static async recognizeByAlbum(loadingController: CustomDialogController): Promise<string> {try {let photoPicker: photoAccessHelper.PhotoViewPicker = new photoAccessHelper.PhotoViewPicker();let photoResult: photoAccessHelper.PhotoSelectResult =await photoPicker.select({MIMEType: photoAccessHelper.PhotoViewMIMETypes.IMAGE_TYPE,maxSelectNumber: 1,isPhotoTakingSupported: false});if (!photoResult || photoResult.photoUris.length === 0) {return '';}loadingController.open();return OCRManager.recognizeText(photoResult.photoUris[0]);} catch (error) {loadingController.close();return '';}}static async recognizeText(uri: string): Promise<string> {// Visual information to be recognized.// Currently, only the visual information of the PixelMap type in color data format RGBA_8888 is supported.let visionInfo: textRecognition.VisionInfo = { pixelMap: await OCRManager.getPixelMap(uri) };let result: textRecognition.TextRecognitionResult = await textRecognition.recognizeText(visionInfo);visionInfo.pixelMap.release();return result.value;}static async getPixelMap(uri: string): Promise<image.PixelMap> {// Convert image resources to PixelMaplet fileSource = await fs.open(uri, fs.OpenMode.READ_ONLY);let imgSource: image.ImageSource = image.createImageSource(fileSource.fd);let pixelMap: image.PixelMap = await imgSource.createPixelMap();fs.close(fileSource);imgSource.release();return pixelMap;}
}
2、拍照识别
弹出框界面,为“拍照”按钮绑定事件
import { common } from '@kit.AbilityKit'
import { OCRManager } from '../common/utils/OCRManager'//拍照按钮
.onClick(async () => {PromptActionManager.closeCustomDialog();let text: string =await OCRManager.recognizeByCamera(params.uiContext.getHostContext() as common.UIAbilityContext,params.loadingController);params.loadingController.close();if (text) {params.textAreaController.deleteText();params.textAreaController.addText(text);}})
主界面,修改TextArea,传入controller并双向绑定识别结果。
...
@State ocrResult: string = '';
...//TextArea
controller: this.resultController,
text: $$this.ocrResult
拍照识别功能实现。
3、相册识别
弹出框界面,为“相册”按钮绑定事件
//相册按钮
.onClick(async () => {PromptActionManager.closeCustomDialog();let text: string =await OCRManager.recognizeByAlbum(params.loadingController);params.loadingController.close();if (text) {params.textAreaController.deleteText();params.textAreaController.addText(text);}})
相册识别功能实现。
4、地址解析
主界面的“地址解析”按钮,将通过图片识别或手工输入的地址信息,解析显示到对应的输入框中。
封装地址解析类AddressParse,本案例使用正则表达式进行匹配。后续可以使用大模型或NLP工具进行解析。
在utils目录下新建AddressParse.ets文件
import { ConsigneeInfo } from '../../viewmodel/DataModel';export class AddressParse {static nameBeforeRegex = /([\w\u4e00-\u9fa5]+[\s\,\,\。]+|[\s\,\,\。]*)([\u4e00-\u9fa5]{2,4})[\s\,\,\。]+/;static nameAfterRegex = /[\s\,\,\。]+([\u4e00-\u9fa5]{2,4})[\s\,\,\。]*/;static nameTagRegex = /(?:收货人|收件人|姓名|联系人)[::\s]*([\u4e00-\u9fa5]{2,4})/i;static namePlainRegex = /[\u4e00-\u9fa5]{2,4}/;static phoneRegex =/(1[3-9]\d[\s-]?\d{4}[\s-]?\d{4})|(\d{3,4}[\s-]?\d{7,8})|(\(\d{2,4}\)[\s-]?\d{4,8})|(\+\d{1,4}[\s-]?\d{5,15})/g;static phoneHyphenRegex = /[\(\)\s-]/g;static addressKeywords =['收货地址', '收件地址', '配送地址', '所在地区', '位置','地址', '寄至', '寄往', '送至', '详细地址'];static addressNoiseWords = ['收货人', '收件人', '姓名', '联系人', '电话', '手机', '联系方式', ':', ':', ',', ','];static extractInfo(text: string, info: ConsigneeInfo[]): ConsigneeInfo[] {const baseText: string = text.replace(/\s+/g, ' ')const phoneResult: string = AddressParse.extractPhone(baseText);const nameResult: string = AddressParse.extractName(baseText, phoneResult);const addressResult: string = AddressParse.extractAddress(baseText, phoneResult, nameResult);info[0].value = nameResult;info[1].value = phoneResult.replace(AddressParse.phoneHyphenRegex, '');info[2].value = addressResult;return info;}static extractPhone(text: string): string {const phoneMatch: RegExpMatchArray | null = text.match(AddressParse.phoneRegex);return phoneMatch ? phoneMatch[0] : '';}static extractName(text: string, phone: string): string {let name = '';// Try to extract from the labelconst nameFromTag = text.match(AddressParse.nameTagRegex);if (nameFromTag) {name = nameFromTag[1];}// Try to extract before or after the phoneif (!name && phone) {const phoneIndex = text.indexOf(phone);const beforePhone = text.substring(0, phoneIndex);const nameBefore = beforePhone.match(AddressParse.nameBeforeRegex);if (nameBefore) {name = nameBefore[2];}if (!name) {const afterPhone = text.substring(phoneIndex + phone.length);const nameAfter = afterPhone.match(AddressParse.nameAfterRegex);if (nameAfter) {name = nameAfter[1];}}}// Try to extract 2-4 Chinese characters directlyif (!name) {const nameMatch = text.match(AddressParse.namePlainRegex);if (nameMatch) {name = nameMatch[0];}}return name;}static extractAddress(text: string, phone: string, name: string): string {for (const keyword of AddressParse.addressKeywords) {const keywordIndex = text.indexOf(keyword);if (keywordIndex !== -1) {const possibleAddress = text.substring(keywordIndex + keyword.length).trim();// Clean up the beginning punctuationconst cleanedAddress = possibleAddress.replace(/^[::,,。、\s]+/, '');if (cleanedAddress.length > 5) {return cleanedAddress;}}}// Try to remove name and phone numberlet cleanedText = text;if (name) {cleanedText = cleanedText.replace(name, '');}if (phone) {cleanedText = cleanedText.replace(phone, '');}// Remove common distracting wordsAddressParse.addressNoiseWords.forEach(word => {cleanedText = cleanedText.replace(word, '');});// Extract the longest text segment that may contain an addressconst segments = cleanedText.split(/[\s,,。;;]+/).filter(seg => seg.length > 4);if (segments.length > 0) {// The segment containing the address key is preferredconst addressSegments = segments.filter(seg =>seg.includes('省') || seg.includes('市') || seg.includes('区') ||seg.includes('县') || seg.includes('路') || seg.includes('街') ||seg.includes('号') || seg.includes('栋') || seg.includes('单元'));if (addressSegments.length > 0) {return addressSegments.join(' ');}// Otherwise select the longest segmentreturn segments.reduce((longest, current) =>current.length > longest.length ? current : longest, '');}// Finally, return the entire textreturn cleanedText;}
}
在主文件中调用地址解析方法,修改Index.ets文件
import { AddressParse } from '../common/utils/AddressParse';...
//地址解析按钮
.onClick(() => {if (!this.ocrResult || !this.ocrResult.trim()) {this.uiContext.getPromptAction().showToast({ message: $r('app.string.empty_toast') });return;}this.consigneeInfos = AddressParse.extractInfo(this.ocrResult, this.consigneeInfos);})
5、保存地址
为保存按钮绑定事件,清空界面数据并提示保存结果。
修改Index.ets文件,封装clearConsigneeInfos模拟保存操作后清空数据。
...// 保存地址,清空内容clearConsigneeInfos() {for (const item of this.consigneeInfos) {item.value = '';}this.ocrResult = '';}...
//保存地址按钮
.onClick(() => {if (this.consigneeInfos[0].value && this.consigneeInfos[1].value && this.consigneeInfos[2].value) {this.uiContext.getPromptAction().showToast({ message: '保存成功' });this.clearConsigneeInfos();}})
至此,功能完成。
《鸿蒙应用开发从入门到项目实战》系列文章持续更新中,欢迎关注!

)


采用量子相位估计(QPE)方法,增强量子神经网络训练)


-缓存菜品和缓存套餐功能-记录实战教程、问题的解决方法以及完整代码)


)

