ʕ • ᴥ • ʔ
づ♡ど
🎉 欢迎点赞支持🎉

个人主页:励志不掉头发的内向程序员;
专栏主页:C++语言;
文章目录
前言
一、序列式容器和关联式容器
二、set 系列的使用
2.1、set 和 multiset 参考文档
2.2、set 类的介绍
2.3、set 的构造和迭代器
2.4、set 的增删查
2.5、find 和 erase 使用样例
2.6、multiset 和 set 的差异
三、map 系列的使用
3.1、map 和 multimap 参考文档
3.2、map 类的介绍
3.3、pair 类型介绍
3.4、map 的构造和迭代器
3.5、map 的增删查
3.6、map 的数据修改
3.7、map 的迭代器和 [ ] 功能样例
3.8、multimap 和 map 的差异
总结
前言
本章节我们讲解 map/set 这两个容器,它和我们之前学习的容器不太一样,要比我们之前学习的内容复杂的多,它的底层的大致框架就是我们上一章节的二叉搜索树,所以学习本章节前希望大家对上一章的学习能够充分掌握,这样我们学习本章节时就会比较轻松啦,接下来我们一起看看吧。

一、序列式容器和关联式容器
前面我们已经接触过了 STL 中的部分容器如:string、vector、list、deque 等,这些容器我们统称为序列容器,因为逻辑结构为线性序列的数据结构,两个位置存储的值之间一般没有紧密的关联关系,比如交换一下,它依旧是序列式容器。顺序容器中的元素是按它们在容器中的存储位置来按顺序保存和访问的。
关联式容器也是用来存储数据的,与序列式容器不同的是,关联式容器的逻辑结构通常是非线性结构,两个位置有紧密的关联关系,交换一下,他的存储结构就被破坏了。顺序容器中的元素是按关键字来保存和访问的。关联式容器有 map/set 系列和 unordered_map/unordered_set 系列。
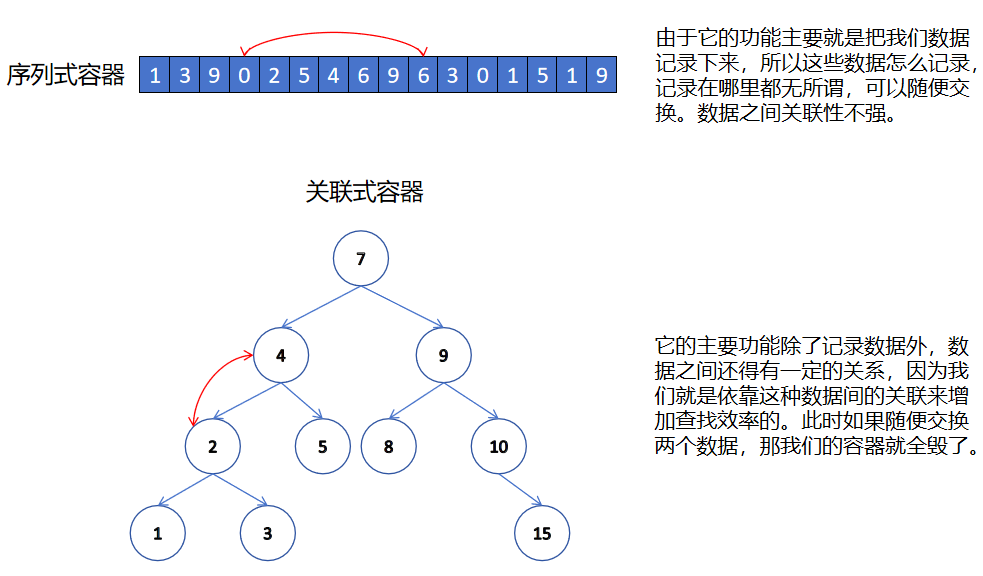
本章节所讲解的 map 和 set 底层是红黑树,红黑树是一颗平衡二叉搜索树(我们上一章节讲了二叉搜索树,明白了它的弊端,所以红黑树就是用来解决这种弊端的一种方法,后面会讲)。set 是 key 搜索场景的结构,map 是 key/value 搜索场景的结构。
二、set 系列的使用
2.1、set 和 multiset 参考文档
我们大家可以打开参考文档查看:<set> - C++ Reference
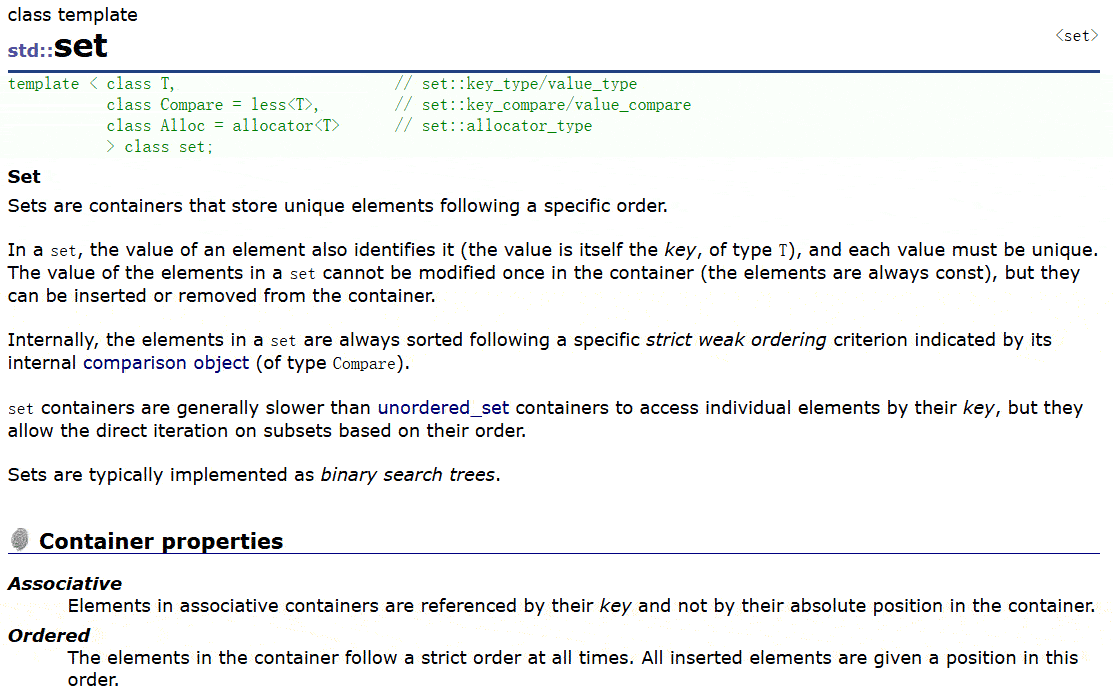
2.2、set 类的介绍
set 的声明如下,T 就是 set 底层关键字的类型

我们 set 就像优先级队列一样可以比较大小,我们上一章节也有说 set 的插入逻辑。set 默认要求 T 支持小于比较,如果不支持或者想按自己的需求走可以自行实现仿函数传给第二个模板参数。
set 底层存储数据的内存是从空间配置器中申请的,如果需要可以自己实现内存池,传给第三个参数。一般情况下我们都不需要传后两个模板参数。
set 底层是用红黑树实现,增删查的效率是 O(logN),迭代器遍历是走的搜索树的中序,所以是有序的。
2.3、set 的构造和迭代器
set 构造我们关注以下几个接口即可。
1、无参的默认构造:

set<int> st1;2、迭代器区间构造

vector<int> v({ 1, 2, 3, 4, 5, 6, 7, 8, 9, 0 });
set<int> st2(v.begin() + 1, v.end() - 2);
3、拷贝构造
![]()
set<int> st3(st2);4、列表构造(C++11 后才支持)
set<int> st4({ 10, 11, 12, 13, 14, 15 });set 支持正向和反向迭代遍历,遍历默认按照升序顺序,因为底层是二叉搜索树,迭代器遍历走的中序;支持迭代器就意味着支持范围 for,set 的 iterator 和 const_iterator 都不支持迭代器修改数据,修改关键字数据,破坏了底层搜索树的结构。
set<int>::iterator it = st2.begin();
set<int>::reverse_iterator rit = st4.rbegin();while (it != st2.end())
{cout << *it << " ";it++;
}cout << endl;while (rit != st4.rend())
{cout << *rit << " ";rit++;
}cout << endl;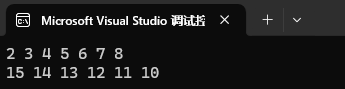
也是支持范围 for 的。
for (auto e : st3)
{cout << e << " ";
}
cout << endl;
2.4、set 的增删查
set 的增删查关注以下几个接口即可:
增:
单个数据插入,如果已经存在则插入失败。
![]()
这里的 value_type 其实就是把 T 封装一下。
set<int> st1;
st1.insert(1);
st1.insert(2);
st1.insert(2);
st1.insert(4);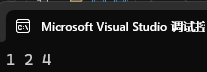
迭代器区间插入,已经在容器中存在的值不会插入。
![]()
vector<int> v({ 1, 2, 3, 4, 5, 6, 7, 8, 9 });
set<int> st1({ 1, 2, 3 ,4 });
st1.insert(v.begin(), v.end());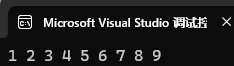
列表插入,已经在容器中存在的值不会插入。
![]()
set<int> st1({ 1, 2, 3 ,4 });
st1.insert({3, 4, 5, 6, 7, 8});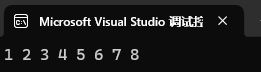
查:
查找 val,返回 val 所在的迭代器,没有找到返回 end()。
![]()
set<int> st1({ 1, 2, 3, 4, 5, 6, 7, 8, 9 });auto it = st1.find(4);
cout << *it << endl;
// 找不到就返回 end()
it = st1.find(0);
cout << *(--it) << endl;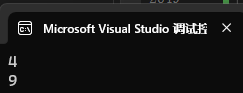
查找 val,返回 val 的个数(我们虽然 set 不能保存多个相同的数据,但是 multiset 则可以保存,这个接口主要就是给 multiset 使用的)。
![]()
set<int> st1({ 1, 2, 3, 4, 5, 6, 7, 8, 9 });cout << st1.count(2) << endl;
cout << st1.count(0) << endl;
删:
删除一个迭代器位置的值。
![]()
set<int> st1({ 1, 2, 3, 4, 5, 6, 7, 8, 9 });
set<int>::iterator it = st1.begin();
it++;
it++;
it++;st1.erase(it);for (auto e : st1)
{cout << e << " ";
}
cout << endl;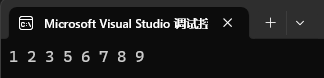
删除 val,val 不存在返回 0,存在返回 1
![]()
set<int> st1({ 1, 2, 3, 4, 5, 6, 7, 8, 9 });cout << st1.erase(5) << endl;
cout << st1.erase(100) << endl;for (auto e : st1)
{cout << e << " ";
}
cout << endl;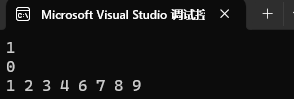
删除一段迭代器区间的值。
![]()
set<int> st1({ 1, 2, 3, 4, 5, 6, 7, 8, 9 });st1.erase(++st1.begin(), --st1.end());for (auto e : st1)
{cout << e << " ";
}
cout << endl;
我们的删除方式和我们上一章节讲解的二叉搜索树一样的删除方式,所以有可能直接删除销毁,会导致我们的迭代器指向野指针,也有可能是交换,此时迭代器指向的内容变了,所以我们认为迭代器失效了。
我们的查询除了 find 和 count 还有两个之前没有讲过的函数 lower_bound 和 upper_bound。
lower_bound 的作用是返回 >= val 位置的迭代器。
![]()
set<int> st1({ 1, 2, 3, 4, 5, 6, 7, 8, 9 });set<int>::iterator it = st1.lower_bound(4);while (it != st1.end())
{cout << *it << " ";++it;
}cout << endl;
upper_bound 的作用是返回 > val 位置的迭代器。
![]()
set<int> st1({ 1, 2, 3, 4, 5, 6, 7, 8, 9 });set<int>::iterator it = st1.upper_bound(4);while (it != st1.end())
{cout << *it << " ";++it;
}cout << endl;
2.5、find 和 erase 使用样例
由于我们的 set 的 find 接口返回的是一个迭代器,而 set 的 erase 支持迭代器删除,所以我们就可以使用 find 去查找我们想要删除的值,然后调用 erase 删除。
int main()
{set<int> s = { 4,2,7,2,8,5,9 };int x;// 直接查找在利⽤迭代器删除xcin >> x;auto pos = s.find(x);if (pos != s.end()){s.erase(pos);}else{cout << x << "不存在!" << endl;}for (auto e : s){cout << e << " ";}cout << endl;return 0;
}
2.6、multiset 和 set 的差异
multiset 和 set 使用基本完全类似,主要区别点在于 multiset 支持值冗余,那么 insert/find/count/erase 都围绕着支持值冗余有所差异。
int main()
{// 相⽐set不同的是,multiset是排序,但是不去重multiset<int> s = { 4,2,7,2,4,8,4,5,4,9 };auto it = s.begin();while (it != s.end()){cout << *it << " ";++it;}cout << endl;// 相⽐set不同的是,x可能会存在多个,find查找中序的第⼀个int x;cin >> x;auto pos = s.find(x);while (pos != s.end() && *pos == x){cout << *pos << " ";++pos;}cout << endl;// 相⽐set不同的是,count会返回x的实际个数cout << s.count(x) << endl;// 相⽐set不同的是,erase给值时会删除所有的xs.erase(x);for (auto e : s){cout << e << " ";}cout << endl;return 0;
}
三、map 系列的使用
3.1、map 和 multimap 参考文档
我们大家可以打开参考文档查看:map - C++ Reference;
3.2、map 类的介绍
map 的声明如下,Key 就是 set 底层关键字的类型,T 就是 map 底层 value 的类型。

set 默认要求 Key 支持小于比较,如果不支持或者需要的话可以自行实现仿函数传给第二个模板参数,map 底层存储数据的内存是从空间配置器申请的。一般情况下,我们都不需要传后两个模板参数。map 底层是用红黑树实现的,增删查改的效率是 O(logN),迭代器遍历是走的中序,所以是按 key 有序顺序遍历的。
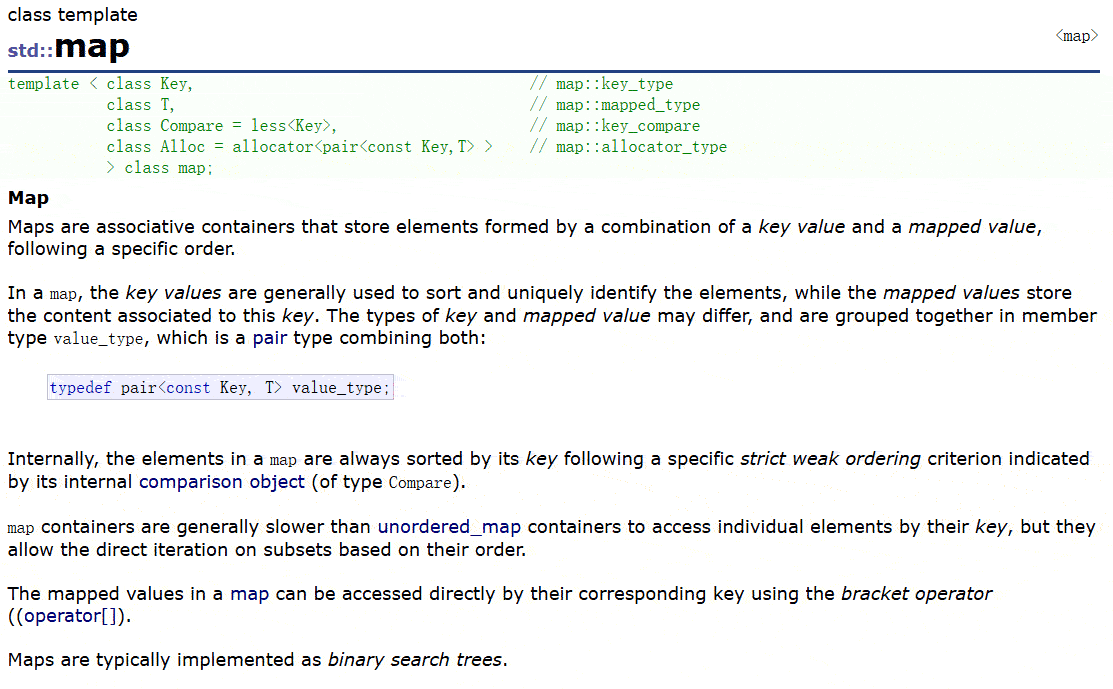
3.3、pair 类型介绍
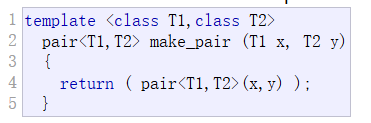
![]()
这里的 pair 是一个类模板,它里面有两个成员,分别是 first 和 second。

我们如果把 key 传给 T1 ,value 传给 T2 的话,那 first 就对应 key,second 就对应 value。
我们可以来看看它的底层实现。
typedef pair<const Key, T> value_type;template <class T1, class T2>
struct pair
{typedef T1 first_type;typedef T2 second_type;T1 first;T2 second;pair() : first(T1()), second(T2()){}pair(const T1& a, const T2& b) : first(a), second(b){}template<class U, class V>pair(const pair<U, V>& pr) : first(pr.first), second(pr.second){}
};template <class T1, class T2>
inline pair<T1, T2> make_pair(T1 x, T2 y)
{return (pair<T1, T2>(x, y));
}
map 底层的红黑树结点中的数据,使用 pair<Key, T> 存储键值对数据。

我们上一章节实现 key/value 是创建了两个值,这里只不过是把这两个值放在一个结构里面封装起来了罢了。
3.4、map 的构造和迭代器
map 的构造我们关注以下几个接口即可。
1、无参默认构造

map<int, int> mp1;2、迭代器区间构造

vector<pair<int, int>> v({ {1,1}, {2, 2}, {3, 3}, {4, 4}, {5, 5} });
map<int, int> mp2(v.begin() + 1, v.end() - 1);
3、拷贝构造
![]()
map<int, int> mp3(mp2);4、列表构造

map<int, int> mp4({ {10, 10}, {11, 11}, {12, 12}, {13, 13}, {14, 14} });map 的支持正向和反向迭代遍历,遍历默认按 key 的升序顺序,因为底层是⼆叉搜索树,迭代器遍历⾛的中序;⽀持迭代器就意味着⽀持范围 for,map 支持修改 value 数据,不⽀持修改 key 数据,修改关键字数据,破坏了底层搜索树的结构。
map<int, int>::iterator it = mp2.begin();
map<int, int>::reverse_iterator rit = mp2.rbegin();while (it != mp2.end())
{cout << it->first << " " << it->second << endl;++it;
}
cout << endl;while (rit != mp2.rend())
{cout << it->first << " " << it->second << endl;++it;
}
cout << endl;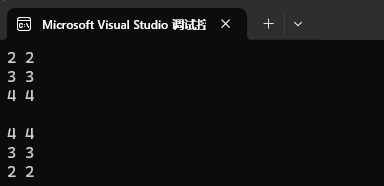
我们这里因为 map 中存储的是一个 pair 结构,而 pair 没有重载流输入和流输出,所以此时我们就得自己去实现我们的输入和输出,而 pair 中就两个数据,first 和 second。我们可以使用
(*it).first、(*it).second,或者直接使用箭头即可。
当然也是支持范围 for 的。
for (auto e : mp4)
{cout << e.first << " " << e.second << endl;
}cout << endl;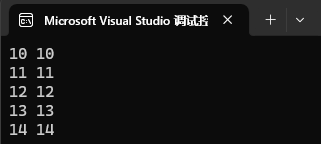
也可以试着修改 value。
map<int, int>::iterator it = mp2.begin();while (it != mp2.end())
{cout << it->first << " " << it->second << endl;++it;
}
cout << endl;it = mp2.begin();while (it != mp2.end())
{++it->second;cout << it->first << " " << it->second << endl;++it;
}
cout << endl;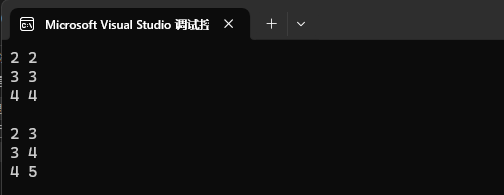
3.5、map 的增删查
map 的增删查关注以下几个接口即可:
map 增的接口,插入的 pair 键值对数据,跟 set 所有不同,但是查和删的接口只用关键字 key 跟set 是完全类似的,不过 find 返回 iterator,不仅仅可以确认 key 在不在,还找到 key 映射的 value,同时通过迭代还可以修改 value。
增:
1、单个数据插入,如果已经 key 存在则插⼊失败,key 存在相等 value 不相等也会插⼊失败。
![]()
map<int, int> mp1;
pair<int, int> kv1 = { 3, 2 };
pair<int, int> kv2 = { 4, 1 };mp1.insert(pair<int, int>( 1, 1 ));
mp1.insert(pair<int, int>( 2, 1 ));
mp1.insert(pair<int, int>( 2, 1 ));
mp1.insert(pair<int, int>( 3, 1 ));
mp1.insert(kv1);
mp1.insert(kv2);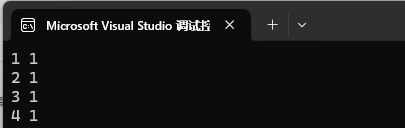
我们的 pair 就和对象一样直接调用即可。只输出了 4 个值,只要 key 相同就只会插入第一次出现的那个 key/value。但是我们这样调用十分的麻烦,不是特别方便,所以我们引入了一个make_pair。

有了这个类型,我们可以直接把 key 和 value 传给 map, 它会自动推导类型,推导成功后构造一个 pair 进行返回。
map<int, int> mp1;
mp1.insert(make_pair(1, 1));
mp1.insert(make_pair(2, 1));
mp1.insert(make_pair(2, 1));
mp1.insert(make_pair(3, 1));
mp1.insert(make_pair(3, 2));
mp1.insert(make_pair(4, 1));
C++11 后支持多参数的隐式类型转换,此时我们便支持这种方式了。
map<int, int> mp1;
mp1.insert({ 1, 1 });
mp1.insert({ 2, 1 });
mp1.insert({ 2, 1 });
mp1.insert({ 3, 1 });
mp1.insert({ 3, 2 });
mp1.insert({ 4, 1 });
2、列表插入,已经在容器中存在的值不会插入。
![]()
map<int, int> mp1;
mp1.insert({ {1, 2}, {1, 3}, {2, 3}, {2, 3}, {3, 3}, {4, 3} });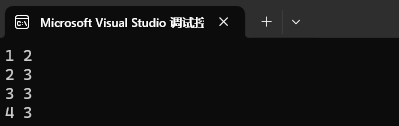
3、迭代器区间插入,已经在容器中存在的值不会插入。
![]()
map<int, int> mp1;
mp1.insert({ {1, 2}, {1, 3}, {2, 3}, {2, 3}, {3, 3}, {4, 3} });
vector<pair<int, int>> v({ {1, 3}, {10, 2}, {3, 7}, {5, 10}, {100, 1} });
mp1.insert(v.begin(), v.end());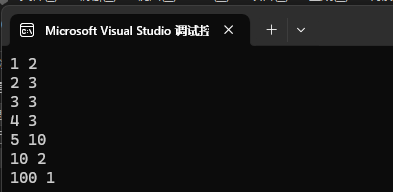
查:
1、查找k,返回k所在的迭代器,没有找到返回end()。
![]()
map<int, int> mp1;
mp1.insert({ {1, 2}, {2, 3}, {3, 4}, {4, 5}, {5, 6}, {6, 7} });auto it1 = mp1.find(2);
cout << it1->first << " " << it1->second << endl;
auto it2 = mp1.find(9);
it2--;
cout << it2->first << " " << it2->second << endl;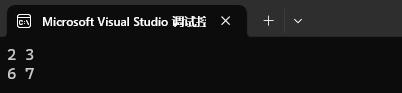
2、查找k,返回k的个数。
![]()
map<int, int> mp1;
mp1.insert({ {1, 2}, {2, 3}, {3, 4}, {4, 5}, {5, 6}, {6, 7} });auto it1 = mp1.count(2);
cout << it1 << endl;
auto it2 = mp1.count(9);
cout << it2 << endl;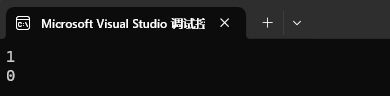
删:
1、删除⼀个迭代器位置的值。
![]()
map<int, int> mp1;
mp1.insert({ {1, 2}, {2, 3}, {3, 4}, {4, 5}, {5, 6}, {6, 7} });map<int, int>::iterator it = mp1.begin();
it++;
it++;
it++;
mp1.erase(it);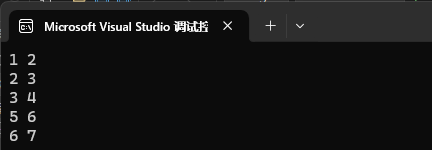
2、删除k,k存在返回0,存在返回1。
![]()
map<int, int> mp1;
mp1.insert({ {1, 2}, {2, 3}, {3, 4}, {4, 5}, {5, 6}, {6, 7} });cout << mp1.erase(2) << endl;
cout << mp1.erase(100) << endl;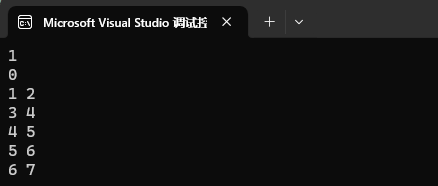
3、删除⼀段迭代器区间的值。
![]()
map<int, int> mp1;
mp1.insert({ {1, 2}, {2, 3}, {3, 4}, {4, 5}, {5, 6}, {6, 7} });mp1.erase(++mp1.begin(), --mp1.end());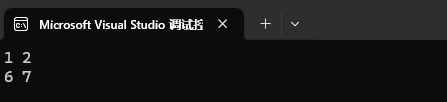
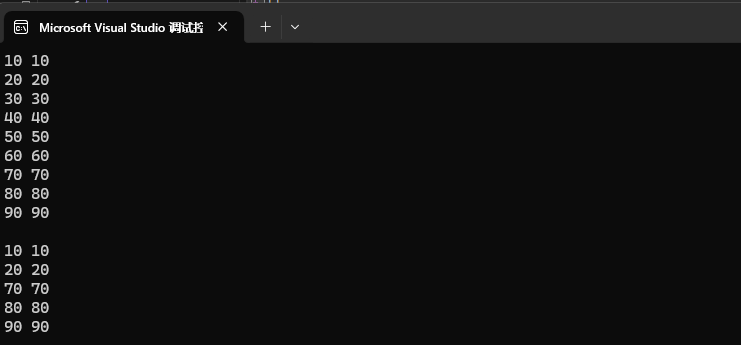
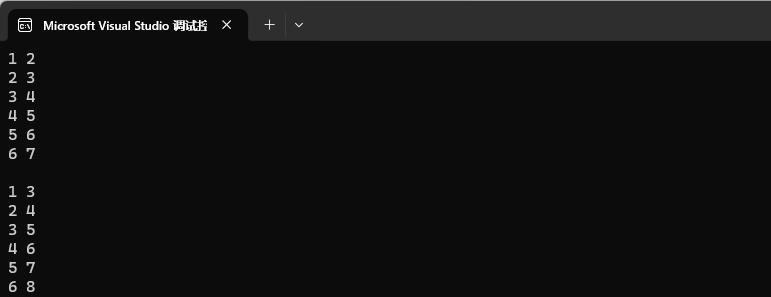
我们 map 也有 lower_bound 和 upper_bound 这两个接口。和我们的 set 的功能是一样的,也是比较 key,查找大于或大于等于 key 的所有值。


int main()
{map<int, int> mp;for (int i = 1; i < 10; i++)mp.insert({ i * 10, 1 }); // 10 20 30 40 50 60 70 80 90for (auto e : mp){cout << e.first << " " << e.first << endl;}cout << endl;// 实现查找到的[itlow,itup)包含[30, 60]区间// 返回 >= 30auto itlow = mp.lower_bound(30);// 返回 > 60auto itup = mp.upper_bound(60);// 删除这段区间的值mp.erase(itlow, itup);for (auto e : mp){cout << e.first << " " << e.first << endl;}cout << endl;return 0;
}
3.6、map 的数据修改
- 前⾯我提到 map 支持修改 mapped_type 数据,不支持修改 key 数据,修改关键字数据,破坏了底层搜索树的结构。
- map 第⼀个支持修改的方式是通过迭代器,迭代器遍历时或者 find 返回 key 所在的 iterator 修改,map 还有⼀个⾮常重要的修改接口 operator[ ],但是 operator[ ] 不仅仅支持修改,还⽀持插⼊数据和查找数据,所以他是⼀个多功能复合接口。
- 需要注意从内部实现⻆度,map 这⾥把我们传统说的 value 值,给的是 T 类型,typedef 为mapped_type。⽽ value_type 是红⿊树结点中存储的 pair 键值对值。⽇常使⽤我们还是习惯将这⾥的 T 映射值叫做 value。
我们迭代器修改只能对 pair 的第二个值 value 进行修改,不能对第一个值进行修改。
int main()
{map<int, int> mp1;mp1.insert({ {1, 2}, {2, 3}, {3, 4}, {4, 5}, {5, 6}, {6, 7} });for (auto e : mp1){cout << e.first << " " << e.second << endl;}cout << endl;map<int, int>::iterator it = mp1.begin();while (it != mp1.end()){(it->second)++;cout << it->first << " " << it->second << endl;it++;}return 0;
}
我们 operator[ ] 函数,如果 [ ] 中的 key 值存在的话,那就是修改。
map<int, int> mp1;
mp1.insert({ {1, 2}, {2, 3}, {3, 4}, {4, 5}, {5, 6}, {6, 7} });mp1[2] = 200;
mp1[3] = 300;
mp1[4] = 400;
mp1[5] = 500;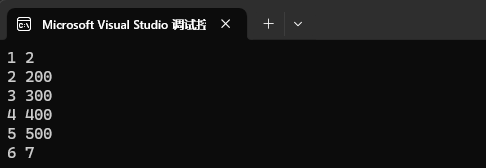
如果 [ ] 中的 key 值不存在的话,那就是插入。
map<int, int> mp1;
mp1.insert({ {1, 2}, {2, 3}, {3, 4}, {4, 5}, {5, 6}, {6, 7} });mp1[10] = 2;
mp1[20] = 3;
mp1[30] = 4;
mp1[40] = 5;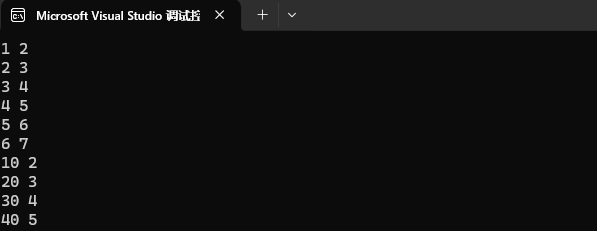
3.7、map 的迭代器和 [ ] 功能样例
1、
using namespace std;
int main()
{map<string, string> dict;dict.insert(make_pair("sort", "排序"));// key不存在->插⼊ {"insert", string()}dict["insert"];// 插⼊+修改dict["left"] = "左边";// 修改dict["left"] = "左边、剩余";// key存在->查找cout << dict["left"] << endl;return 0;
}
2、
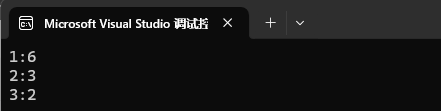
int main()
{// 利⽤find和iterator修改功能,统计数字出现的次数string arr[] = { "1", "2", "1", "2", "1", "1", "2","1", "3", "1", "3" };map<string, int> countmap;for (const auto& str : arr){// 先查找数字在不在map中// 1、不在,说明数字第⼀次出现,则插⼊{数字, 1}// 2、在,则查找到的节点中数字对应的次数++auto ret = countmap.find(str);if (ret == countmap.end()){countmap.insert({ str, 1 });}else{ret->second++;}}for (const auto& e : countmap){cout << e.first << ":" << e.second << endl;}cout << endl;return 0;
}
3.8、multimap 和 map 的差异
multimap 和 map 的使用基本完全类似,主要区别点在于 multimap 支持关键值 key 冗余,那insert/find/count/erase 都围绕着支持关键值 key 冗余有所差异,这⾥跟 set 和 multiset 完全⼀样,比如 find 时,有多个 key,返回中序第⼀个。其次就是 multimap 不支持 [ ],因为支持 key 冗余, [ ] 就只能支持插入了,不能支持修改。
总结
以上便是 map/set 的主要内容学习,在看的时候可以和上一章节的内容进行结合,因为 map/set 的底层的主体就是二叉搜索树,我们可以通过对上一章节的了解来更加深刻的理解我们 map/set 的各种接口的实现。下一章节将会讲解我们的 map/set 的模拟实现,我们下一章节再见。
🎇坚持到这里已经很厉害啦,辛苦啦🎇
ʕ • ᴥ • ʔ
づ♡ど


)
从语言模型到通用智能体)


刀具分配问题详解)


哨兵模式与集群模式有何区别?)


