项目中使用的设计模式
- 请列举几个项目中常用的设计模式
- 什么是设计模式,在项目中使用了那些设计模式
- 动态代理模式
- JDK动态代理
- CGLIB动态代理
- 单例模式
- 懒汉式(非线程安全)
- 饿汉式
- 懒汉式(线程安全)
- 工厂模式
- 观察者模式
- 装饰器模式
请列举几个项目中常用的设计模式
单例模式(Singleton pattern)用于Runtime,Calendar和其他的一些类中。工厂模式(Factory pattern)被用于各种不可变的类如 Boolean,像Boolean.valueOf,观察者模式(Observer pattern)被用于 Swing 和很多的事件监听中。装饰器设计模式(Decorator design pattern)被用于多个 Java IO 类中。
什么是设计模式,在项目中使用了那些设计模式
设计模式是软件开发人员在软件开发过程中面临的一般问题的解决方案。这些解决方案是众多软件开发人员经过相当长的一段时间的试验和错误总结出来的。设计模式是代码可用性的延伸
设计模式分类:创建型模式,结构型模式,行为型模式
动态代理模式
代理模式分为静态代理与动态代理,静态代理不做过多解释(项目中不常用),动态代理分为JDK动态代理与CGLIB动态代理,Spring2.x之前使用的代理模式为JDK动态代理,但仍需要定义接口才能实现功能,有一定的局限性,因此在Spring2.x之后,采用了CGLIB动态代理技术。
JDK动态代理
/*** 接口*/
public interface Target {public String  execute();
}
/*** 实现类*/
public class TargetImpl implements Target {@Overridepublic String execute() {System.out.println("Target execute");return "execute";}
}
import java.lang.reflect.InvocationHandler;
import java.lang.reflect.Method;/*** 代理类*/
public class DynamicProxyHandler implements InvocationHandler {private Target target;public DynamicProxyHandler(Target target) {this.target = target;}@Overridepublic Object invoke(Object proxy, Method method, Object[] args) throws Throwable {System.out.println("======before======");Object result = method.invoke(target, args);System.out.println("======after======");return result;}
}
import java.lang.reflect.Proxy;/*** 测试类*/
public class DynamicProxyTest {public static void main(String[] args) {Target target = new TargetImpl();DynamicProxyHandler handler = new DynamicProxyHandler(target);Target proxy = (Target) Proxy.newProxyInstance(TargetImpl.class.getClassLoader(), TargetImpl.class.getInterfaces(), handler);String result = proxy.execute();System.out.println(result);}
}
输出结果为
======before======
Target execute
======after======
execute
CGLIB动态代理
CGLib采用了非常底层的字节码技术,也就是ASM 字节码操作框架,在运行时动态生成被代理类的子类字节码。该子类重写了父类(被代理类)的所有飞final方法。因此CGLIB的局限性也在于此,被代理类不能继承其他类或被final修饰的类。JDK动态代理与CGLib动态代理均是实现Spring AOP的基础。
/*** 目标类*/
public class Target {public String execute() {String message = "======test======";System.out.println(message);return message;}
}
import net.sf.cglib.proxy.MethodInterceptor;
import net.sf.cglib.proxy.MethodProxy;import java.lang.reflect.Method;/*** 通用代理类*/
public class MyMethodInterceptor implements MethodInterceptor {@Overridepublic Object intercept(Object o, Method method, Object[] objects, MethodProxy methodProxy) throws Throwable {System.out.println("======MethodInterceptor start======");// 使用invokeSuper而不是invoke,避免无限递归Object result = methodProxy.invokeSuper(o, objects);System.out.println("======MethodInterceptor end======");return result;}
}
import net.sf.cglib.proxy.Enhancer;/*** 测试类*/
public class CgLibTest {public static void main(String[] args) {System.out.println("***************");CgLibTest test = new CgLibTest();Target proxyTarget = (Target) test.createProxy(Target.class);String res = proxyTarget.execute();System.out.println(res);}public Object createProxy(Class targetClass) {Enhancer enhancer = new Enhancer();enhancer.setSuperclass(targetClass);enhancer.setCallback(new MyMethodInterceptor());return enhancer.create();}
}
输出结果为
***************
======MethodInterceptor start======
======test======
======MethodInterceptor end======
======test======
代理类的对象生成过程由Enhancer类实现,大概步骤如下:
- 生成代理类Class的二进制字节码;
- 通过Class。forName加载二进制字节码,生成Class对象;
- 通过反射机制获取实例构造,并初始代理类对象。
单例模式
单例模式是Java中最简单的设计模式之一。这种类型的设计模式属于创建型模式,它提供了一种创建对象的最佳方式。意图:保证一个类仅有一个实例,并提供一个访问它的全局访问点。主要解决:一个全局使用的类频繁的创建与销毁。单利模式主要分为懒汉与饿汉,他俩的区别在于创建对象的时机,一个是当你调用类的getInstance()方法时,才会初始化对象,而另一个在类初始化时,就会创建对象,他俩只会创建同一个对象。
懒汉式(非线程安全)
public class Singleton {private static Singleton instance;// 私有化构造方法private Singleton() {}// 提供一个对象,全局仅创建一次public static synchronized Singleton getInstance() {if (instance == null) {instance = new Singleton();}return instance;}
}
饿汉式
public class Singleton {private static Singleton instance = new Singleton();// 私有化构造方法private Singleton() {}public static Singleton getInstance() {return instance;}
}
懒汉式(线程安全)
public class Singleton {// 确保可见性与有序性private static volatile Singleton instance = null;// 构造方法私有化private Singleton() {}// 双重校验锁 + volatilepublic static Singleton getInstance(){if (instance == null) {synchronized (Singleton.class) {// 避免CPU切换到另一个线程创建对象,创建完再切换回来if (instance == null) {instance = new Singleton();}}}return instance;}
}
工厂模式
工厂模式是Java中最场景的设计模式之一。这种类型的设计模式属于创建者模式,它提供了一种创建对象的最佳方式。意图:定义一个创建对象的接口,让其子类自己决定实例化哪一个工厂类,工厂模式使其创建过程延迟到子类进行。主要解决:主要解决接口选择的问题。
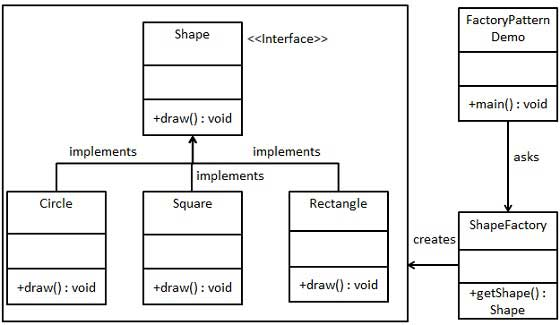
步骤1:创建一个接口
Shapa.java
public interface Shape {void draw();
}
步骤2:创建实现接口的实体类Rectangle.java、
public class Rectangle implements Shape {@Overridepublic void draw() {System.out.println("Inside Rectangle::draw() method");}
}
Square.java
public class Square implements Shape{@Overridepublic void draw() {System.out.println("Inside Square::draw() method.");}
}
Circle.java
public class Circle implements Shape {@Overridepublic void draw() {System.out.println("Inside Circle::draw() method.");}
}
步骤3:创建一个工厂,生成基于给定信息的实体类对象。
ShapeFactory.java
public class ShapeFactory {// 使用getShape() 方法获取形状类型的对象public Shape getShape(String shapeType) {if (shapeType == null) {return null;}shapeType = shapeType.toLowerCase(Locale.ROOT);switch (shapeType){case "circle":return new Circle();case "rectangle":return new Rectangle();case "square":return new Square();default: return null;}}
}
步骤4:使用该工厂,通过传递类型信息来获取实体类的对象。
FactoryPatternDemo.java
public class FactoryPatternDemo {public static void main(String[] args) {ShapeFactory shapeFactory = new ShapeFactory();// 获取Circle对象,并调用它的draw方法Shape shape1 = shapeFactory.getShape("CIRCLE");shape1.draw();// 获取Rectangle对象,并调用它的draw方法Shape shape2 = shapeFactory.getShape("RECTANGLE");shape2.draw();// 获取Square对象,并调用它的draw方法Shape shape3 = shapeFactory.getShape("SQUARE");shape3.draw();}
}
步骤5:验证输出结果
Inside Circle::draw() method.
Inside Rectangle::draw() method
Inside Square::draw() method.
观察者模式
观察者模式属于行为模式。当对象间存在一对多的关系时,则使用观察者模式。比如,当一个对象被修改时,则会自动通知它的依赖对象。意图:定义对象间的一种一对多的依赖关系,当一个对象的状态发生改变时,所有依赖于它的对象都会得到通知并被自动更新。主要解决:一个对象状态改变给其他对象通知的问题,而且要考虑到易用性和低耦合,保证高度的协作。
实现:观察者模式使用三个类Subject、Observer和Client。Subject对象带有绑定观察者到Client对象和从Client对象解绑观察者的方法。

步骤1:创建Subject类
Subject.java
public class Subject {private List<Observer> observers = new ArrayList<>();private int state;public int getState() {return state;}public void setState(int state){this.state = state;notifyAllObservers();}public void attach(Observer observer) {observers.add(observer);}public void notifyAllObservers() {for(Observer observer : observers) {observer.update();}}
}
步骤2:创建Observer类
Observer.java
public abstract class Observer {protected Subject subject;public abstract void update();
}
步骤3:创建实体观察者类:
BinaryObserver.java
public class BinaryObserver extends Observer{public BinaryObserver(Subject subject){this.subject = subject;this.subject.attach(this);}@Overridepublic void update() {System.out.println("Binary String" + Integer.toBinaryString(subject.getState()));}
}
OctalObserver.java
public class OctalObserver extends Observer{public OctalObserver(Subject subject){this.subject = subject; this.subject.attach(this);}@Overridepublic void update() {System.out.println("Octal String: " + Integer.toOctalString(subject.getState()));}
}
HexaObserver.java
public class HexaObserver extends Observer{public HexaObserver(Subject subject){this.subject = subject; this.subject.attach(this);}@Overridepublic void update() {System.out.println("Hex String: " + Integer.toHexString(subject.getState()).toUpperCase());}
}
步骤4:使用SUbject和实体类观察者对象
ObserverPatternDemo.java
public class ObserverPatternDemo {public static void main(String[] args) {Subject subject = new Subject();new BinaryObserver(subject);new OctalObserver(subject);new HexaObserver(subject);System.out.println("First state change: 15");subject.setState(15);System.out.println("------------");System.out.println("Second state change: 10");subject.setState(10);}
}
步骤5:验证结果
First state change: 15
Binary String: 1111
Octal String: 17
Hex String: F
------------
Second state change: 10
Binary String: 1010
Octal String: 12
Hex String: A
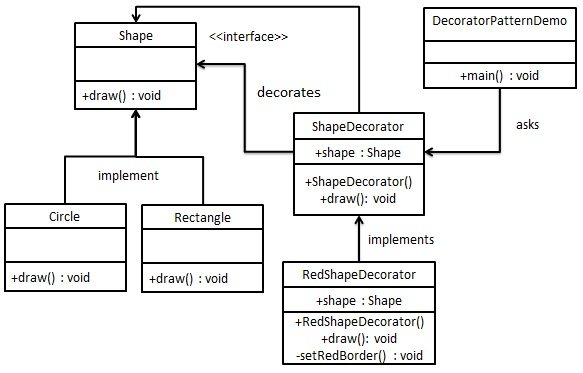
装饰器模式
装饰器模式允许向一个现有的对象添加新功能,同时又不改变其结构。这种类型的设计模式属于结构型模式,它是作为现有的一个类包装。意图:动态代给一个对象添加一些额外的职责。就增加功能来说,装饰器模式相比生成子类更为灵活。主要解决:一般的,我们为了拓展一个类经常使用继承方式实现,由于继承为类引入静态特征,并且随着扩展功能的增多,子类会很膨胀。
实现:我们将创建一个Shape接口和实现Shape接口的实体类。然后我们创建一个实现了Shape接口的抽象装饰类ShapeDecorator,并且把Shape对象作为它的实例变量。
RedShapeDecorator是实现了ShapeDecorator的实体类;
DecoratorPatternDemo是我们的演示类使用RedShapeDecorator来装饰Shape对象。
步骤1:创建一个接口:
Shape.java
public interface Shape {void draw();
}
步骤2:创建实现接口的实体类
Rectangle.java
public class Rectangle implements Shape{@Overridepublic void draw() {System.out.println("Shape: Rectangle");}
}
Circle.java
public class Circle implements Shape{@Overridepublic void draw() {System.out.println("Shape Circle");}
}
步骤3:创建实现了Shape接口的抽象装饰类
ShapeDecorator.java
public abstract class ShapeDecorator implements Shape{protected Shape decoratorShape;public ShapeDecorator(Shape decoratorShape){this.decoratorShape = decoratorShape;}@Overridepublic void draw(){decoratorShape.draw();}
}
步骤4:创建扩展了ShapeDecorator类的实体装饰类
RedShapeDecorator.java
public class RedShapeDecorator extends ShapeDecorator{public RedShapeDecorator(Shape decoratorShape) {super(decoratorShape);}@Overridepublic void draw(){decoratorShape.draw();setRedBorder(decoratorShape);}private void setRedBorder(Shape decoratorShape){System.out.println("Border Color: Red");}
}
步骤5:使用RedShape来装饰Shape对象
DecoratorPatternDemo.java
public class DecoratorPatternDemo {public static void main(String[] args) {Shape circle = new Circle();Shape redCircle = new RedShapeDecorator(new Circle());Shape redRectangle = new RedShapeDecorator(new Rectangle());System.out.println("Circle with normal border");circle.draw();System.out.println("\nCircle of red border");redCircle.draw();System.out.println("\nRectangle of red border");redRectangle.draw();}
}
步骤6:验证结果
Circle with normal border
Shape CircleCircle of red border
Shape Circle
Border Color: RedRectangle of red border
Shape: Rectangle
Border Color: Red

信息)


)

基于PHP和Vue的网上购物平台)

—— 表单)
提升特征多样性,同时减少参数和计算量)

)
)
