1 原理
tflite就是Tensorflow的轻量化模型,核心处理就是量化和剪枝。不过这部分目前是在Tensorflow中封装了,所以这里也不会去看细节,主要就是看看原理和使用方法。
量化Quantization,其实就是把原来的float32换成int8。这样一个是减少了模型中的参数大小,理论上缩减到之前的1/4,另外也加快了运算。换算就是把之前的浮点数映射到int8的256个格子里面。
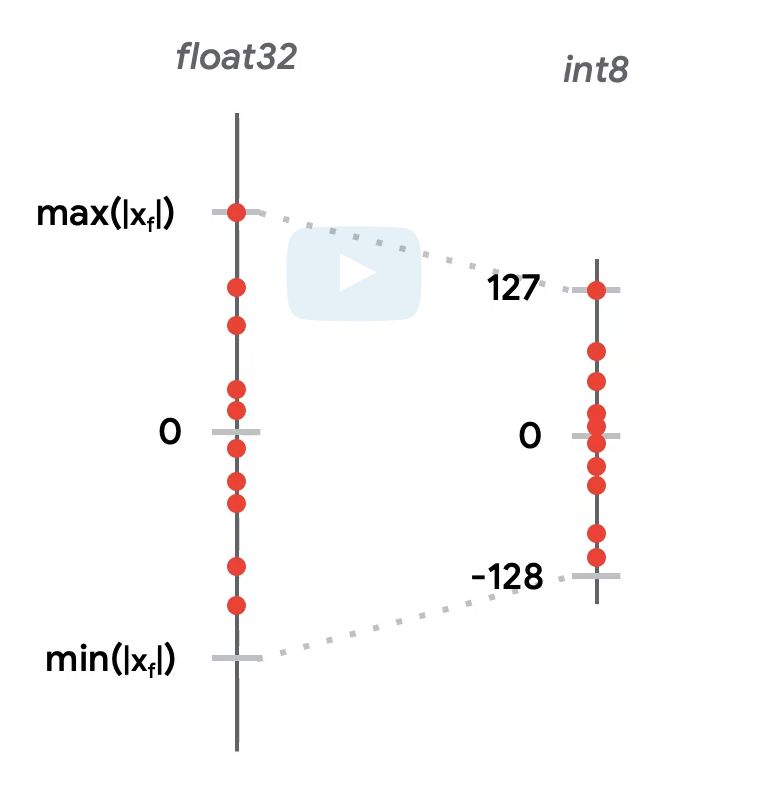
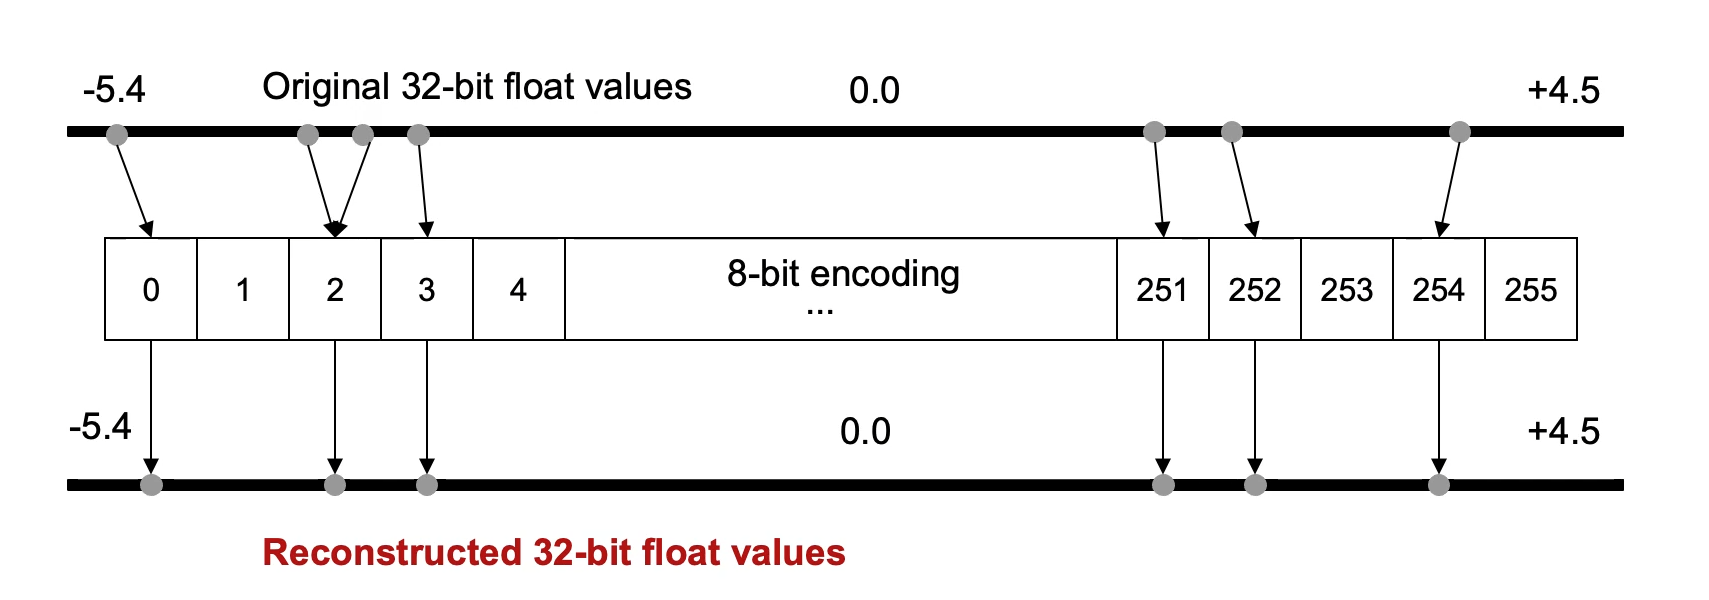
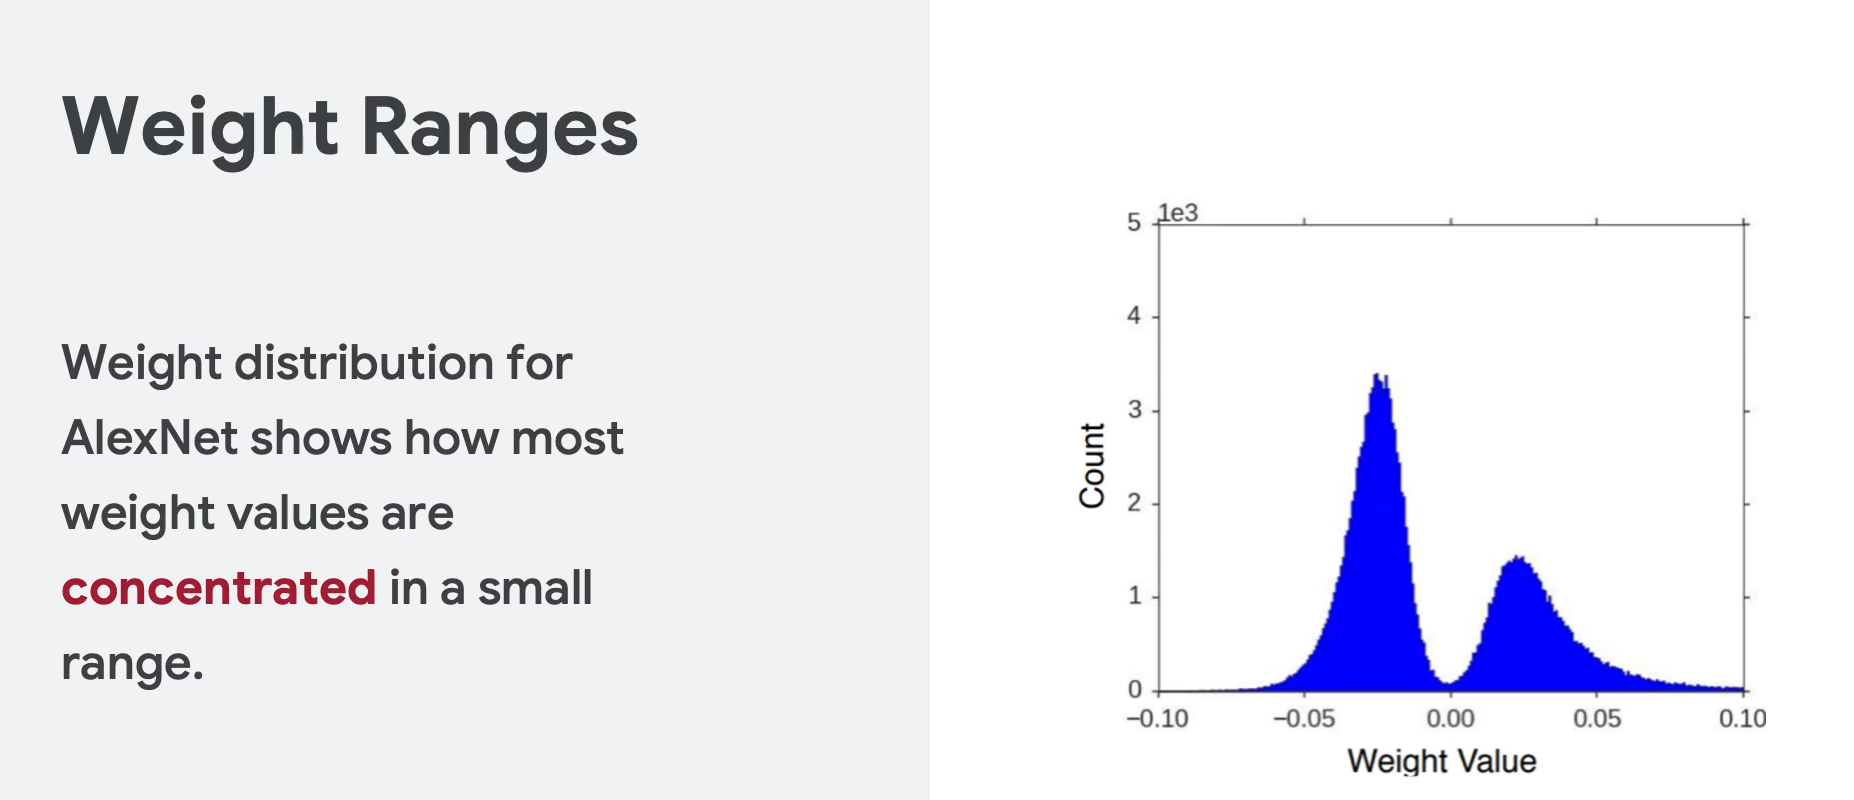
原因是根据分析,大部分的权重都分布在一些相对狭窄的区域,也就是说很多区域其实是浪费了。所以可以压缩,这也是压缩的理论基础。
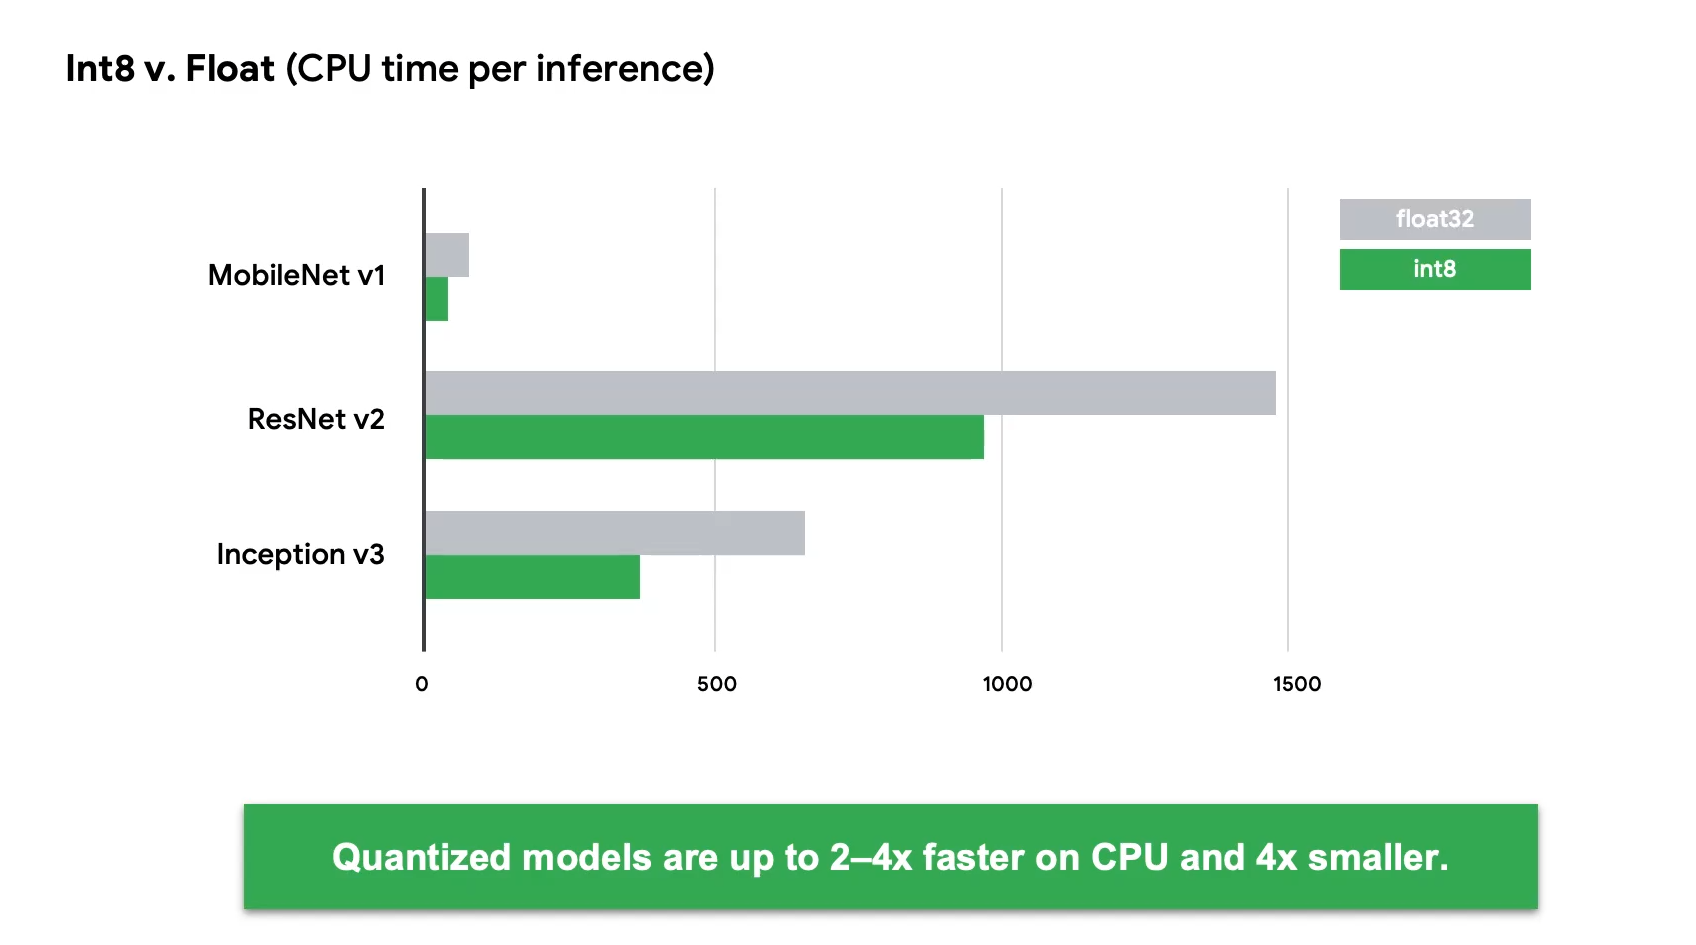
测试后,量化的数据运行速度基本能达到之前的1/2甚至1/4。
剪枝pruning,则是去掉一些不必要的神经元。这样可以减少体积和加快推理速度,具体怎么剪的,目前不知道。。。

2 练习
2.1 线性回归
练习:https://colab.research.google.com/github/tinyMLx/colabs/blob/master/3-3-4-TFLiteConverter.ipynb
整理的代码
import tensorflow as tf
if tf.__version__ != "2.14.0":print(f"Current TensorFlow version: {tf.__version__}, switching to 2.14.0")# Uninstall current TensorFlow version!pip uninstall -y tensorflow# Install TensorFlow 2.10!pip install numpy==1.26 --force-reinstall!pip install tensorflow==2.14.0# After installation, restart runtimeprint("TensorFlow 2.14.0 installed.")print("Please click on the Runtime > Restart session and run all.")
else:print("TensorFlow 2.14.0 is already installed.")import tensorflow as tf
import numpy as np
from tensorflow.keras import Sequential
from tensorflow.keras.layers import Densel0 = Dense(units=1, input_shape=[1])
model = Sequential([l0])
model.compile(optimizer='sgd', loss='mean_squared_error')xs = np.array([-1.0, 0.0, 1.0, 2.0, 3.0, 4.0], dtype=float)
ys = np.array([-3.0, -1.0, 1.0, 3.0, 5.0, 7.0], dtype=float)model.fit(xs, ys, epochs=500)print(model.predict(np.array([10.0])))
print("Here is what I learned: {}".format(l0.get_weights()))export_dir = 'saved_model/1'
tf.saved_model.save(model, export_dir)# Convert the model.
converter = tf.lite.TFLiteConverter.from_saved_model(export_dir)
tflite_model = converter.convert()import pathlib
tflite_model_file = pathlib.Path('model.tflite')
tflite_model_file.write_bytes(tflite_model)# Load TFLite model and allocate tensors.
interpreter = tf.lite.Interpreter(model_content=tflite_model)
interpreter.allocate_tensors()# Get input and output tensors.
input_details = interpreter.get_input_details()
output_details = interpreter.get_output_details()
print(input_details)
print(output_details)to_predict = np.array([[10.0]], dtype=np.float32)
print(to_predict)
interpreter.set_tensor(input_details[0]['index'], to_predict)
interpreter.invoke()
tflite_results = interpreter.get_tensor(output_details[0]['index'])
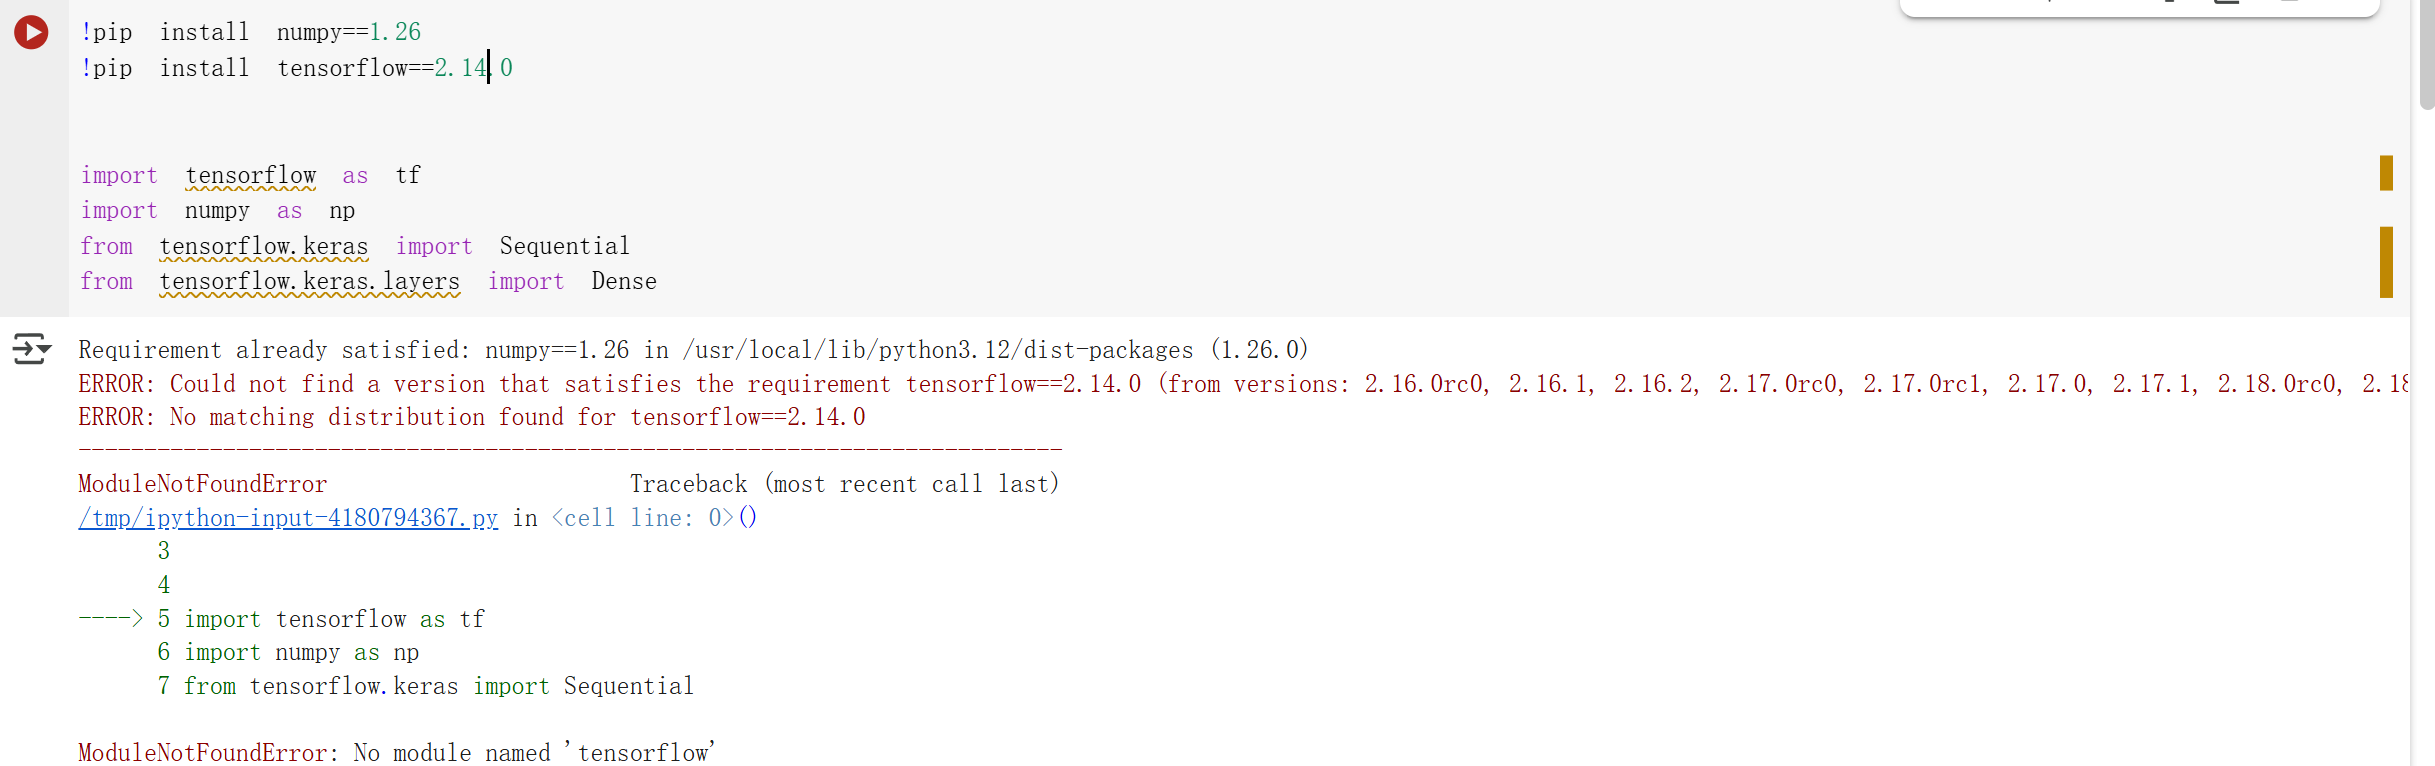
print(tflite_results)因为里面指定了版本是2.14.0,但是Colab上面已经没有2.14.0了。后面改成2.16倒是可以安装,但是会在后面报错,所以这次只看代码了。
核心就是三个地方。
转换
# Convert the model.
converter = tf.lite.TFLiteConverter.from_saved_model(export_dir)
tflite_model = converter.convert()
加载
interpreter = tf.lite.Interpreter(model_content=tflite_model)
interpreter.allocate_tensors()
推理
interpreter.set_tensor(input_details[0]['index'], to_predict)
interpreter.invoke()
2.2 猫狗识别
练习代码是在:https://colab.research.google.com/github/tinyMLx/colabs/blob/master/3-3-7-RunningTFLiteModels.ipynb
本来是想运行的,但是和上面一样,Google的colab用着确实有点问题,更换了库之后,死活也无法重启colab。所以只能手搓代码学习了。。。
代码整理:
tf_version = "2.14.0"
hub_version = "0.15.0"
datasets_version = "4.6.0"
numpy_version = "1.26.4"
protobuf_version = "3.20.3"import tensorflow as tf
import numpy as nptry:import tensorflow_hub as hubimport tensorflow_datasets as tfds
except:hub = Nonetfds = None# Check if versions match
if (tf.__version__ != tf_version or (hub and hub.__version__ != hub_version) or (tfds and tfds.__version__ != datasets_version) or not np.__version__.startswith(numpy_version)):print(f"Current TensorFlow version: {tf.__version__} → {tf_version}")if hub: print(f"Current TensorFlow Hub version: {hub.__version__} → {hub_version}")if tfds: print(f"Current TensorFlow Datasets version: {tfds.__version__} → {datasets_version}")print(f"Current NumPy version: {np.__version__} → {numpy_version}")# Uninstall old versions!pip uninstall -y tensorflow tensorflow_hub tensorflow_datasets numpy protobuf# Install specific versions!pip install tensorflow=={tf_version} \tensorflow_hub=={hub_version} \tensorflow_datasets=={datasets_version} \numpy=={numpy_version} \protobuf=={protobuf_version}# Prompt user to restartprint("\n Specified versions installed successfully.")print(" Please restart the runtime (Runtime > Restart session) and re-run the notebook.\n")
else:print(" All packages are already at the specified versions.")import numpy as np
import matplotlib.pylab as pltimport tensorflow as tf
import tensorflow_hub as hub
import tensorflow_datasets as tfds
setattr(tfds.image_classification.cats_vs_dogs, '_URL',"https://download.microsoft.com/download/3/E/1/3E1C3F21-ECDB-4869-8368-6DEBA77B919F/kagglecatsanddogs_5340.zip")def format_image(image, label):image = tf.image.resize(image, (224, 224)) / 255.0return  image, label(raw_train, raw_validation, raw_test), metadata = tfds.load('cats_vs_dogs',split=['train[:80%]', 'train[80%:90%]', 'train[90%:]'],with_info=True,as_supervised=True,
)num_examples = metadata.splits['train'].num_examples
num_classes = metadata.features['label'].num_classes
print(num_examples)
print(num_classes)BATCH_SIZE = 32
train_batches = raw_train.shuffle(num_examples // 4).map(format_image).batch(BATCH_SIZE).prefetch(1)
validation_batches = raw_validation.map(format_image).batch(BATCH_SIZE).prefetch(1)
test_batches = raw_test.map(format_image).batch(1)for image_batch, label_batch in train_batches.take(1):passimage_batch.shapemodule_selection = ("mobilenet_v2", 224, 1280)
handle_base, pixels, FV_SIZE = module_selection
MODULE_HANDLE ="https://tfhub.dev/google/tf2-preview/{}/feature_vector/4".format(handle_base)
IMAGE_SIZE = (pixels, pixels)
print("Using {} with input size {} and output dimension {}".format(MODULE_HANDLE, IMAGE_SIZE, FV_SIZE))feature_extractor = hub.KerasLayer(MODULE_HANDLE,input_shape=IMAGE_SIZE + (3,), output_shape=[FV_SIZE],trainable=False)print("Building model with", MODULE_HANDLE)model = tf.keras.Sequential([feature_extractor,tf.keras.layers.Dense(num_classes, activation='softmax')
])model.summary()model.compile(optimizer='adam',loss='sparse_categorical_crossentropy',metrics=['accuracy'])EPOCHS = 5hist = model.fit(train_batches,epochs=EPOCHS,validation_data=validation_batches)CATS_VS_DOGS_SAVED_MODEL = "exp_saved_model"
tf.saved_model.save(model, CATS_VS_DOGS_SAVED_MODEL)import pathlib
converter = tf.lite.TFLiteConverter.from_saved_model(CATS_VS_DOGS_SAVED_MODEL)tflite_model = converter.convert()
tflite_models_dir = pathlib.Path("/tmp/")tflite_model_file = tflite_models_dir/'model1.tflite'
tflite_model_file.write_bytes(tflite_model)
# This will report back the file size in bytesfrom tqdm import tqdm
# Load TFLite model and allocate tensors.
tflite_model_file = '/tmp/model1.tflite'
interpreter = tf.lite.Interpreter(model_path=tflite_model_file)
interpreter.allocate_tensors()input_index = interpreter.get_input_details()[0]["index"]
output_index = interpreter.get_output_details()[0]["index"]predictions = []# This will report how many iterations per second, where each
# iteration is 100 predictions
test_labels, test_imgs = [], []
for img, label in tqdm(test_batches.take(100)):interpreter.set_tensor(input_index, img)interpreter.invoke()predictions.append(interpreter.get_tensor(output_index))test_labels.append(label.numpy()[0])test_imgs.append(img)# This will tell you how many of the predictions were correct
score = 0
for item in range(0,len(predictions)):prediction=np.argmax(predictions[item])label = test_labels[item]if prediction==label:score=score+1print("Out of 100 predictions I got " + str(score) + " correct")#@title Utility functions for plotting
# Utilities for plottingclass_names = ['cat', 'dog']def plot_image(i, predictions_array, true_label, img):predictions_array, true_label, img = predictions_array[i], true_label[i], img[i]plt.grid(False)plt.xticks([])plt.yticks([])img = np.squeeze(img)plt.imshow(img, cmap=plt.cm.binary)predicted_label = np.argmax(predictions_array)if predicted_label == true_label:color = 'green'else:color = 'red'plt.xlabel("{} {:2.0f}% ({})".format(class_names[predicted_label],100*np.max(predictions_array),class_names[true_label]), color=color)#@title Visualize the outputs { run: "auto" }
max_index = 73 #@param {type:"slider", min:1, max:100, step:1}
for index in range(0,max_index):plt.figure(figsize=(6,3))plt.subplot(1,2,1)plot_image(index, predictions, test_labels, test_imgs)plt.show()
关键的解读如下:
首先就是约束版本。。。感觉真的挺复杂的,以后整合这些版本也是很麻烦的。
tf_version = "2.14.0"
hub_version = "0.15.0"
datasets_version = "4.6.0"
numpy_version = "1.26.4"
protobuf_version = "3.20.3"
tf就是tensorflow,numpy倒是不用说,protobuf之前是谷歌网络框架gPRC里面的,没想到在AI领域又拿出来了,是直接用来替代json保存模型。hub是提供了一些预先训练好的模型,可以直接用。datasets不是数据库,因为如果要把数据库都下载下来,体积是非常大。datasets是数据库的管理工具。
2.2.1 训练模型
首先是数据划分。
split=['train[:80%]', 'train[80%:90%]', 'train[90%:]'],训练集80%,验证集10%,测试集10%。
之前做了归一化,打乱这些处理。
之后使用Hub加载了MobileNet V2 预训练特征提取器。之后直接在后面增加一个全连接层就搞定。。
module_selection = ("mobilenet_v2", 224, 1280)
MODULE_HANDLE ="https://tfhub.dev/google/tf2-preview/mobilenet_v2/feature_vector/4"
feature_extractor = hub.KerasLayer(MODULE_HANDLE, input_shape=(224,224,3), output_shape=[1280], trainable=False)model = tf.keras.Sequential([feature_extractor,tf.keras.layers.Dense(num_classes, activation='softmax')
])
2.2.2 模型转换
其实也就是几行代码。
tf.saved_model.save(model, "exp_saved_model")converter = tf.lite.TFLiteConverter.from_saved_model("exp_saved_model")
tflite_model = converter.convert()
2.2.3 使用tflite推理
interpreter = tf.lite.Interpreter(model_path='/tmp/model1.tflite')
interpreter.allocate_tensors()input_index = interpreter.get_input_details()[0]["index"]
output_index = interpreter.get_output_details()[0]["index"]for img, label in tqdm(test_batches.take(100)):interpreter.set_tensor(input_index, img)interpreter.invoke()predictions.append(interpreter.get_tensor(output_index))test_labels.append(label.numpy()[0])test_imgs.append(img)
后面还有显示预测准确性,还有做了一个可视化。
不过可惜我在Colab上面运行一直报错,这里暂时看不到了。。。
2.3 大作业
链接:https://colab.research.google.com/github/tinyMLx/colabs/blob/master/3-3-14-Assignment.ipynb
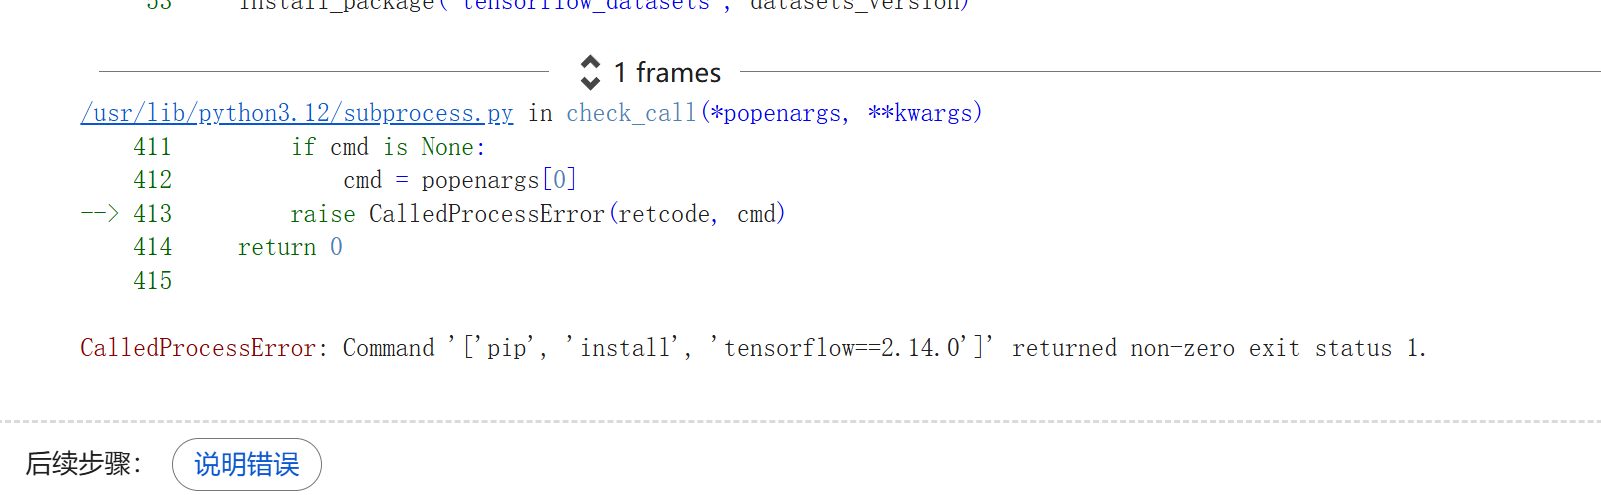
依旧还是2.14版本的问题。
代码如下:
import subprocess
import tensorflow as tf
import numpy as np# Desired versions
tf_version = "2.14.0"
hub_version = "0.15.0"
datasets_version = "4.6.0"
numpy_version = "1.26.4"
protobuf_version = "3.20.3"# Try importing optional packages
try:import tensorflow_hub as hub
except ImportError:hub = Nonetry:import tensorflow_datasets as tfds
except ImportError:tfds = None# Helper to install a specific version of a package
def install_package(package, version):subprocess.check_call(["pip", "install", f"{package}=={version}"])# Helper to uninstall multiple packages
def uninstall_packages(packages):subprocess.check_call(["pip", "uninstall", "-y"] + packages)# Version mismatch check
version_mismatch = (tf.__version__ != tf_version or(hub and hub.__version__ != hub_version) or(tfds and tfds.__version__ != datasets_version) ornot np.__version__.startswith(numpy_version)
)# Act on mismatches
if version_mismatch:print(f"TensorFlow: {tf.__version__} → {tf_version}")if hub: print(f"TensorFlow Hub: {hub.__version__} → {hub_version}")if tfds: print(f"TensorFlow Datasets: {tfds.__version__} → {datasets_version}")print(f"NumPy: {np.__version__} → {numpy_version}")uninstall_packages(["tensorflow", "tensorflow_hub", "tensorflow_datasets","numpy", "protobuf"])install_package("tensorflow", tf_version)install_package("tensorflow_hub", hub_version)install_package("tensorflow_datasets", datasets_version)install_package("numpy", numpy_version)install_package("protobuf", protobuf_version)print("\nRequired versions installed successfully.")print("Please restart the runtime (Runtime > Restart session) and re-run the notebook.")
else:print("All packages are already at the specified versions.")import numpy as np
import matplotlib.pylab as plt
import tensorflow as tf
import tensorflow_hub as hub
import tensorflow_datasets as tfds
from tqdm import tqdm
import pathlibdef format_image(image, label):image = tf.image.resize(image, (224, 224)) / 255.0return  image, label(raw_train, raw_validation, raw_test), metadata = tfds.load('rock_paper_scissors', split=['train[:80%]', 'train[80%:]', 'test'], with_info=True, as_supervised=True)
num_examples = metadata.splits['train'].num_examples
num_classes = metadata.features['label'].num_classesBATCH_SIZE = 32
train_batches = raw_train.shuffle(num_examples // 4).map(format_image).batch(BATCH_SIZE).prefetch(1)
validation_batches = raw_validation.map(format_image).batch(BATCH_SIZE).prefetch(1)
test_batches = raw_test.map(format_image).batch(1)for image_batch, label_batch in train_batches.take(1):passmodule_selection = ("mobilenet_v2", 224, 1280)
handle_base, pixels, FV_SIZE = module_selection
MODULE_HANDLE ="https://tfhub.dev/google/tf2-preview/{}/feature_vector/4".format(handle_base)
IMAGE_SIZE = (pixels, pixels)
print("Using {} with input size {} and output dimension {}".format(MODULE_HANDLE, IMAGE_SIZE, FV_SIZE))feature_extractor = hub.KerasLayer(MODULE_HANDLE,input_shape=IMAGE_SIZE + (3,), output_shape=[FV_SIZE],trainable=False)print("Building model with", MODULE_HANDLE)model = tf.keras.Sequential([feature_extractor,tf.keras.layers.Dense(num_classes, activation='softmax')
])model.summary()model.compile(optimizer='adam',loss='sparse_categorical_crossentropy',metrics=['accuracy'])EPOCHS = 5hist = model.fit(train_batches,epochs=EPOCHS,validation_data=validation_batches)ROCK_PAPER_SCISSORS_SAVED_MODEL = "exp_saved_model"
tf.saved_model.save(model, ROCK_PAPER_SCISSORS_SAVED_MODEL)converter = # YOUR CODE GOES HERE #
tflite_model = # YOUR CODE GOES HERE #tflite_models_dir = pathlib.Path("/tmp/")
tflite_model_file = tflite_models_dir/'model1.tflite'
tflite_model_file.write_bytes(tflite_model)
# This will report back the file size in bytes
# you will note that this model is too big for our Arduino
# but would work on a mobile phone# Load TFLite model and allocate tensors.
TFLITE_MODEL_FILE = '/tmp/model1.tflite'
interpreter = # YOUR CODE GOES HERE #
interpreter.allocate_tensors()input_index = interpreter.get_input_details()[0]["index"]
output_index = interpreter.get_output_details()[0]["index"]
predictions = []# This will report how many iterations per second, where each
# iteration is 100 predictions
test_labels, test_imgs = [], []
for img, label in tqdm(test_batches.take(100)):interpreter.set_tensor(input_index, img)interpreter.invoke()predictions.append(interpreter.get_tensor(output_index))    test_labels.append(label.numpy()[0])test_imgs.append(img)# This will tell you how many of the predictions were correct
score = 0
for item in range(0,99):prediction=np.argmax(predictions[item])label = test_labels[item]if prediction==label:score=score+1print("\nOut of 100 predictions I got " + str(score) + " correct")# Utilities for plottingclass_names = ['rock', 'paper', 'scissors']def plot_image(i, predictions_array, true_label, img):predictions_array, true_label, img = predictions_array[i], true_label[i], img[i]plt.grid(False)plt.xticks([])plt.yticks([])img = np.squeeze(img)plt.imshow(img, cmap=plt.cm.binary)predicted_label = np.argmax(predictions_array)if predicted_label == true_label:color = 'green'else:color = 'red'plt.xlabel("{} {:2.0f}% ({})".format(class_names[predicted_label],100*np.max(predictions_array),class_names[true_label]), color=color)#@title Visualize the outputs { run: "auto" }
max_index = 73 #@param {type:"slider", min:0, max:99, step:1}
for index in range(0,max_index):plt.figure(figsize=(6,3))plt.subplot(1,2,1)plot_image(index, predictions, test_labels, test_imgs)plt.show()
填写的应该和之前的类似。
ROCK_PAPER_SCISSORS_SAVED_MODEL = "exp_saved_model"
tf.saved_model.save(model, ROCK_PAPER_SCISSORS_SAVED_MODEL)
interpreter = tf.lite.Interpreter(model_path='/tmp/model1.tflite')


过期删除策略)

:STAP-A模式)


:RT-THREAD)
)


