文章目录
- MariaDB介绍和安装
- 1.MariaDB介绍
- 1.1 起源与背景
- 1.2 核心特性
- 1.2.1 高度兼容 MySQL
- 1.2.2 优化的存储引擎
- 1.2.3 企业级功能增强
- 1.2.4 性能优化
- 1.2.5 安全增强
- 1.3 社区与生态
- 1.4 应用场景
- 1.5 总结
- 2.MariaDB安装
- 2.1 主机初始化
- 2.1.1 设置网卡名
- 2.1.2 设置ip地址
- 2.1.3 配置镜像源
- 2.1.4 关闭防火墙
- 2.1.5 禁用SELinux
- 2.1.6 禁用AppArmor
- 2.1.7 设置时区
- 2.2 包安装
- 2.2.1 系统自带包安装MariaDB
- 2.2.1.1 Yum资源库安装MariaDB
- 2.2.1.2 Apt资源库安装MariaDB
- 2.2.1.3 SUSE资源库安装MariaDB
- 2.2.2 添加MariaDB官方资源库
- 2.2.2.1 Yum资源库安装MariaDB
- 2.2.2.2 Apt资源库安装MariaDB
- 2.2.2.3 SUSE资源库安装MariaDB
MariaDB介绍和安装
1.MariaDB介绍

图1 MariaDB
MariaDB 是一款开源的关系型数据库管理系统(RDBMS),由 MySQL 的原核心开发团队(以 Michael Widenius 为首)于 2009 年创建,旨在作为 MySQL 的社区驱动替代方案。其设计目标是在保持与 MySQL 高度兼容的基础上,通过创新功能和开源生态,提供更灵活、可靠且高性能的数据库服务。
1.1 起源与背景
2008 年,MySQL 被 Sun 公司收购;2009 年 Sun 又被 Oracle 收购。Oracle 对 MySQL 的商业化策略(如闭源功能、社区参与度下降)引发了原 MySQL 社区和开发者的担忧。为避免 MySQL 闭源风险并推动开源生态发展,Michael Widenius 等核心开发者基于 MySQL 代码分叉,启动了 MariaDB 项目(名称源自 Widenius 的女儿 Maria)。
目前,MariaDB 已成为全球最流行的 MySQL 替代方案之一,广泛应用于企业级场景。
1.2 核心特性
MariaDB 在继承 MySQL 优点的同时,针对性能、功能和企业需求进行了优化,主要特性包括:
1.2.1 高度兼容 MySQL
MariaDB 完全兼容 MySQL 的数据文件格式、API 接口、SQL 语法和命令行工具(如 mysql 客户端),现有 MySQL 应用无需修改即可直接迁移到 MariaDB。这一特性极大降低了用户的迁移成本。
1.2.2 优化的存储引擎
- XtraDB:替代 MySQL 的 InnoDB,是 MariaDB 的默认事务引擎,支持更高效的并发控制、更快的崩溃恢复和更完善的监控指标。
- Aria:替代 MySQL 的 MyISAM,作为非事务引擎,支持崩溃恢复、行级锁和更快的查询性能,适用于日志、临时表等场景。
- ColumnStore(原 InfiniDB):面向大数据分析的列式存储引擎,支持海量数据的快速聚合与分析(OLAP 场景)。
- Connect:支持直接访问外部数据源(如 CSV、Excel、其他数据库),实现跨数据源查询。
1.2.3 企业级功能增强
- Galera Cluster:原生支持多主复制的分布式集群方案,提供高可用性(HA)和自动故障转移,确保业务连续性。
- 多线程复制:相比 MySQL 的单线程复制,MariaDB 支持按库、按表或按事务的多线程复制,显著降低主从延迟。
- 地理信息系统(GIS)支持:内置更全面的 GIS 函数(如 PostGIS 兼容特性),满足位置相关应用需求。
- 动态列(Dynamic Columns):允许在表中存储半结构化数据(类似 NoSQL 的灵活模式),无需预定义所有列。
1.2.4 性能优化
MariaDB 针对查询处理、索引算法(如哈希索引、全文索引)和资源管理(内存、CPU)进行了优化,尤其在 OLTP(在线事务处理)场景下表现优异。例如:
- 优化的查询优化器(支持更智能的执行计划生成);
- 支持内存表(MEMORY 引擎)的加密和压缩;
- 更高效的大事务处理能力。
1.2.5 安全增强
- 支持透明数据加密(TDE)、密钥管理服务(KMS);
- 细粒度的权限控制(如角色管理、列级权限);
- 增强的审计日志(记录用户操作行为);
- 支持 SSL/TLS 加密连接。
1.3 社区与生态
MariaDB 采用开放治理模式,由 MariaDB 基金会(MariaDB Foundation)主导社区发展,确保技术决策的透明性和中立性。同时,商业公司(如 MariaDB Corporation)提供企业级支持、技术咨询和增值服务(如备份工具、监控平台)。
生态方面,MariaDB 兼容主流的 DevOps 工具(如 Docker、Kubernetes)、云平台(AWS、Azure、阿里云等)及中间件(如 Hibernate、Spring),并支持与 Hadoop、Spark 等大数据框架集成。
1.4 应用场景
MariaDB 适用于多种场景,尤其适合以下需求:
- 传统企业应用:如 ERP、CRM 系统,需高可用、事务一致性的场景;
- 互联网服务:高并发的 Web 应用(如电商、社交平台),依赖其高性能和扩展性;
- 大数据分析:结合 ColumnStore 引擎处理海量结构化数据;
- 云原生环境:通过容器化(Docker)和云托管服务(如 AWS RDS for MariaDB)快速部署。
1.5 总结
MariaDB 凭借开源开放、高度兼容 MySQL、企业级功能丰富等优势,成为 MySQL 用户迁移或新项目选型的热门选择。无论是追求低成本迁移、高性能优化,还是需要分布式集群和高可用方案,MariaDB 都能提供灵活的支持,是当前最活跃的开源关系型数据库之一。
2.MariaDB安装
2.1 主机初始化
2.1.1 设置网卡名
-
Rocky Linux 9/10、Almalinux 9/10、CentOS Stream 9/10、AnolisOS 23、OpenCloudOS 9:
-
创建 systemd 链接文件: 创建
/etc/systemd/network/70-eth0.link文件。[root@rocky10 ~]# mkdir -p /etc/systemd/network/ [root@rocky10 ~]# touch /etc/systemd/network/70-eth0.link[root@rocky10 ~]# ip addr 1: lo: <LOOPBACK,UP,LOWER_UP> mtu 65536 qdisc noqueue state UNKNOWN group default qlen 1000link/loopback 00:00:00:00:00:00 brd 00:00:00:00:00:00inet 127.0.0.1/8 scope host lovalid_lft forever preferred_lft foreverinet6 ::1/128 scope host valid_lft forever preferred_lft forever 2: ens160: <BROADCAST,MULTICAST,UP,LOWER_UP> mtu 1500 qdisc mq state UP group default qlen 1000link/ether 00:0c:29:f8:60:8f brd ff:ff:ff:ff:ff:ffaltname enp3s0inet 172.31.7.16/21 brd 172.31.7.255 scope global dynamic noprefixroute ens160valid_lft 1791sec preferred_lft 1791secinet6 fe80::20c:29ff:fef8:608f/64 scope link noprefixroute valid_lft forever preferred_lft forever[root@rocky10 ~]# cat > /etc/systemd/network/70-eth0.link << EOF [Match] MACAddress=00:0c:29:f8:60:8f[Link] Name=eth0 EOF# 也可以执行下面命令 ETHNAME=`ip addr | awk -F"[ :]" '/^2/{print $3}'` ETHMAC=`ip addr show ${ETHNANME} | awk -F' ' '/ether/{print $2}'` mkdir /etc/systemd/network/ touch /etc/systemd/network/70-eth0.link cat > /etc/systemd/network/70-eth0.link << EOF [Match] MACAddress=${ETHMAC}[Link] Name=eth0 EOF -
修改 NetworkManager 配置文件: 如果使用 NetworkManager 管理网络,需要修改
/etc/NetworkManager/system-connections下的配置文件。[root@rocky10 ~]# mv /etc/NetworkManager/system-connections/ens160.nmconnection /etc/NetworkManager/system-connections/eth0.nmconnection[root@rocky10 ~]# sed -i.bak 's/'ens160'/eth0/' /etc/NetworkManager/system-connections/eth0.nmconnection# 也可以执行下面命令 mv /etc/NetworkManager/system-connections/${ETHNAME}.nmconnection /etc/NetworkManager/system-connections/eth0.nmconnection sed -i.bak 's/'${ETHNAME}'/eth0/' /etc/NetworkManager/system-connections/eth0.nmconnection
-
-
Rocky Linux 8、Almalinux 8、CentOS 7、CentOS Stream 8、openEuler 22.03和24.03 LTS、AnolisOS 8、OpenCloudOS 8、Kylin Server v10、UOS Server v20:
-
修改 GRUB 配置文件: 打开
/etc/default/grub文件,添加以下内容到GRUB_CMDLINE_LINUX行net.ifnames=0 biosdevname=0执行以下命令:
sed -ri.bak '/^GRUB_CMDLINE_LINUX=/s@"$@ net.ifnames=0 biosdevname=0"@' /etc/default/grub然后更新 GRUB 配置:
grub2-mkconfig -o /boot/grub2/grub.cfg如果是 UEFI 引导系统,更新命令为:
# Rocky grub2-mkconfig -o /boot/efi/EFI/rocky/grub.cfg# Almalinux grub2-mkconfig -o /boot/efi/EFI/almalinux/grub.cfg# CentOS grub2-mkconfig -o /boot/efi/EFI/centos/grub.cfg# openEuler grub2-mkconfig -o /boot/efi/EFI/openEuler/grub.cfg# AnolisOS grub2-mkconfig -o /boot/efi/EFI/anolis/grub.cfg# OpenCloudOS grub2-mkconfig -o /boot/efi/EFI/opencloudos/grub.cfg# Kylin Server grub2-mkconfig -o /boot/efi/EFI/kylin/grub.cfg# Uos Server grub2-mkconfig -o /boot/efi/EFI/uos/grub.cfg# UEFI 引导系统可以直接执行下面命令: EFI_DIR=`find /boot/efi/ -name "grub.cfg" | awk -F"/" '{print $5}'` grub2-mkconfig -o /boot/efi/EFI/${EFI_DIR}/grub.cfg -
创建 Udev 规则文件: 创建
/etc/udev/rules.d/10-network.rules文件,并添加以下内容:SUBSYSTEM=="net", ACTION=="add", ATTR{address}=="<网卡MAC地址>", NAME="eth0"**注意:**创建Udev这个步骤只在AnolisOS 8上执行。
将
<网卡MAC地址>替换为实际网卡的 MAC 地址。[root@anolis8 ~]# ip addr 1: lo: <LOOPBACK,UP,LOWER_UP> mtu 65536 qdisc noqueue state UNKNOWN group default qlen 1000link/loopback 00:00:00:00:00:00 brd 00:00:00:00:00:00inet 127.0.0.1/8 scope host lovalid_lft forever preferred_lft foreverinet6 ::1/128 scope host valid_lft forever preferred_lft forever 2: ens33: <BROADCAST,MULTICAST,UP,LOWER_UP> mtu 1500 qdisc fq_codel state UP group default qlen 1000link/ether 00:0c:29:c5:38:3b brd ff:ff:ff:ff:ff:ffaltname enp2s1inet 172.31.7.15/21 brd 172.31.7.255 scope global dynamic noprefixroute ens33valid_lft 1590sec preferred_lft 1590secinet6 fe80::20c:29ff:fec5:383b/64 scope link noprefixroute valid_lft forever preferred_lft forever[root@anolis8 ~]# cat >> /etc/udev/rules.d/10-network.rules << EOF SUBSYSTEM=="net", ACTION=="add", ATTR{address}=="00:0c:29:c5:38:3b", NAME="eth0" EOF# 也可以执行下面命令 ETHNAME=`ip addr | awk -F"[ :]" '/^2/{print $3}'` ETHMAC=`ip addr show ${ETHNANME} | awk -F' ' '/ether/{print $2}'` cat >> /etc/udev/rules.d/10-network.rules << EOF SUBSYSTEM=="net", ACTION=="add", ATTR{address}=="${ETHMAC}", NAME="eth0" EOF -
修改网卡配置文件: 创建
/etc/sysconfig/network-scripts/ifcfg-eth0文件,并配置网卡参数,例如:ETHNAME=`ip addr | awk -F"[ :]" '/^2/{print $3}'` mv /etc/sysconfig/network-scripts/ifcfg-${ETHNAME} /etc/sysconfig/network-scripts/ifcfg-eth0 sed -i.bak 's/'${ETHNAME}'/eth0/' /etc/sysconfig/network-scripts/ifcfg-eth0
-
-
Ubuntu和Debian:
# Ubuntu和Debian先启用root用户,并设置密码 raymond@ubuntu2404:~$ cat set_root_login.sh #!/bin/bashread -p "请输入密码: " PASSWORD echo ${PASSWORD} |sudo -S sed -ri 's@#(PermitRootLogin )prohibit-password@\1yes@' /etc/ssh/sshd_config sudo systemctl restart sshd sudo -S passwd root <<-EOF ${PASSWORD} ${PASSWORD} EOFraymond@ubuntu2404:~$ bash set_root_login.sh 请输入密码: 123456 [sudo] password for raymond: New password: Retype new password: passwd: password updated successfully-
修改 GRUB 配置文件: 打开
/etc/default/grub文件,添加以下内容到GRUB_CMDLINE_LINUX行net.ifnames=0 biosdevname=0执行以下命令:
sed -ri.bak '/^GRUB_CMDLINE_LINUX=/s@"$@net.ifnames=0 biosdevname=0"@' /etc/default/grub然后更新 GRUB 配置:
grub-mkconfig -o /boot/grub/grub.cfg如果是 UEFI 引导系统,更新命令为:
# Ubuntu grub-mkconfig -o /boot/efi/EFI/ubuntu/grub.cfg# Debian grub-mkconfig -o /boot/efi/EFI/debian/grub.cfg# UEFI 引导系统可以直接执行下面命令: EFI_DIR=`find /boot/efi/ -name "grub.cfg" | awk -F"/" '{print $5}'` grub-mkconfig -o /boot/efi/EFI/${EFI_DIR}/grub.cfg -
修改网卡配置文件:
# Ubuntu Server 24.04 LTS
ETHNAME=`ip addr | awk -F"[ :]" '/^2/{print $3}'`
sed -i.bak 's/'${ETHNAME}'/eth0/' /etc/netplan/50-cloud-init.yaml# Ubuntu Server 22.04  LTS
ETHNAME=`ip addr | awk -F"[ :]" '/^2/{print $3}'`
touch /etc/cloud/cloud.cfg.d/99-disable-network-config.cfg
cat > /etc/cloud/cloud.cfg.d/99-disable-network-config.cfg <<-EOF
network: {config: disabled}
EOF
sed -i.bak 's/'${ETHNAME}'/eth0/' /etc/netplan/50-cloud-init.yaml# Ubuntu Server 20.04 LTS
ETHNAME=`ip addr | awk -F"[ :]" '/^2/{print $3}'`
sed -i.bak 's/'${ETHNAME}'/eth0/' /etc/netplan/00-installer-config.yaml# Ubuntu Server 18.04 LTS
ETHNAME=`ip addr | awk -F"[ :]" '/^2/{print $3}'`
sed -i.bak 's/'${ETHNAME}'/eth0/' /etc/netplan/01-netcfg.yaml# Debian
ETHNAME=`ip addr | awk -F"[ :]" '/^2/{print $3}'`
sed -i.bak 's/'${ETHNAME}'/eth0/' /etc/network/interfaces
-
-
重启系统:
reboot重启后,网卡名称将变为
eth0。
2.1.2 设置ip地址
ETHNAME=`ip addr | awk -F"[ :]" '/^2/{print $3}'`# IP变量是ip地址,PREFIX变量是子网掩码位数;GATEWAY变量是网关地址;PRIMARY_DNS变量是主DNS,BACKUP_DNS变量是备用DNS,根据自己的需求修改。
IP=172.31.0.10
PREFIX=21
GATEWAY=172.31.0.2
PRIMARY_DNS=223.5.5.5
BACKUP_DNS=180.76.76.76
Rocky Linux 9/10、Almalinux 9/10、CentOS Stream 9/10、AnolisOS 23、OpenCloudOS 9:
cat > /etc/NetworkManager/system-connections/${ETHNAME}.nmconnection <<-EOF
[connection]
id=${ETHNAME}
type=ethernet
interface-name=${ETHNAME}[ipv4]
address1=${IP}/${PREFIX},${GATEWAY}
dns=${PRIMARY_DNS};${BACKUP_DNS};
method=manual
EOF
Rocky Linux 8、Almalinux 8、CentOS 7、CentOS Stream 8、openEuler 22.03和24.03 LTS、AnolisOS 8、OpenCloudOS 8、Kylin Server v10、UOS Server v20:
cat > /etc/sysconfig/network-scripts/ifcfg-${ETHNAME} <<-EOF
NAME=${ETHNAME}
DEVICE=${ETHNAME}
ONBOOT=yes
BOOTPROTO=none
TYPE=Ethernet
IPADDR=${IP}
PREFIX=${PREFIX}
GATEWAY=${GATEWAY}
DNS1=${PRIMARY_DNS}
DNS2=${BACKUP_DNS}
EOF
Ubuntu:
# Ubuntu Server 18.04 LTS
cat > /etc/netplan/01-netcfg.yaml <<-EOF
network:version: 2renderer: networkdethernets:${ETHNAME}:dhcp4: nodhcp6: noaddresses: [${IP}/${PREFIX}] gateway4: ${GATEWAY}nameservers:addresses: [${PRIMARY_DNS}, ${BACKUP_DNS}]# Ubuntu Server 20.04 LTS
cat > /etc/netplan/00-installer-config.yaml <<-EOF
network:version: 2renderer: networkdethernets:${ETHNAME}:dhcp4: nodhcp6: noaddresses: [${IP}/${PREFIX}] gateway4: ${GATEWAY}nameservers:addresses: [${PRIMARY_DNS}, ${BACKUP_DNS}]
EOF# Ubuntu Server 22.04/24.04 LTS
cat > /etc/netplan/50-cloud-init.yaml <<-EOF
network:version: 2renderer: networkdethernets:${ETHNAME}:dhcp4: nodhcp6: noaddresses: [${IP}/${PREFIX}]routes:- to: defaultvia: ${GATEWAY}nameservers:addresses: [${PRIMARY_DNS}, ${BACKUP_DNS}]
EOF
Debian:
sed -ri -e "s/allow-hotplug/auto/g" -e "s/dhcp/static/g" /etc/network/interfaces
sed -i '/static/a\address '${IP}'/'${PREFIX}'\ngateway '${GATEWAY}'\ndns-nameservers '${PRIMARY_DNS}' '${BACKUP_DNS}'\n' /etc/network/interfaces
openSUSE:
cat > /etc/sysconfig/network/ifcfg-${ETHNAME} <<-EOF
STARTMODE='auto'
BOOTPROTO='static'
IPADDR='${IP}/${PREFIX}'
EOF
touch /etc/sysconfig/network/routes
cat > /etc/sysconfig/network/routes  <<-EOF
default ${GATEWAY} - -
EOF
sed -ri  's/(NETCONFIG_DNS_STATIC_SERVERS=).*/\1"'${PRIMARY_DNS}' '${BACKUP_DNS}'"/g' /etc/sysconfig/network/config
2.1.3 配置镜像源
Rocky:
# 阿里云镜像站Rocky系统镜像源地址是:mirrors.aliyun.com/rockylinux,火山引擎镜像站Rocky系统镜像源地址是:mirrors.volces.com/rockylinux,后面地址是rockylinux,使用下面命令执行
MIRROR=mirrors.aliyun.com
sed -i.bak -e 's|^mirrorlist=|#mirrorlist=|g' -e 's|^#baseurl=http://dl.rockylinux.org/$contentdir|baseurl=https://'${MIRROR}'/rockylinux|g' /etc/yum.repos.d/[Rr]ocky*.repo# 搜狐镜像站Rocky系统镜像源地址是:mirrors.sohu.com/Rocky,后面地址是Rocky,使用下面命令执行
MIRROR=mirrors.sohu.com
sed -i.bak -e 's|^mirrorlist=|#mirrorlist=|g' -e 's|^#baseurl=http://'${OLD_MIRROR}'/$contentdir|baseurl=https://'${MIRROR}'/Rocky|g' /etc/yum.repos.d/[Rr]ocky*.repo# 其余镜像站Rocky系统镜像源地址后面地址都是rocky,使用下面命令执行
MIRROR=mirrors.tencent.com
sed -i.bak -e 's|^mirrorlist=|#mirrorlist=|g' -e 's|^#baseurl=http://dl.rockylinux.org/$contentdir|baseurl=https://'${MIRROR}'/rocky|g' /etc/yum.repos.d/[Rr]ocky*.repodnf clean all && dnf makecache
Almalinux:
MIRROR=mirrors.tencent.com
OLD_MIRROR=$(sed -rn '/^.*baseurl=/s@.*=http.*://(.*)/(.*)/\$releasever/.*/$@\1@p' /etc/yum.repos.d/almalinux*.repo | head -1)
sed -i.bak -e 's|^mirrorlist=|#mirrorlist=|g' -e 's|^# baseurl=https://'${OLD_MIRROR}'|baseurl=https://'${MIRROR}'|g' /etc/yum.repos.d/almalinux*.repo
CentOS Stream 9和10:
cat update_mirror.pl
#!/usr/bin/perluse strict;
use warnings;
use autodie;# 要修改镜像源,请去修改url变量!
my $url = 'mirrors.aliyun.com';
my $mirrors = "https://$url/centos-stream";if (@ARGV < 1) {die "Usage: $0 <filename1> <filename2> ...\n";
}while (my $filename = shift @ARGV) {my $backup_filename = $filename . '.bak';rename $filename, $backup_filename;open my $input, "<", $backup_filename;open my $output, ">", $filename;while (<$input>) {s/^metalink/# metalink/;if (m/^name/) {my (undef, $repo, $arch) = split /-/;$repo =~ s/^\s+|\s+$//g;($arch = defined $arch ? lc($arch) : '') =~ s/^\s+|\s+$//g;if ($repo =~ /^Extras/) {$_ .= "baseurl=${mirrors}/SIGs/\$releasever-stream/extras" . ($arch eq 'source' ? "/${arch}/" : "/\$basearch/") . "extras-common\n";} else {$_ .= "baseurl=${mirrors}/\$releasever-stream/$repo" . ($arch eq 'source' ? "/" : "/\$basearch/") . ($arch ne '' ? "${arch}/tree/" : "os") . "\n";}}print $output $_;}
}rpm -q perl &> /dev/null || { echo -e "\\033[01;31m "安装perl工具,请稍等..."\033[0m";yum -y install perl ; }perl ./update_mirror.pl /etc/yum.repos.d/centos*.repodnf clean all && dnf makecache
CentOS Stream 8:
MIRROR=mirrors.aliyun.com
sed -i.bak -e 's|^mirrorlist=|#mirrorlist=|g' -e 's|^#baseurl=http://mirror.centos.org/$contentdir|baseurl=https://'${MIRROR}'/centos-vault|g' /etc/yum.repos.d/CentOS-*.repodnf clean all && dnf makecache
CentOS 7:
MIRROR=mirrors.aliyun.com
OS_RELEASE_FULL_VERSION=`cat /etc/centos-release | sed -rn 's/^(CentOS Linux release )(.*)( \(Core\))/\2/p'`
sed -i.bak -e 's|^mirrorlist=|#mirrorlist=|g' -e 's|^#baseurl=http://mirror.centos.org/centos|baseurl=https://'${MIRROR}'/centos-vault|g' -e "s/\$releasever/${OS_RELEASE_FULL_VERSION}/g" /etc/yum.repos.d/CentOS-*.repoyum clean all && yum makecache
Ubuntu Server 24.04 LTS:
MIRROR=mirrors.aliyun.com
sed -ri "s@^(URIs: )(http.*://)(.*)(/ubuntu).?@\1https://${MIRROR}\4@g" /etc/apt/sources.list.d/ubuntu.sourcesapt update
Ubuntu Server 18.04/20.04/22.04 LTS:
MIRROR=mirrors.aliyun.com
OLD_MIRROR=`sed -rn "s@^deb http(.*)://(.*)/ubuntu/? $(lsb_release -cs) main.*@\2@p" /etc/apt/sources.list`
SECURITY_MIRROR=`sed -rn "s@^deb http(.*)://(.*)/ubuntu.* $(lsb_release -cs)-security main.*@\2@p" /etc/apt/sources.list`
sed -i.bak -e 's@http.*://'${OLD_MIRROR}'@https://'${MIRROR}'@g' -e 's@http.*://'${SECURITY_MIRROR}'@https://'${MIRROR}'@g' /etc/apt/sources.listapt update
Debian:
MIRROR=mirrors.aliyun.com
OLD_MIRROR=`sed -rn "s@^deb http(.*)://(.*)/debian/? $(lsb_release -cs) main.*@\2@p" /etc/apt/sources.list`
SECURITY_MIRROR=`sed -rn "s@^deb http(.*)://(.*)/debian-security $(lsb_release -cs)-security main.*@\2@p" /etc/apt/sources.list`
sed -ri.bak -e 's/'${OLD_MIRROR}'/'${MIRROR}'/g' -e 's/'${SECURITY_MIRROR}'/'${MIRROR}'/g' -e 's/^(deb cdrom.*)/#\1/g' /etc/apt/sources.listapt update
openEuler:
MIRROR=mirrors.aliyun.com
OLD_MIRROR=$(awk -F'/' '/^baseurl=/{print $3}' /etc/yum.repos.d/openEuler.repo | head -1)
sed -i.bak -e 's|^metalink=|#metalink=|g' -e 's|http.*://'${OLD_MIRROR}'|https://'${MIRROR}'/openeuler|g' /etc/yum.repos.d/openEuler.repodnf clean all && dnf makecache
AnolisOS:
OLD_MIRROR=$(sed -rn '/^.*baseurl=/s@.*=http.*://(.*)/(.*)/\$releasever/.*/$@\1@p' /etc/yum.repos.d/AnolisOS*.repo | head -1)# 中国科学院软件研究所镜像站AnolisOS系统镜像源地址是:mirror.iscas.ac.cn/openanolis,后面地址是openanolis,使用下面命令执行
MIRROR=mirror.iscas.ac.cn
sed -i.bak -e 's|http.*://'${OLD_MIRROR}'/anolis|https://'${MIRROR}'/openanolis|g' /etc/yum.repos.d/AnolisOS*.repo# 其余镜像站AnolisOS系统镜像源地址后面地址都是anolis,使用下面命令执行
MIRROR=mirrors.aliyun.com
sed -i.bak -e 's|http.*://'${OLD_MIRROR}'/anolis|https://'${MIRROR}'/anolis|g' /etc/yum.repos.d/AnolisOS*.repodnf clean all && dnf makecache
OpenCloudOS:
MIRROR=mirrors.tencent.com
OLD_MIRROR=$(awk -F'/' '/^baseurl=/{print $3}' /etc/yum.repos.d/OpenCloudOS*.repo | head -1)
sed -i.bak -e 's|http.*://'${OLD_MIRROR}'|https://'${MIRROR}'|g' /etc/yum.repos.d/OpenCloudOS*.repodnf clean all && dnf makecache
openSUSE:
MIRROR=mirrors.aliyun.com
OLD_MIRROR=$(awk -F'/' '/^baseurl=/{print $3}' /etc/zypp/repos.d/repo-*.repo | head -1)
sed -i.bak 's|http.*://'${OLD_MIRROR}'|https://'${MIRROR}'/opensuse|g' /etc/zypp/repos.d/repo-*.repozypper clean && zypper refresh
2.1.4 关闭防火墙
# Rocky、Almalinux、CentOS、openEuler、AnolisOS、OpenCloudOS、openSUSE、Kylin Server、UOS Server
systemctl disable --now firewalld# CentOS 7还要执行下面命令
systemctl disable --now NetworkManager# Ubuntu
systemctl disable --now ufw# Debian默认没有安装防火墙,不用设置
2.1.5 禁用SELinux
# Rocky、Almalinux、CentOS、openEuler、AnolisOS、OpenCloudOS、Kylin Server、UOS Server
setenforce 0
sed -i 's#SELINUX=enforcing#SELINUX=disabled#g' /etc/selinux/config# Ubuntu、Debian和openSUSE默认没有安装SELinux,不用设置
2.1.6 禁用AppArmor
# openSUSE发行版默认不启用SELinux,而是使用AppArmor来提供强制访问控制(MAC)功能,需要禁用AppArmor。
systemctl disable --now apparmor
2.1.7 设置时区
timedatectl set-timezone Asia/Shanghai
echo 'Asia/Shanghai' >/etc/timezone# Ubuntu还要设置下面内容
cat >> /etc/default/locale <<-EOF
LC_TIME=en_DK.UTF-8
EOF
2.2 包安装
2.2.1 系统自带包安装MariaDB
2.2.1.1 Yum资源库安装MariaDB
在Rocky、Almalinux、CentOS、openEuler、AnolisOS、OpenCloudOS、Kylin Server、UOS Server上安装MariaDB:
[root@rocky10 ~]# yum list mariadb-server --showduplicates
Last metadata expiration check: 0:08:25 ago on Fri 08 Aug 2025 01:13:14 PM CST.
Available Packages
mariadb-server.x86_64                                 3:10.11.11-1.el10                                 appstream[root@rocky10 ~]# yum -y install mariadb-server[root@rocky10 ~]# systemctl enable --now mariadb[root@rocky10 ~]# ls /var/lib/mysql
aria_log.00000001  ddl_recovery.log  ibdata1      ibtmp1             mysql       mysql_upgrade_info  sys
aria_log_control   ib_buffer_pool    ib_logfile0  multi-master.info  mysql.sock  performance_schema[root@rocky10 ~]# mariadb -V
mariadb  Ver 15.1 Distrib 10.11.11-MariaDB, for Linux (x86_64) using  EditLine wrapper[root@rocky10 ~]# systemctl status mariadb
● mariadb.service - MariaDB 10.11 database serverLoaded: loaded (/usr/lib/systemd/system/mariadb.service; enabled; preset: disabled)Active: active (running) since Fri 2025-08-08 13:28:01 CST; 1min 11s agoInvocation: 3d54eb415ece4dcebce26a9b4e05034eDocs: man:mariadbd(8)https://mariadb.com/kb/en/library/systemd/Process: 1619 ExecStartPre=/usr/libexec/mariadb-check-socket (code=exited, status=0/SUCCESS)Process: 1642 ExecStartPre=/usr/libexec/mariadb-prepare-db-dir mariadb.service (code=exited, status=0/SUCCES>Process: 1750 ExecStartPost=/usr/libexec/mariadb-check-upgrade (code=exited, status=0/SUCCESS)Main PID: 1737 (mariadbd)Status: "Taking your SQL requests now..."Tasks: 8 (limit: 10481)Memory: 206.2M (peak: 231.3M)CPU: 889msCGroup: /system.slice/mariadb.service└─1737 /usr/libexec/mariadbd --basedir=/usrAug 08 13:28:01 rocky10 mariadb-prepare-db-dir[1681]: you need to be the system 'mysql' user to connect.
Aug 08 13:28:01 rocky10 mariadb-prepare-db-dir[1681]: After connecting you can set the password, if you would ne>
Aug 08 13:28:01 rocky10 mariadb-prepare-db-dir[1681]: able to connect as any of these users with a password and >
Aug 08 13:28:01 rocky10 mariadb-prepare-db-dir[1681]: See the MariaDB Knowledgebase at https://mariadb.com/kb
Aug 08 13:28:01 rocky10 mariadb-prepare-db-dir[1681]: Please report any problems at https://mariadb.org/jira
Aug 08 13:28:01 rocky10 mariadb-prepare-db-dir[1681]: The latest information about MariaDB is available at https>
Aug 08 13:28:01 rocky10 mariadb-prepare-db-dir[1681]: Consider joining MariaDB's strong and vibrant community:
Aug 08 13:28:01 rocky10 mariadb-prepare-db-dir[1681]: https://mariadb.org/get-involved/
Aug 08 13:28:01 rocky10 (mariadbd)[1737]: mariadb.service: Referenced but unset environment variable evaluates t>
Aug 08 13:28:01 rocky10 systemd[1]: Started mariadb.service - MariaDB 10.11 database server.[root@rocky10 ~]# mariadb
Welcome to the MariaDB monitor.  Commands end with ; or \g.
Your MariaDB connection id is 3
Server version: 10.11.11-MariaDB MariaDB ServerCopyright (c) 2000, 2018, Oracle, MariaDB Corporation Ab and others.Type 'help;' or '\h' for help. Type '\c' to clear the current input statement.MariaDB [(none)]> status
--------------
mysql  Ver 15.1 Distrib 10.11.11-MariaDB, for Linux (x86_64) using  EditLine wrapperConnection id:		3
Current database:
Current user:		root@localhost
SSL:			Not in use
Current pager:		stdout
Using outfile:		''
Using delimiter:	;
Server:			MariaDB
Server version:		10.11.11-MariaDB MariaDB Server
Protocol version:	10
Connection:		Localhost via UNIX socket
Server characterset:	latin1
Db     characterset:	latin1
Client characterset:	utf8mb3
Conn.  characterset:	utf8mb3
UNIX socket:		/var/lib/mysql/mysql.sock
Uptime:			1 min 44 secThreads: 1  Questions: 4  Slow queries: 0  Opens: 17  Open tables: 10  Queries per second avg: 0.038
--------------MariaDB [(none)]> show databases;
+--------------------+
| Database           |
+--------------------+
| information_schema |
| mysql              |
| performance_schema |
| sys                |
+--------------------+
4 rows in set (0.001 sec)MariaDB [(none)]> exit
Bye
2.2.1.2 Apt资源库安装MariaDB
在Ubuntu和Debian上安装MariaDB:
root@ubuntu2404:~# apt-cache madison mariadb-server
mariadb-server | 1:10.11.13-0ubuntu0.24.04.1 | https://mirrors.aliyun.com/ubuntu noble-updates/universe amd64 Packages
mariadb-server | 1:10.11.13-0ubuntu0.24.04.1 | https://mirrors.aliyun.com/ubuntu noble-security/universe amd64 Packages
mariadb-server | 1:10.11.7-2ubuntu2 | https://mirrors.aliyun.com/ubuntu noble/universe amd64 Packagesroot@ubuntu2404:~# apt -y install mariadb-serverroot@ubuntu2404:~# systemctl enable --now mariadbroot@ubuntu2404:~# ls /var/lib/mysql
aria_log.00000001  ddl_recovery.log   ib_buffer_pool  ib_logfile0  multi-master.info  mysql_upgrade_info  sys
aria_log_control   debian-10.11.flag  ibdata1         ibtmp1       mysql              performance_schemaroot@ubuntu2404:~# mariadb -V
mysql  Ver 15.1 Distrib 10.11.13-MariaDB, for debian-linux-gnu (x86_64) using  EditLine wrapperroot@ubuntu2404:~# systemctl status mariadb
● mariadb.service - MariaDB 10.11.13 database serverLoaded: loaded (/usr/lib/systemd/system/mariadb.service; enabled; preset: enabled)Active: active (running) since Fri 2025-08-08 15:43:17 CST; 3min 43s agoDocs: man:mariadbd(8)https://mariadb.com/kb/en/library/systemd/Main PID: 1949 (mariadbd)Status: "Taking your SQL requests now..."Tasks: 10 (limit: 14588)Memory: 78.9M (peak: 82.0M)CPU: 554msCGroup: /system.slice/mariadb.service└─1949 /usr/sbin/mariadbdAug 08 15:43:17 ubuntu2404 mariadbd[1949]: 2025-08-08 15:43:17 0 [Note] InnoDB: log sequence number 45502; trans>
Aug 08 15:43:17 ubuntu2404 mariadbd[1949]: 2025-08-08 15:43:17 0 [Note] Plugin 'FEEDBACK' is disabled.
Aug 08 15:43:17 ubuntu2404 mariadbd[1949]: 2025-08-08 15:43:17 0 [Note] InnoDB: Loading buffer pool(s) from /var>
Aug 08 15:43:17 ubuntu2404 mariadbd[1949]: 2025-08-08 15:43:17 0 [Warning] You need to use --log-bin to make --e>
Aug 08 15:43:17 ubuntu2404 mariadbd[1949]: 2025-08-08 15:43:17 0 [Note] Server socket created on IP: '127.0.0.1'.
Aug 08 15:43:17 ubuntu2404 mariadbd[1949]: 2025-08-08 15:43:17 0 [Note] InnoDB: Buffer pool(s) load completed at>
Aug 08 15:43:17 ubuntu2404 mariadbd[1949]: 2025-08-08 15:43:17 0 [Note] /usr/sbin/mariadbd: ready for connection>
Aug 08 15:43:17 ubuntu2404 mariadbd[1949]: Version: '10.11.13-MariaDB-0ubuntu0.24.04.1'  socket: '/run/mysqld/my>
Aug 08 15:43:17 ubuntu2404 systemd[1]: Started mariadb.service - MariaDB 10.11.13 database server.
Aug 08 15:43:17 ubuntu2404 /etc/mysql/debian-start[1967]: Upgrading MariaDB tables if necessary.root@ubuntu2404:~# mariadb
Welcome to the MariaDB monitor.  Commands end with ; or \g.
Your MariaDB connection id is 31
Server version: 10.11.13-MariaDB-0ubuntu0.24.04.1 Ubuntu 24.04Copyright (c) 2000, 2018, Oracle, MariaDB Corporation Ab and others.Type 'help;' or '\h' for help. Type '\c' to clear the current input statement.MariaDB [(none)]> status
--------------
mysql  Ver 15.1 Distrib 10.11.13-MariaDB, for debian-linux-gnu (x86_64) using  EditLine wrapperConnection id:		31
Current database:
Current user:		root@localhost
SSL:			Not in use
Current pager:		stdout
Using outfile:		''
Using delimiter:	;
Server:			MariaDB
Server version:		10.11.13-MariaDB-0ubuntu0.24.04.1 Ubuntu 24.04
Protocol version:	10
Connection:		Localhost via UNIX socket
Server characterset:	utf8mb4
Db     characterset:	utf8mb4
Client characterset:	utf8mb3
Conn.  characterset:	utf8mb3
UNIX socket:		/run/mysqld/mysqld.sock
Uptime:			4 min 13 secThreads: 1  Questions: 61  Slow queries: 0  Opens: 33  Open tables: 26  Queries per second avg: 0.241
--------------MariaDB [(none)]> show databases;
+--------------------+
| Database           |
+--------------------+
| information_schema |
| mysql              |
| performance_schema |
| sys                |
+--------------------+
4 rows in set (0.000 sec)MariaDB [(none)]> exit
Bye
2.2.1.3 SUSE资源库安装MariaDB
在openSUSE上安装MariaDB:
opensuse15:~ # zypper search "mariadb"
Loading repository data...
Reading installed packages...S | Name                     | Summary                                                             | Type
--+--------------------------+---------------------------------------------------------------------+-----------| libmariadb-devel         | Development files for the MariaDB Connector C API                   | package| libmariadb3              | MariaDB connector in C                                              | package| libmariadb3-32bit        | MariaDB connector in C                                              | package| libmariadb_plugins       | Plugins for the MariaDB C Connector                                 | package| libmariadbd-devel        | MariaDB embedded server development files                           | package| libmariadbd19            | MariaDB embedded server library                                     | package| libmariadbd104-devel     | MariaDB embedded server development files                           | package| libmariadbprivate        | Additional internal libraries for the MariaDB C Connector           | package| mariadb                  | Server part of MariaDB                                              | package| mariadb                  | Server part of MariaDB                                              | srcpackage| mariadb-bench            | Benchmarks for MariaDB                                              | package| mariadb-client           | Client for MariaDB                                                  | package| mariadb-connector-odbc   | MariaDB ODBC Connector                                              | package| mariadb-errormessages    | The error messages files required by server, client and libmariadbd | package| mariadb-galera           | The configuration files and scripts for galera replication          | package| mariadb-rpm-macros       | MariaDB RPM macros                                                  | package| mariadb-test             | Testsuite for MariaDB                                               | package| mariadb-tools            | MariaDB tools                                                       | package| mariadb104               | Server part of MariaDB                                              | srcpackage| mariadb104               | Server part of MariaDB                                              | package| mariadb104-bench         | Benchmarks for MariaDB                                              | package| mariadb104-client        | Client for MariaDB                                                  | package| mariadb104-errormessages | The error messages files required by server, client and libmariadbd | package| mariadb104-galera        | The configuration files and scripts for galera replication          | package| mariadb104-rpm-macros    | MariaDB RPM macros                                                  | package| mariadb104-test          | Testsuite for MariaDB                                               | package| mariadb104-tools         | MariaDB tools                                                       | packageopensuse15:~ # zypper info mariadb
Loading repository data...
Reading installed packages...Information for package mariadb:
--------------------------------
Repository     : Update repository with updates from SUSE Linux Enterprise 15
Name           : mariadb
Version        : 10.11.11-150600.4.10.1
Arch           : x86_64
Vendor         : SUSE LLC <https://www.suse.com/>
Installed Size : 158.8 MiB
Installed      : No
Status         : not installed
Source package : mariadb-10.11.11-150600.4.10.1.src
Upstream URL   : https://www.mariadb.org
Summary        : Server part of MariaDB
Description    : MariaDB is an open-source, multi-threaded, relational database managementsystem. It's a backward compatible, drop-in replacement branch of theMySQL Community Server.This package only contains the server-side programs.opensuse15:~ # zypper install -y mariadbopensuse15:~ # systemctl enable --now mariadbopensuse15:~ # ls /var/lib/mysql
aria_log.00000001  ib_buffer_pool  ibtmp1             mysql_upgrade_info  sys
aria_log_control   ib_logfile0     multi-master.info  opensuse15.pid      test
ddl_recovery.log   ibdata1         mysql              performance_schemaopensuse15:~ # mariadb -V
mariadb  Ver 15.1 Distrib 10.11.11-MariaDB, for Linux (x86_64) using  EditLine wrapperopensuse15:~ # systemctl status mariadb
● mariadb.service - MariaDB database serverLoaded: loaded (/usr/lib/systemd/system/mariadb.service; enabled; preset: disabled)Active: active (running) since Sun 2025-08-17 14:25:20 CST; 43s agoDocs: man:mysqld(8)https://mariadb.com/kb/en/library/systemd/Process: 13918 ExecStartPre=/usr/lib/mysql/mysql-systemd-helper install (code=exited, status=0/SUCCESS)Process: 13968 ExecStartPre=/usr/lib/mysql/mysql-systemd-helper upgrade (code=exited, status=0/SUCCESS)Main PID: 13975 (mysqld)Status: "Taking your SQL requests now..."Tasks: 10 (limit: 2250)CPU: 1.067sCGroup: /system.slice/mariadb.service└─13975 /usr/sbin/mysqld --defaults-file=/etc/my.cnf --user=mysql --socket=/run/mysql/mysql.sockAug 17 14:25:19 opensuse15 mysql-systemd-helper[13924]: The second is mysql@localhost, it has no password either>
Aug 17 14:25:19 opensuse15 mysql-systemd-helper[13924]: you need to be the system 'mysql' user to connect.
Aug 17 14:25:19 opensuse15 mysql-systemd-helper[13924]: After connecting you can set the password, if you would >
Aug 17 14:25:19 opensuse15 mysql-systemd-helper[13924]: able to connect as any of these users with a password an>
Aug 17 14:25:19 opensuse15 mysql-systemd-helper[13924]: See the MariaDB Knowledgebase at https://mariadb.com/kb
Aug 17 14:25:19 opensuse15 mysql-systemd-helper[13924]: Please report any problems at https://mariadb.org/jira
Aug 17 14:25:19 opensuse15 mysql-systemd-helper[13924]: The latest information about MariaDB is available at htt>
Aug 17 14:25:19 opensuse15 mysql-systemd-helper[13924]: Consider joining MariaDB's strong and vibrant community:
Aug 17 14:25:19 opensuse15 mysql-systemd-helper[13924]: https://mariadb.org/get-involved/
Aug 17 14:25:20 opensuse15 systemd[1]: Started MariaDB database server.opensuse15:~ # mariadb
Welcome to the MariaDB monitor.  Commands end with ; or \g.
Your MariaDB connection id is 3
Server version: 10.11.11-MariaDB MariaDB packageCopyright (c) 2000, 2018, Oracle, MariaDB Corporation Ab and others.Type 'help;' or '\h' for help. Type '\c' to clear the current input statement.MariaDB [(none)]> status
--------------
mariadb  Ver 15.1 Distrib 10.11.11-MariaDB, for Linux (x86_64) using  EditLine wrapperConnection id:		3
Current database:
Current user:		root@localhost
SSL:			Not in use
Current pager:		less
Using outfile:		''
Using delimiter:	;
Server:			MariaDB
Server version:		10.11.11-MariaDB MariaDB package
Protocol version:	10
Connection:		Localhost via UNIX socket
Server characterset:	utf8mb4
Db     characterset:	utf8mb4
Client characterset:	utf8mb3
Conn.  characterset:	utf8mb3
UNIX socket:		/run/mysql/mysql.sock
Uptime:			1 min 7 secThreads: 1  Questions: 4  Slow queries: 0  Opens: 17  Open tables: 10  Queries per second avg: 0.059
--------------MariaDB [(none)]> show databases;
+--------------------+
| Database           |
+--------------------+
| information_schema |
| mysql              |
| performance_schema |
| sys                |
| test               | # 有test数据库
+--------------------+
5 rows in set (0.000 sec)MariaDB [(none)]> select user,host from mysql.user;
+-------------+------------+
| User        | Host       |
+-------------+------------+
| PUBLIC      |            |
|             | localhost  | # 有匿名用户
| mariadb.sys | localhost  |
| mysql       | localhost  |
| root        | localhost  |
|             | opensuse15 | # 有远程登录用户
+-------------+------------+
6 rows in set (0.001 sec)MariaDB [(none)]> exit
Bye# 有test数据库、匿名用户和远程登录用户,需要安全初始化
opensuse15:~ # mariadb-secure-installationNOTE: RUNNING ALL PARTS OF THIS SCRIPT IS RECOMMENDED FOR ALL MariaDBSERVERS IN PRODUCTION USE!  PLEASE READ EACH STEP CAREFULLY!In order to log into MariaDB to secure it, we'll need the current
password for the root user. If you've just installed MariaDB, and
haven't set the root password yet, you should just press enter here.Enter current password for root (enter for none): # 输入 root 的当前密码(不输入),直接敲回车
OK, successfully used password, moving on...Setting the root password or using the unix_socket ensures that nobody
can log into the MariaDB root user without the proper authorisation.You already have your root account protected, so you can safely answer 'n'.Switch to unix_socket authentication [Y/n] y # 输入y,切换到 unix_socket 身份验证
Enabled successfully!
Reloading privilege tables..... Success!You already have your root account protected, so you can safely answer 'n'.Change the root password? [Y/n] n # 输入n,不设置root密码... skipping.By default, a MariaDB installation has an anonymous user, allowing anyone
to log into MariaDB without having to have a user account created for
them.  This is intended only for testing, and to make the installation
go a bit smoother.  You should remove them before moving into a
production environment.Remove anonymous users? [Y/n] y # 输入y,移除匿名账户... Success!Normally, root should only be allowed to connect from 'localhost'.  This
ensures that someone cannot guess at the root password from the network.Disallow root login remotely? [Y/n] y # 输入y,禁止 root 远程登录... Success!By default, MariaDB comes with a database named 'test' that anyone can
access.  This is also intended only for testing, and should be removed
before moving into a production environment.Remove test database and access to it? [Y/n] y # 输入y,移除测试库- Dropping test database...... Success!- Removing privileges on test database...... Success!Reloading the privilege tables will ensure that all changes made so far
will take effect immediately.Reload privilege tables now? [Y/n] y # 输入y,重新加载权限表... Success!Cleaning up...All done!  If you've completed all of the above steps, your MariaDB
installation should now be secure.Thanks for using MariaDB!opensuse15:~ # mariadb
Welcome to the MariaDB monitor.  Commands end with ; or \g.
Your MariaDB connection id is 14
Server version: 10.11.11-MariaDB MariaDB packageCopyright (c) 2000, 2018, Oracle, MariaDB Corporation Ab and others.Type 'help;' or '\h' for help. Type '\c' to clear the current input statement.MariaDB [(none)]> status
--------------
mariadb  Ver 15.1 Distrib 10.11.11-MariaDB, for Linux (x86_64) using  EditLine wrapperConnection id:		14
Current database:
Current user:		root@localhost
SSL:			Not in use
Current pager:		less
Using outfile:		''
Using delimiter:	;
Server:			MariaDB
Server version:		10.11.11-MariaDB MariaDB package
Protocol version:	10
Connection:		Localhost via UNIX socket
Server characterset:	utf8mb4
Db     characterset:	utf8mb4
Client characterset:	utf8mb3
Conn.  characterset:	utf8mb3
UNIX socket:		/run/mysql/mysql.sock
Uptime:			2 min 34 secThreads: 1  Questions: 30  Slow queries: 0  Opens: 21  Open tables: 14  Queries per second avg: 0.194
--------------MariaDB [(none)]> show databases;
+--------------------+
| Database           |
+--------------------+
| information_schema |
| mysql              |
| performance_schema |
| sys                |
+--------------------+
4 rows in set (0.000 sec)
# 没有test数据库MariaDB [(none)]> select user,host from mysql.user;
+-------------+-----------+
| User        | Host      |
+-------------+-----------+
| PUBLIC      |           |
| mariadb.sys | localhost |
| mysql       | localhost |
| root        | localhost |
+-------------+-----------+
4 rows in set (0.001 sec)
# 没有匿名用户和远程登录用户MariaDB [(none)]> exit
Bye
2.2.2 添加MariaDB官方资源库
2.2.2.1 Yum资源库安装MariaDB
添加官方资源库,去“https://mariadb.org”网站下载,选择“Download”。
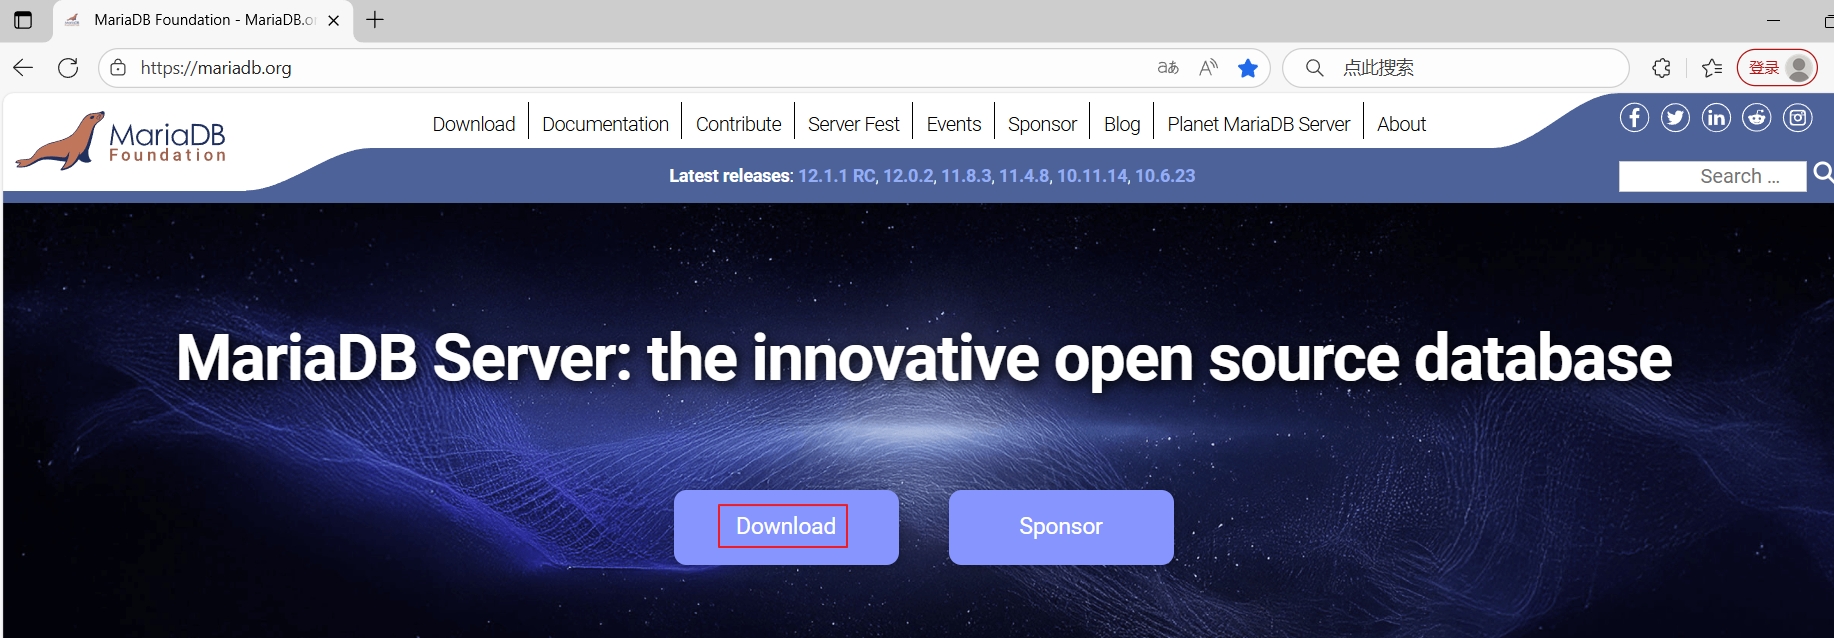
图2 MariaDB首页
在打开的网页,在“MariaDB Server Repositories”下面选择“Choose a distribution为:Red Hat Enterprise Linux 9”,选择“Choose a MariaDB Server version为:11.8”,选择“Mirror为:清华大学 TUNA 协会 (Tsinghua University TUNA Association)”,然后根据下面提示操作。
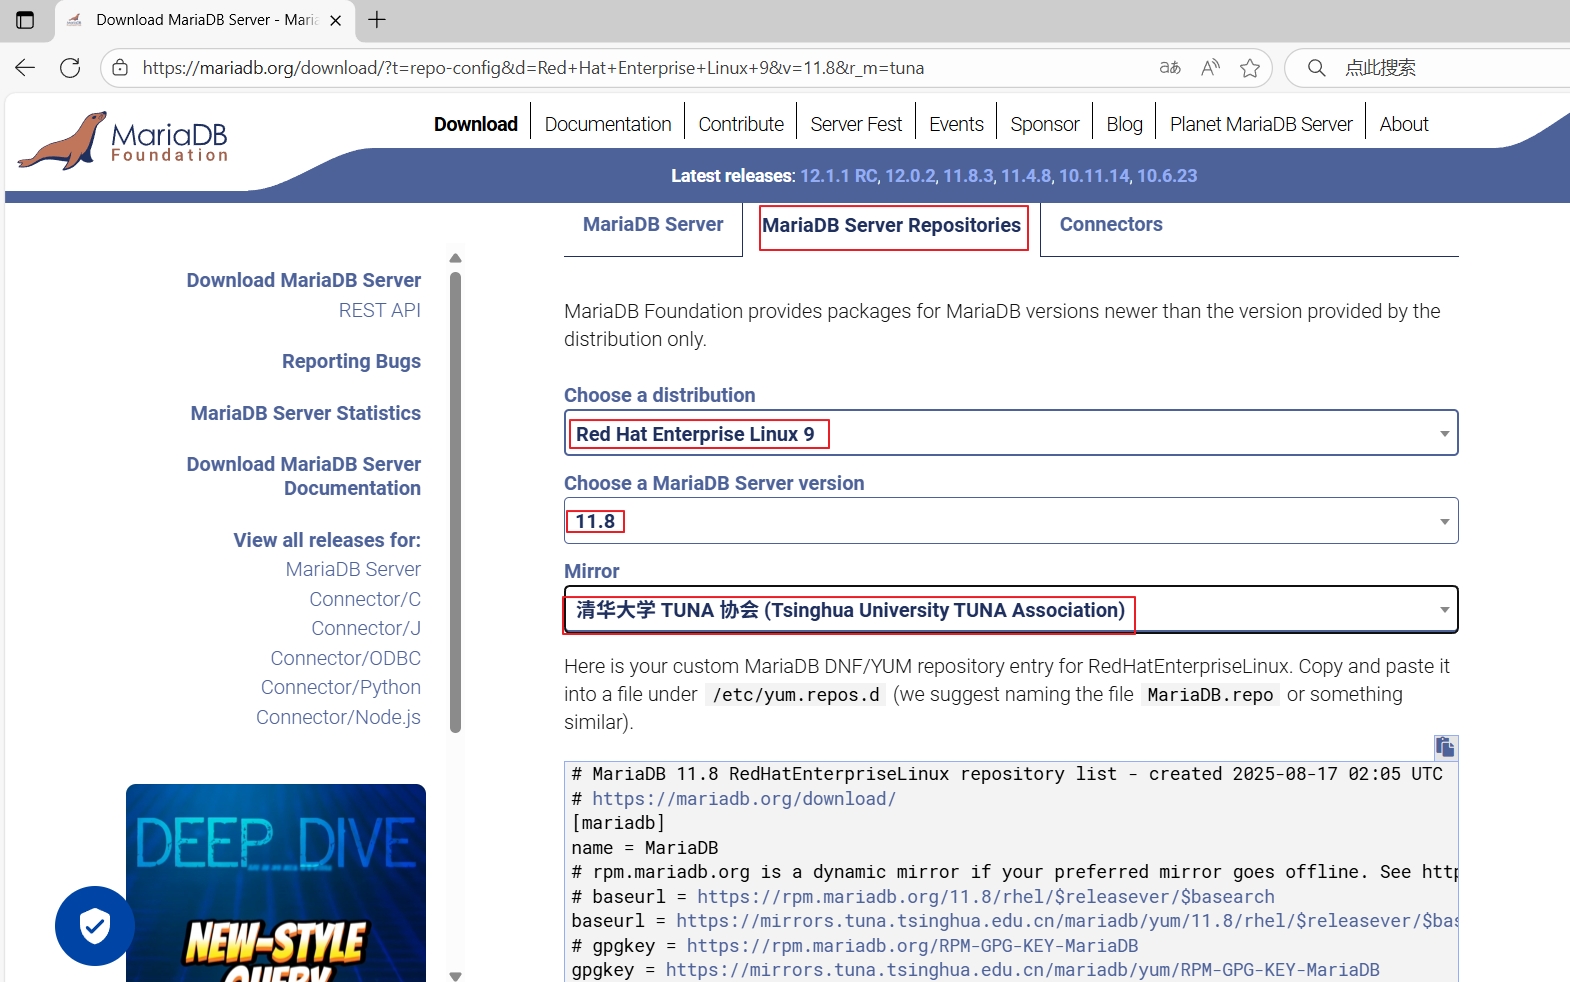
图3 MariaDB添加资源库
[root@rocky9 ~]# cat > /etc/yum.repos.d/MariaDB.repo <<EOF
# MariaDB 11.8 RedHatEnterpriseLinux repository list - created 2025-08-17 02:34 UTC
# https://mariadb.org/download/
[mariadb]
name = MariaDB
# rpm.mariadb.org is a dynamic mirror if your preferred mirror goes offline. See https://mariadb.org/mirrorbits/ for details.
# baseurl = https://rpm.mariadb.org/11.8/rhel/$releasever/$basearch
baseurl = https://mirrors.tuna.tsinghua.edu.cn/mariadb/yum/11.8/rhel/\$releasever/\$basearch
# gpgkey = https://rpm.mariadb.org/RPM-GPG-KEY-MariaDB
gpgkey = https://mirrors.tuna.tsinghua.edu.cn/mariadb/yum/RPM-GPG-KEY-MariaDB
gpgcheck = 1
EOF[root@rocky9 ~]# dnf install -y MariaDB-server[root@rocky9 ~]# systemctl enable --now mariadb[root@rocky9 ~]# ls /var/lib/mysql/
aria_log.00000001  ib_buffer_pool  ibtmp1                mysql               rocky9.pid  test     undo003
aria_log_control   ibdata1         mariadb_upgrade_info  mysql.sock          sys         undo001
ddl_recovery.log   ib_logfile0     multi-master.info     performance_schema  tc.log      undo002[root@rocky9 ~]# mariadb -V
mariadb from 11.8.3-MariaDB, client 15.2 for Linux (x86_64) using  EditLine wrapper[root@rocky9 ~]# systemctl status mariadb
● mariadb.service - MariaDB 11.8.3 database serverLoaded: loaded (/usr/lib/systemd/system/mariadb.service; enabled; preset: disabled)Drop-In: /etc/systemd/system/mariadb.service.d└─migrated-from-my.cnf-settings.confActive: active (running) since Sun 2025-08-17 10:36:26 CST; 1min 17s agoDocs: man:mariadbd(8)https://mariadb.com/kb/en/library/systemd/Process: 12291 ExecStartPre=/bin/sh -c [ ! -e /usr/bin/galera_recovery ] && VAR= ||   VAR=`/usr/bin/galera_r>Process: 12308 ExecStartPost=/bin/rm -f /var/lib/mysql/wsrep-start-position (code=exited, status=0/SUCCESS)Main PID: 12298 (mariadbd)Status: "Taking your SQL requests now..."Tasks: 8 (limit: 13443)Memory: 126.7MCPU: 563msCGroup: /system.slice/mariadb.service└─12298 /usr/sbin/mariadbdAug 17 10:36:25 rocky9 mariadbd[12298]: 2025-08-17 10:36:25 0 [Note] InnoDB: Loading buffer pool(s) from /var/li>
Aug 17 10:36:25 rocky9 mariadbd[12298]: 2025-08-17 10:36:25 0 [Note] Plugin 'FEEDBACK' is disabled.
Aug 17 10:36:25 rocky9 mariadbd[12298]: 2025-08-17 10:36:25 0 [Note] Plugin 'wsrep-provider' is disabled.
Aug 17 10:36:25 rocky9 mariadbd[12298]: 2025-08-17 10:36:25 0 [Note] InnoDB: Buffer pool(s) load completed at 25>
Aug 17 10:36:26 rocky9 mariadbd[12298]: 2025-08-17 10:36:26 0 [Note] Server socket created on IP: '0.0.0.0', por>
Aug 17 10:36:26 rocky9 mariadbd[12298]: 2025-08-17 10:36:26 0 [Note] Server socket created on IP: '::', port: '3>
Aug 17 10:36:26 rocky9 mariadbd[12298]: 2025-08-17 10:36:26 0 [Note] mariadbd: Event Scheduler: Loaded 0 events
Aug 17 10:36:26 rocky9 mariadbd[12298]: 2025-08-17 10:36:26 0 [Note] /usr/sbin/mariadbd: ready for connections.
Aug 17 10:36:26 rocky9 mariadbd[12298]: Version: '11.8.3-MariaDB'  socket: '/var/lib/mysql/mysql.sock'  port: 33>
Aug 17 10:36:26 rocky9 systemd[1]: Started MariaDB 11.8.3 database server.[root@rocky9 ~]# mariadb
mysql: Deprecated program name. It will be removed in a future release, use '/usr/bin/mariadb' instead
Welcome to the MariaDB monitor.  Commands end with ; or \g.
Your MariaDB connection id is 3
Server version: 11.8.3-MariaDB MariaDB ServerCopyright (c) 2000, 2018, Oracle, MariaDB Corporation Ab and others.Type 'help;' or '\h' for help. Type '\c' to clear the current input statement.MariaDB [(none)]> status
--------------
mysql from 11.8.3-MariaDB, client 15.2 for Linux (x86_64) using  EditLine wrapperConnection id:		3
Current database:
Current user:		root@localhost
SSL:			Cipher in use is TLS_AES_256_GCM_SHA384, cert is OK
Current pager:		stdout
Using outfile:		''
Using delimiter:	;
Server:			MariaDB
Server version:		11.8.3-MariaDB MariaDB Server
Protocol version:	10
Connection:		Localhost via UNIX socket
Server characterset:	utf8mb4
Db     characterset:	utf8mb4
Client characterset:	utf8mb4
Conn.  characterset:	utf8mb4
UNIX socket:		/var/lib/mysql/mysql.sock
Uptime:			1 min 45 secThreads: 1  Questions: 4  Slow queries: 0  Opens: 17  Open tables: 10  Queries per second avg: 0.038
--------------MariaDB [(none)]> show databases;
+--------------------+
| Database           |
+--------------------+
| information_schema |
| mysql              |
| performance_schema |
| sys                |
| test               | # 有test数据库
+--------------------+
5 rows in set (0.001 sec)MariaDB [(none)]> select user,host from mysql.user;
+-------------+-----------+
| User        | Host      |
+-------------+-----------+
| PUBLIC      |           |
|             | localhost | # 有匿名用户
| mariadb.sys | localhost |
| mysql       | localhost |
| root        | localhost |
|             | rocky9    | # 有远程登录用户
+-------------+-----------+
6 rows in set (0.001 sec)MariaDB [(none)]> exit
Bye# 有test数据库、匿名用户和远程登录用户,需要安全初始化
[root@rocky9 ~]# mariadb-secure-installationNOTE: RUNNING ALL PARTS OF THIS SCRIPT IS RECOMMENDED FOR ALL MariaDBSERVERS IN PRODUCTION USE!  PLEASE READ EACH STEP CAREFULLY!In order to log into MariaDB to secure it, we'll need the current
password for the root user. If you've just installed MariaDB, and
haven't set the root password yet, you should just press enter here.Enter current password for root (enter for none): # 输入 root 的当前密码(不输入),直接敲回车
OK, successfully used password, moving on...Setting the root password or using the unix_socket ensures that nobody
can log into the MariaDB root user without the proper authorisation.You already have your root account protected, so you can safely answer 'n'.Switch to unix_socket authentication [Y/n] y # 输入y,切换到 unix_socket 身份验证
Enabled successfully!
Reloading privilege tables..... Success!You already have your root account protected, so you can safely answer 'n'.Change the root password? [Y/n] n # 输入n,不设置root密码... skipping.By default, a MariaDB installation has an anonymous user, allowing anyone
to log into MariaDB without having to have a user account created for
them.  This is intended only for testing, and to make the installation
go a bit smoother.  You should remove them before moving into a
production environment.Remove anonymous users? [Y/n] y # 输入y,移除匿名账户... Success!Normally, root should only be allowed to connect from 'localhost'.  This
ensures that someone cannot guess at the root password from the network.Disallow root login remotely? [Y/n] y # 输入y,禁止 root 远程登录... Success!By default, MariaDB comes with a database named 'test' that anyone can
access.  This is also intended only for testing, and should be removed
before moving into a production environment.Remove test database and access to it? [Y/n] y # 输入y,移除测试库- Dropping test database...... Success!- Removing privileges on test database...... Success!Reloading the privilege tables will ensure that all changes made so far
will take effect immediately.Reload privilege tables now? [Y/n] y # 输入y,重新加载权限表... Success!Cleaning up...All done!  If you've completed all of the above steps, your MariaDB
installation should now be secure.Thanks for using MariaDB![root@rocky9 ~]# mariadb
Welcome to the MariaDB monitor.  Commands end with ; or \g.
Your MariaDB connection id is 14
Server version: 11.8.3-MariaDB MariaDB ServerCopyright (c) 2000, 2018, Oracle, MariaDB Corporation Ab and others.Type 'help;' or '\h' for help. Type '\c' to clear the current input statement.MariaDB [(none)]> status
--------------
mariadb from 11.8.3-MariaDB, client 15.2 for Linux (x86_64) using  EditLine wrapperConnection id:		14
Current database:
Current user:		root@localhost
SSL:			Cipher in use is TLS_AES_256_GCM_SHA384, cert is OK
Current pager:		stdout
Using outfile:		''
Using delimiter:	;
Server:			MariaDB
Server version:		11.8.3-MariaDB MariaDB Server
Protocol version:	10
Connection:		Localhost via UNIX socket
Server characterset:	utf8mb4
Db     characterset:	utf8mb4
Client characterset:	utf8mb4
Conn.  characterset:	utf8mb4
UNIX socket:		/var/lib/mysql/mysql.sock
Uptime:			7 min 59 secThreads: 1  Questions: 30  Slow queries: 0  Opens: 18  Open tables: 11  Queries per second avg: 0.062
--------------MariaDB [(none)]> show databases;
+--------------------+
| Database           |
+--------------------+
| information_schema |
| mysql              |
| performance_schema |
| sys                |
+--------------------+
4 rows in set (0.001 sec)
# 没有test数据库MariaDB [(none)]> select user,host from mysql.user;
+-------------+-----------+
| User        | Host      |
+-------------+-----------+
| PUBLIC      |           |
| mariadb.sys | localhost |
| mysql       | localhost |
| root        | localhost |
+-------------+-----------+
4 rows in set (0.001 sec)
# 没有匿名用户和远程登录用户MariaDB [(none)]> exit
Bye
2.2.2.2 Apt资源库安装MariaDB
添加官方资源库,去“https://mariadb.org”网站下载,选择“Download”。

图4 MariaDB首页
在打开的网页,在“MariaDB Server Repositories”下面选择“Choose a distribution为:24.04 “noble””,选择“Choose a MariaDB Server version为:11.8”,选择“Mirror为:清华大学 TUNA 协会 (Tsinghua University TUNA Association)”,然后根据下面提示操作。
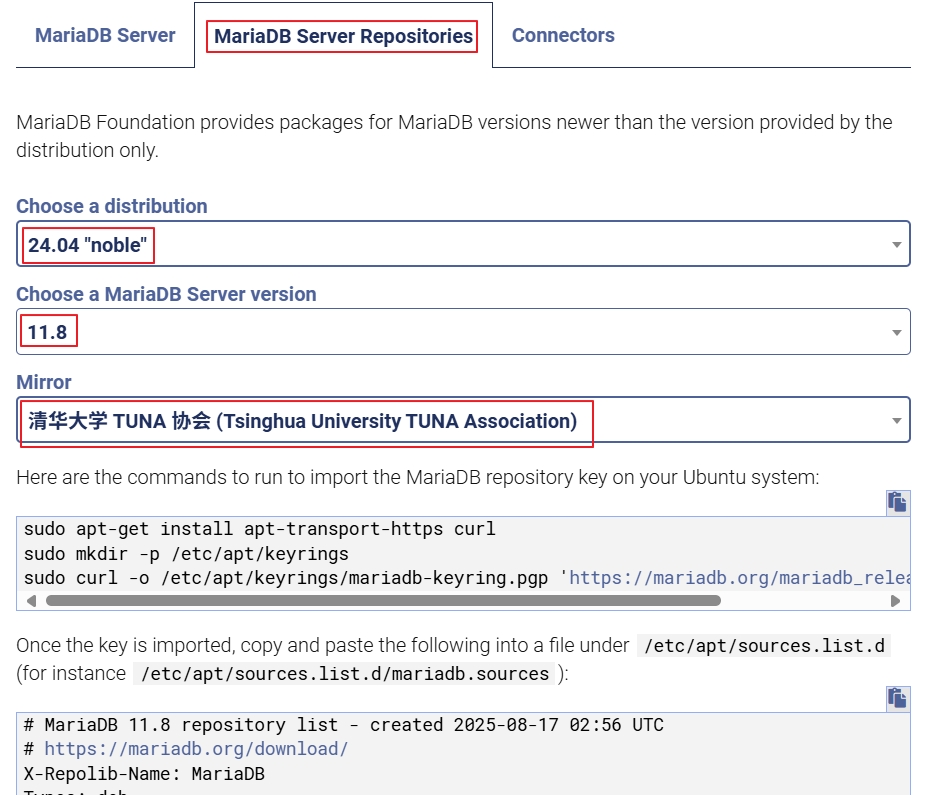
图5 MariaDB添加资源库
apt install -y apt-transport-https curl
mkdir -p /etc/apt/keyrings
curl -o /etc/apt/keyrings/mariadb-keyring.pgp 'https://mariadb.org/mariadb_release_signing_key.pgp'cat > /etc/apt/sources.list.d/mariadb.sources <<EOF
# MariaDB 11.8 repository list - created 2025-08-17 03:03 UTC
# https://mariadb.org/download/
X-Repolib-Name: MariaDB
Types: deb
# deb.mariadb.org is a dynamic mirror if your preferred mirror goes offline. See https://mariadb.org/mirrorbits/ for details.
# URIs: https://deb.mariadb.org/11.8/ubuntu
URIs: https://mirrors.tuna.tsinghua.edu.cn/mariadb/repo/11.8/ubuntu
Suites: noble
Components: main main/debug
Signed-By: /etc/apt/keyrings/mariadb-keyring.pgp
EOFroot@ubuntu2404:~# apt updateroot@ubuntu2404:~# apt install -y mariadb-serverroot@ubuntu2404:~# systemctl enable --now mariadbroot@ubuntu2404:~# ls /var/lib/mysql/
aria_log.00000001  debian-11.8.flag  ib_logfile0           multi-master.info   sys      undo002
aria_log_control   ib_buffer_pool    ibtmp1                mysql               tc.log   undo003
ddl_recovery.log   ibdata1           mariadb_upgrade_info  performance_schema  undo001root@ubuntu2404:~# mariadb -V
mariadb from 11.8.3-MariaDB, client 15.2 for debian-linux-gnu (x86_64) using  EditLine wrapperroot@ubuntu2404:~# systemctl status mariadb
● mariadb.service - MariaDB 11.8.3 database serverLoaded: loaded (/usr/lib/systemd/system/mariadb.service; enabled; preset: enabled)Drop-In: /etc/systemd/system/mariadb.service.d└─migrated-from-my.cnf-settings.confActive: active (running) since Sun 2025-08-17 12:21:22 CST; 1min 1s agoDocs: man:mariadbd(8)https://mariadb.com/kb/en/library/systemd/Main PID: 2588 (mariadbd)Status: "Taking your SQL requests now..."Tasks: 10 (limit: 14588)Memory: 93.0M (peak: 97.2M)CPU: 2.489sCGroup: /system.slice/mariadb.service└─2588 /usr/sbin/mariadbdAug 17 12:21:21 ubuntu2404 mariadbd[2588]: 2025-08-17 12:21:21 0 [Note] Plugin 'FEEDBACK' is disabled.
Aug 17 12:21:21 ubuntu2404 mariadbd[2588]: 2025-08-17 12:21:21 0 [Note] InnoDB: Loading buffer pool(s) from /var>
Aug 17 12:21:21 ubuntu2404 mariadbd[2588]: 2025-08-17 12:21:21 0 [Note] Plugin 'wsrep-provider' is disabled.
Aug 17 12:21:21 ubuntu2404 mariadbd[2588]: 2025-08-17 12:21:21 0 [Note] InnoDB: Buffer pool(s) load completed at>
Aug 17 12:21:22 ubuntu2404 mariadbd[2588]: 2025-08-17 12:21:22 0 [Note] Server socket created on IP: '127.0.0.1'>
Aug 17 12:21:22 ubuntu2404 mariadbd[2588]: 2025-08-17 12:21:22 0 [Note] mariadbd: Event Scheduler: Loaded 0 even>
Aug 17 12:21:22 ubuntu2404 mariadbd[2588]: 2025-08-17 12:21:22 0 [Note] /usr/sbin/mariadbd: ready for connection>
Aug 17 12:21:22 ubuntu2404 mariadbd[2588]: Version: '11.8.3-MariaDB-ubu2404'  socket: '/run/mysqld/mysqld.sock' >
Aug 17 12:21:22 ubuntu2404 systemd[1]: Started mariadb.service - MariaDB 11.8.3 database server.
Aug 17 12:21:22 ubuntu2404 /etc/mysql/debian-start[2621]: Triggering myisam-recover for all MyISAM tables and ar>root@ubuntu2404:~# mariadb
Welcome to the MariaDB monitor.  Commands end with ; or \g.
Your MariaDB connection id is 31
Server version: 11.8.3-MariaDB-ubu2404 mariadb.org binary distributionCopyright (c) 2000, 2018, Oracle, MariaDB Corporation Ab and others.Type 'help;' or '\h' for help. Type '\c' to clear the current input statement.MariaDB [(none)]> status
--------------
mariadb from 11.8.3-MariaDB, client 15.2 for debian-linux-gnu (x86_64) using  EditLine wrapperConnection id:		31
Current database:
Current user:		root@localhost
SSL:			Cipher in use is TLS_AES_256_GCM_SHA384, cert is OK
Current pager:		stdout
Using outfile:		''
Using delimiter:	;
Server:			MariaDB
Server version:		11.8.3-MariaDB-ubu2404 mariadb.org binary distribution
Protocol version:	10
Connection:		Localhost via UNIX socket
Server characterset:	utf8mb4
Db     characterset:	utf8mb4
Client characterset:	utf8mb4
Conn.  characterset:	utf8mb4
UNIX socket:		/run/mysqld/mysqld.sock
Uptime:			1 min 26 secThreads: 1  Questions: 61  Slow queries: 0  Opens: 33  Open tables: 26  Queries per second avg: 0.709
--------------MariaDB [(none)]> show databases;
+--------------------+
| Database           |
+--------------------+
| information_schema |
| mysql              |
| performance_schema |
| sys                |
+--------------------+
4 rows in set (0.001 sec)MariaDB [(none)]>  select user,host from mysql.user;
+-------------+-----------+
| User        | Host      |
+-------------+-----------+
| mariadb.sys | localhost |
| mysql       | localhost |
| root        | localhost |
+-------------+-----------+
3 rows in set (0.001 sec)MariaDB [(none)]> exit
Bye
2.2.2.3 SUSE资源库安装MariaDB
添加官方资源库,去“https://mariadb.org”网站下载,选择“Download”。

图6 MariaDB首页
在打开的网页,在“MariaDB Server Repositories”下面选择“Choose a distribution为:24.04 “noble””,选择“Choose a MariaDB Server version为:11.8”,选择“Mirror为:清华大学 TUNA 协会 (Tsinghua University TUNA Association)”,然后根据下面提示操作。
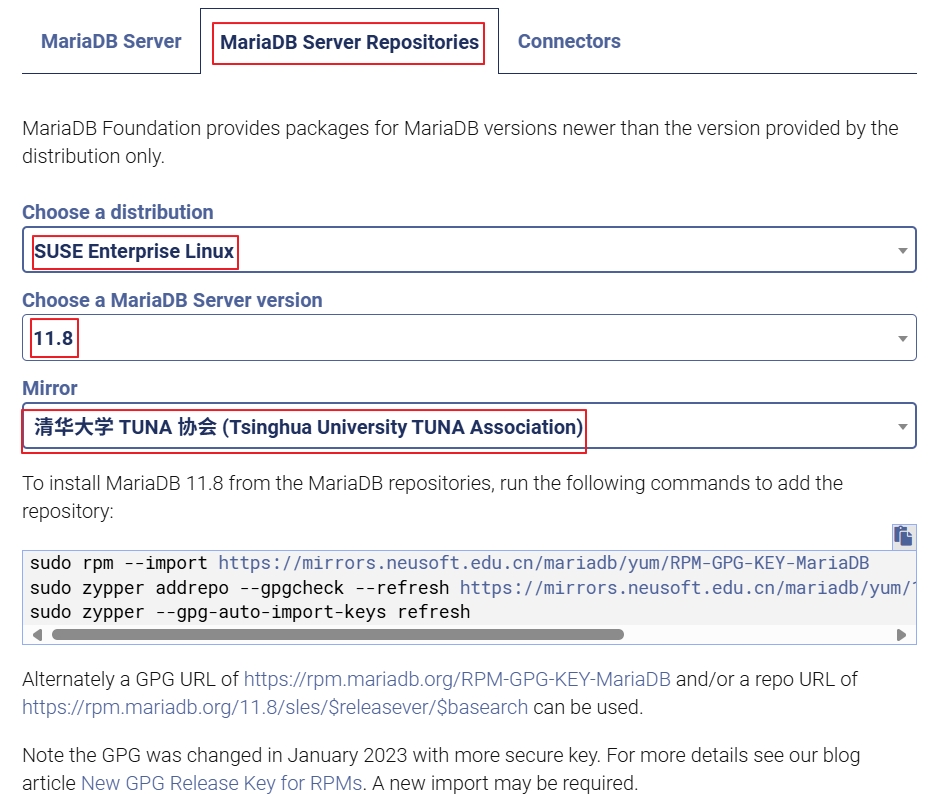
图7 MariaDB添加资源库
rpm --import https://mirrors.tuna.tsinghua.edu.cn/mariadb/yum/RPM-GPG-KEY-MariaDB
zypper addrepo --gpgcheck --refresh https://mirrors.tuna.tsinghua.edu.cn/mariadb/yum/11.8/sles/\$releasever/\$basearch mariadb
zypper --gpg-auto-import-keys refreshopensuse15:~ # zypper install -y MariaDB-serveropensuse15:~ # systemctl enable --now mariadbopensuse15:~ # ls /var/lib/mysql/
aria_log.00000001  ib_buffer_pool  ibtmp1                mysql           performance_schema  test     undo003
aria_log_control   ib_logfile0     mariadb_upgrade_info  mysql.sock      sys                 undo001
ddl_recovery.log   ibdata1         multi-master.info     opensuse15.pid  tc.log              undo002opensuse15:~ # mariadb -V
mariadb from 11.8.3-MariaDB, client 15.2 for Linux (x86_64) using readline 5.1opensuse15:~ # systemctl status mariadb
● mariadb.service - MariaDB 11.8.3 database serverLoaded: loaded (/usr/lib/systemd/system/mariadb.service; enabled; preset: disabled)Drop-In: /etc/systemd/system/mariadb.service.d└─migrated-from-my.cnf-settings.confActive: active (running) since Sun 2025-08-17 12:44:32 CST; 51s agoDocs: man:mariadbd(8)https://mariadb.com/kb/en/library/systemd/Process: 14079 ExecStartPre=/bin/sh -c [ ! -e /usr/bin/galera_recovery ] && VAR= ||   VAR=`/usr/bin/galera_r>Process: 14099 ExecStartPost=/bin/rm -f /var/lib/mysql/wsrep-start-position (code=exited, status=0/SUCCESS)Main PID: 14087 (mariadbd)Status: "Taking your SQL requests now..."Tasks: 11 (limit: 14850)CPU: 687msCGroup: /system.slice/mariadb.service└─14087 /usr/sbin/mariadbdAug 17 12:44:31 opensuse15 mariadbd[14087]: 2025-08-17 12:44:31 0 [Note] Plugin 'FEEDBACK' is disabled.
Aug 17 12:44:31 opensuse15 mariadbd[14087]: 2025-08-17 12:44:31 0 [Note] Plugin 'wsrep-provider' is disabled.
Aug 17 12:44:31 opensuse15 mariadbd[14087]: 2025-08-17 12:44:31 0 [Note] InnoDB: Loading buffer pool(s) from /va>
Aug 17 12:44:31 opensuse15 mariadbd[14087]: 2025-08-17 12:44:31 0 [Note] InnoDB: Buffer pool(s) load completed a>
Aug 17 12:44:32 opensuse15 mariadbd[14087]: 2025-08-17 12:44:32 0 [Note] Server socket created on IP: '0.0.0.0',>
Aug 17 12:44:32 opensuse15 mariadbd[14087]: 2025-08-17 12:44:32 0 [Note] Server socket created on IP: '::', port>
Aug 17 12:44:32 opensuse15 mariadbd[14087]: 2025-08-17 12:44:32 0 [Note] mariadbd: Event Scheduler: Loaded 0 eve>
Aug 17 12:44:32 opensuse15 mariadbd[14087]: 2025-08-17 12:44:32 0 [Note] /usr/sbin/mariadbd: ready for connectio>
Aug 17 12:44:32 opensuse15 mariadbd[14087]: Version: '11.8.3-MariaDB'  socket: '/var/lib/mysql/mysql.sock'  port>
Aug 17 12:44:32 opensuse15 systemd[1]: Started MariaDB 11.8.3 database server.opensuse15:~ # mariadb
Welcome to the MariaDB monitor.  Commands end with ; or \g.
Your MariaDB connection id is 3
Server version: 11.8.3-MariaDB MariaDB ServerCopyright (c) 2000, 2018, Oracle, MariaDB Corporation Ab and others.Type 'help;' or '\h' for help. Type '\c' to clear the current input statement.MariaDB [(none)]> status
--------------
mariadb from 11.8.3-MariaDB, client 15.2 for Linux (x86_64) using readline 5.1Connection id:		3
Current database:
Current user:		root@localhost
SSL:			Cipher in use is TLS_AES_256_GCM_SHA384, cert is OK
Current pager:		less
Using outfile:		''
Using delimiter:	;
Server:			MariaDB
Server version:		11.8.3-MariaDB MariaDB Server
Protocol version:	10
Connection:		Localhost via UNIX socket
Server characterset:	utf8mb4
Db     characterset:	utf8mb4
Client characterset:	utf8mb4
Conn.  characterset:	utf8mb4
UNIX socket:		/var/lib/mysql/mysql.sock
Uptime:			1 min 16 secThreads: 1  Questions: 4  Slow queries: 0  Opens: 17  Open tables: 10  Queries per second avg: 0.052
--------------MariaDB [(none)]> show databases;
+--------------------+
| Database           |
+--------------------+
| information_schema |
| mysql              |
| performance_schema |
| sys                |
| test               | # 有test数据库
+--------------------+
5 rows in set (0.000 sec)MariaDB [(none)]> select user,host from mysql.user;
+-------------+------------+
| User        | Host       |
+-------------+------------+
| PUBLIC      |            |
|             | localhost  | # 有匿名用户
| mariadb.sys | localhost  |
| mysql       | localhost  |
| root        | localhost  |
|             | opensuse15 | # 有远程登录用户
+-------------+------------+
6 rows in set (0.001 sec)MariaDB [(none)]> exit
Bye# 有test数据库、匿名用户和远程登录用户,需要安全初始化
opensuse15:~ # mariadb-secure-installationNOTE: RUNNING ALL PARTS OF THIS SCRIPT IS RECOMMENDED FOR ALL MariaDBSERVERS IN PRODUCTION USE!  PLEASE READ EACH STEP CAREFULLY!In order to log into MariaDB to secure it, we'll need the current
password for the root user. If you've just installed MariaDB, and
haven't set the root password yet, you should just press enter here.Enter current password for root (enter for none):  # 输入 root 的当前密码(不输入),直接敲回车
OK, successfully used password, moving on...Setting the root password or using the unix_socket ensures that nobody
can log into the MariaDB root user without the proper authorisation.You already have your root account protected, so you can safely answer 'n'.Switch to unix_socket authentication [Y/n] y # 输入y,切换到 unix_socket 身份验证
Enabled successfully!
Reloading privilege tables..... Success!You already have your root account protected, so you can safely answer 'n'.Change the root password? [Y/n] n # 输入n,不设置root密码... skipping.By default, a MariaDB installation has an anonymous user, allowing anyone
to log into MariaDB without having to have a user account created for
them.  This is intended only for testing, and to make the installation
go a bit smoother.  You should remove them before moving into a
production environment.Remove anonymous users? [Y/n] y # 输入y,移除匿名账户... Success!Normally, root should only be allowed to connect from 'localhost'.  This
ensures that someone cannot guess at the root password from the network.Disallow root login remotely? [Y/n] y # 输入y,禁止 root 远程登录... Success!By default, MariaDB comes with a database named 'test' that anyone can
access.  This is also intended only for testing, and should be removed
before moving into a production environment.Remove test database and access to it? [Y/n] y # 输入y,移除测试库- Dropping test database...... Success!- Removing privileges on test database...... Success!Reloading the privilege tables will ensure that all changes made so far
will take effect immediately.Reload privilege tables now? [Y/n] y # 输入y,重新加载权限表... Success!Cleaning up...All done!  If you've completed all of the above steps, your MariaDB
installation should now be secure.Thanks for using MariaDB!opensuse15:~ # mariadb
Welcome to the MariaDB monitor.  Commands end with ; or \g.
Your MariaDB connection id is 14
Server version: 11.8.3-MariaDB MariaDB ServerCopyright (c) 2000, 2018, Oracle, MariaDB Corporation Ab and others.Type 'help;' or '\h' for help. Type '\c' to clear the current input statement.MariaDB [(none)]> status
--------------
mariadb from 11.8.3-MariaDB, client 15.2 for Linux (x86_64) using readline 5.1Connection id:		14
Current database:
Current user:		root@localhost
SSL:			Cipher in use is TLS_AES_256_GCM_SHA384, cert is OK
Current pager:		less
Using outfile:		''
Using delimiter:	;
Server:			MariaDB
Server version:		11.8.3-MariaDB MariaDB Server
Protocol version:	10
Connection:		Localhost via UNIX socket
Server characterset:	utf8mb4
Db     characterset:	utf8mb4
Client characterset:	utf8mb4
Conn.  characterset:	utf8mb4
UNIX socket:		/var/lib/mysql/mysql.sock
Uptime:			2 min 35 secThreads: 1  Questions: 30  Slow queries: 0  Opens: 18  Open tables: 11  Queries per second avg: 0.193
--------------MariaDB [(none)]> show databases;
+--------------------+
| Database           |
+--------------------+
| information_schema |
| mysql              |
| performance_schema |
| sys                |
+--------------------+
4 rows in set (0.000 sec)
# 没有test数据库MariaDB [(none)]> select user,host from mysql.user;
+-------------+-----------+
| User        | Host      |
+-------------+-----------+
| PUBLIC      |           |
| mariadb.sys | localhost |
| mysql       | localhost |
| root        | localhost |
+-------------+-----------+
4 rows in set (0.001 sec)
# 没有匿名用户和远程登录用户MariaDB [(none)]> exit
Bye


——非传统影像轻量级解决方案)


)
)

、SDK、deep及bsp工程管理)
 - 使用Arbess+GitPuk+sourcefare实现Node.js项目自动化部署)


)