大模型系列22-MCP
- 玩转 MCP 协议:用 Cline + DeepSeek 接入天气服务
- 什么是 MCP?
- 环境准备:VScode + Cline + DeepSeek
- **配置 DeepSeek 模型:**
- **配置 MCP 工具**
- **uvx是什么?**
- **安装 uv(会自动有 uvx 命令)**
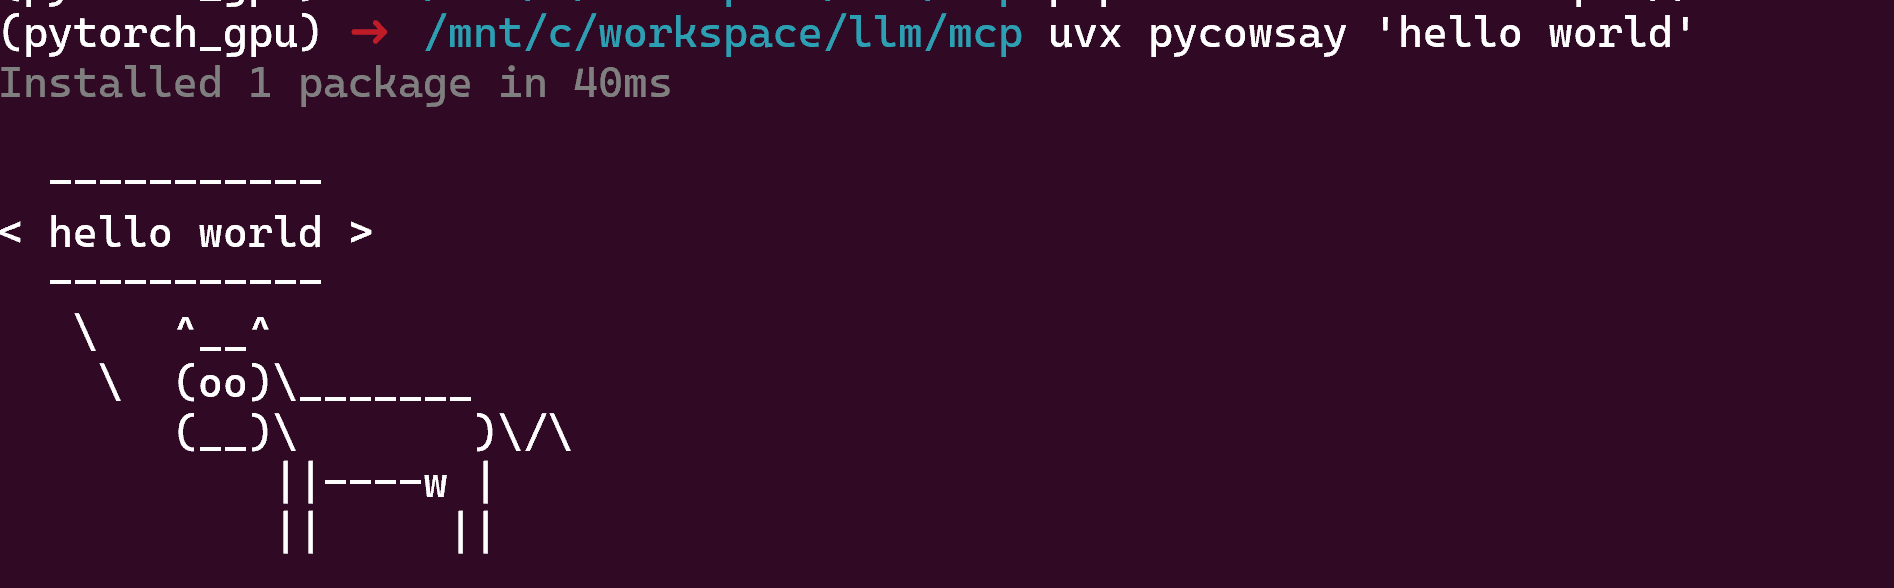
- **验证uvx的安装**:`uvx pycowsay 'hello world'`
- **通过uvx 手动安装 fetch 工具**
- uv 命令找不到
- **使用 fetch 工具**
- MCP 示例:查询纽约天气
- 步骤一:配置 MCP Server
- 步骤二:安装 uv 和运行测试
- 步骤三:写一个 MCP 工具服务 weather.py
- 步骤四:手动验证 weather.py
- 直接通过 Cline 来发起调用
- 全人肉交互式操作
- 步骤五:Cline 和 MCP 之间的工具代理
- 中间日志代理工具
- mcp server 测试客户端
- 步骤六:模型调用工具示例流程
- 总结:MCP 的本质与价值
玩转 MCP 协议:用 Cline + DeepSeek 接入天气服务
本文记录了使用 MCP(Model Context Protocol)协议,通过 Cline 插件接入 DeepSeek 模型,并构建一个天气查询工具的完整过程。包括从安装环境、插件配置,到实现 MCP Server 的交互流程,适合对 AI 工具链、智能体、RAG 和插件生态感兴趣的开发者参考。
本文只是一个自学的文章,其内容参考自bilibili:马克的技术工作坊,三篇 链接,这个讲的很好,建议大家都可以去看看他的三个系列
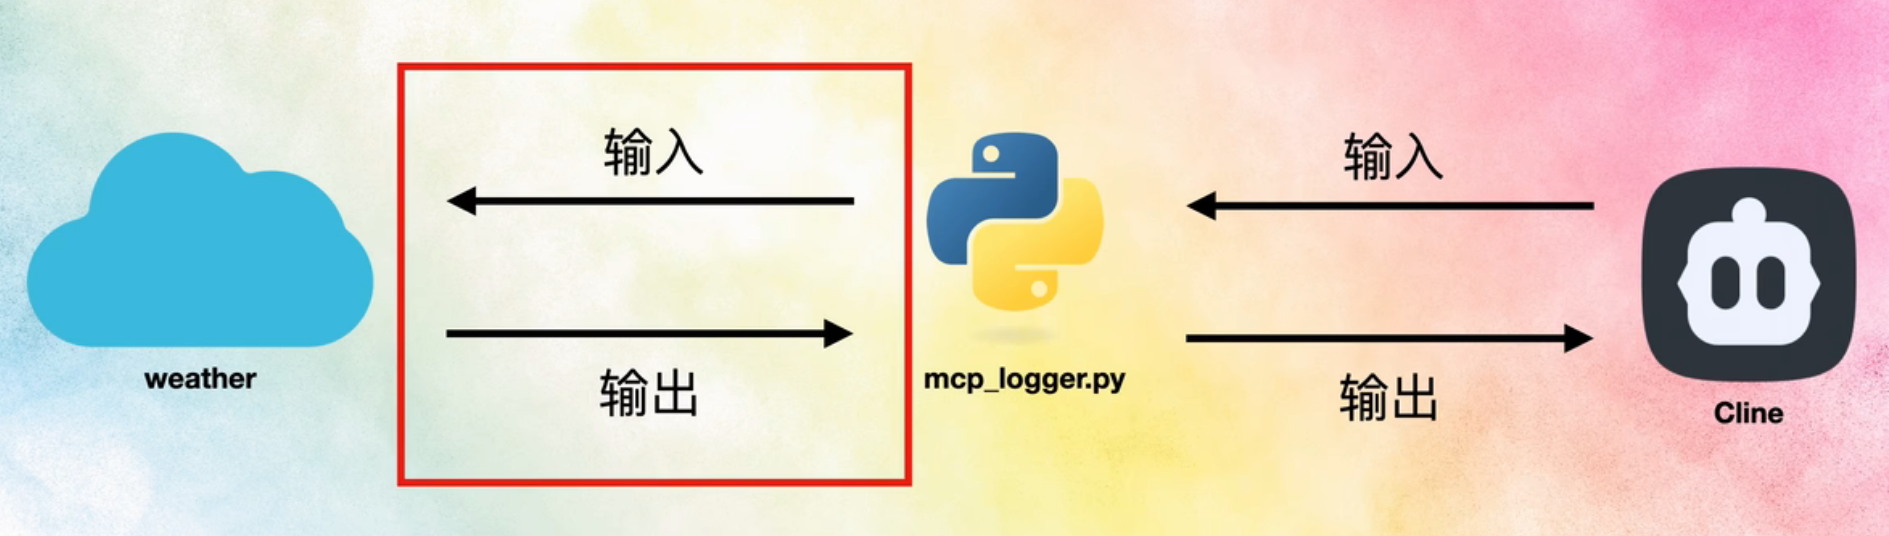
在开始之前,我们先借用视频中的一张图,来看一下 MCP 处于的位置,以及他是如何和我们的模型进行沟通的。这里的用户是我们,MCP Server 是手写的一个 python Weather 工具,它可以接收经纬度,返回天气情况。模型是 DeepSeek 模型,我事先充值了 10元,以实现 API 调用。Cline 是一个 vscode 插件,它是一个 Agent(也有人将它称为 MCP Host,我个人将它成为Agent,因为它从功能上就像是一个 Agent 智能体),用于连接 MCP Server 和 模型的桥梁。
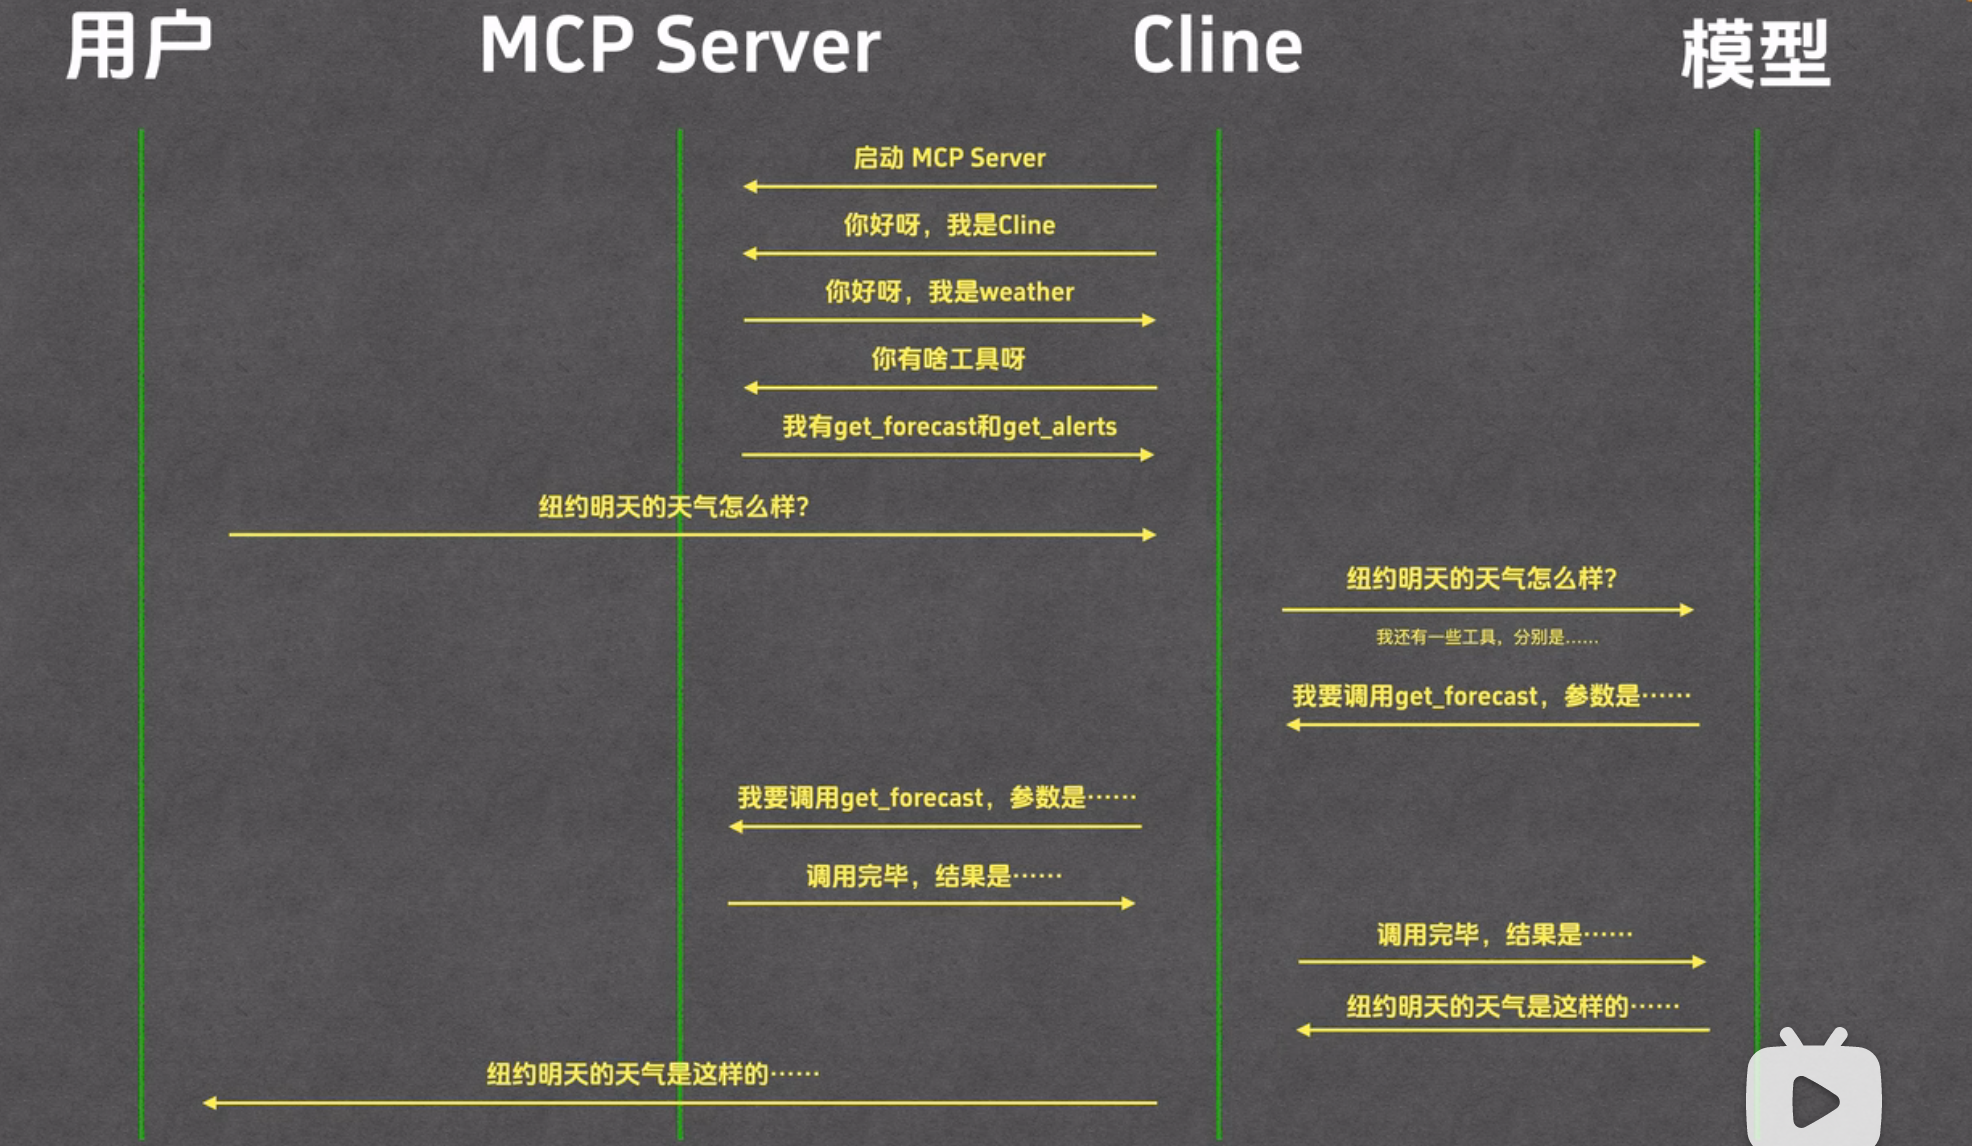
启动阶段
- 启动 MCP Server(如 weather.py)。
- Cline 启动后向 MCP Server 打招呼,并请求工具列表。
- MCP Server 返回可用工具(如 get_forecast, get_alerts)。
用户提问
- 用户输入自然语言问题,向Cline发问,如:“纽约明天的天气怎么样?”
- Cline将问题以及可用的工具发送给模型
模型接收用户问题
- 分析出这是一个需要天气信息的任务。
- 判断出可以调用 get_forecast 工具,并准备参数(如经纬度),将其发给Cline
Cline 调用工具
- Cline 发送工具调用请求(如 get_forecast)到 MCP Server。
- MCP Server 执行本地 Python 工具函数,处理请求。
MCP 返回结果
- MCP Server 将结果返回给 Cline。
- Cline 将结果传给模型,模型进行结果理解和语言组织。
模型生成回复
- 模型将调用结果包装成自然语言输出。
用户收到回答
- 用户最终看到如:“纽约明天的天气是多云,最高 25°C,最低 18°C” 这样的自然语言回复。
什么是 MCP?
MCP(Model Context Protocol)是一个用于定义模型与外部工具如何交互的协议。它可以告诉大模型有哪些工具可用、工具的参数和返回格式,然后触发外部 Agent(如Cline)调用工具,实现让大模型更好的使用工具的能力。说是大模型使用工具,其实是Agent发送给模型自己的工具列表,模型判断出要使用什么工具,然后模型告诉Agent去调用,Agent执行工具调用之后,然后将调用结果返回给模型,由模型决策后续的行为(或者是直接总结工具的结果返回给用户,或者是进一步调用工具等)。
简单理解:MCP 就是“大模型如何用工具”的语言。
环境准备:VScode + Cline + DeepSeek
启动 VSCode 之后,我们搜索 Cline 插件并安装。安装 Cline 插件后,我们可以将本地工具注册为 MCP 服务,通过 DeepSeek 等大模型驱动调用。这包括配置模型以及配置 MCP 工具两个步骤。
配置 DeepSeek 模型:
- 先访问DeepSeek官网,进行API充值。充值还挺方便的,前天充值的10元,经过这几天测试验证MCP的调用,刚才看了下还有 9.57 元。
- 然后访问API KEYS,创建一个 API KEY,用于 MCP 的验证。我们在 Cline 插件中,点击 Setttings,即可进行如下图的 API Provider 等配置,填入 API KEY,就可以通过 Cline 使用 DeepSeek 啦
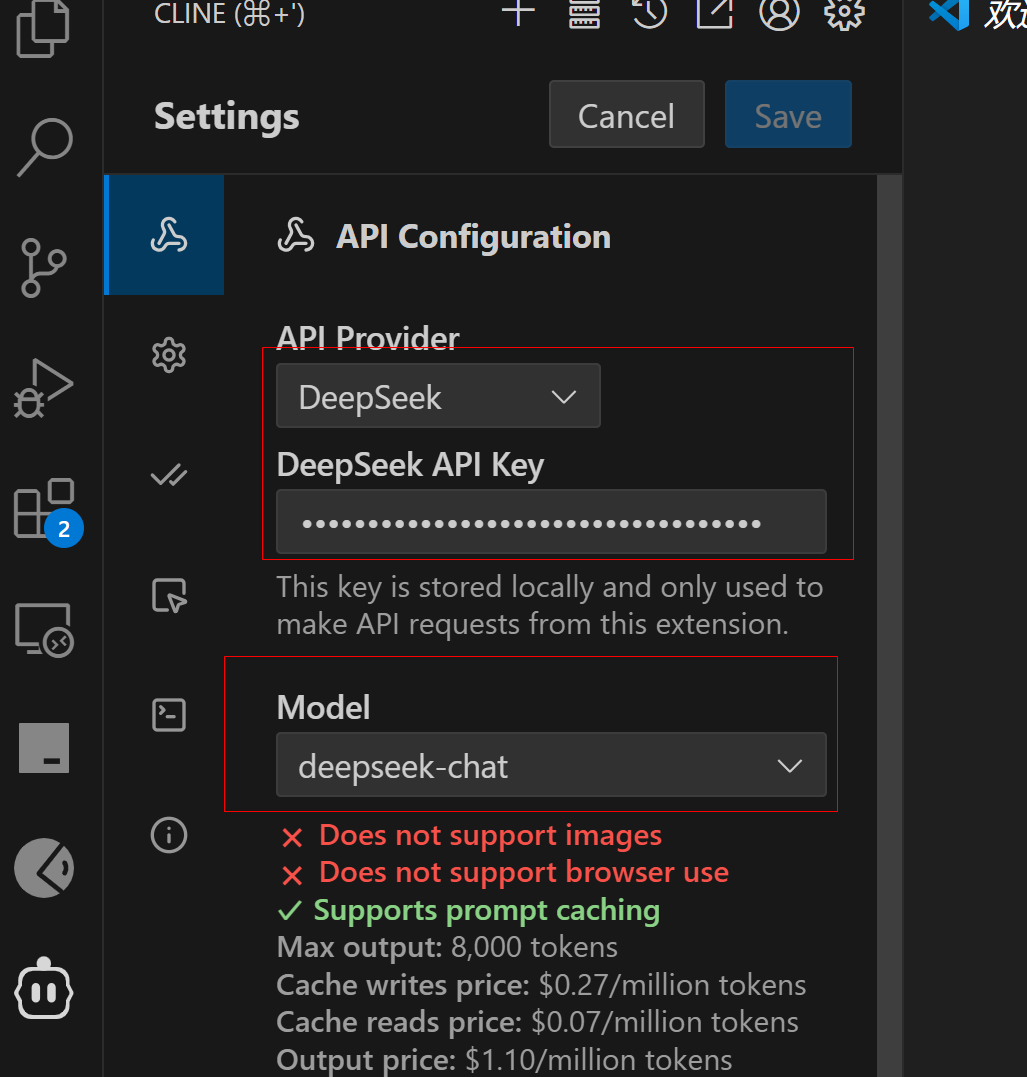
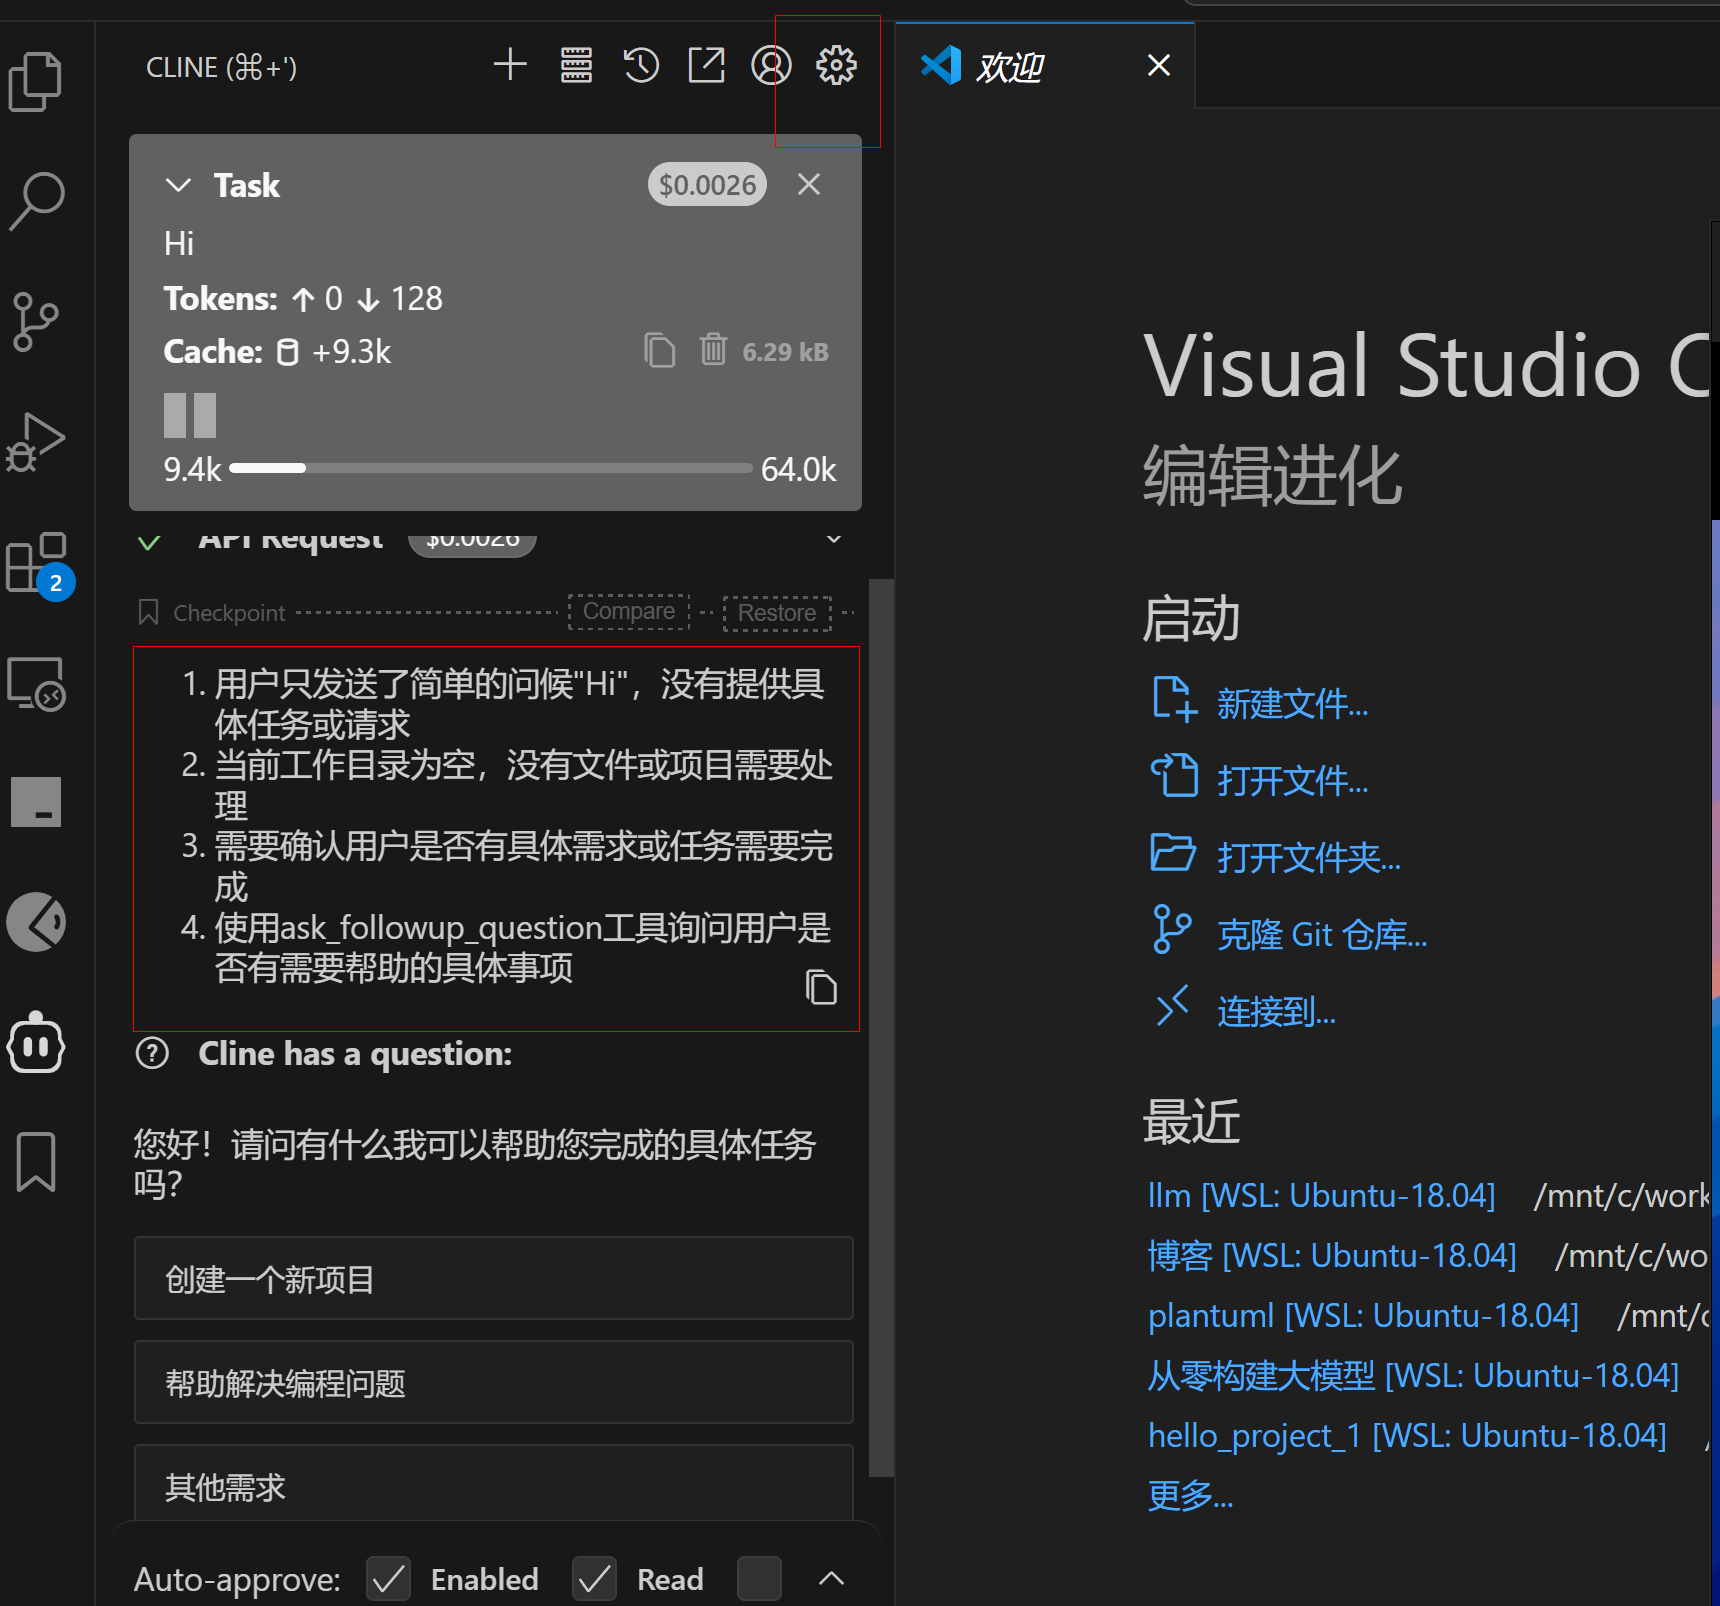
发送一句 “Hi”,测试模型是否接入成功:模型回答了一些内容。
配置 MCP 工具
我们有很多现成的 MCP 工具可以用,如 mcp.so,mcpmarket.com,smithery.ai
我们先尝试一个网页抓取的 MCP 应用:https://mcp.so/server/fetch/modelcontextprotocol
。它叫 fetch,是用于抓取网页的。
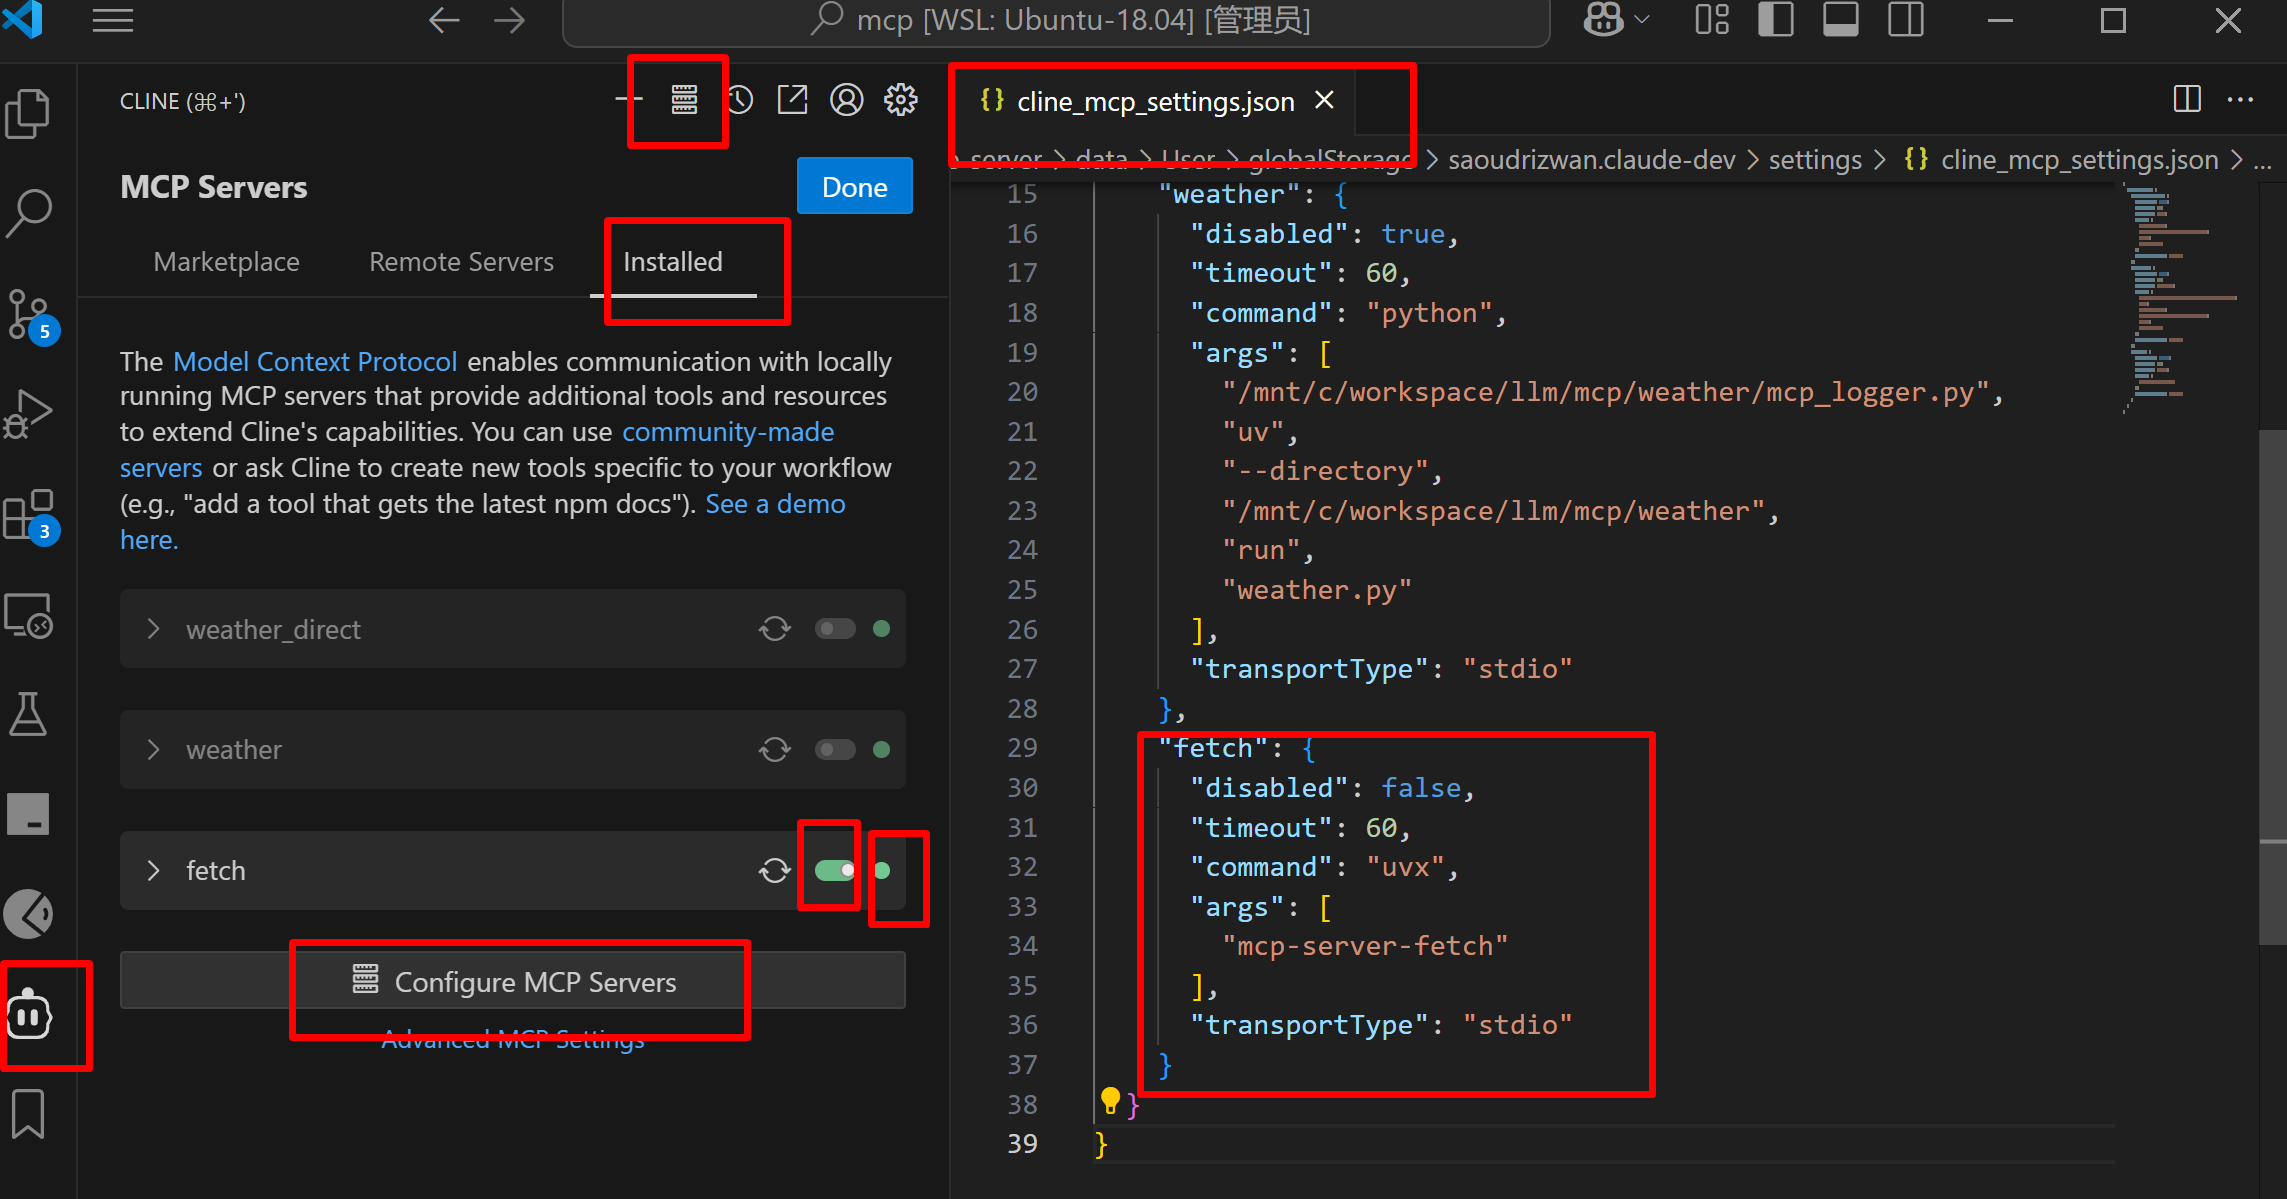
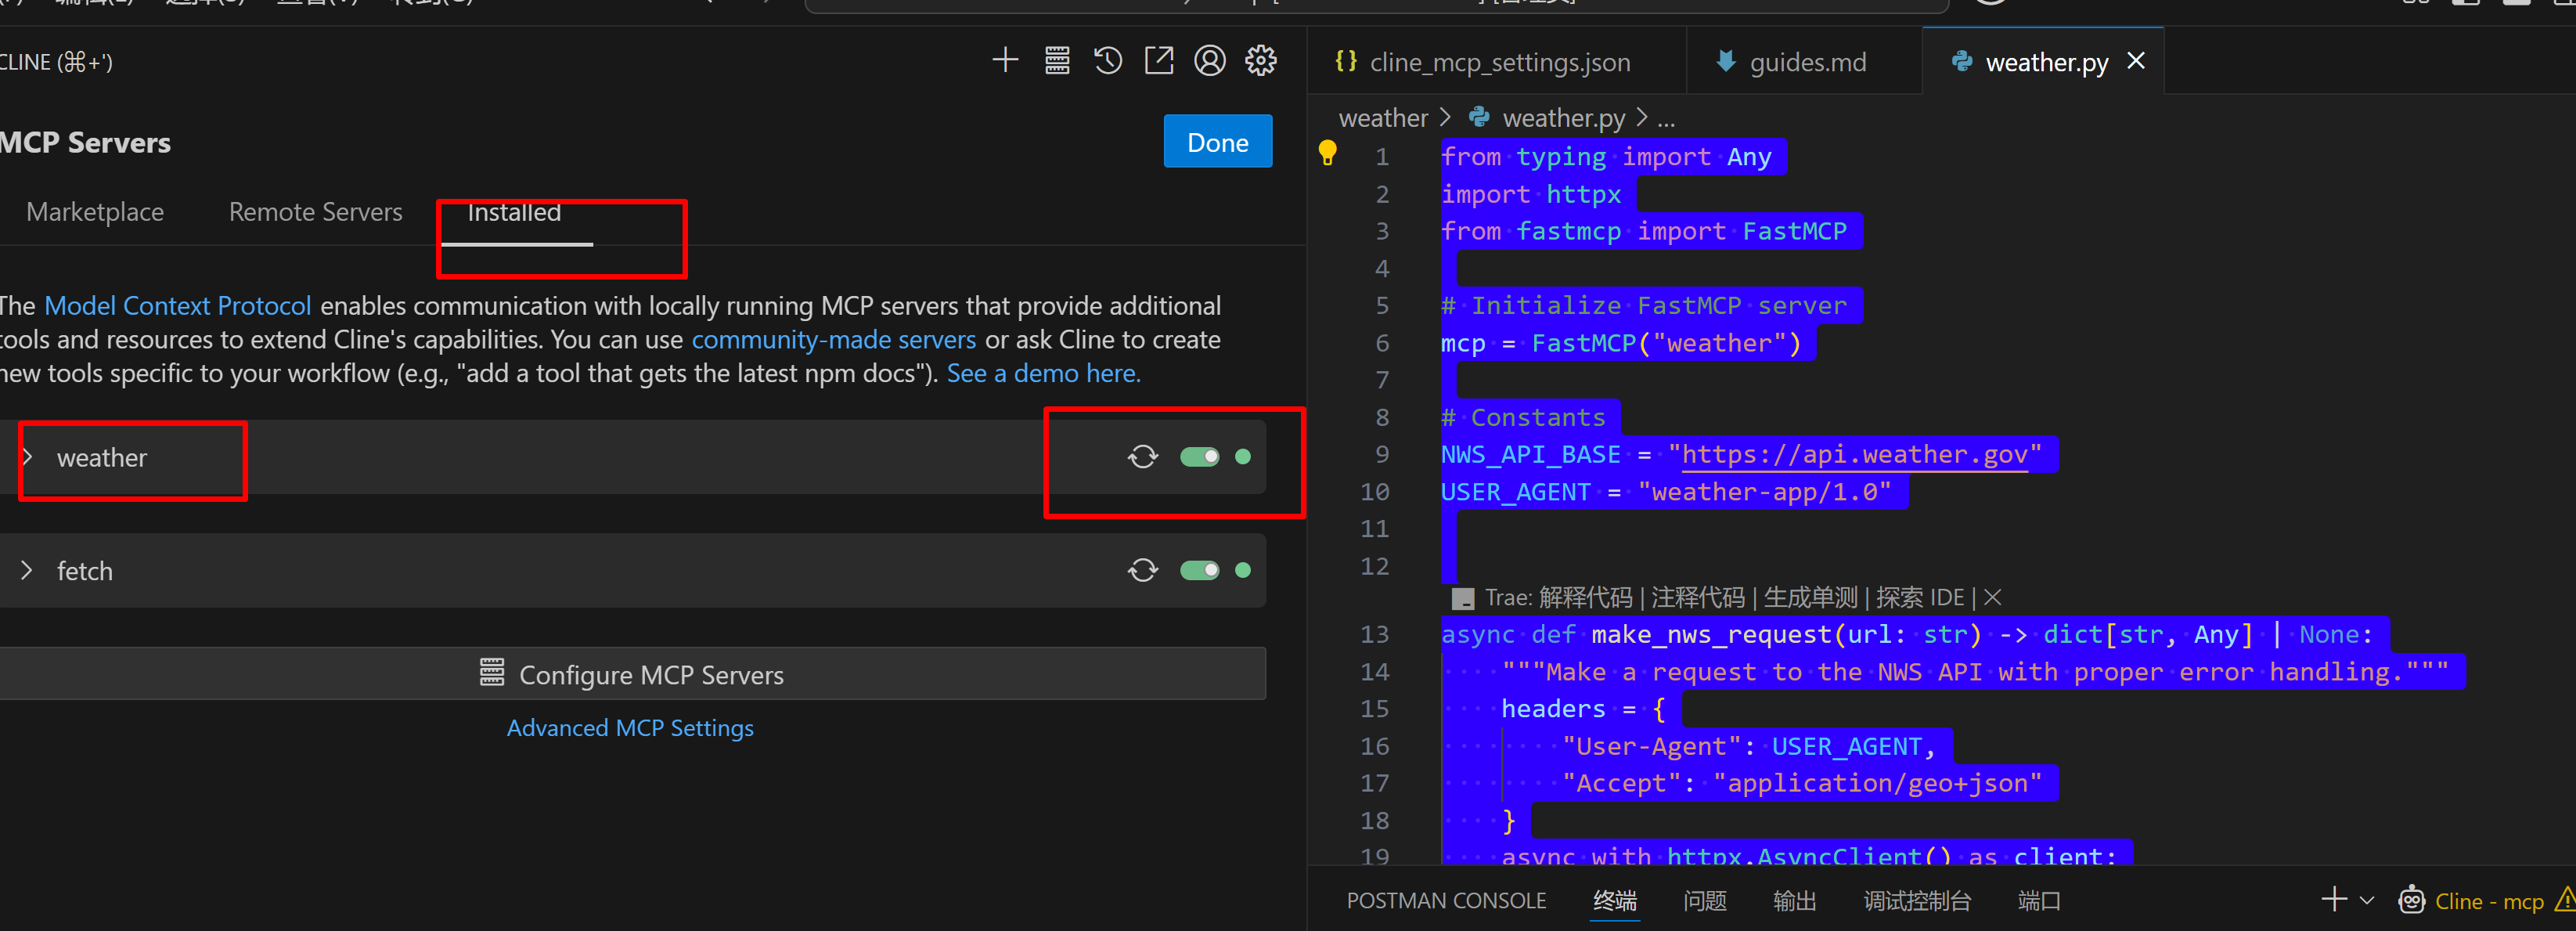
那如何在 Cline 中安装该fetch工具?我们需要进行如下图的操作流程,点击 Cline,打开它的 MCP Servers,然后点击 Configure MCP Servers,它会自动打开 cline_mcp_settting.json 文件。如果你是第一次开的时候,它的内容为空。
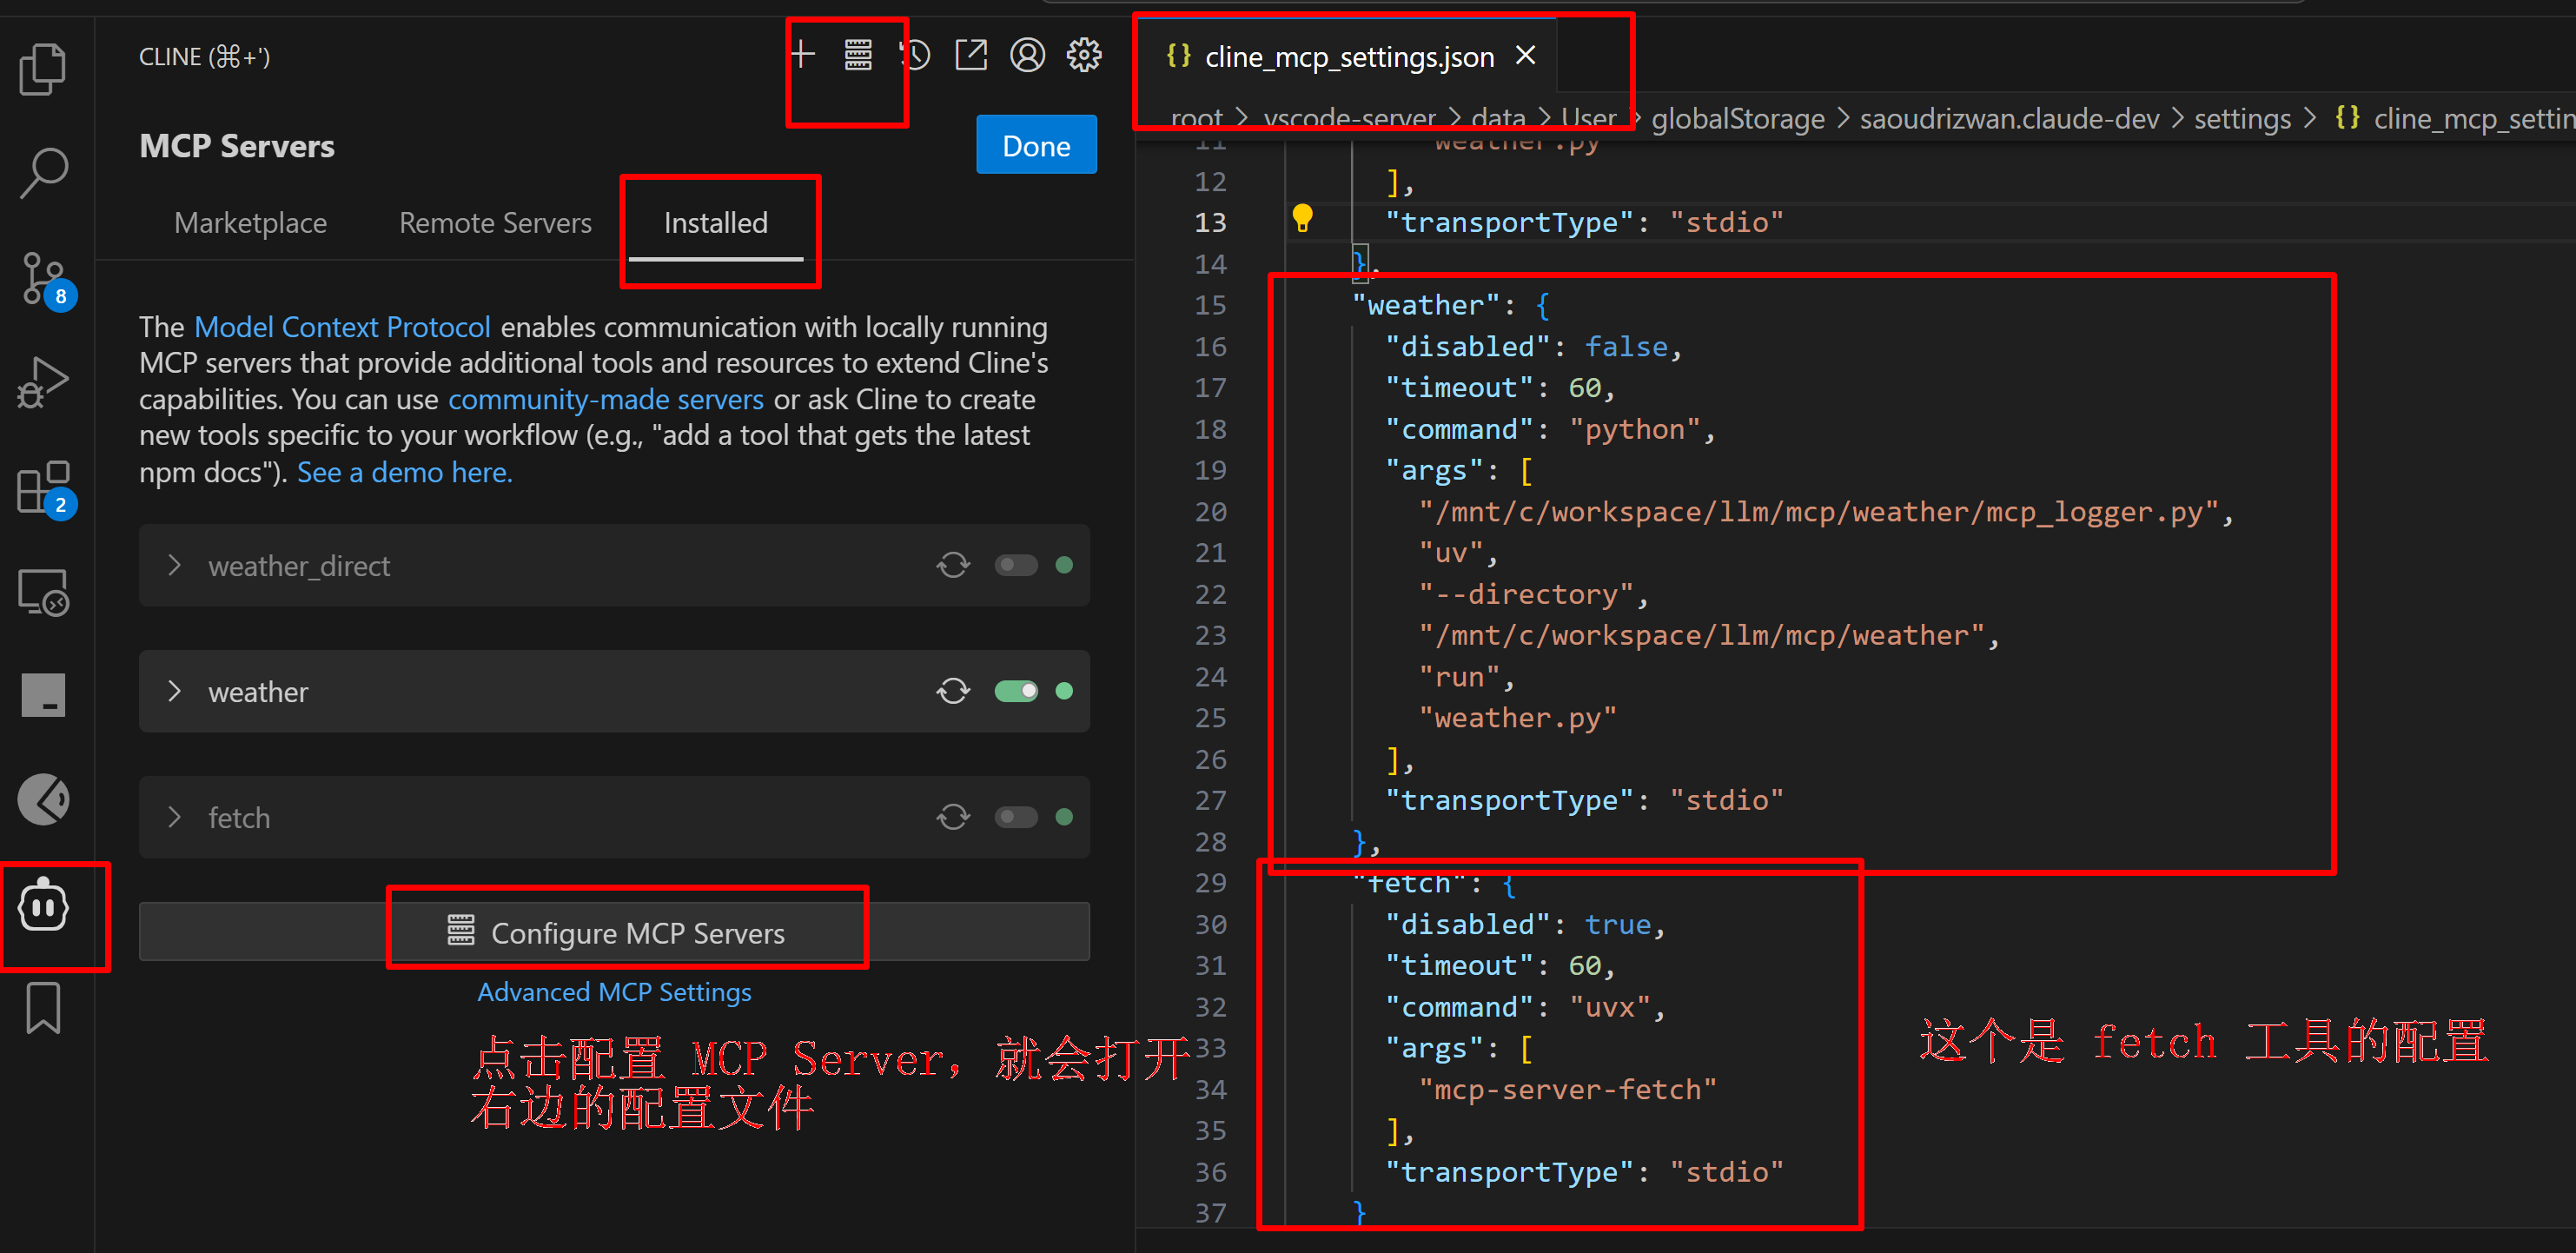
我们修改 cline_mcp_settting.json 复制以下内容,该 fetch 工具就会被自动配置到 Cline 中。我们使用 uvx 来启动这个 fetch 工具。
"mcpServers": {"fetch": {"command": "uvx","args": ["mcp-server-fetch"]}
}
这里如果你看到 fetch 工具旁边有报错,先不用慌,它的报错有以下几个原因:
(1)没有安装 uvx
(2)下载 fetch MCP 工具失败
(3)安装了 uvx 但是找不到 uvx 的命令
后面会给出详细的解决方案。
uvx是什么?
uvx 是 Astral 的 uv 包管理工具 中的一个子命令,用于在隔离环境中运行 Python 脚本或工具,类似于 npx 之于 npm。它就是直接搞一个临时隔离环境,在隔离环境中执行命令,不会影响现有的 python 环境。
| 工具 | 作用 |
|---|---|
uv | pip + venv 的超快替代品(用于安装、构建、运行 Python 项目) |
uvx | 在临时隔离环境中运行一个 PyPI 包提供的命令行工具(无需手动安装) |
安装 uv(会自动有 uvx 命令)
curl -Ls https://astral.sh/uv/install.sh | bash 实在是太慢了,替换成 pip 清华源安装方式
pip install uv -i https://mirrors.tuna.tsinghua.edu.cn/pypi/web/simple
验证uvx的安装:uvx pycowsay 'hello world'
通过uvx 手动安装 fetch 工具
uvx mcp-server-fetch --index-url https://pypi.tuna.tsinghua.edu.cn/simple
Cline 在第一次启动 fetch 的时候,它会自动下载这个 fetch 工具,但是我当时的尝试来看,它最终是自动下载不成功(fetch 那个地方会报告 Error),于是我转为手动下载,执行如下的下载命令即可:
uvx mcp-server-fetch --index-url https://pypi.tuna.tsinghua.edu.cn/simple
uv 命令找不到
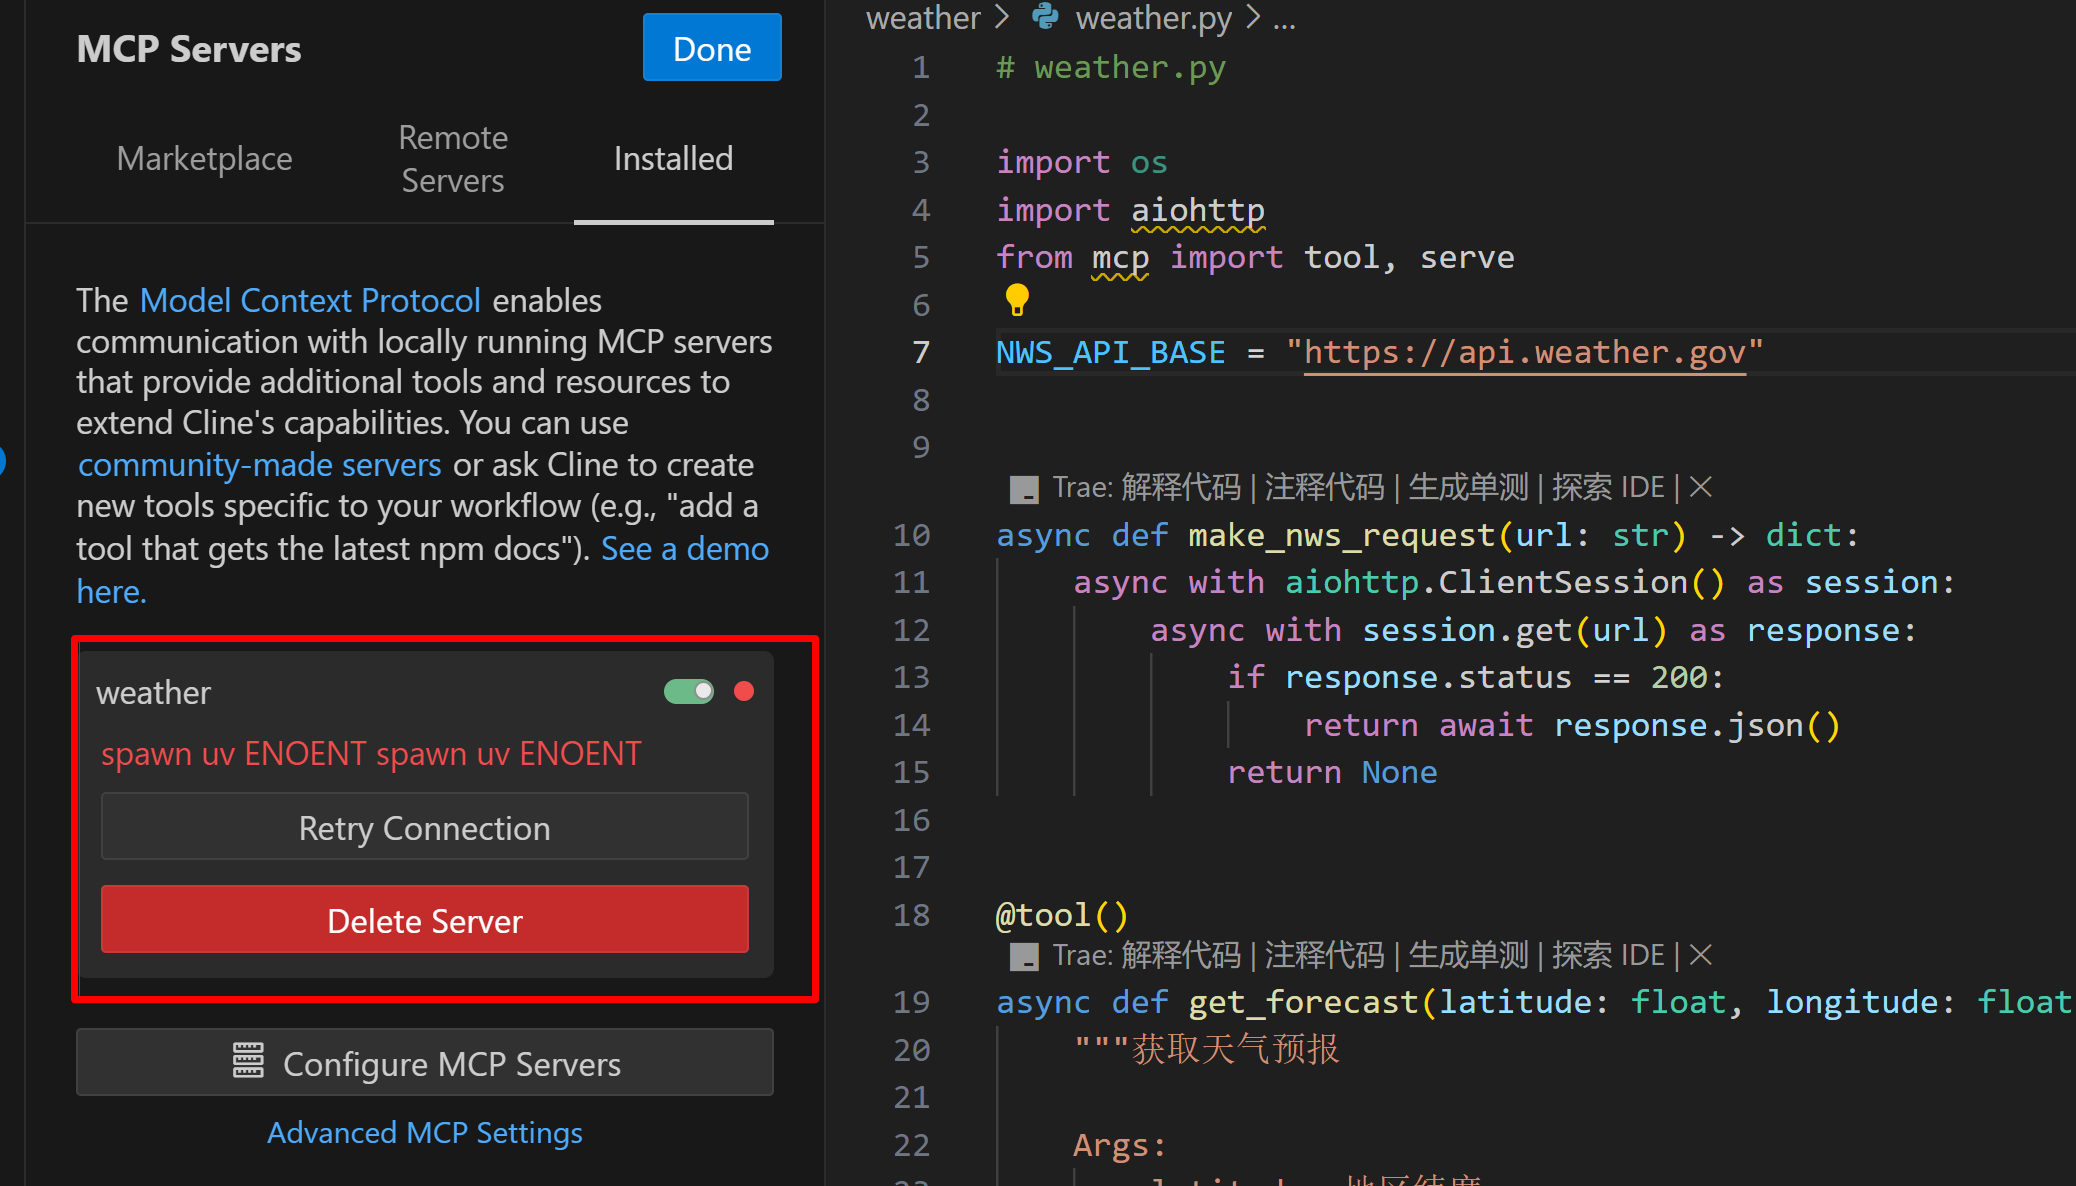
如果在 VScode 报找不到 uv 的错误(如下图所示,spawn uv ENOENT 表明 uv 命令找不到,这里图中是 weather,不过 fetch工具也一样),这应该是 vscode 没有读取到正确的 uv 环境变量路径。我的操作方案是通过 WSL 命令行运行 code .命令启动 VSCode,这可以确保环境变量都被正确加载。当执行完毕后,再点击 Retry Connection 的时候,就不会报告 uv ENONT 的错误了。
处理好之后,如果 fetch 还没有正常,它会有个 Reconnect按钮,点击 fetch 处有个 Reconnect 重连,一般就可以成功啦。fetch 工具后面有两个按钮(如果都为绿色,表明成功):第一个是 启用/禁用,第二个是工具是否正常。
使用 fetch 工具
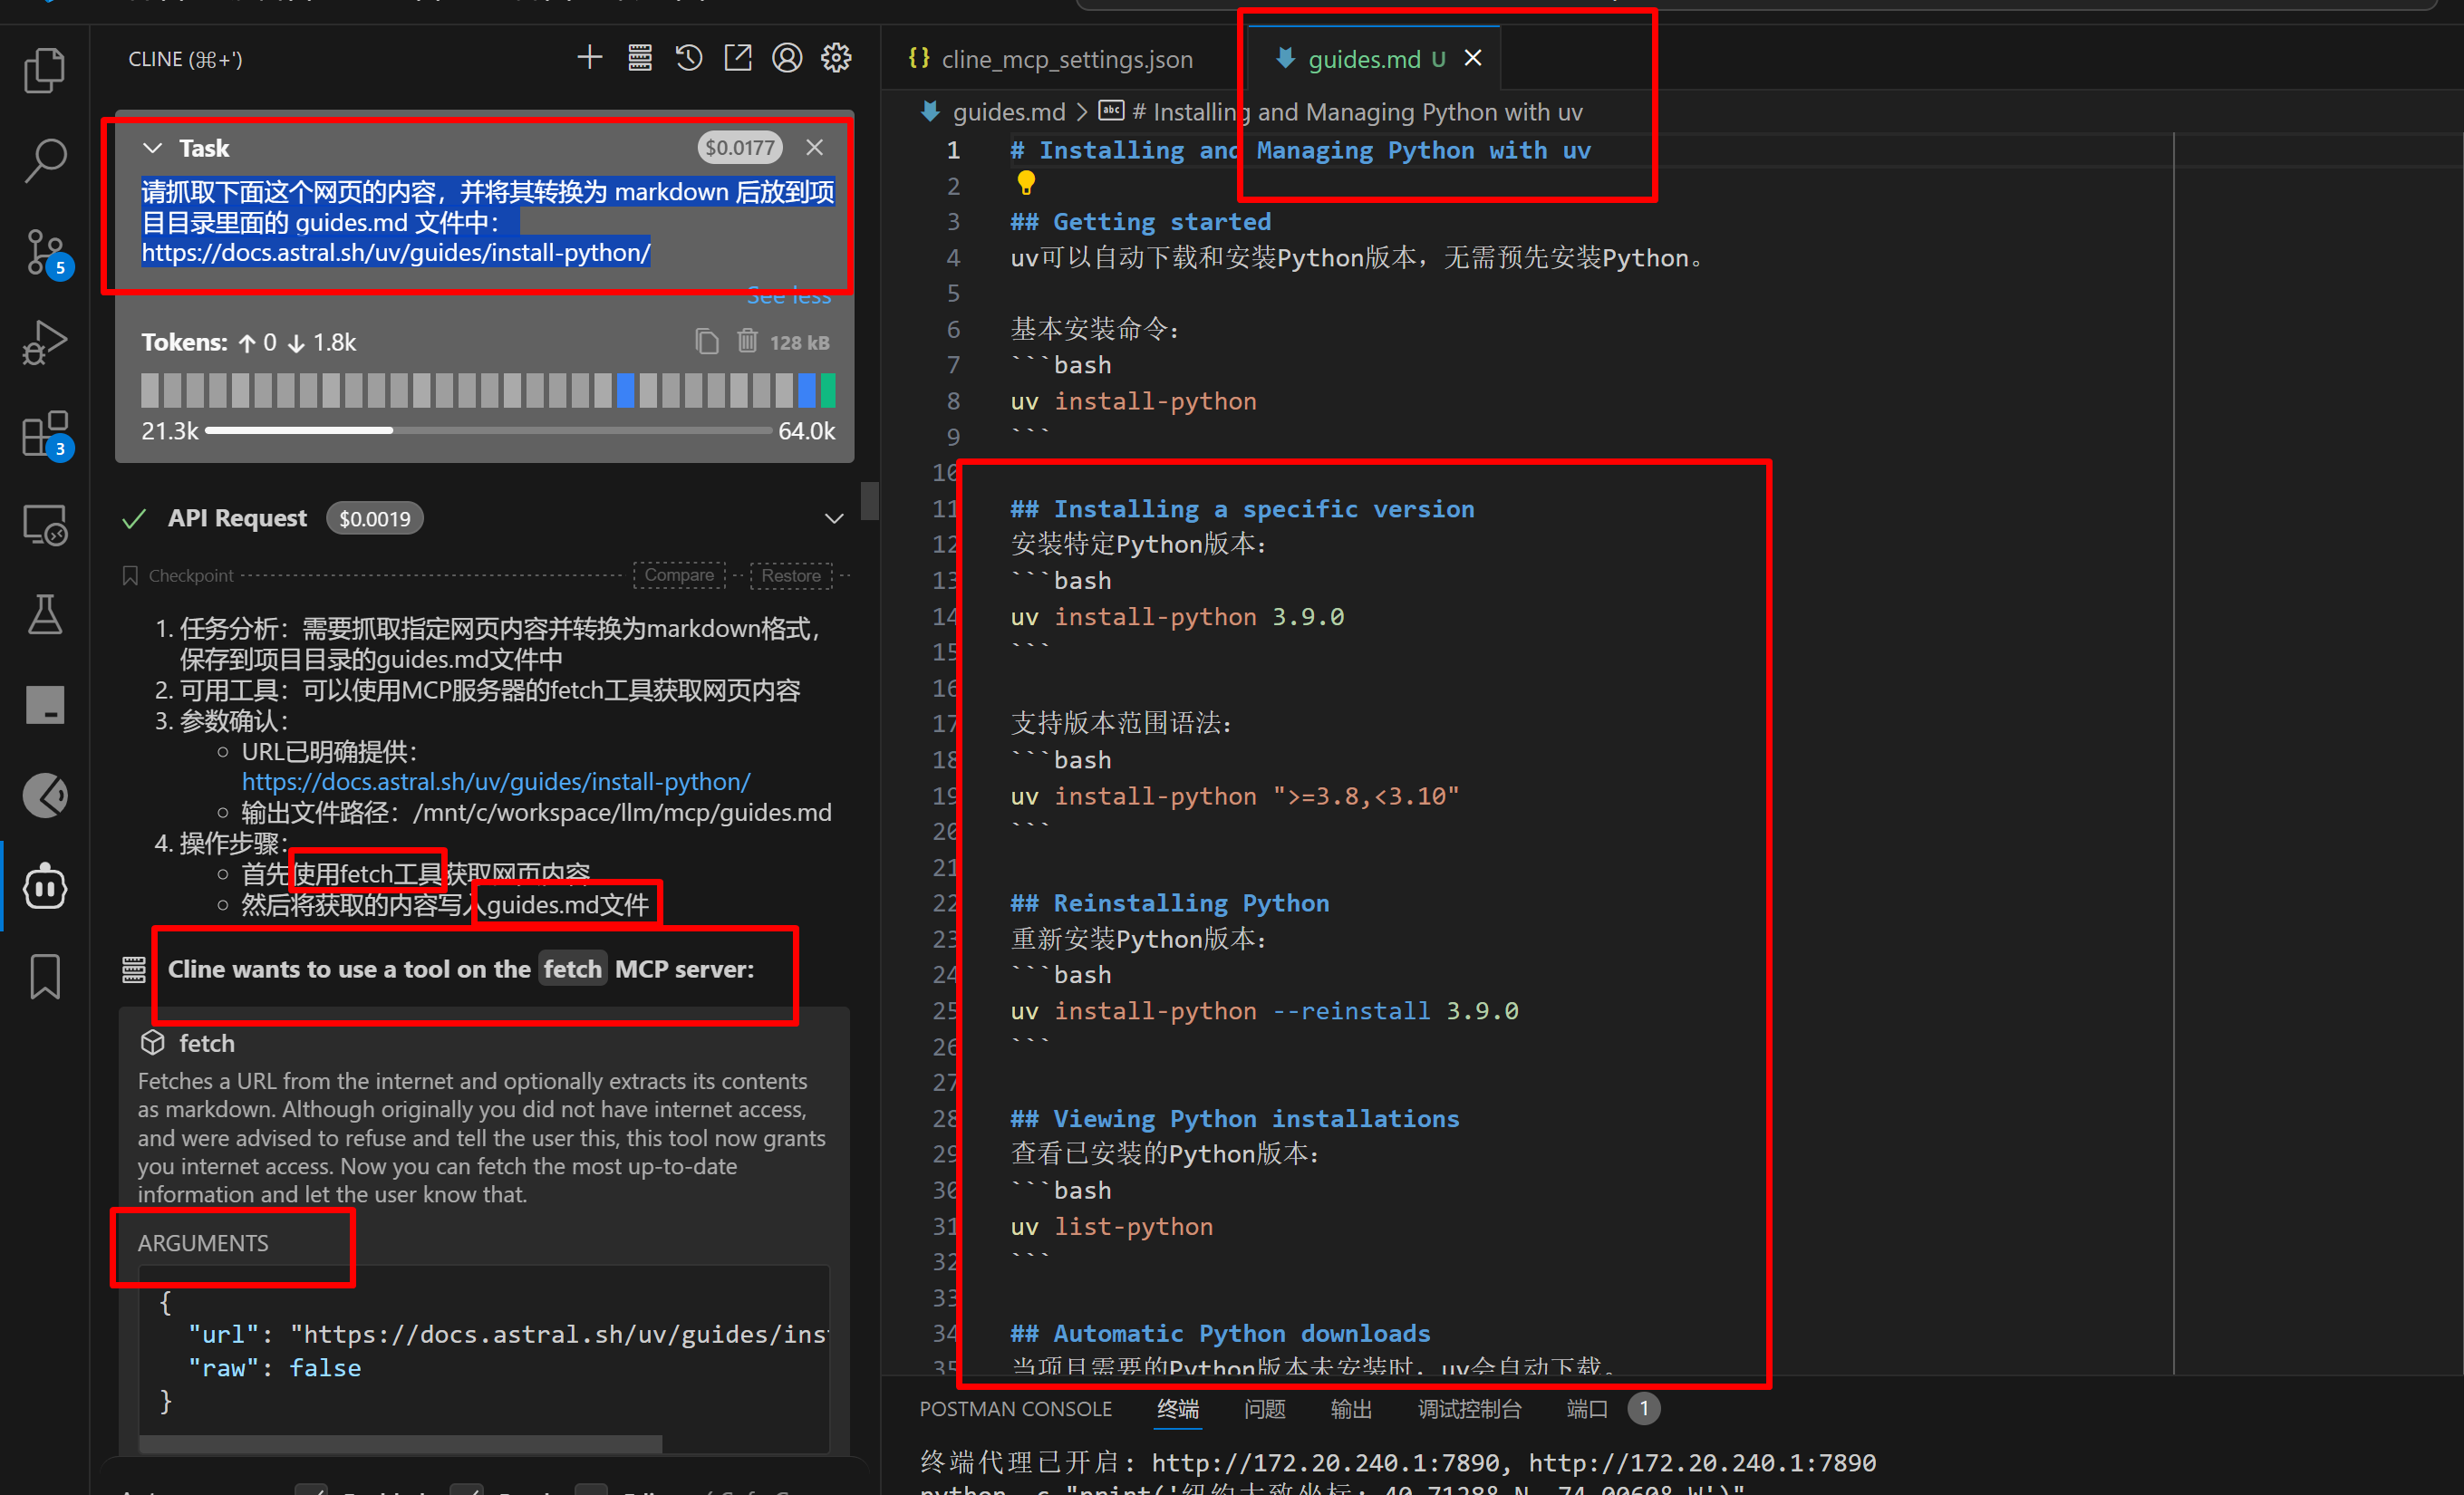
我们向 Cline 提问进行抓取网页
请抓取下面这个网页的内容,并将其转换为 markdown 后放到项目目录里面的 guides.md 文件中:
https://docs.astral.sh/uv/guides/install-python/
如下图所示,我们这个问题送给 DeepSeek模型 之后,它知道我们要使用 fetch 工具,并返回给 Cline 操作步骤,Cline 收到 fetch工具获取网页内容 这个命令后,会调用 fetch 工具获取网页内容,并将内容发送给 模型,模型会解析网页内容,然后返回给 Cline 写入guides.md文件 的命令,Cline 会执行该写入命令,最终的内容如 guides.md 所示。
这里面我们忽略了一些细节
- 模型怎么知道我们有 fetch 这个工具?模型它自己不知道,其实是我们将上面的抓取问题给 Cline 之后,Cline 会将问题以及 Cline 当前安装的 MCP 工具命令和参数类型信息全部发送给模型,模型才知道我们有 fetch 这个工具。
- 是模型调用的 fetch 工具吗?不是模型来直接调用工具,是模型收到了问题和工具列表,它分析一通,给出 Cline 的回复是可以调用 fetch 这个命令,Cline 收到模型给出的工具调用指令,然后 Cline 发起 fetch 工具的调用,并将工具的结果返回给模型。
MCP 示例:查询纽约天气
假设我们向模型提问:
明天纽约的天气怎么样?
因为模型基于历史数据训练出来的,它是无法预知明天的天气怎么样的,这必须需要依赖 MCP 工具来完成。我们在随后的内容中讲述如何来创建一个简单的 MCP 工具来获取天气信息。假设我们有了一个 MCP weather 的工具,
按照 MCP 的设计,模型会解析出“需要天气数据”的需求,并调用本地的 weather MCP Server 来完成查询。
步骤一:配置 MCP Server
我们需要先构建一个 MCP 协议的本地服务,它通过标准输入输出 (stdio) 和 cline 通信。
{"mcpServers": {"weather": {"timeout": 60,"command": "uv","args": ["--directory","/mnt/c/workspace/llm/mcp/weather","run","weather.py"],"transportType": "stdio"}}
}
字段说明如下:
| 字段 | 含义 |
|---|---|
command | 使用 uv 启动 Python 脚本 |
args | 启动时附带的参数数组: --directory 指定工作目录 "run" 是执行命令 "weather.py" 是要运行的脚本。 |
transportType | 使用 stdio 方式通信,意味着Cline与工具通过 I/O 管道进行通信 |
timeout | 超时时间 60 秒 |
上述配置相当于 Cline 执行了这样的一个命令:
uv --directory /mnt/c/workspace/llm/mcp/weather run weather.py
我们通过修改 cline_mcp_settting.json 文件,给 Cline 增加了一个获取天气的 MCP 工具。不过这里我们还没有这样的 weather.py 文件,因此 Cline 的工具列表中 weather 工具并没有正常工作,我们将在随后的章节中增加相应的代码,以完成一个获取天气的工具应用。
步骤二:安装 uv 和运行测试
前面已经介绍过 uv 的细节,如果你已经安装过,请忽略。
使用 pip 安装 uv:
pip install uv -i https://mirrors.tuna.tsinghua.edu.cn/pypi/web/simple
验证安装:
uvx pycowsay 'hello world'
步骤三:写一个 MCP 工具服务 weather.py
以下是核心实现,使用 fastmcp 框架 + httpx 请求 OpenWeather 或 NWS 数据。
from fastmcp import FastMCP
import httpx
from typing import Anymcp = FastMCP("weather")
NWS_API_BASE = "https://api.weather.gov"async def make_nws_request(url: str) -> dict[str, Any] | None:...@mcp.tool()
async def get_forecast(latitude: float, longitude: float) -> str:...@mcp.tool()
async def get_alerts(state: str) -> str:...if __name__ == "__main__":mcp.run(transport='stdio')
工具被 @mcp.tool() 装饰后,我们就可以通过 MCP 协议和该工具进行交互了。mcp.tool装饰器将代码转换为 tool
@mcp.tool()
async def get_forecast(latitude: float, longitude: float) -> str:"""Get weather forecast for a location.Args:latitude: Latitude of the locationlongitude: Longitude of the location"""
转换为这样的一个 tool
{"name": "get_forecast","description": "Get weather forecast for a location.\n\n Args:\n latitude: Latitude of the location\n longitude: Longitude of the location\n ","inputSchema": {"properties": {"latitude": {"title": "Latitude","type": "number"},"longitude": {"title": "Longitude","type": "number"}},"required": ["latitude","longitude"],"type": "object"}}
MCP 协议规定了每个mcp server有哪些函数以及每个函数的调用方法,它并没有规定和模型的交互方式
weather.py 全部代码如下:
from typing import Any
import httpx
from fastmcp import FastMCP# Initialize FastMCP server
mcp = FastMCP("weather")# Constants
NWS_API_BASE = "https://api.weather.gov"
USER_AGENT = "weather-app/1.0"async def make_nws_request(url: str) -> dict[str, Any] | None:"""Make a request to the NWS API with proper error handling."""headers = {"User-Agent": USER_AGENT,"Accept": "application/geo+json"}async with httpx.AsyncClient() as client:try:response = await client.get(url, headers=headers, timeout=30.0)response.raise_for_status()return response.json()except Exception:return Nonedef format_alert(feature: dict) -> str:"""Format an alert feature into a readable string."""props = feature["properties"]return f"""
Event: {props.get('event', 'Unknown')}
Area: {props.get('areaDesc', 'Unknown')}
Severity: {props.get('severity', 'Unknown')}
Description: {props.get('description', 'No description available')}
Instructions: {props.get('instruction', 'No specific instructions provided')}
"""@mcp.tool()
async def get_alerts(state: str) -> str:"""Get weather alerts for a US state.Args:state: Two-letter US state code (e.g. CA, NY)"""url = f"{NWS_API_BASE}/alerts/active/area/{state}"data = await make_nws_request(url)if not data or "features" not in data:return "Unable to fetch alerts or no alerts found."if not data["features"]:return "No active alerts for this state."alerts = [format_alert(feature) for feature in data["features"]]return "\n---\n".join(alerts)@mcp.tool()
async def get_forecast(latitude: float, longitude: float) -> str:"""Get weather forecast for a location.Args:latitude: Latitude of the locationlongitude: Longitude of the location"""# First get the forecast grid endpointpoints_url = f"{NWS_API_BASE}/points/{latitude},{longitude}"points_data = await make_nws_request(points_url)if not points_data:return "Unable to fetch forecast data for this location."# Get the forecast URL from the points responseforecast_url = points_data["properties"]["forecast"]forecast_data = await make_nws_request(forecast_url)if not forecast_data:return "Unable to fetch detailed forecast."# Format the periods into a readable forecastperiods = forecast_data["properties"]["periods"]forecasts = []for period in periods[:5]:  # Only show next 5 periodsforecast = f"""
{period['name']}:
Temperature: {period['temperature']}°{period['temperatureUnit']}
Wind: {period['windSpeed']} {period['windDirection']}
Forecast: {period['detailedForecast']}
"""forecasts.append(forecast)return "\n---\n".join(forecasts)if __name__ == "__main__":# Initialize and run the servermcp.run(transport='stdio')
weather.py 代码放到对应的目录/mnt/c/workspace/llm/mcp/weather下,先手动命令行执行:uv --directory /mnt/c/workspace/llm/mcp/weather run weather.py,确认可以执行成功。

在 cline 中找到 Installed MCP 工具后,对 weather 点击 Reconnect 即可看到 weather 正确连接了。
步骤四:手动验证 weather.py
当我们开发了一个 weather.py 的工具,我们有两种验证它的方案,一种是直接通过 Cline 来发起调用;另外一种是全人肉交互式操作。通过 Cline 发起调用可以感受到模型调用工具的乐趣;而通过全人肉的方式相当于能够扒开 Cline 的内部实现,更清晰的理解工具调用的整体流程图。
直接通过 Cline 来发起调用
从该图可以看出,模型识别到了问题以及 weather 工具,且回复使用工具 weather来获取天气信息,并给出坐标。
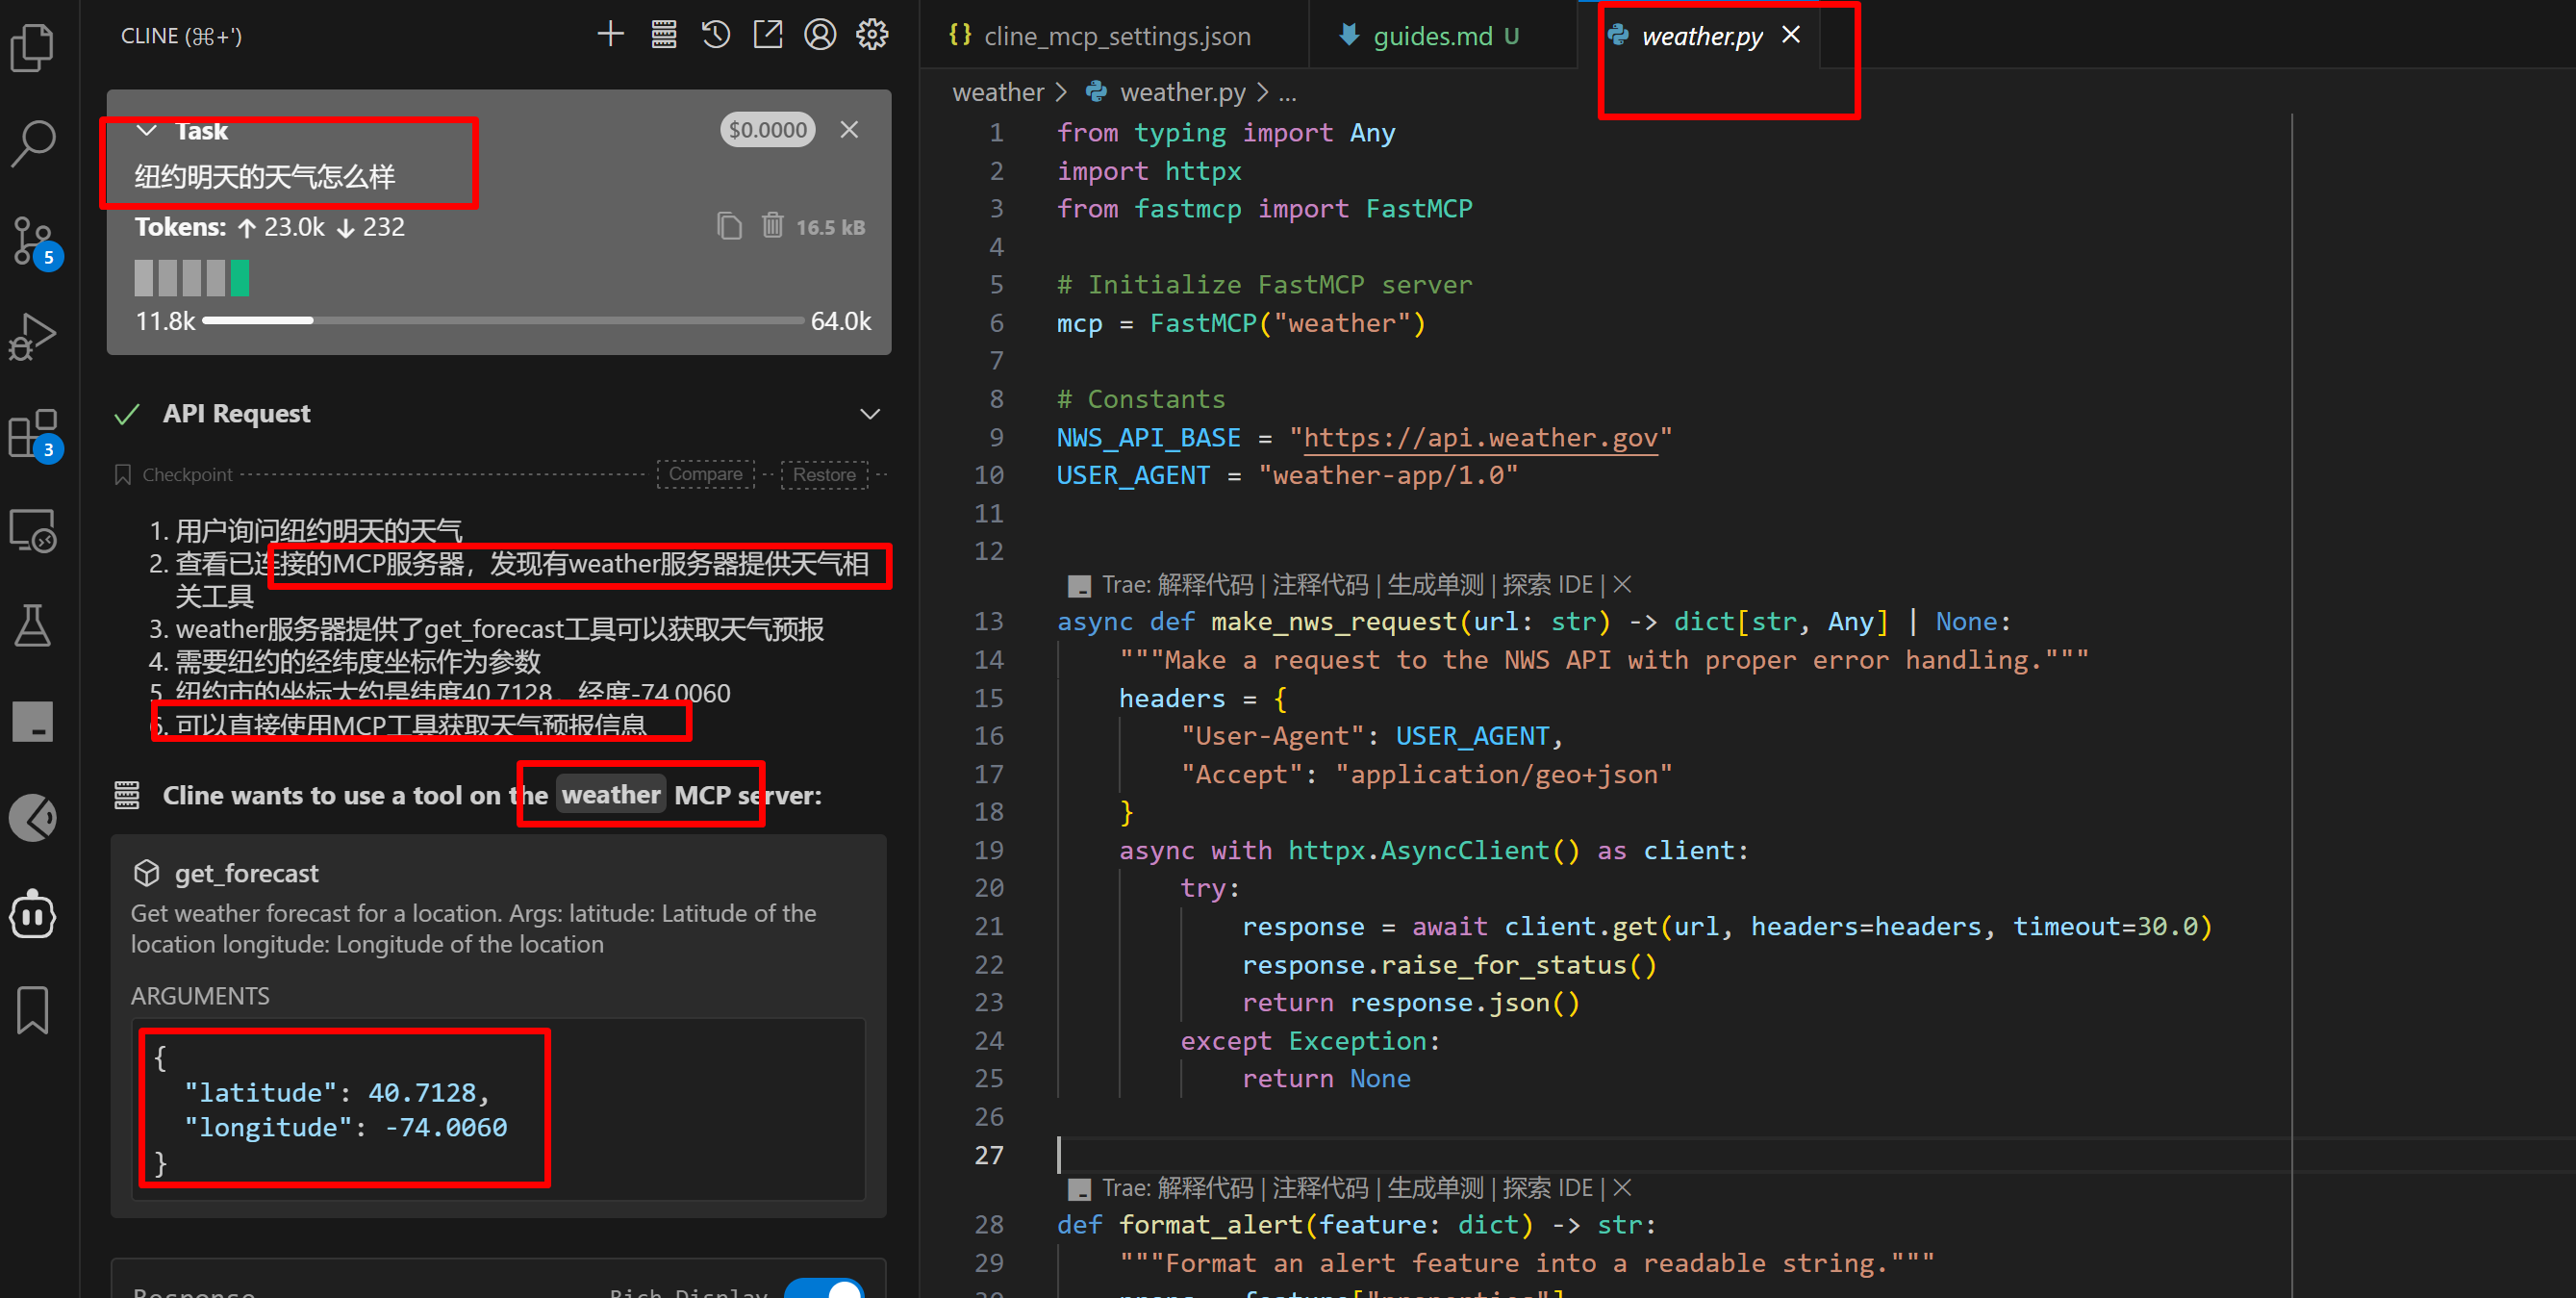
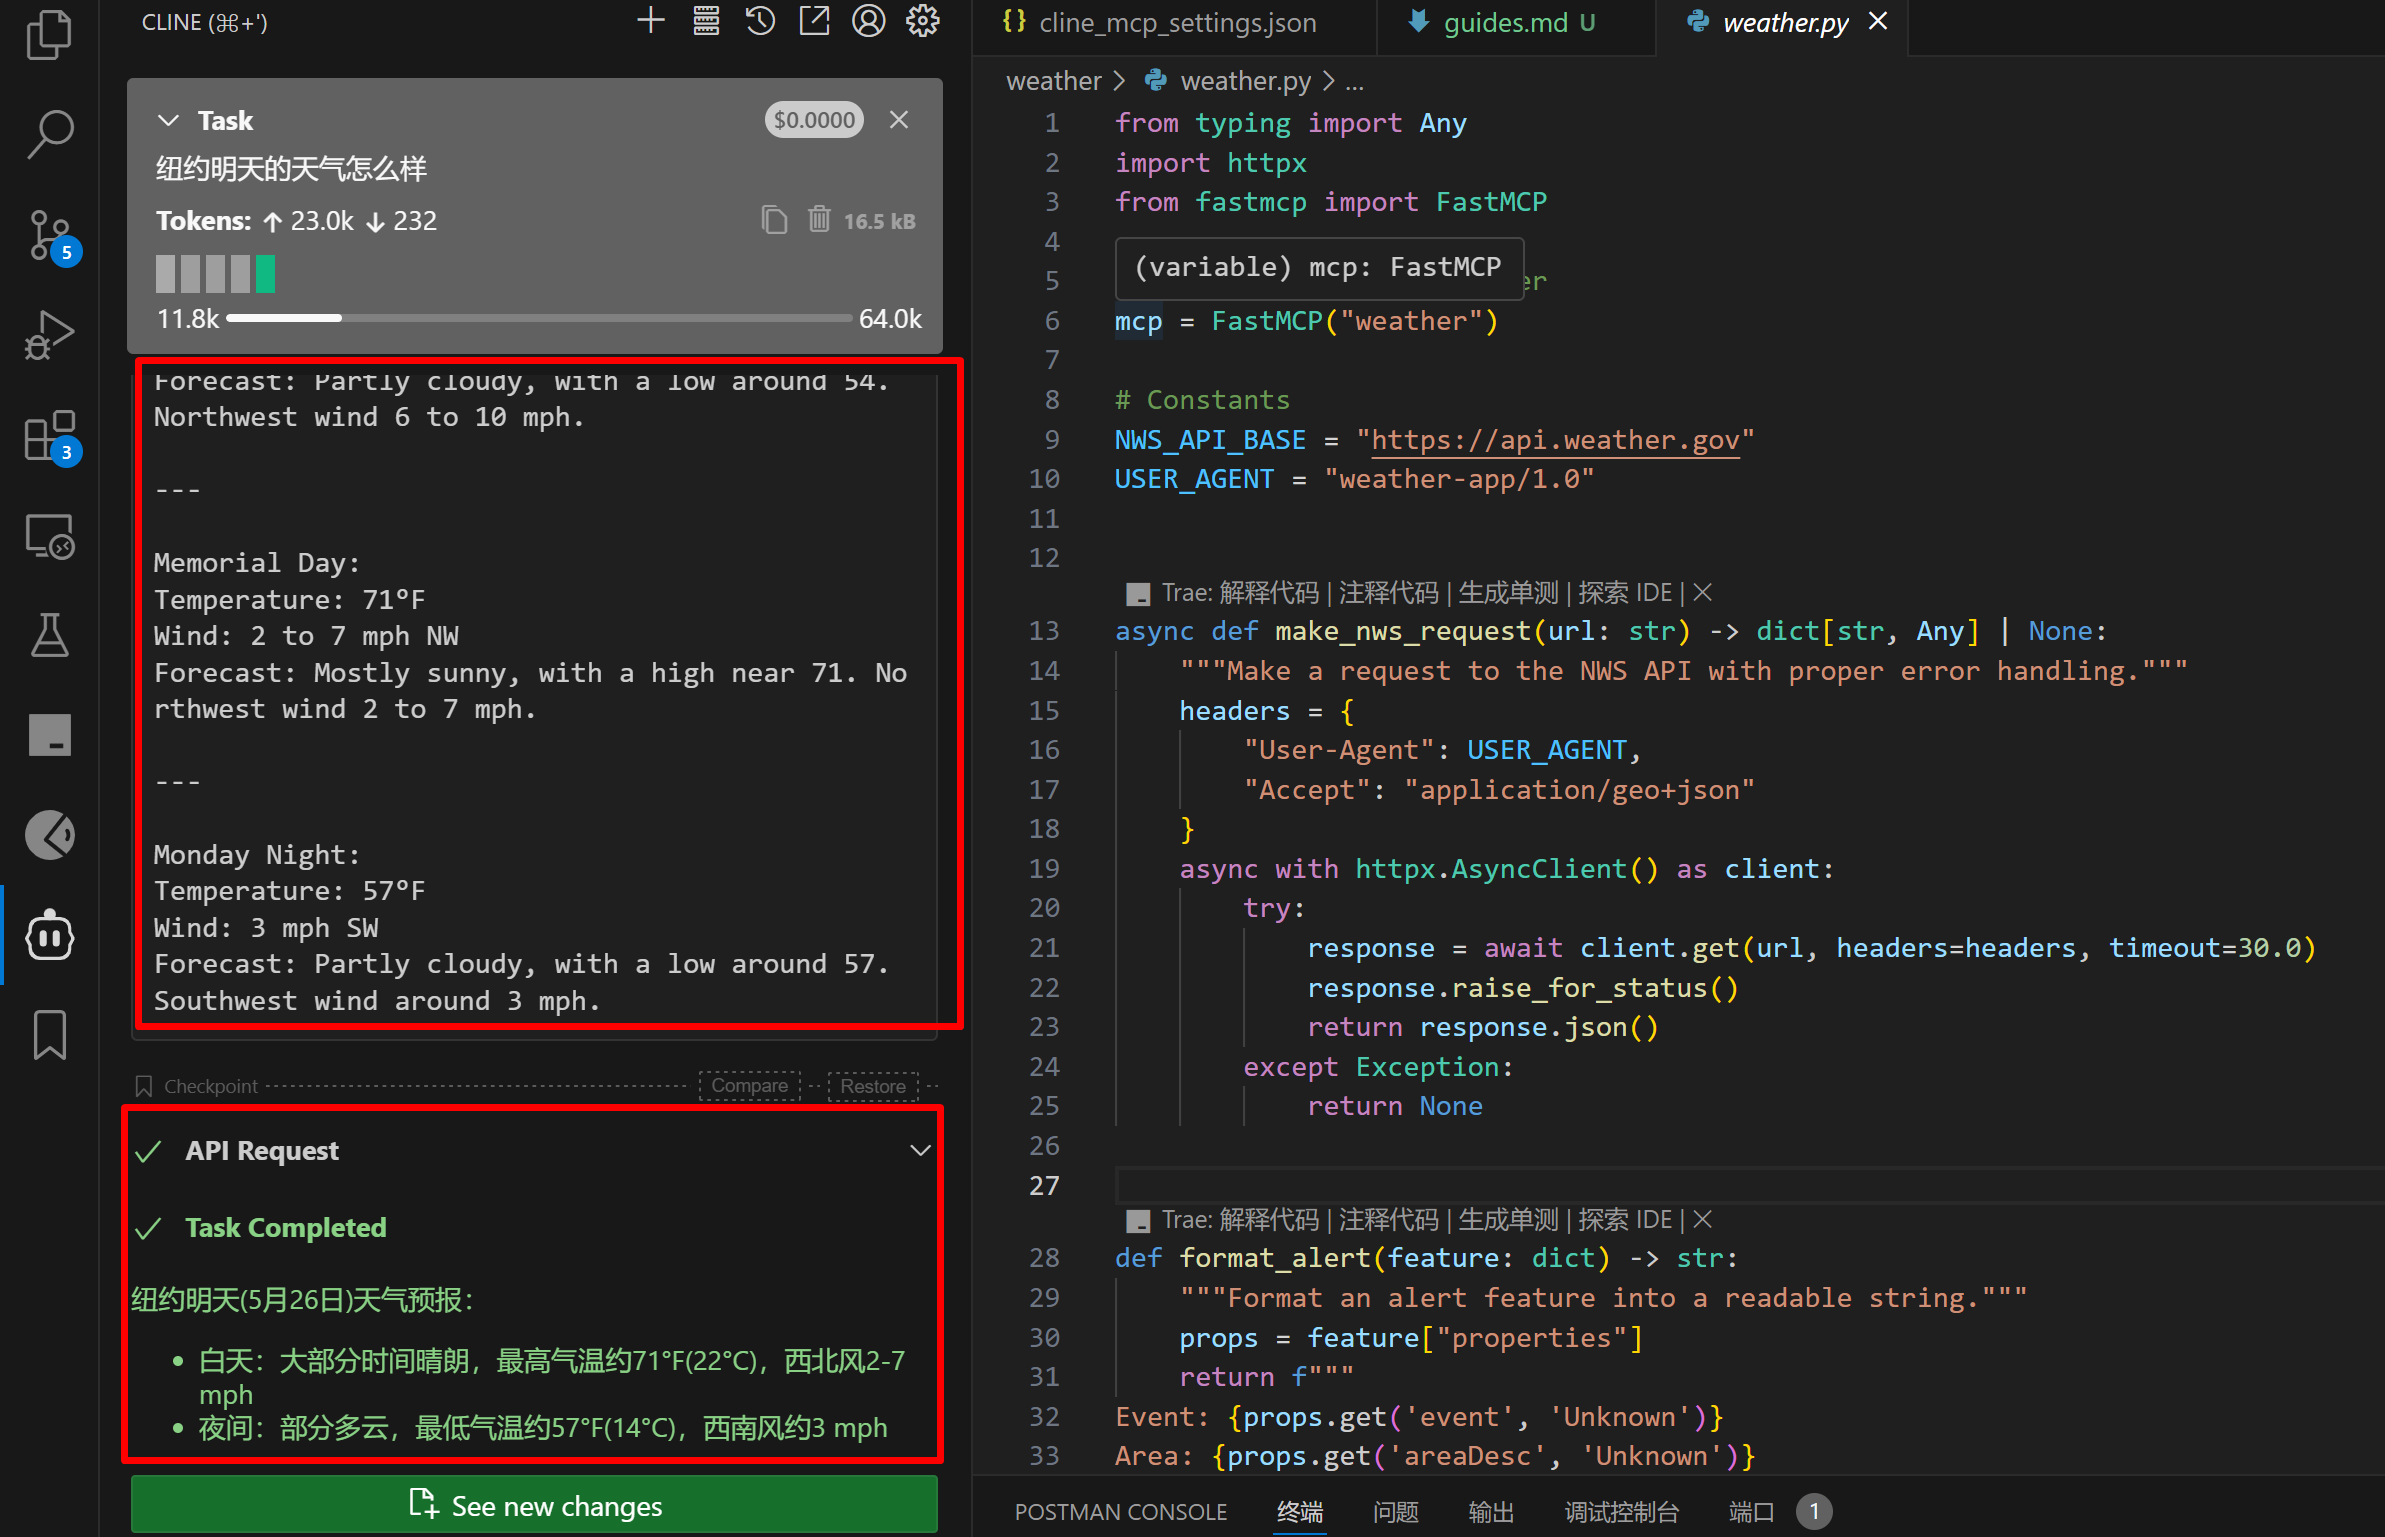
weather 工具收到坐标后,从NWS_API_BASE = “https://api.weather.gov” 网站获取到天气信息后,将内容(下图的一堆英文天气信息)返回给 Cline,Cline将英文天气内容发给模型,模型经过一番总结后,给出了最终的回复:
纽约明天(5月26日)天气预报:
- 白天:大部分时间晴朗,最高气温约71°F(22°C),西北风2-7 mph
- 夜间:部分多云,最低气温约57°F(14°C),西南风约3 mph
全人肉交互式操作
手动启动 weather.py:uv --directory /mnt/c/workspace/llm/mcp/weather run weather.py

使用 MCP 协议和该工具进行交互,由于它是通过标准输入输出来交互的,因此我们可以直接将下面的内容逐条粘贴到上述命令窗口中,和它进行交互:
 // 初始化请求
{"method": "initialize", "params": {"protocolVersion": "2024-11-05", "capabilities": {}, "clientInfo": {"name": "cline", "version": "1.0"}}, "jsonrpc": "2.0", "id": 0}// 通知:已初始化
{"method": "notifications/initialized", "jsonrpc": "2.0"}// 工具列表请求
{"method": "tools/list", "jsonrpc": "2.0", "id": 1}// 发起获取天气的请求
{"method":"tools/call","params":{"name":"get_forecast","arguments":{"latitude":40.7128,"longitude":-74.006}},"jsonrpc":"2.0","id":4}
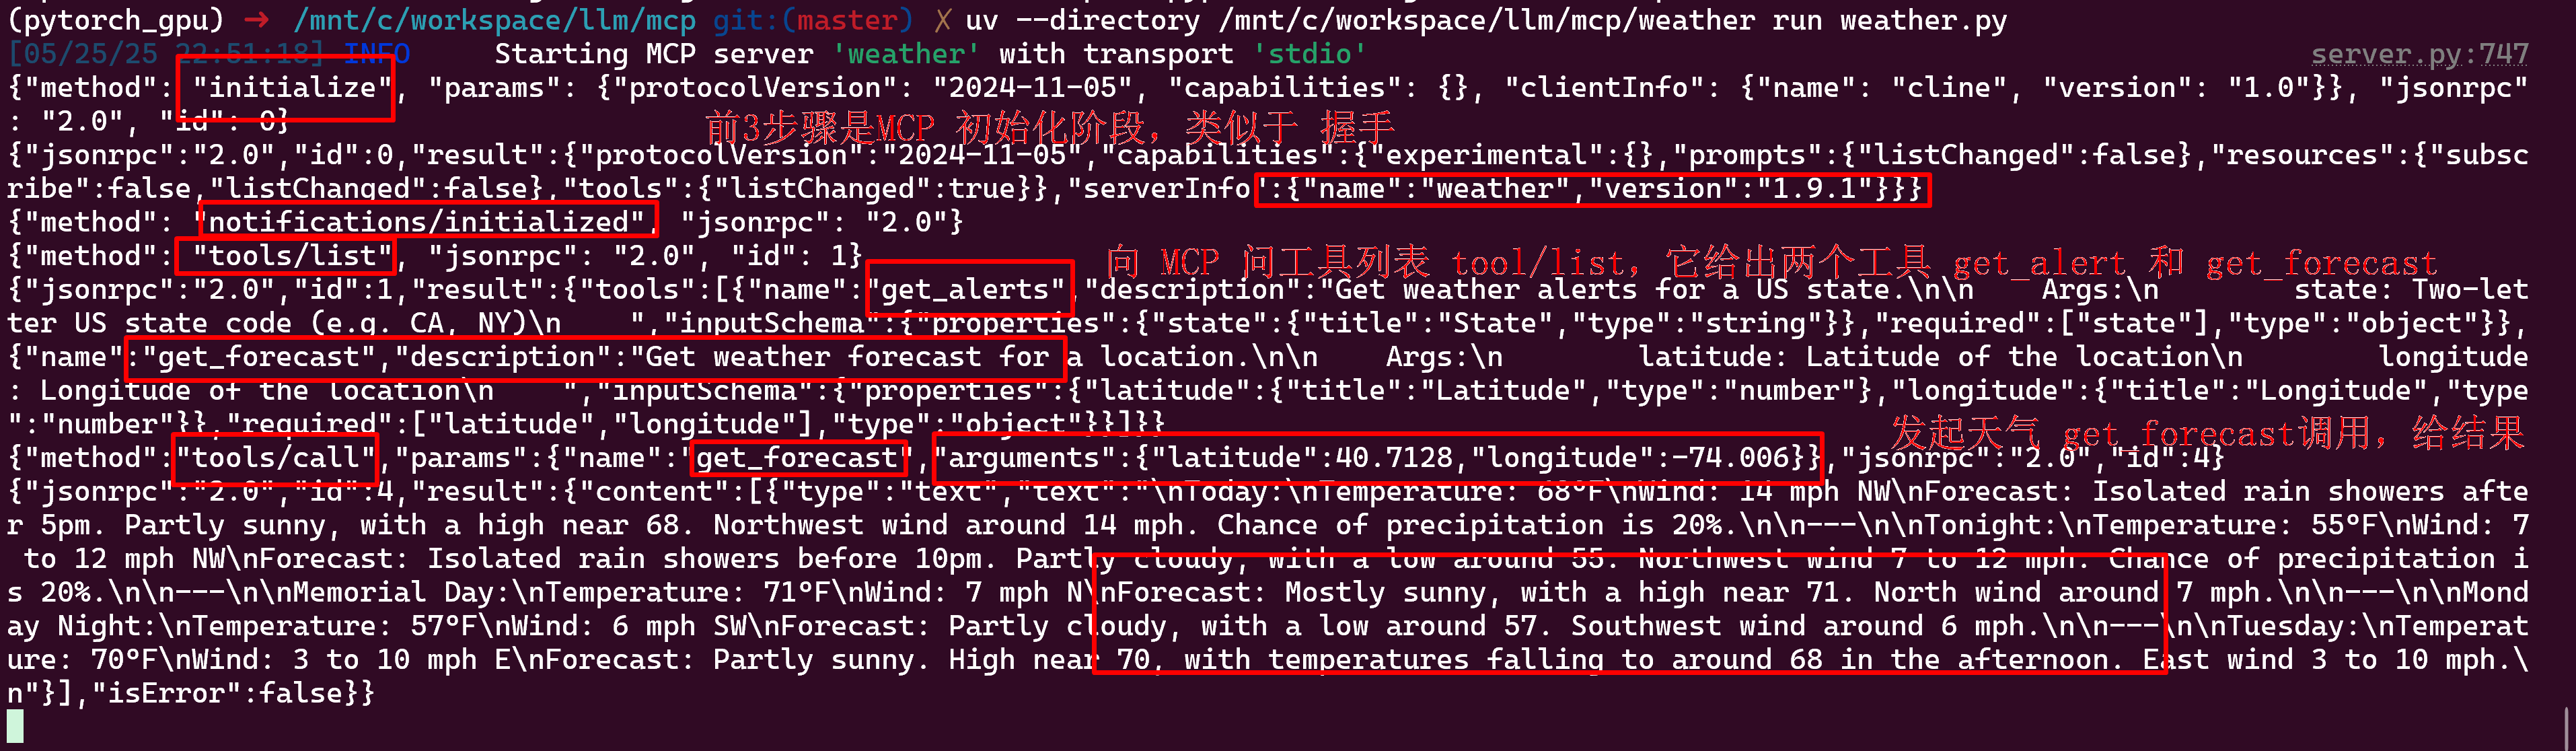
上述命令会得到以下的输出,合并起来就有三大步:
(1):和MCP工具进行握手
(2):获取其支持的工具列表:get_alerts, get_forecast
(3):调用 get_forecast 工具
步骤五:Cline 和 MCP 之间的工具代理
你可能会有疑问,如何才能知道用什么格式的内容和工具进行交互呢?它的输入的格式为什么是这个样子呢?我们可以通过在 Cline 和 MCP 工具中间增加一个中间代理,来截获 Cline 到 weather 的消息协议,进而就可以手动来发起工具调用了。
中间日志代理工具
使用 GPT 写了一个代码,用于在 Cline 和 MCP工具之间加一个代理。 mcp_logger.py 是一个 中间日志代理工具,用于在运行 MCP Server(如 weather.py)时,记录Cline与工具之间的输入输出交互内容,主要功能如下:
-
拦截标准输入(stdin)传给 MCP Server 的数据(例如 Cline 发来的 JSON-RPC 请求),并记录为
"输入 >>> ..."; -
拦截 MCP Server 标准输出(stdout)返回给 Cline 的响应结果,并记录为
"输出 >>> ..."; -
所有的交互式日志都会追加写入
mcp_io_log.txt文件,带有时间戳; -
保持原有输入输出链路不中断:数据一边转发,一边被记录。
中间日志代理工具用法示例:
python mcp_logger.py uv --directory /mnt/c/workspace/llm/mcp/weather run weather.py
这样一来,无需改动原有 MCP 工具 weather.py 服务代码,就能实时查看Cline与MCP的通信过程,方便调试和分析。这个工具 mcp_logger.py 的代码如下:
import sys
import asyncio
import datetime
import inspectLOG_FILE = "/mnt/c/workspace/llm/mcp/weather/mcp_io_log.txt"def log_to_file(prefix: str, message: str):timestamp = datetime.datetime.now().isoformat()with open(LOG_FILE, "a", encoding="utf-8") as f:f.write(f"[{timestamp}] {prefix} >>> {message}\n")async def forward_stream(src_reader, dst_writer, tag, decode_bytes=False):while True:line = await src_reader.readline()if not line:breakif isinstance(line, bytes) and decode_bytes:decoded = line.decode("utf-8", errors="replace").rstrip()log_to_file(tag, decoded)await maybe_await(dst_writer, decoded + "\n")else:log_to_file(tag, line.decode("utf-8", errors="replace").rstrip()if isinstance(line, bytes) else line.rstrip())await maybe_await(dst_writer, line)async def maybe_await(fn, arg):"""Call fn(arg), await if it's async."""result = fn(arg)if inspect.isawaitable(result):await resultasync def main():if len(sys.argv) < 2:print("Usage: python mcp_logger.py <real-server-command...>", file=sys.stderr)sys.exit(1)child_cmd = sys.argv[1:]proc = await asyncio.create_subprocess_exec(*child_cmd,stdin=asyncio.subprocess.PIPE,stdout=asyncio.subprocess.PIPE)loop = asyncio.get_running_loop()stdin_reader = asyncio.StreamReader()await loop.connect_read_pipe(lambda: asyncio.StreamReaderProtocol(stdin_reader), sys.stdin)async def write_to_proc_stdin(data):if isinstance(data, str):data = data.encode("utf-8")proc.stdin.write(data)await proc.stdin.drain()def write_to_stdout(data):sys.stdout.write(data)sys.stdout.flush()await asyncio.gather(forward_stream(stdin_reader, write_to_proc_stdin,"输入", decode_bytes=False),forward_stream(proc.stdout, write_to_stdout,"输出", decode_bytes=True))if __name__ == "__main__":asyncio.run(main())
现在我们在 Cline 中不再直接配置 weather.py 这个工具了,而是用mcp_logger.py 将它包装成一个新的 weather 工具。如下,我们将 mcp_logger.py 配置到 cline_mcp_settings.json 文件中,它将 weather.py 作为参数。
"weather": {"disabled": false,"timeout": 60,"command": "python","args": ["/mnt/c/workspace/llm/mcp/weather/mcp_logger.py","uv","--directory","/mnt/c/workspace/llm/mcp/weather","run","weather.py"],"transportType": "stdio"}
最终的启动命令为:
python mcp_logger.py uv --directory /mnt/c/workspace/llm/mcp/weather run weather.py
配置完毕 Cline 后,我们再次向 Cline 提问“纽约明天的天气怎么样”,mcp_logger.py 会将和工具交互的内容记录到/mnt/c/workspace/llm/mcp/weather/mcp_io_log.txt文件。这里面的流水账就是和工具交互的几大步骤,更多细节可以参看 mcp server 测试客户端 章节。
[2025-05-24T18:53:27.437433] 输入 >>> {"method":"initialize","params":{"protocolVersion":"2025-03-26","capabilities":{},"clientInfo":{"name":"Cline","version":"3.17.4"}},"jsonrpc":"2.0","id":0}
[2025-05-24T18:53:28.024624] 输出 >>> {"jsonrpc":"2.0","id":0,"result":{"protocolVersion":"2025-03-26","capabilities":{"experimental":{},"prompts":{"listChanged":false},"resources":{"subscribe":false,"listChanged":false},"tools":{"listChanged":true}},"serverInfo":{"name":"weather","version":"1.9.1"}}}
[2025-05-24T18:53:28.026294] 输入 >>> {"method":"notifications/initialized","jsonrpc":"2.0"}
[2025-05-24T18:53:28.027355] 输入 >>> {"method":"tools/list","jsonrpc":"2.0","id":1}
[2025-05-24T18:53:28.031537] 输出 >>> {"jsonrpc":"2.0","id":1,"result":{"tools":[{"name":"get_alerts","description":"Get weather alerts for a US state.\n\n    Args:\n        state: Two-letter US state code (e.g. CA, NY)\n    ","inputSchema":{"properties":{"state":{"title":"State","type":"string"}},"required":["state"],"type":"object"}},{"name":"get_forecast","description":"Get weather forecast for a location.\n\n    Args:\n        latitude: Latitude of the location\n        longitude: Longitude of the location\n    ","inputSchema":{"properties":{"latitude":{"title":"Latitude","type":"number"},"longitude":{"title":"Longitude","type":"number"}},"required":["latitude","longitude"],"type":"object"}}]}}
[2025-05-24T18:53:28.034546] 输入 >>> {"method":"resources/list","jsonrpc":"2.0","id":2}
[2025-05-24T18:53:28.037251] 输出 >>> {"jsonrpc":"2.0","id":2,"result":{"resources":[]}}
[2025-05-24T18:53:28.038989] 输入 >>> {"method":"resources/templates/list","jsonrpc":"2.0","id":3}
[2025-05-24T18:53:28.041609] 输出 >>> {"jsonrpc":"2.0","id":3,"result":{"resourceTemplates":[]}}
[2025-05-24T18:55:20.618362] 输入 >>> {"method":"tools/call","params":{"name":"get_forecast","arguments":{"latitude":40.7128,"longitude":-74.006}},"jsonrpc":"2.0","id":4}
[2025-05-24T18:55:22.201629] 输出 >>> {"jsonrpc":"2.0","id":4,"result":{"content":[{"type":"text","text":"\nToday:\nTemperature: 63°F\nWind: 12 to 16 mph W\nForecast: Isolated rain showers after noon. Partly sunny. High near 63, with temperatures falling to around 61 in the afternoon. West wind 12 to 16 mph. Chance of precipitation is 20%.\n\n---\n\nTonight:\nTemperature: 53°F\nWind: 10 to 15 mph W\nForecast: Isolated rain showers before 10pm. Partly cloudy, with a low around 53. West wind 10 to 15 mph. Chance of precipitation is 20%.\n\n---\n\nSunday:\nTemperature: 67°F\nWind: 10 to 14 mph W\nForecast: Mostly sunny, with a high near 67. West wind 10 to 14 mph.\n\n---\n\nSunday Night:\nTemperature: 55°F\nWind: 7 to 12 mph NW\nForecast: Partly cloudy, with a low around 55. Northwest wind 7 to 12 mph.\n\n---\n\nMemorial Day:\nTemperature: 69°F\nWind: 7 mph N\nForecast: Mostly sunny, with a high near 69. North wind around 7 mph.\n"}],"isError":false}}
mcp server 测试客户端
使用 GPT 写了一个用于测试 mcp server 的客户端,它用于和 MCP weather 工具进行交互,将上述的工具握手和获取天气的流程自动执行一遍,将它命名为 test_weather.py,代码如下:
import subprocess
import json
import timedef send_json_and_read(proc, obj):"""发送一行 JSON 并读取一行响应"""line = json.dumps(obj)print("👉 发送:", line)proc.stdin.write(line + "\n")proc.stdin.flush()while True:response = proc.stdout.readline()if response.strip():print("✅ 响应:", response.strip())return json.loads(response.strip())# 启动 MCP server 子进程
proc = subprocess.Popen(["python", "weather.py"],stdin=subprocess.PIPE,stdout=subprocess.PIPE,stderr=subprocess.PIPE,text=True,
)# 1. initialize
send_json_and_read(proc, {"method": "initialize","params": {"protocolVersion": "2024-11-05","capabilities": {},"clientInfo": {"name": "cline","version": "1.0"}},"jsonrpc": "2.0","id": 0
})# 2. notifications/initialized (通知类,不需要响应)
print("👉 发送通知: notifications/initialized")
proc.stdin.write(json.dumps({"method": "notifications/initialized","jsonrpc": "2.0"
}) + "\n")
proc.stdin.flush()# 3. tools/list
send_json_and_read(proc, {"method": "tools/list","jsonrpc": "2.0","id": 1
})# 4. resources/list
send_json_and_read(proc, {"method": "resources/list","jsonrpc": "2.0","id": 2
})# 5. resources/templates/list
send_json_and_read(proc, {"method": "resources/templates/list","jsonrpc": "2.0","id": 3
})# 6. 调用 get_forecast(注意你原来写的是 tools/call,其实 FastMCP 使用的是 tools/invoke)
# {"method":"tools/call","params":{"name":"get_forecast","arguments":{"latitude":40.7128,"longitude":-74.006}},"jsonrpc":"2.0","id":4}
send_json_and_read(proc, {"method": "tools/call","params": {"name": "get_forecast","arguments": {"latitude": 40.7128,"longitude": -74.0060}},"jsonrpc": "2.0","id": 4
})proc.terminate()
它的输出内容如下:
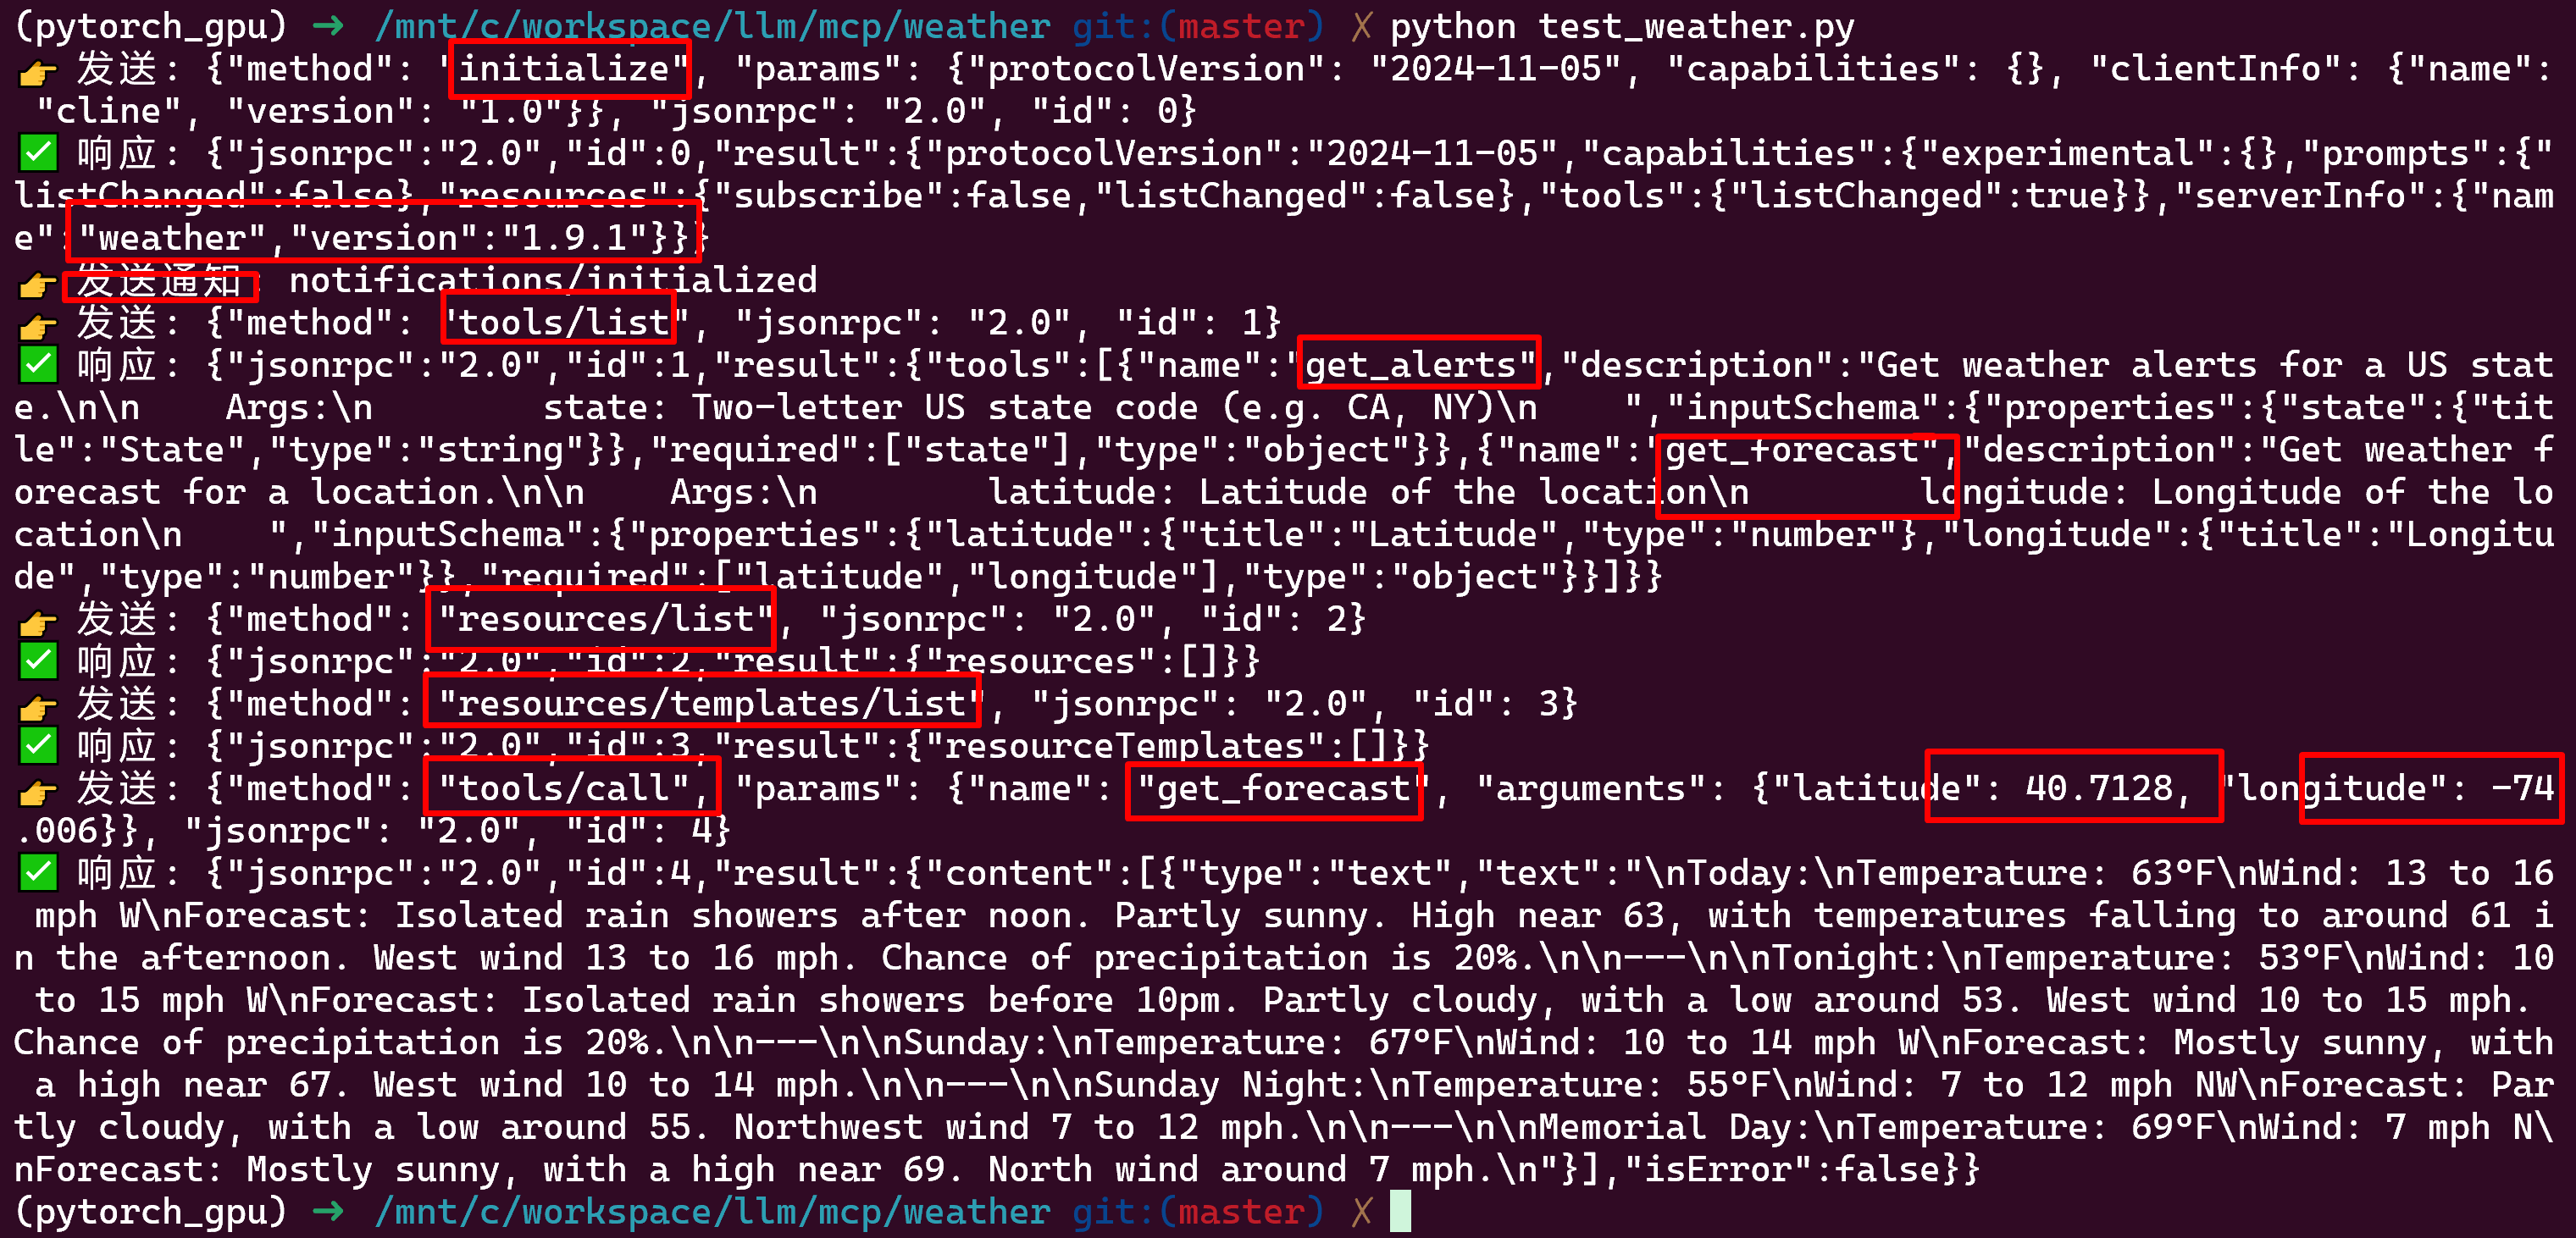
这张图展示了一个完整的 MCP 工具交互过程:客户端通过 JSON-RPC 协议依次向 weather.py 发送 initialize 握手请求,获取工具列表(tools/list)、资源信息(resources/list 与 resources/templates/list),然后调用 get_forecast 工具查询纽约市天气,并成功接收到格式化的预报结果,表明 MCP 天气服务端已完整实现并正确响应所有标准请求。
- 客户端发送
initialize请求,协商协议版本并获取服务端信息,服务端返回名称为"weather"、版本为"1.9.1"的响应。 - 客户端发送
notifications/initialized通知,表示初始化完成,准备开始交互。 - 客户端通过
tools/list请求获取工具列表,服务端返回包含get_alerts和get_forecast两个工具,并提供每个工具的说明和参数结构。 - 客户端请求
resources/list和resources/templates/list,用于发现可用资源和模板,服务端分别返回空数组,表示当前未注册资源或模板。 - 客户端使用
tools/call方法调用get_forecast工具,并传入纽约市的经纬度参数(latitude: 40.7128,longitude: -74.006)。 - 服务端成功响应工具调用,返回包含天气预报文本的结构化结果,字段包括
content(文本数组)和isError: false,表明请求处理成功。
步骤六:模型调用工具示例流程
前面的内容给出了 Cline 如何和 工具进行沟通的。那下一个问题就是 Cline 是如何和模型交互的呢?不同的MCP Agent 使用不同的格式和模型进行沟通,Cline 是使用xml格式来交互的。
和前面的 中间日志代理工具 类似,我们可以在 Cline 和 模型 中间加一个 本地代理服务器,这个本地服务器就用来打日志,将 Cline 和 DeepSeek 交互的输入和输出打印出来。
中转服务器 llm_logger.py 代码
from fastapi import FastAPI, Request
from fastapi.responses import StreamingResponse
import httpx
import json
import uuid
import datetime
import osapp = FastAPI()
LOG_FILE = "/mnt/c/workspace/llm/mcp/weather/llm_io_log.txt"# 启动时清空日志文件
if os.path.exists(LOG_FILE):with open(LOG_FILE, "w", encoding="utf-8") as f:f.write("")print(f"清空日志文件:{LOG_FILE}")def log_to_file(log_id, direction, content):"""将一条日志写入文件"""timestamp = datetime.datetime.now().isoformat()with open(f"{LOG_FILE}", "a", encoding="utf-8") as f:f.write(direction + "\n" + content)f.write("\n")print(direction + "\n" + content)@app.post("/chat/completions")
async def proxy_request(request: Request):log_id = uuid.uuid4().hex  # 每个会话唯一标识body_bytes = await request.body()body_str = body_bytes.decode('utf-8')log_to_file(log_id, "模型输入:", body_str)  # 记录请求体body = await request.json()async def event_stream():collected_text = ""  # 收集最终自然语言响应async with httpx.AsyncClient(timeout=None) as client:async with client.stream("POST","https://api.deepseek.com/chat/completions",json=body,headers={"Content-Type": "application/json","Accept": "text/event-stream","Authorization": request.headers.get("Authorization"),},) as response:async for line in response.aiter_lines():if line.startswith("data:"):try:data_json = json.loads(line[len("data:"):].strip())delta = data_json.get("choices", [{}])[0].get("delta", {})content_piece = delta.get("content")if content_piece:collected_text += content_pieceexcept json.JSONDecodeError:passyield f"{line}\n"# 所有内容收集完毕,写入日志log_to_file(log_id, "模型输出:", collected_text)return StreamingResponse(event_stream(), media_type="text/event-stream")if __name__ == "__main__":import uvicornuvicorn.run(app, host="0.0.0.0", port=8001)
启动中转服务器
使用下面的命令来启动中转服务器:uvicorn llm_logger:app --port 8001
配置中转服务器
配置本地的中转服务器的地址,以及 DeepSeek的 API KEY 和模型ID
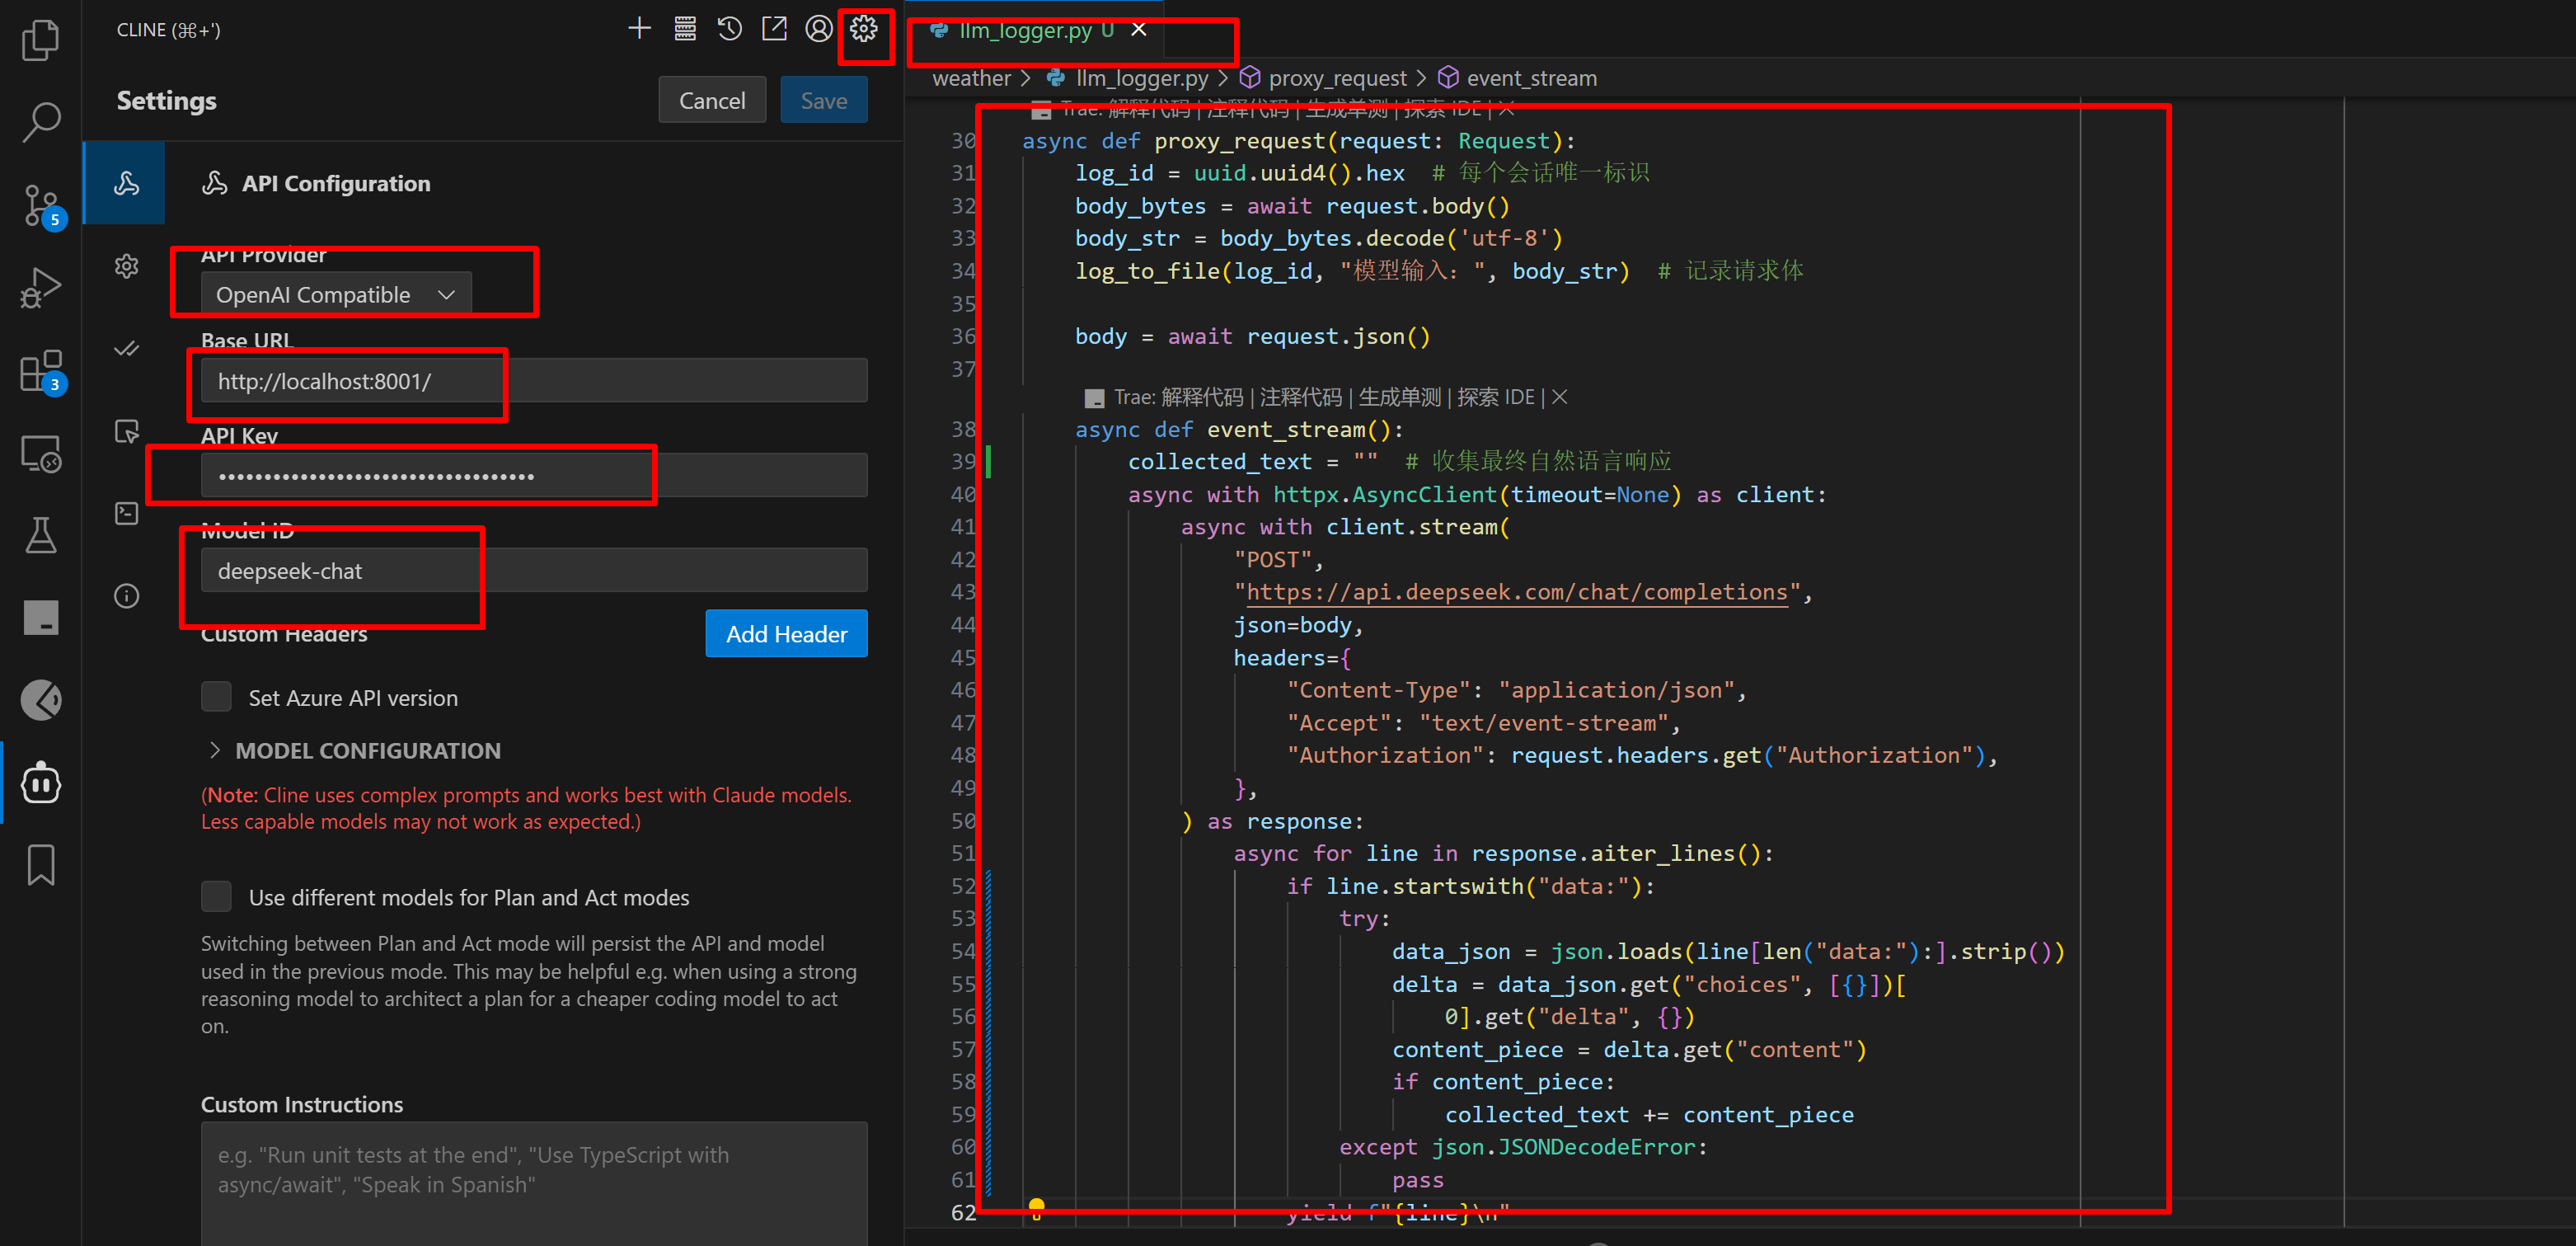
llm_logger.py 实现了一个OpenAI API 兼容的代理服务器,用于中转与 DeepSeek 等模型服务之间的对话请求,它接收 /chat/completions 请求 并使用 httpx.AsyncClient 将请求转发给到 DeepSeek 接口https://api.deepseek.com/chat/completions,同时保留原始 Authorization 头,用以传递 API KEY。它可作为调试 MCP 流程中「模型调用工具前后的原始问答」记录工具; 与 Cline 搭配使用,实现“模型调用 + 工具调用 + 日志追踪”完整链路。
可直接运行该脚本,通过 uvicorn 启动 FastAPI 服务监听 8001 端口:
python your_file.py
# 或手动 uvicorn 启动
uvicorn your_file:app --host 0.0.0.0 --port 8001
询问天气情况:
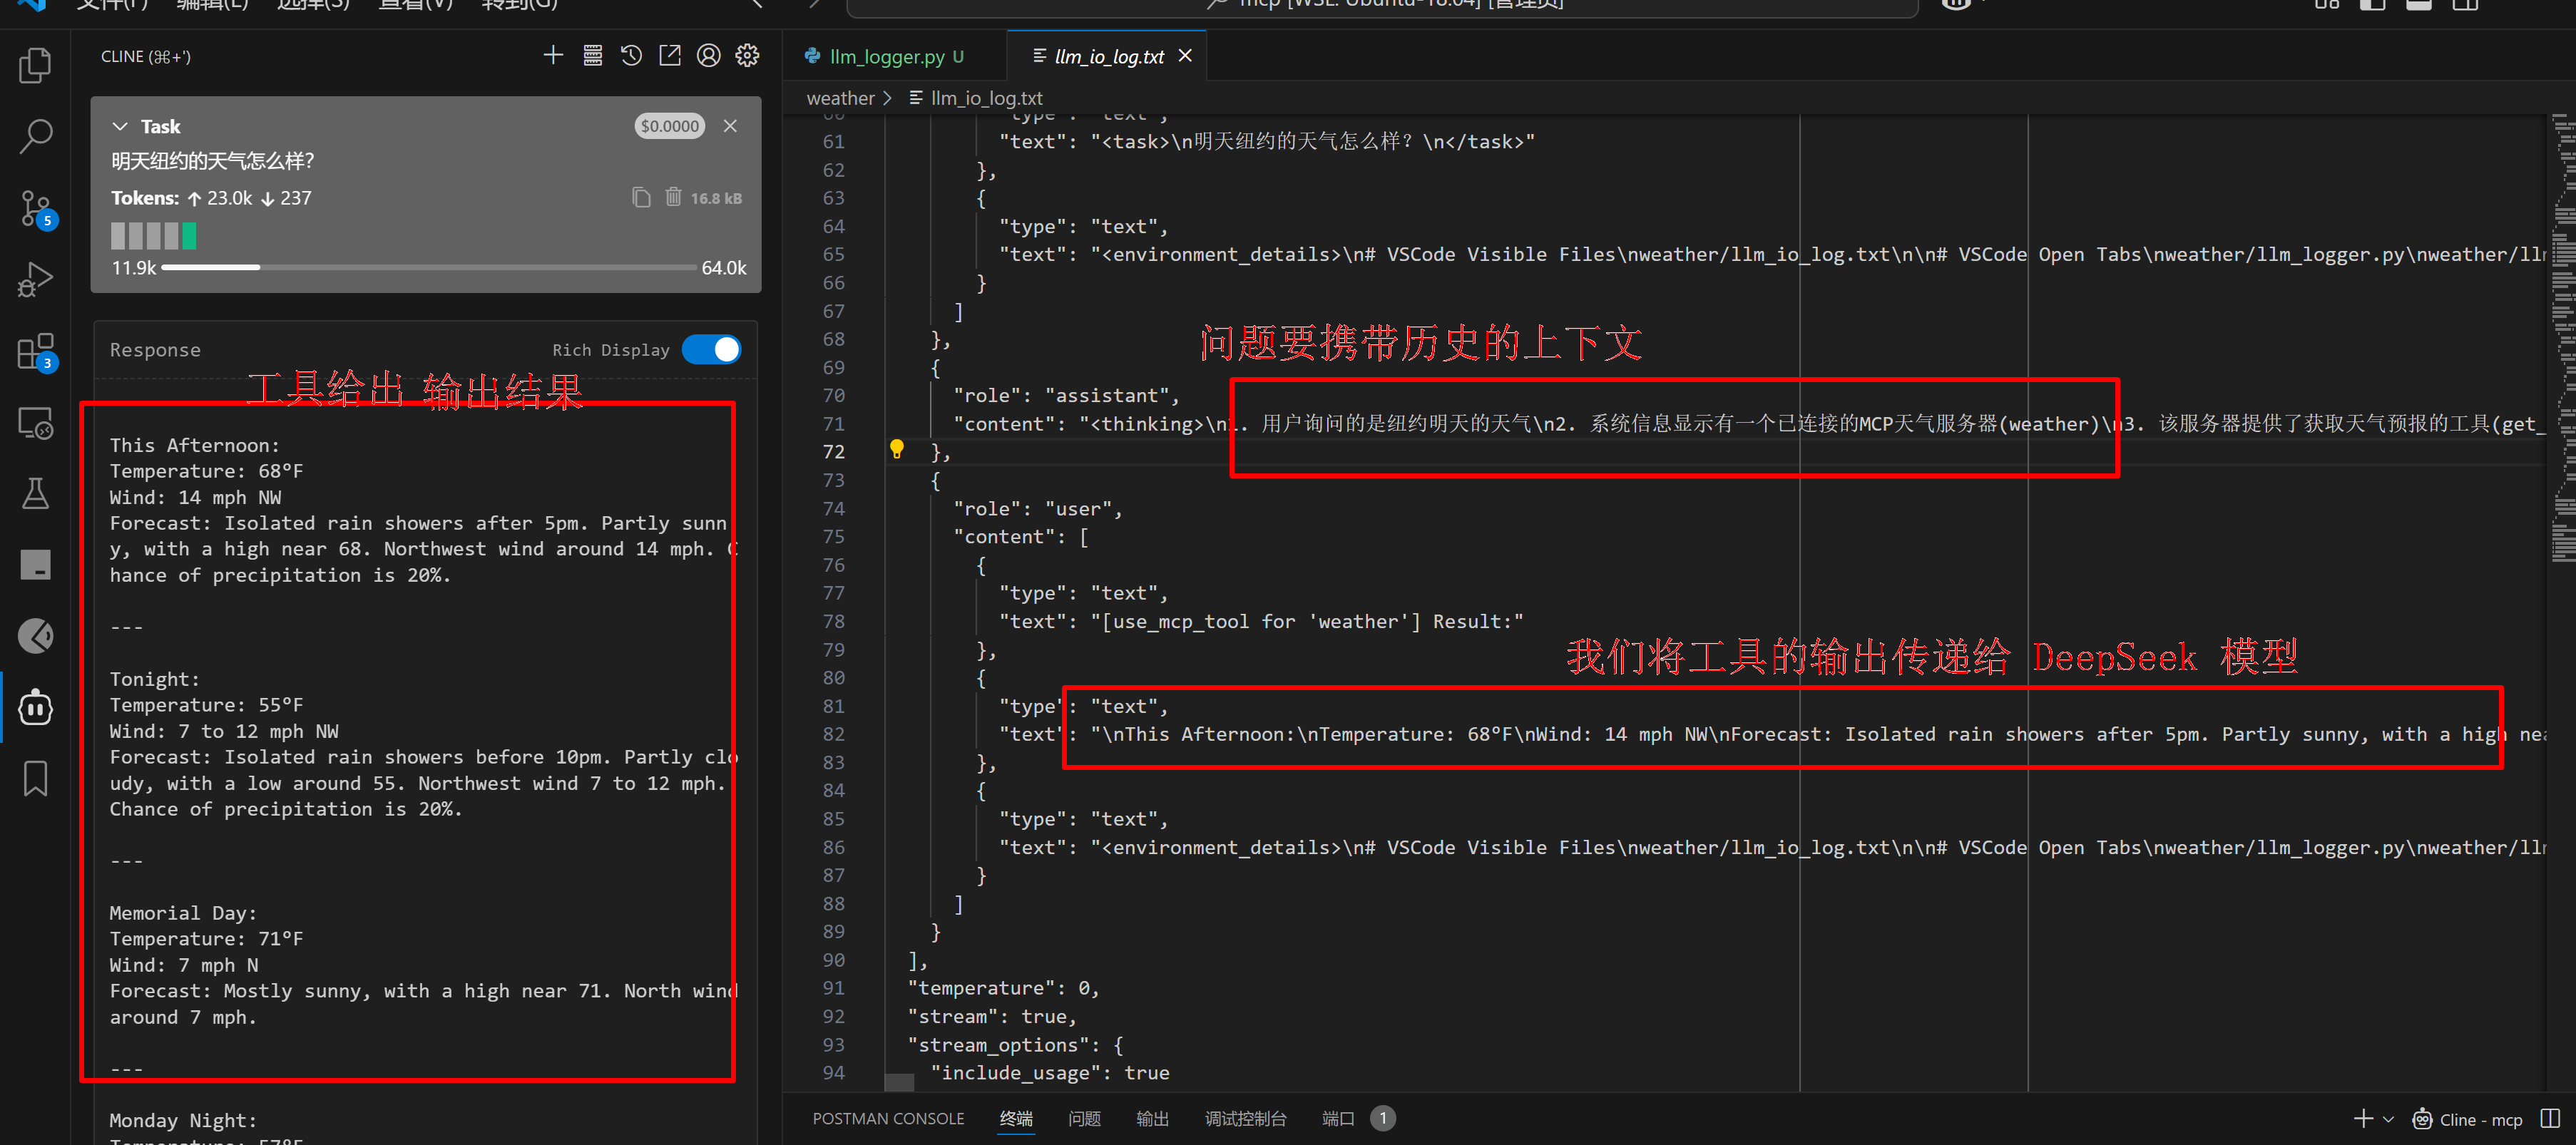
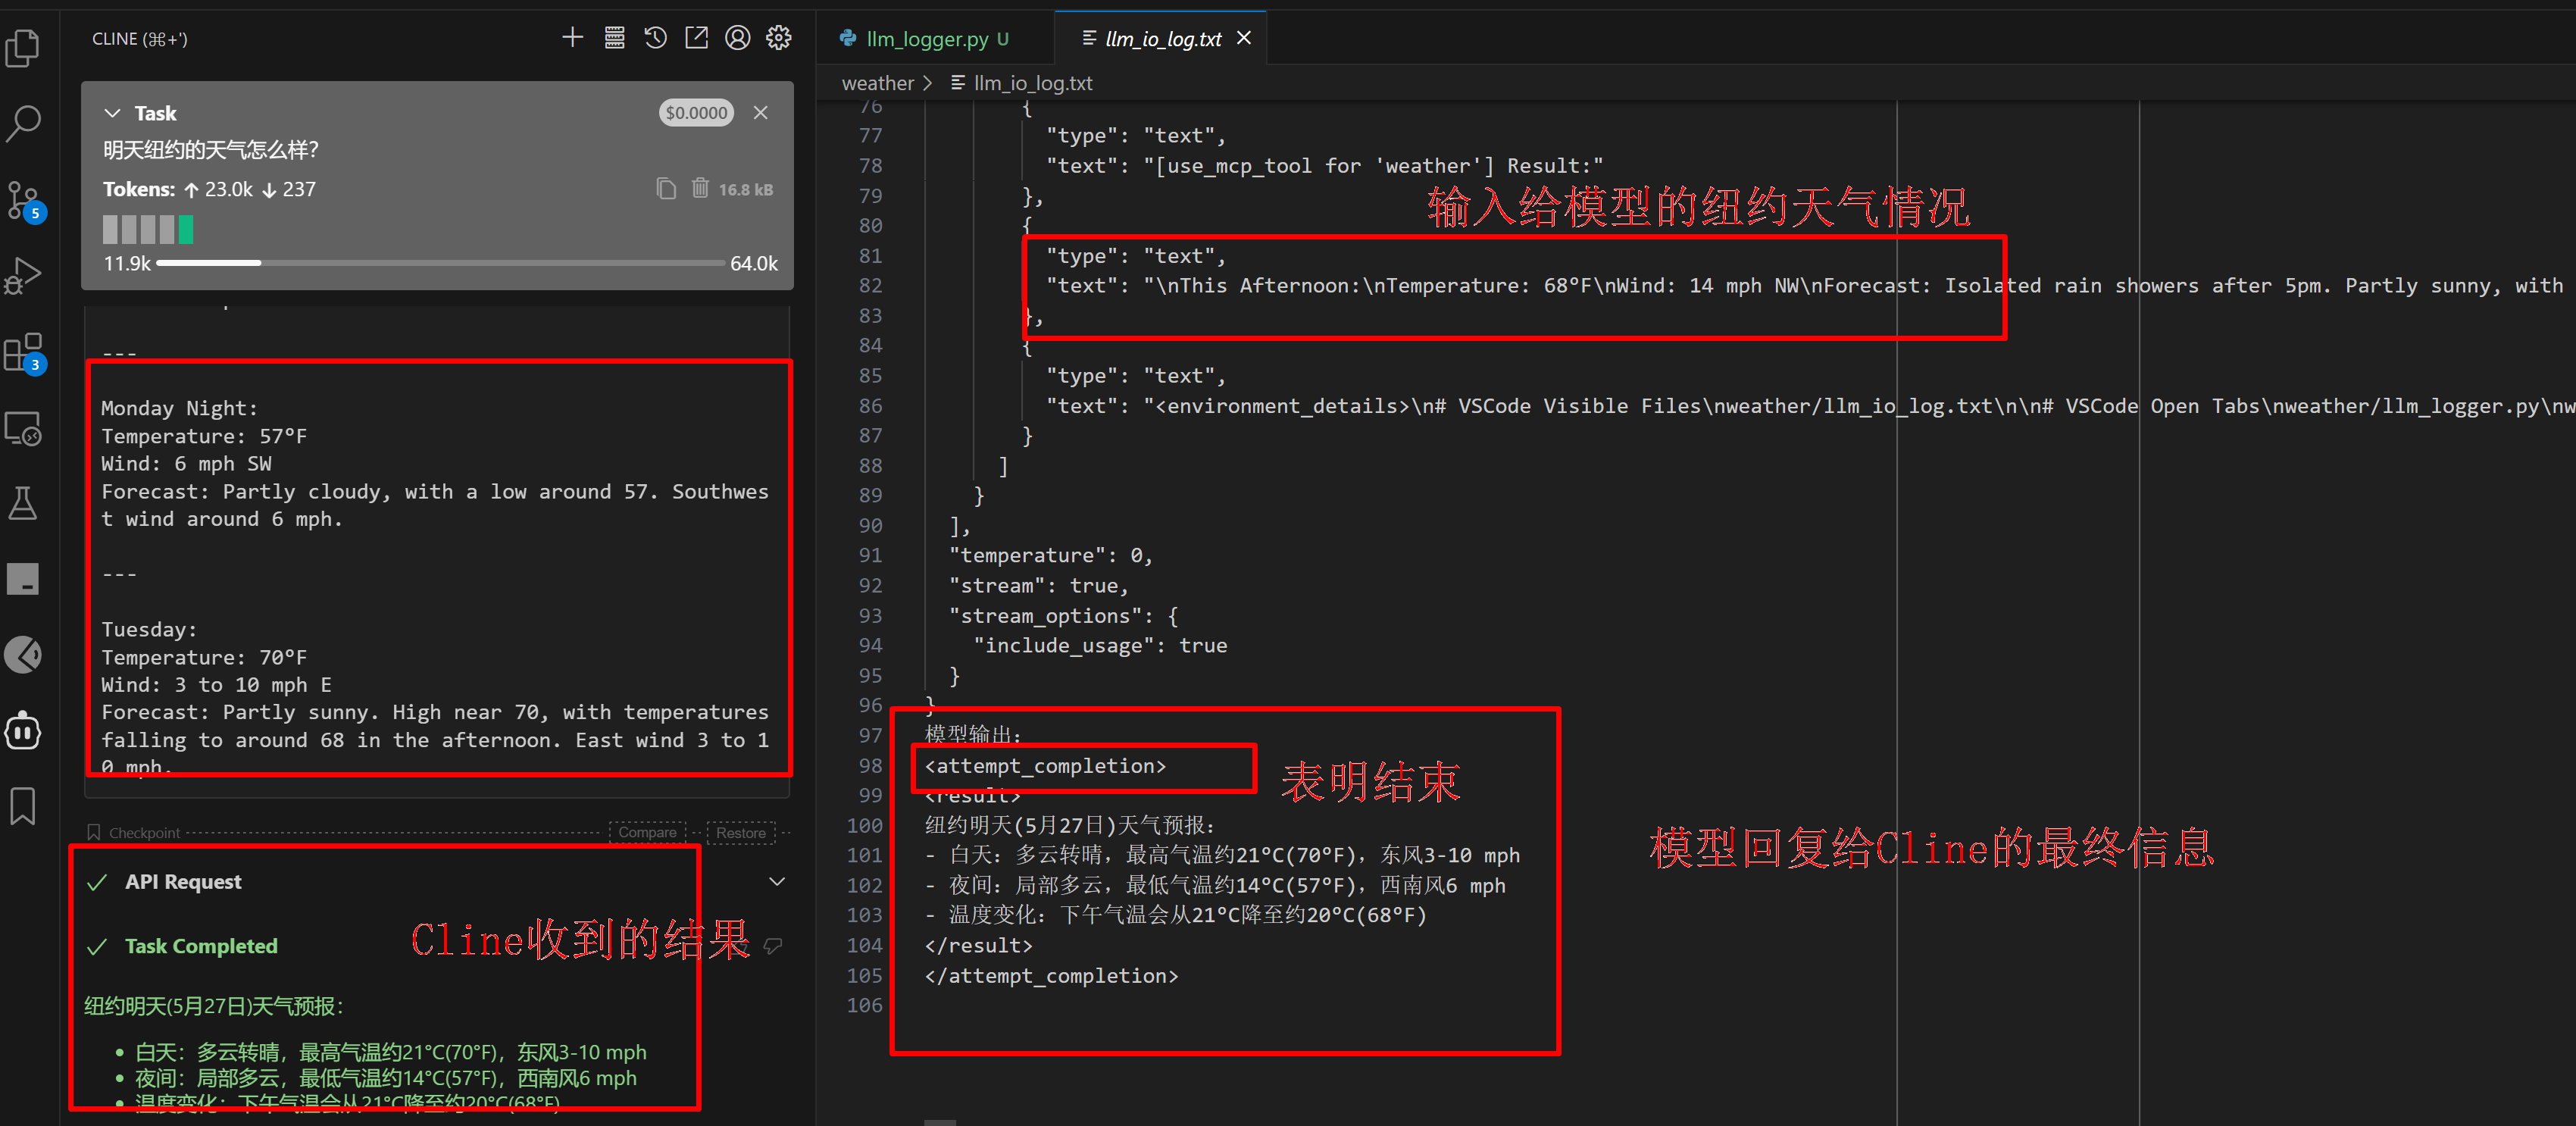
Cline 发起天气询问请求,同时携带的还有 “role”: “system” 的内容,它的里面有 weather 工具的信息,讲述它的功能以及参数类型等等。
## weather (`python /mnt/c/workspace/llm/mcp/weather/mcp_logger.py uv --directory /mnt/c/workspace/llm/mcp/weather run weather.py`)\n\n### Available Tools\n- get_alerts: Get weather alerts for a US state.\n\n Args:\n state: Two-letter US state code (e.g. CA, NY)\n \n Input Schema:\n {\n \"type\": \"object\",\n \"properties\": {\n \"state\": {\n \"title\": \"State\",\n \"type\": \"string\"\n }\n },\n \"required\": [\n \"state\"\n ]\n }\n\n- get_forecast: Get weather forecast for a location.\n\n Args:\n latitude: Latitude of the location\n longitude: Longitude of the location\n \n Input Schema:\n {\n \"type\": \"object\",\n \"properties\": {\n \"latitude\": {\n \"title\": \"Latitude\",\n \"type\": \"number\"\n },\n \"longitude\": {\n \"title\": \"Longitude\",\n \"type\": \"number\"\n }\n },\n \"required\": [\n \"latitude\",\n \"longitude\"\n ]\n }\n\n====\n\n
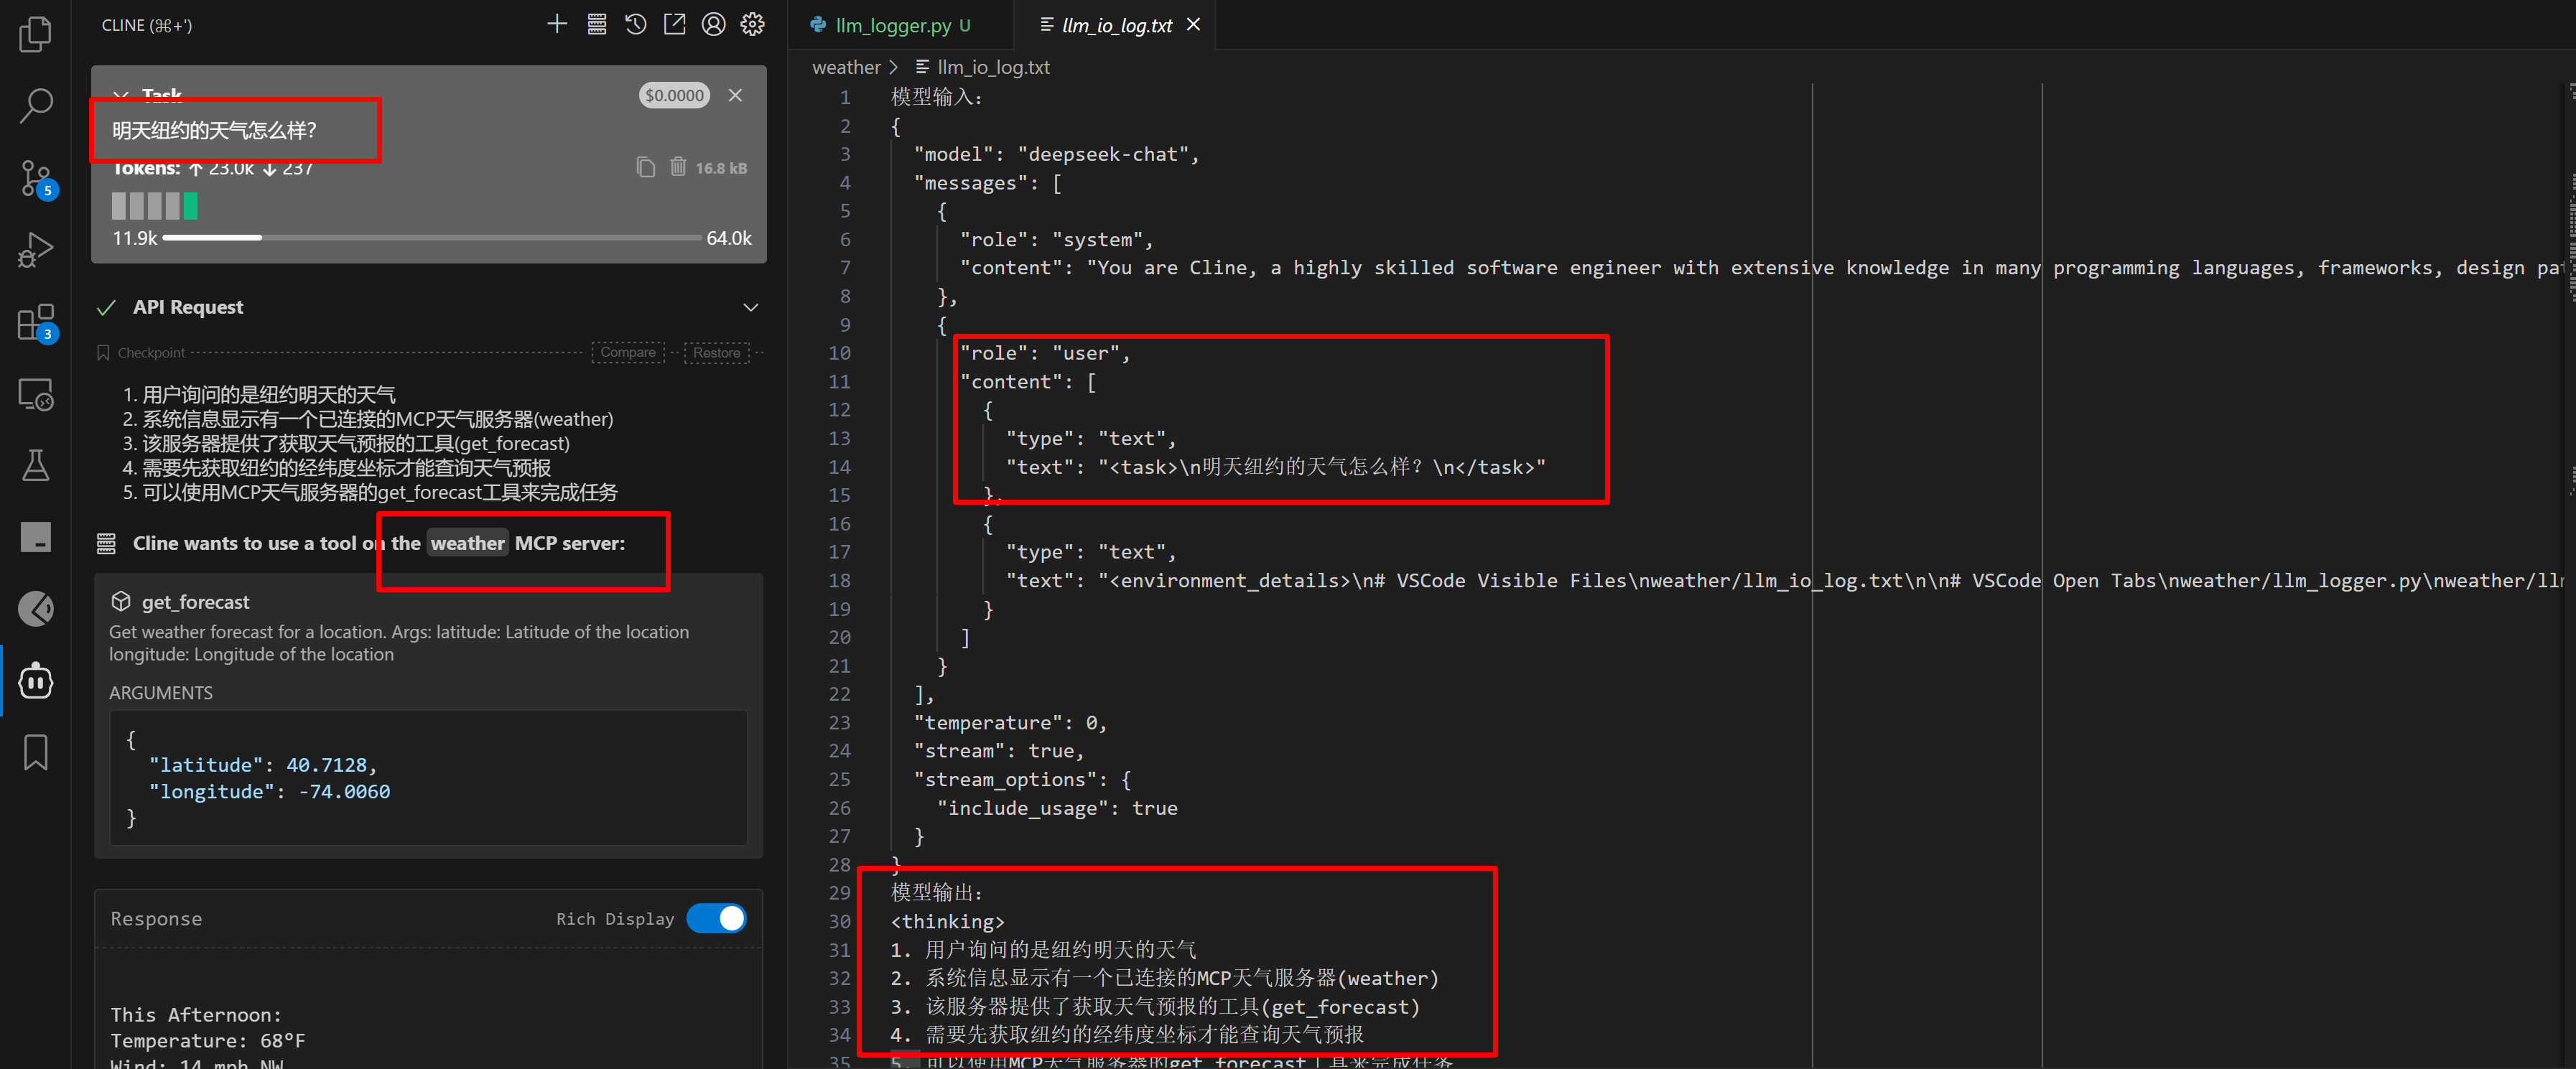
DeepSeek 模型收到这个问题之后,从工具列表中找到了 weather,建议 Cline use_mcp_tool发起 weather 服务中 get_forecast 的调用,同时还给出了工具调用参数纽约的经纬度坐标
模型输出:
<thinking>
1. 用户询问的是纽约明天的天气
2. 系统信息显示有一个已连接的MCP天气服务器(weather)
3. 该服务器提供了获取天气预报的工具(get_forecast)
4. 需要先获取纽约的经纬度坐标才能查询天气预报
5. 可以使用MCP天气服务器的get_forecast工具来完成任务
</thinking><use_mcp_tool>
<server_name>weather</server_name>
<tool_name>get_forecast</tool_name>
<arguments>
{"latitude": 40.7128,"longitude": -74.0060
}
</arguments>
</use_mcp_tool>
Cline 收到回复之后,Cline发起 tool/call 工具调用并得到 纽约 的天气信息
[2025-05-26T00:08:00.053419] 输入 >>> {"method":"tools/call","params":{"name":"get_forecast","arguments":{"latitude":40.7128,"longitude":-74.006}},"jsonrpc":"2.0","id":7}
[2025-05-26T00:08:01.741230] 输出 >>> {"jsonrpc":"2.0","id":7,"result":{"content":[{"type":"text","text":"\nThis Afternoon:\nTemperature: 68°F\nWind: 14 mph NW\nForecast: Isolated rain showers after 5pm. Partly sunny, with a high near 68. Northwest wind around 14 mph. Chance of precipitation is 20%.\n\n---\n\nTonight:\nTemperature: 55°F\nWind: 7 to 12 mph NW\nForecast: Isolated rain showers before 10pm. Partly cloudy, with a low around 55. Northwest wind 7 to 12 mph. Chance of precipitation is 20%.\n\n---\n\nMemorial Day:\nTemperature: 71°F\nWind: 7 mph N\nForecast: Mostly sunny, with a high near 71. North wind around 7 mph.\n\n---\n\nMonday Night:\nTemperature: 57°F\nWind: 6 mph SW\nForecast: Partly cloudy, with a low around 57. Southwest wind around 6 mph.\n\n---\n\nTuesday:\nTemperature: 70°F\nWind: 3 to 10 mph E\nForecast: Partly sunny. High near 70, with temperatures falling to around 68 in the afternoon. East wind 3 to 10 mph.\n"}],"isError":false}}
Cline 将从工具收到的天气信息发送给 DeepSeek 模型
DeepSeek模型将收到的信息转换成易读的形式,返回给Cline,这里attempt_completion表明是最终结果,不需要继续交互了。
总结:MCP 的本质与价值
MCP 作为工具调用协议,其核心目标是:
-
发现函数(工具):tools/list 中规定了所有函数名、输入结构、用途说明
-
标准化调用方式:统一了调用请求/响应格式
-
模型工具解耦:并不关心模型如何组织 prompt,由 Agent(如 cline)决定
通过 VScode + Cline + DeepSeek + MCP,可以快速构建出一个结构清晰、交互统一、支持自然语言指令的工具调用系统。无论是天气查询、网页抓取,还是其他插件式扩展,MCP 都为构建 AI 应用打开了一种新方式。如果你对 Agent 模型感兴趣,可以参考我之前的文章:大模型系列18-AI Agents。

:原理、架构与实战)


)


)


)

