十五、商城业务-支付
15.1 支付宝支付
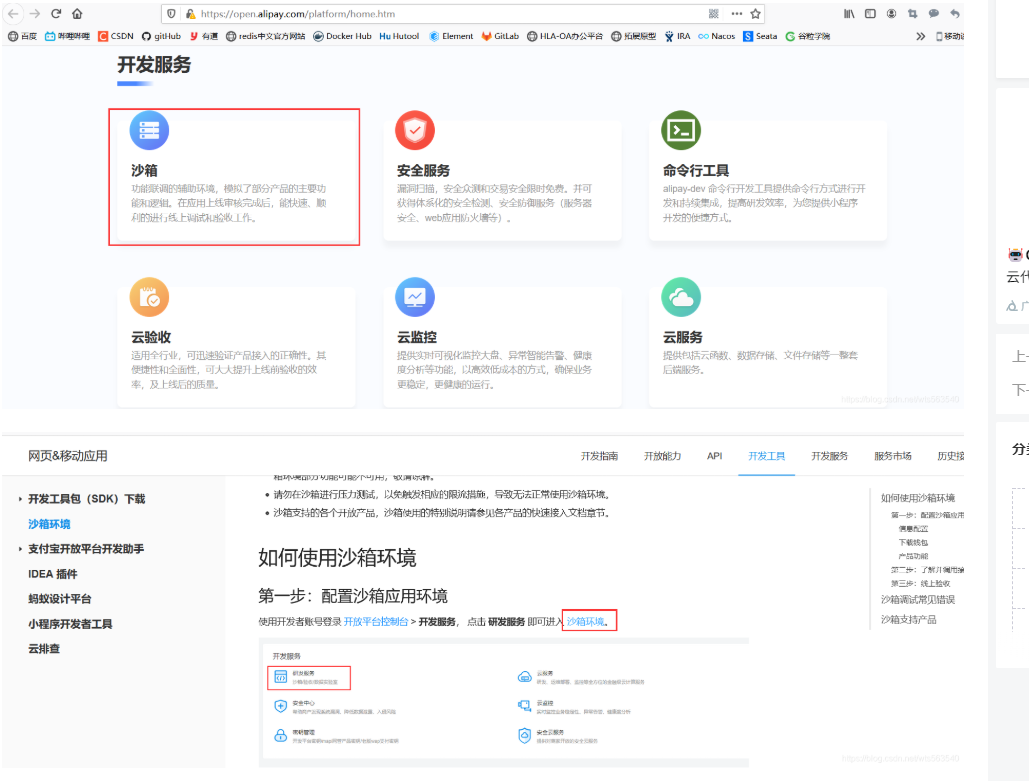
15.1.1 进入“蚂蚁金服开放平台”
支付宝开放 平台地址:
支付宝开放平台
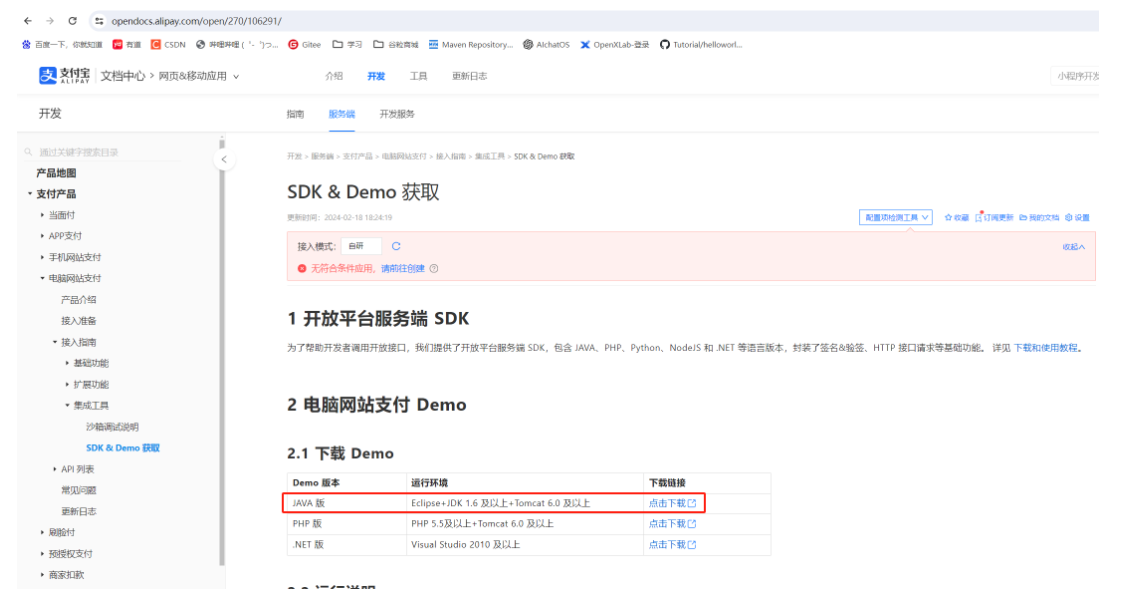
15.1.2 下载支付宝官方 demo,进行配置和测试
开发者文档:支付宝开放平台文档中心
电脑网站支付文档:小程序文档 - 支付宝文档中心
下载 demo
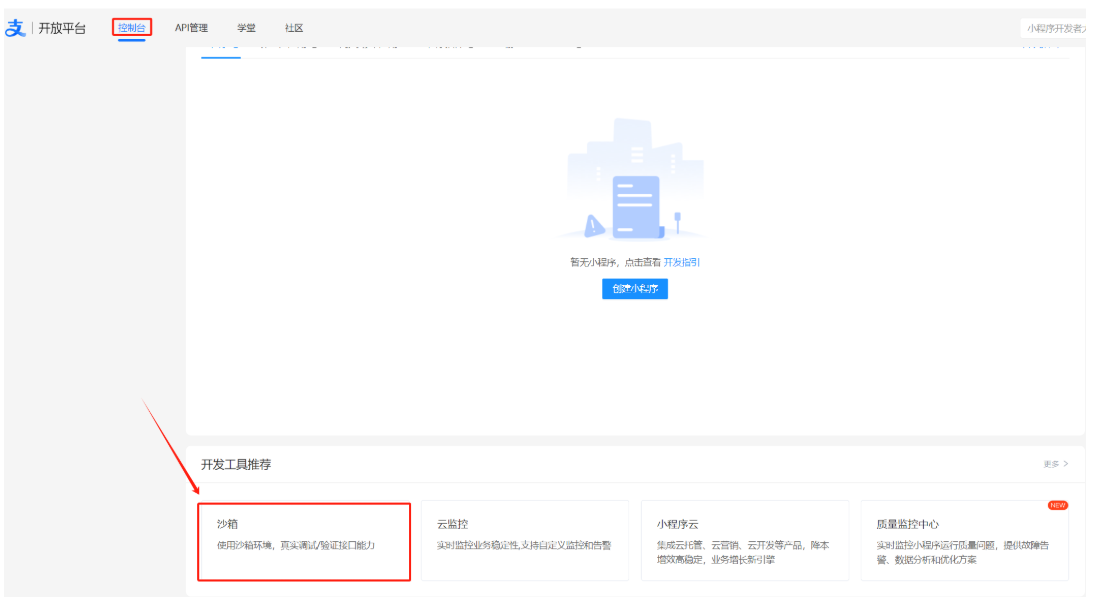
15.1.3 配置使用沙箱进行测试
- 使用 RSA 工具生成签名
- 下载沙箱版钱包
- 运行官方 demo 进行测试
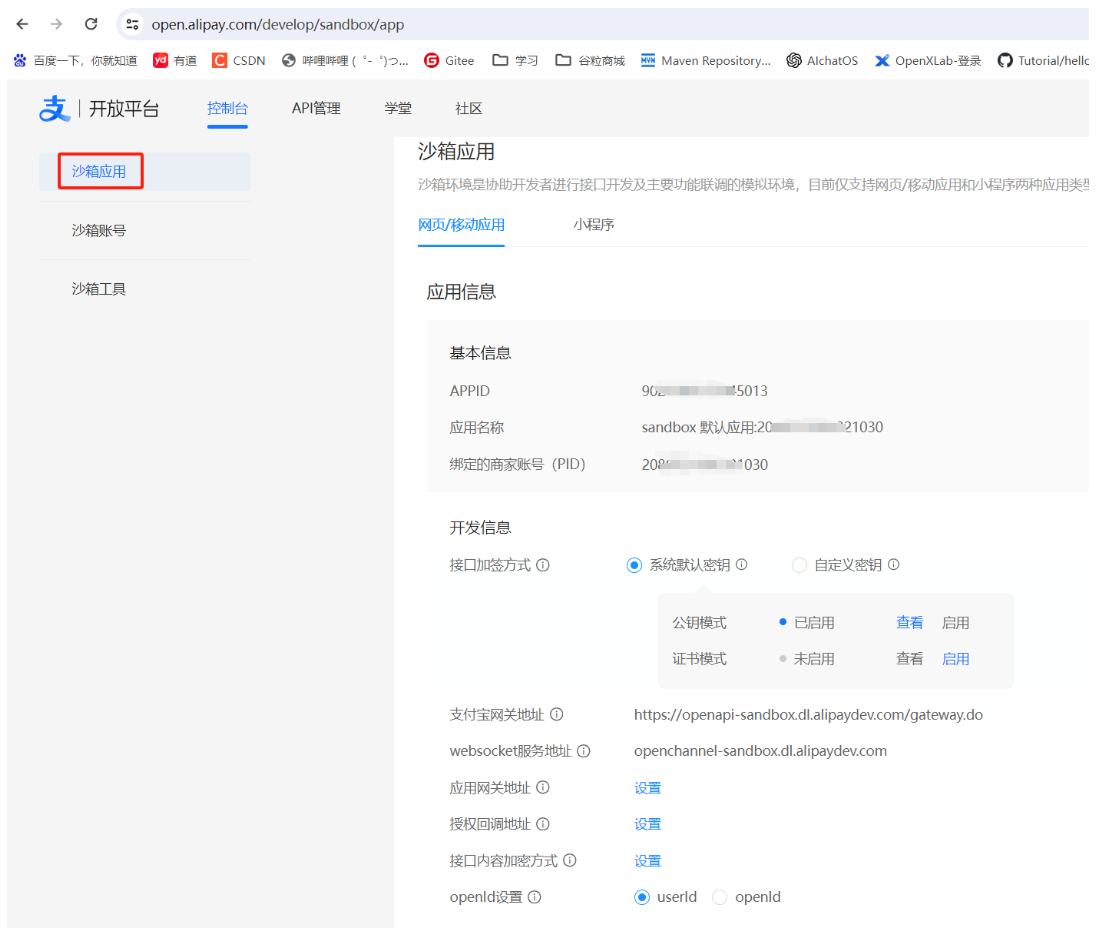
 沙箱应用基本信息
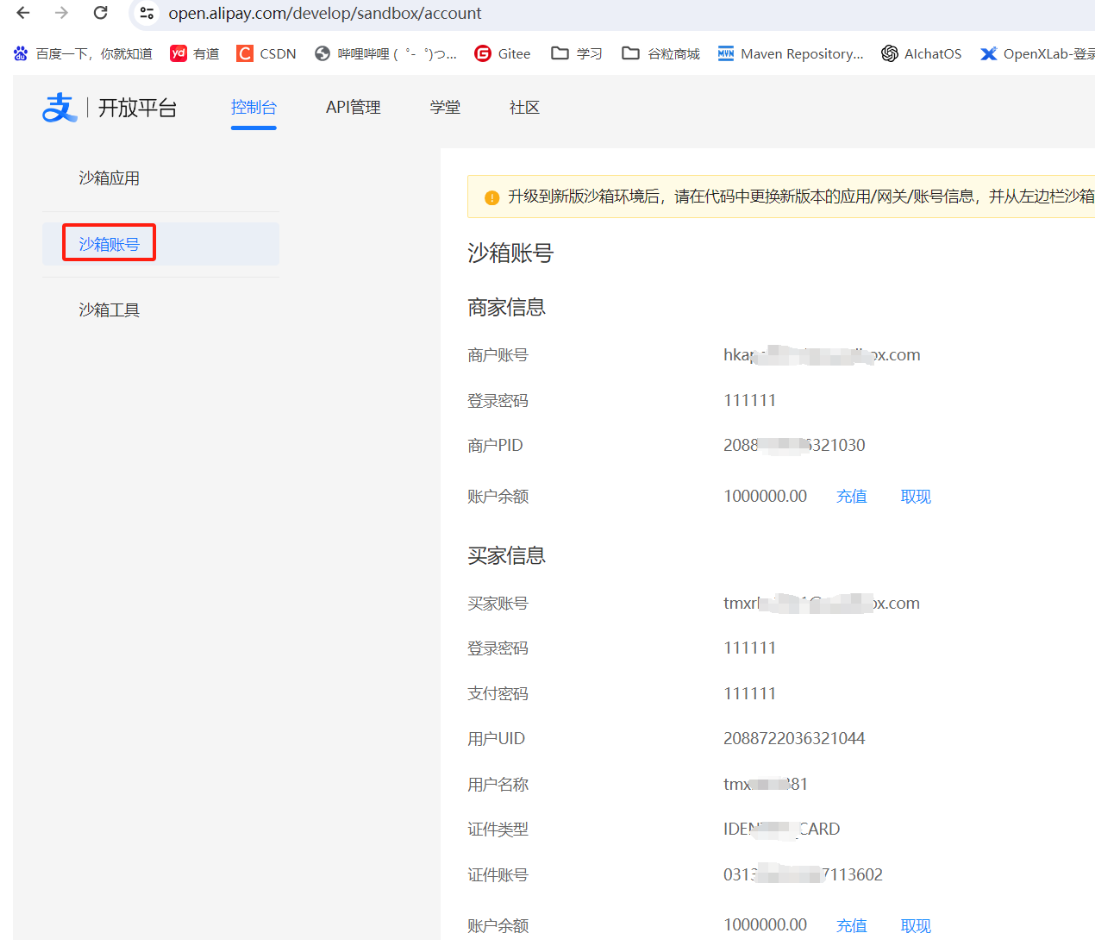
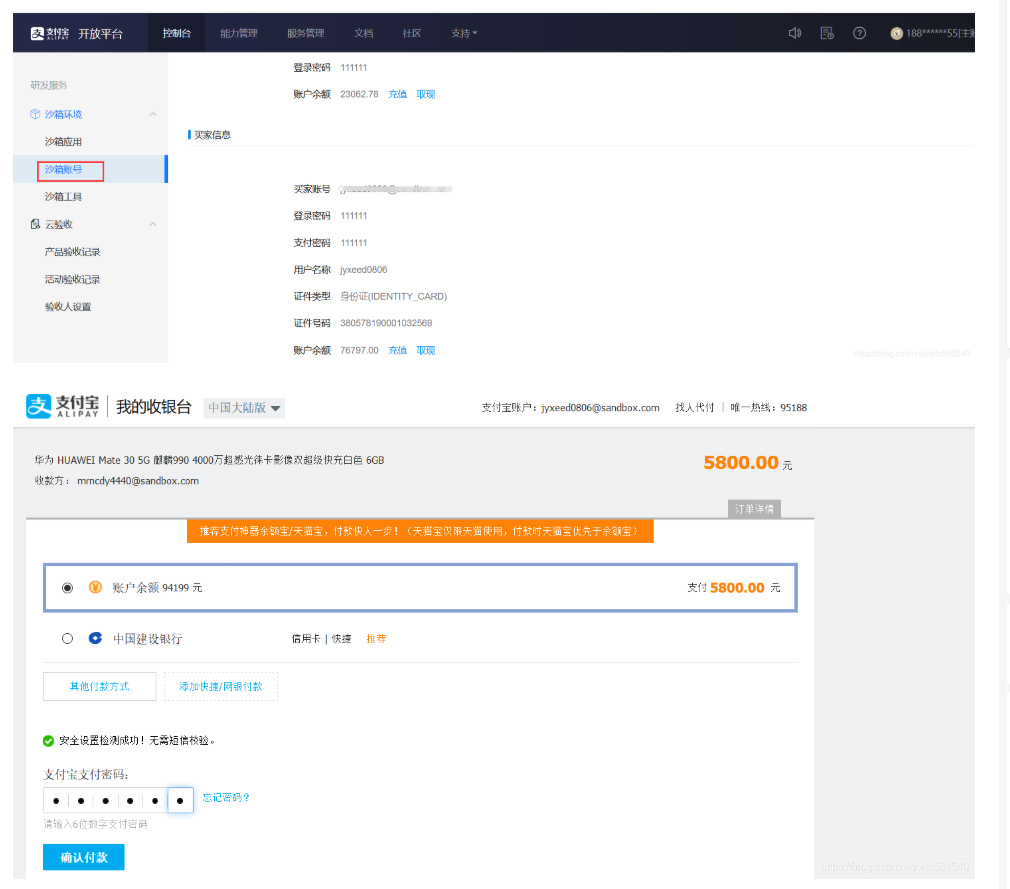
沙箱账号
15.1.4 什么是公钥、私钥、加密、签名和验签?
1 、公钥私钥
公钥和私钥是一个相对概念
它们的公私性是相对于生成者来说的。
一对密钥生成后,保存在生成者手里的就是私钥,生成者发布出去大家用的就是公钥
2 、加密和数字签名
- 加密是指:
- 我们使用一对公私钥中的一个密钥来对数据进行加密,而使用另一个密钥来进行解密的技术。
-
公钥和私钥都可以用来加密,也都可以用来解密。
-
但这个加解密必须是一对密钥之间的互相加解密,否则不能成功。
-
加密的目的是:
-
为了确保数据传输过程中的不可读性,就是不想让别人看到。
-
- 加密方式:
-
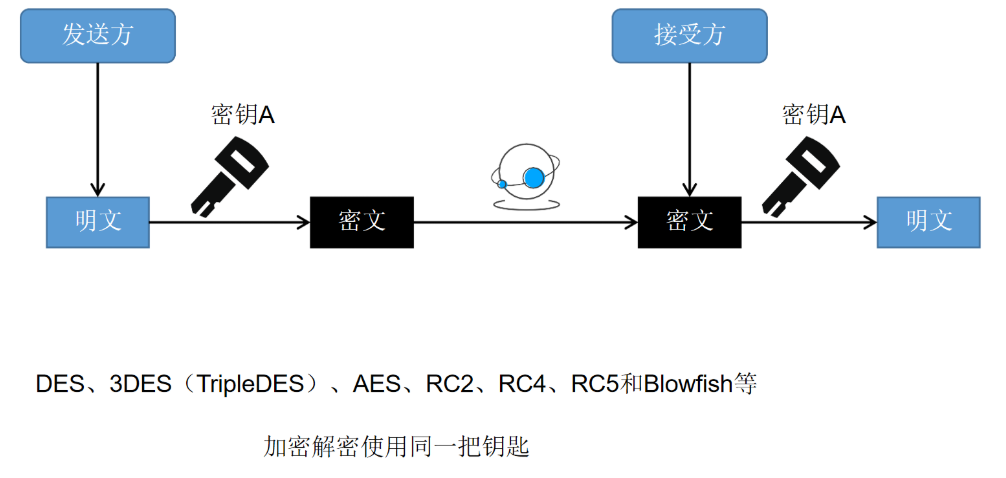
对称加密
-
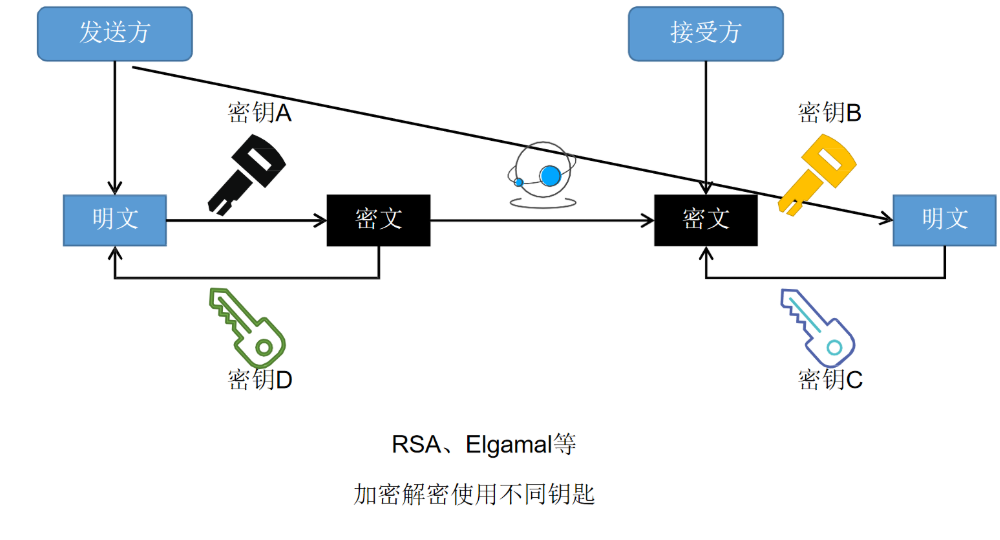
非对称加密
-
- 签名:
- 给我们将要发送的数据,做上一个唯一签名(类似于指纹)
- 用来互相验证接收方和发送方的身份;
-
在验证身份的基础上再验证一下传递的数据是否被篡改过。因此使用数字签名可以用来达到数据的明文传输。
- 验签:
- 支付宝为了验证请求的数据是否商户本人发的
- 商户为了验证响应的数据是否支付宝发的
15.1.5 支付宝加密原理
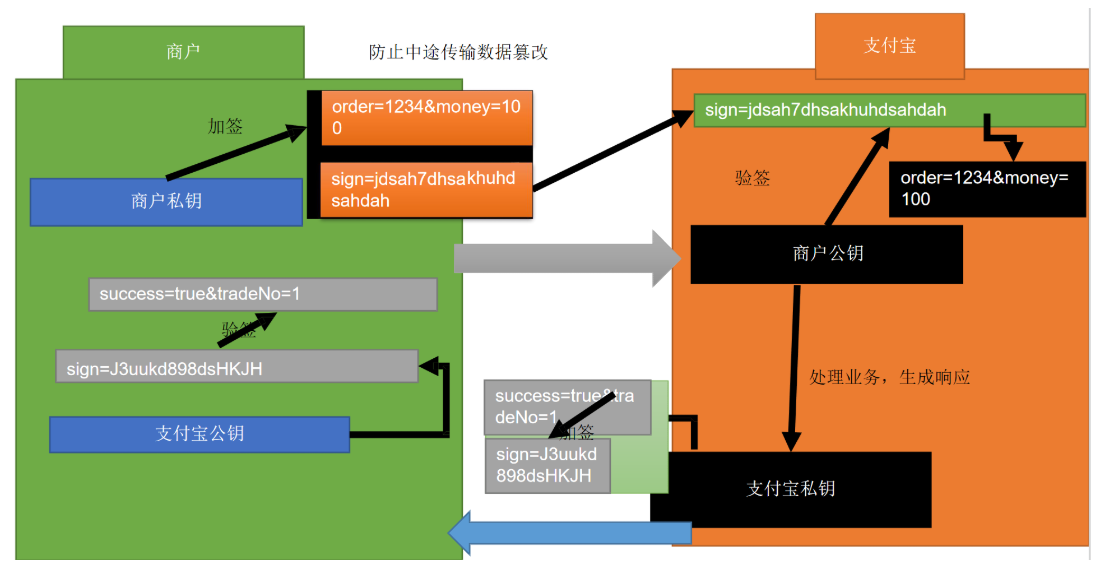
- 支付宝加密采用RSA非对称加密,分别在商户端和支付宝端有两对公钥和私钥
- 在发送订单数据时,直接使用明文,但会使用
商户私钥加一个对应的签名,支付宝端会使用商户公钥对签名进行验签,只有数据明文和签名对应的时候才能说明传输正确 - 支付成功后,支付宝发送支付成功数据之外,还会使用
支付宝私钥加一个对应的签名,商户端收到支付成功数据之后也会使用支付宝公钥延签,成功后才能确认
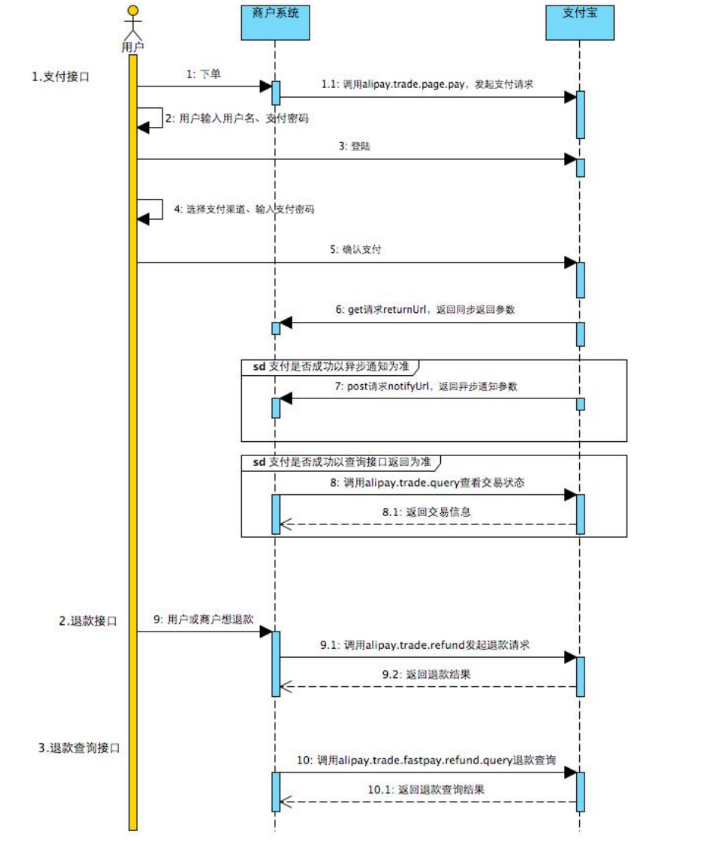
15.1.6 支付宝支付流程
15.2 内网穿透
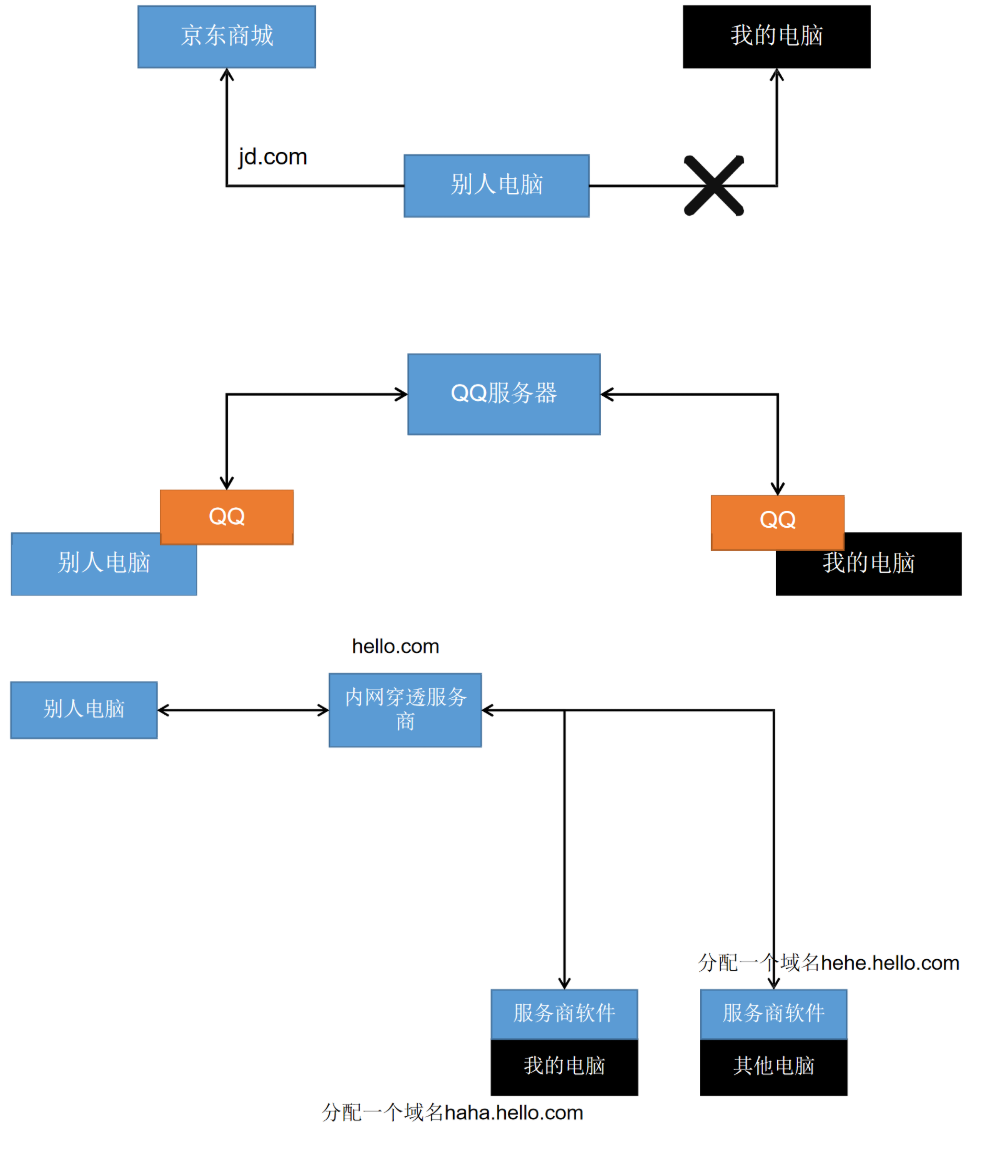
15. 2.1 简介
内网穿透功能可以允许我们使用外网的网址来访问主机;
正常的外网需要访问我们项目的流程是:
- 买服务器并且有公网固定 IP
- 买域名映射到服务器的 IP
- 域名需要进行备案和审核
15.2.2 使用场景
- 开发测试(微信、支付宝)
- 智慧互联
- 远程控制
- 私有云
15.2.3 内网穿透的几个常用软件
- natapp:https://natapp.cn/ 优惠码:022B93FD(9 折)[仅限第一次使用]
- 续断:www.zhexi.tech 优惠码:SBQMEA(95 折)[仅限第一次使用]
- 花生壳:https://www.oray.com/
15.2.4 内网穿透常用软件安装
续断:https://www.zhexi.tech/
第一步:登录
第二步:安装客户端
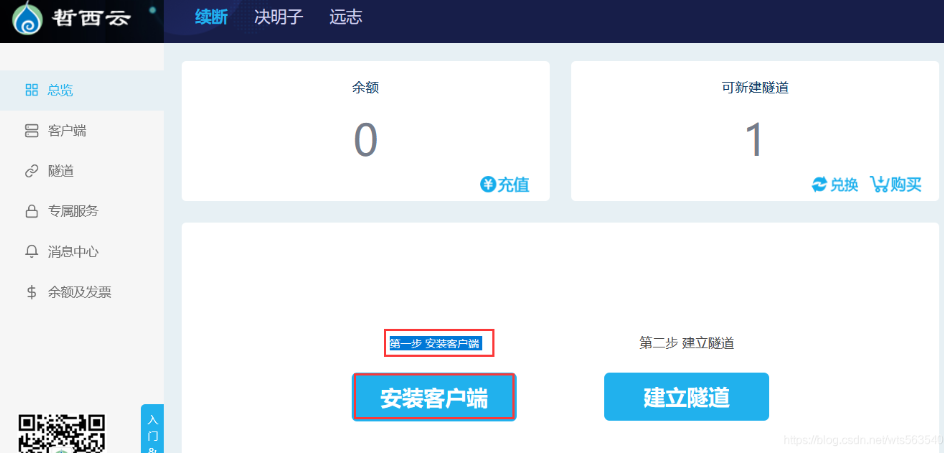
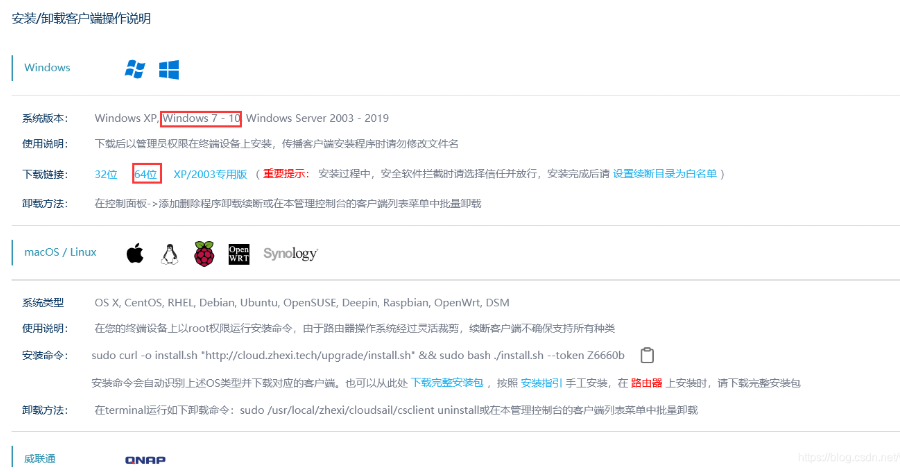
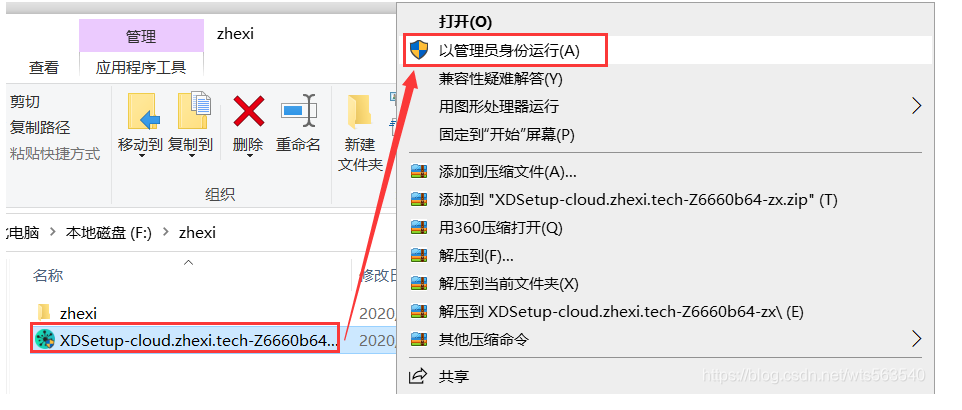
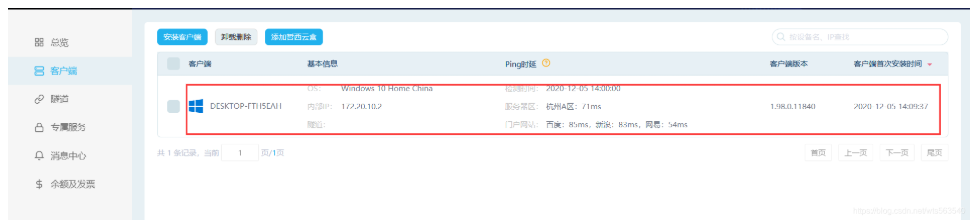
第三步:安装(一定使用管理员身份安装,否则安装失败)
安装好之后,会网站会感应到我们的主机
第四步:新建隧道
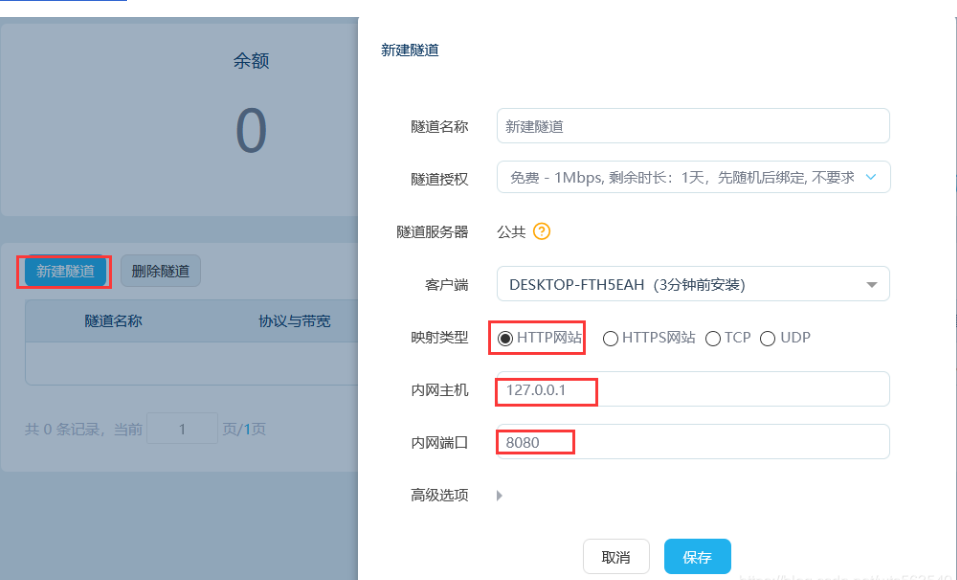
隧道建立好,会给我们生成一个域名

15.3 订单服务-整合支付
15.3.1 搭建支付宝沙箱环境
1、导入依赖
<!--阿里支付模块--><!-- https://mvnrepository.com/artifact/com.alipay.sdk/alipay-sdk-java --><dependency><groupId>com.alipay.sdk</groupId><artifactId>alipay-sdk-java</artifactId><version>4.9.28.ALL</version></dependency>2、抽取支付工具类并进行配置
成功调用该接口后,返回的数据就是支付页面的html,因此后续会使用@ResponseBody
添加“com.yr.gulimall.order.config.AlipayTemplate”类,代码如下:
@ConfigurationProperties(prefix = "alipay")
@Component
@Data
public class AlipayTemplate {//在支付宝创建的应用的idprivate   String app_id = "2016102600763190";// 商户私钥,您的PKCS8格式RSA2私钥private String merchant_private_key = "MjXN6Hnj8k2GAriRFt0BS9gjihbl9Rt38VMNbBi3Vt3Cy6TOwANLLJ/DfnYjRqwCG81fkyKlDqdsamdfCiTysCa0gQKBgQDYQ45LSRxAOTyM5NliBmtev0lbpDa7FqXL0UFgBel5VgA1Ysp0+6ex2n73NBHbaVPEXgNMnTdzU3WF9uHF4Gj0mfUzbVMbj/YkkHDOZHBggAjEHCB87IKowq/uAH/++Qes2GipHHCTJlG6yejdxhOsMZXdCRnidNx5yv9+2JI37QKBgQCw0xn7ZeRBIOXxW7xFJw1WecUV7yaL9OWqKRHat3lFtf1Qo/87cLl+KeObvQjjXuUe07UkrS05h6ijWyCFlBo2V7Cdb3qjq4atUwScKfTJONnrF+fwTX0L5QgyQeDX5a4yYp4pLmt6HKh34sI5S/RSWxDm7kpj+/MjCZgp6Xc51g==";// 支付宝公钥,查看地址:https://openhome.alipay.com/platform/keyManage.htm 对应APPID下的支付宝公钥。private String alipay_public_key = "MIIBIjA74UKxt2F8VMIRKrRAAAuIMuawIsl4Ye+G12LK8P1ZLYy7ZJpgZ+Wv5nOs3DdoEazgCERj/ON8lM1KBHZOAV+TkrIcyi7cD1gfv4a1usikrUqm8/qhFvoiUfyHJFv1ymT7C4BI6aHzQ2zcUlSQPGoPl4C11tgnSkm3DlH2JZKgaIMcCOnNH+qctjNh9yIV9zat2qUiXbxmrCTtxAmiI3I+eVsUNwvwIDAQAB";// 服务器[异步通知]页面路径  需http://格式的完整路径,不能加?id=123这类自定义参数,必须外网可以正常访问// 支付宝会悄悄的给我们发送一个请求,告诉我们支付成功的信息private  String notify_url="http://**.natappfree.cc/payed/notify";// 页面跳转同步通知页面路径 需http://格式的完整路径,不能加?id=123这类自定义参数,必须外网可以正常访问//同步通知,支付成功,一般跳转到成功页private  String return_url="http://order.gulimall.com/memberOrder.html";// 签名方式private  String sign_type = "RSA2";// 字符编码格式private  String charset = "utf-8";// 支付宝网关; https://openapi.alipaydev.com/gateway.doprivate  String gatewayUrl = "https://openapi.alipaydev.com/gateway.do";public  String pay(PayVo vo) throws AlipayApiException {//AlipayClient alipayClient = new DefaultAlipayClient(AlipayTemplate.gatewayUrl, AlipayTemplate.app_id, AlipayTemplate.merchant_private_key, "json", AlipayTemplate.charset, AlipayTemplate.alipay_public_key, AlipayTemplate.sign_type);//1、根据支付宝的配置生成一个支付客户端AlipayClient alipayClient = new DefaultAlipayClient(gatewayUrl,app_id, merchant_private_key, "json",charset, alipay_public_key, sign_type);//2、创建一个支付请求 //设置请求参数AlipayTradePagePayRequest alipayRequest = new AlipayTradePagePayRequest();alipayRequest.setReturnUrl(return_url);alipayRequest.setNotifyUrl(notify_url);//商户订单号,商户网站订单系统中唯一订单号,必填String out_trade_no = vo.getOut_trade_no();//付款金额,必填String total_amount = vo.getTotal_amount();//订单名称,必填String subject = vo.getSubject();//商品描述,可空String body = vo.getBody();alipayRequest.setBizContent("{\"out_trade_no\":\""+ out_trade_no +"\","+ "\"total_amount\":\""+ total_amount +"\","+ "\"subject\":\""+ subject +"\","+ "\"body\":\""+ body +"\","+ "\"product_code\":\"FAST_INSTANT_TRADE_PAY\"}");String result = alipayClient.pageExecute(alipayRequest).getBody();//会收到支付宝的响应,响应的是一个页面,只要浏览器显示这个页面,就会自动来到支付宝的收银台页面System.out.println("支付宝的响应:"+result);return result;}
3、添加“com.yr.gulimall.order.vo.PayVo”类,代码如下:
@Data
public class PayVo {private String out_trade_no; // 商户订单号 必填private String subject; // 订单名称 必填private String total_amount;  // 付款金额 必填private String body; // 商品描述 可空
}
4、添加配置
支付宝相关的设置
alipay.app_id=自己的APPID
5、修改gulimall-order模块的pay.html(支付页)的支付宝按钮
<li><img src="/static/order/pay/img/zhifubao.png" style="weight:auto;height:30px;" alt=""><a th:href="'http://order.gulimall.com/payOrder?orderSn='+${submitOrderResp.order.orderSn}">支付宝</a></li>15.3.2 订单支付与同步通知
添加“com.yr.gulimall.order.web.PayWebController”类,代码如下:
@Controller
public class PayWebController {@Autowiredprivate AlipayTemplate alipayTemplate;@Autowiredprivate OrderService orderService;/*** 支付订单*/@ResponseBody@GetMapping("/payOrder")public String payOrder(@RequestParam("orderSn") String orderSn) throws AlipayApiException {//        PayVo payVo = new PayVo();
//        payVo.setBody();//订单备注
//        payVo.setOut_trade_no();//订单号
//        payVo.setSubject();//订单主题
//        payVo.setTotal_amount();//订单金额PayVo payVo = orderService.getOrderPay(orderSn);// 返回的是一个页面。将此页面直接交给浏览器就行String pay = alipayTemplate.pay(payVo);System.out.println(pay);return "hello";}
}
修改“com.yr.gulimall.order.service.OrderService”类,代码如下:
/*** 根据订单号获取当前订单支付信息** @param orderSn* @return*/PayVo getOrderPay(String orderSn);修改“com.yr.gulimall.order.service.impl.OrderServiceImpl”类,代码如下:
支付宝的响应:<form name="punchout_form" method="post" action="https://openapi.alipaydev.com/gateway.do?charset=utf-8&method=alipay.trade.page.pay&sign=YdraUOF%2Bu9lnoN9WVg22AQhniZXf28ffZf5V5vb7ajRtZ5I76lCZNCiH8%2BKJ0lCLLfb6PIvXXAQQFbiO9P89xou%2B11I%2FUm51ysptIsR7rzIFOiGQfSH2TpCjKIIZifPFAgZI8V7AKShdL6ejq0kcW%2FqMG0Jj14H0l1KqyfcGi6aPAc8JPJ3gXc8irUAzDkE5qNq7kzoZOjKIy%2FEv63L4lvBa8aDCRuV4dABti%2BhglYKaOj0IhDSh5BumWnrBll%2F%2FDuG1UDiXjILL5ddKGSE%2FIXPv3ZbNTneqD6OdGYuKXMDT0yEX4MiuZncrqThlJ2tMFmE5%2BLHX%2B6%2FROpoCZPL7iQ%3D%3D&version=1.0&app_id=2021000116660265&sign_type=RSA2×tamp=2020-12-05+15%3A17%3A57&alipay_sdk=alipay-sdk-java-dynamicVersionNo&format=json">
<input type="hidden" name="biz_content" value="{"out_trade_no":"202012051517520571335121191551672321","total_amount":"5800.00","subject":"华为 HUAWEI Mate 30 5G 麒麟990 4000万超感光徕卡影像双超级快充白色 6GB","body":"颜色:白色;内存:6GB","product_code":"FAST_INSTANT_TRADE_PAY"}">
<input type="submit" value="立即支付" style="display:none" >
</form>
<script>document.forms[0].submit();</script> @Overridepublic PayVo getOrderPay(String orderSn) {PayVo payVo = new PayVo();OrderEntity order = this.getOrderByOrderSn(orderSn);// 支付金额设置为两位小数,否则会报错BigDecimal bigDecimal = order.getPayAmount().setScale(2, BigDecimal.ROUND_UP);payVo.setTotal_amount(bigDecimal.toString());// 商户订单号payVo.setOut_trade_no(order.getOrderSn());List<OrderItemEntity> order_sn = orderItemService.list(new QueryWrapper<OrderItemEntity>().eq("order_sn", orderSn));OrderItemEntity entity = order_sn.get(0);// 订单名称payVo.setSubject(entity.getSkuName());// 商品描述payVo.setBody(entity.getSkuAttrsVals());return payVo;}http://order.gulimall.com/payOrder?orderSn=202012051517520571335121191551672321
运行结果
支付宝的响应:<form name="punchout_form" method="post" action="https://openapi.alipaydev.com/gateway.do?charset=utf-8&method=alipay.trade.page.pay&sign=YdraUOF%2Bu9lnoN9WVg22AQhniZXf28ffZf5V5vb7ajRtZ5I76lCZNCiH8%2BKJ0lCLLfb6PIvXXAQQFbiO9P89xou%2B11I%2FUm51ysptIsR7rzIFOiGQfSH2TpCjKIIZifPFAgZI8V7AKShdL6ejq0kcW%2FqMG0Jj14H0l1KqyfcGi6aPAc8JPJ3gXc8irUAzDkE5qNq7kzoZOjKIy%2FEv63L4lvBa8aDCRuV4dABti%2BhglYKaOj0IhDSh5BumWnrBll%2F%2FDuG1UDiXjILL5ddKGSE%2FIXPv3ZbNTneqD6OdGYuKXMDT0yEX4MiuZncrqThlJ2tMFmE5%2BLHX%2B6%2FROpoCZPL7iQ%3D%3D&version=1.0&app_id=2021000116660265&sign_type=RSA2×tamp=2020-12-05+15%3A17%3A57&alipay_sdk=alipay-sdk-java-dynamicVersionNo&format=json">
<input type="hidden" name="biz_content" value="{"out_trade_no":"202012051517520571335121191551672321","total_amount":"5800.00","subject":"华为 HUAWEI Mate 30 5G 麒麟990 4000万超感光徕卡影像双超级快充白色 6GB","body":"颜色:白色;内存:6GB","product_code":"FAST_INSTANT_TRADE_PAY"}">
<input type="submit" value="立即支付" style="display:none" >
</form>
<script>document.forms[0].submit();</script>我们可以看出返回的结果是html 。所以我们直接修改这个接口,让他返回是html页面
    @ResponseBody@GetMapping(value = "payOrder", produces = "text/html")public String payOrder(@RequestParam("orderSn") String orderSn) throws AlipayApiException {//        PayVo payVo = new PayVo();
//        payVo.setBody();//订单备注
//        payVo.setOut_trade_no();//订单号
//        payVo.setSubject();//订单主题
//        payVo.setTotal_amount();//订单金额PayVo payVo = orderService.getOrderPay(orderSn);// 返回的是一个页面。将此页面直接交给浏览器就行String pay = alipayTemplate.pay(payVo);System.out.println(pay);return pay;}
测试

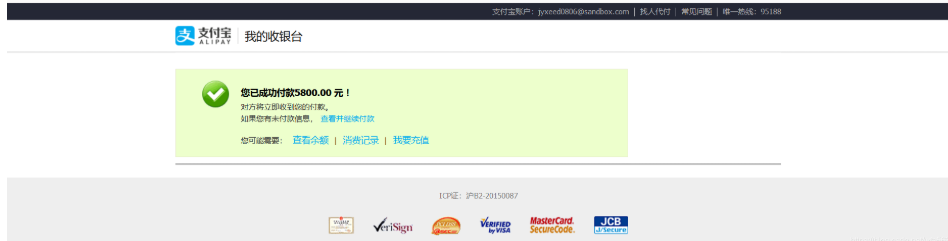
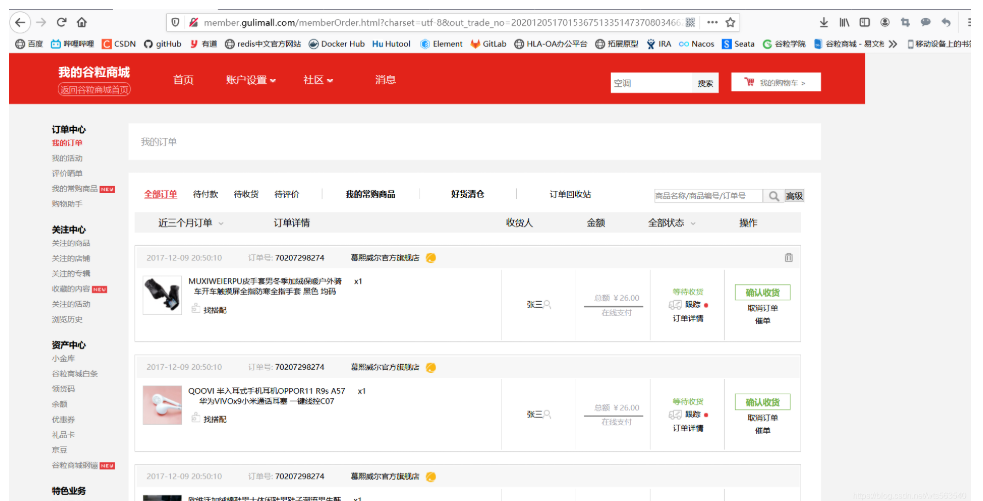
- 1、将支付页让浏览器显示
- 2、支付成功以后,我们要跳到用户的订单列表页
修改“com.yr.gulimall.order.config.AlipayTemplate”类,代码如下:
// 页面跳转同步通知页面路径 需http://格式的完整路径,不能加?id=123这类自定义参数,必须外网可以正常访问// 同步通知,支付成功,一般跳转到成功页private String return_url = "http://member.gulimall.com/memberOrder";gulimall-member
1、添加thymeleaf模板引擎
<!--模板引擎 thymeleaf--><dependency><groupId>org.springframework.boot</groupId><artifactId>spring-boot-starter-thymeleaf</artifactId></dependency>2、添加订单页的html(orderList.html)
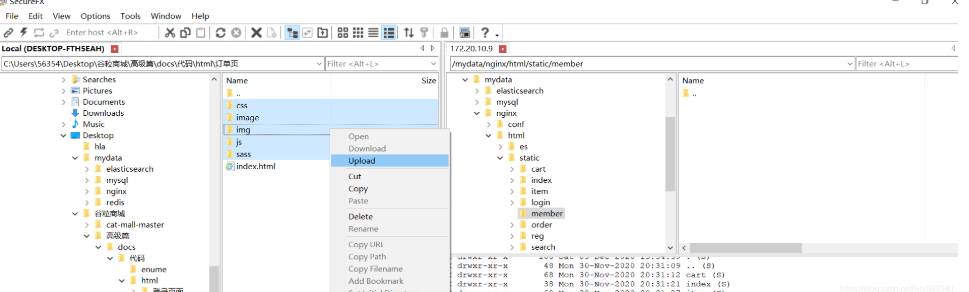
3、往虚拟机的添加订单页的静态资源(在/mydata/nginx/html/static/目录下,创建member文件夹)
4、修改静态资源访问路径

5、做登录拦截添加SpringSession依赖
<!--整合SpringSession完成session共享问题--><dependency><groupId>org.springframework.session</groupId><artifactId>spring-session-data-redis</artifactId></dependency><!--引入redis--><dependency><groupId>org.springframework.boot</groupId><artifactId>spring-boot-starter-data-redis</artifactId><exclusions><exclusion><groupId>io.lettuce</groupId><artifactId>lettuce-core</artifactId></exclusion></exclusions></dependency><dependency><groupId>redis.clients</groupId><artifactId>jedis</artifactId></dependency>6、添加配置
spring:#关闭thymeleaf的缓存thymeleaf:cache: false#配置redisredis:host: 192.168.56.10port: 6379#配置SpringSession存储类型session:store-type: redis7、主启动类添加SpringSession自动开启
@EnableRedisHttpSession
@EnableFeignClients(basePackages="com.atguigu.gulimall.member.feign")
@EnableDiscoveryClient
@SpringBootApplication
public class GulimallMemberApplication {public static void main(String[] args) {SpringApplication.run(GulimallMemberApplication.class, args);}}
8、添加“com.yr.gulimall.member.config.GulimallSessionConfig”类,代码如下:
@Configuration
public class GulimallSessionConfig {@Beanpublic CookieSerializer cookieSerializer(){DefaultCookieSerializer cookieSerializer = new DefaultCookieSerializer();cookieSerializer.setDomainName("gulimall.com");cookieSerializer.setCookieName("GULISESSION");return cookieSerializer;}@Beanpublic RedisSerializer<Object> springSessionDefaultRedisSerializer(){return new GenericJackson2JsonRedisSerializer();}
}
添加登录拦截器“com.yr.gulimall.member.interceptor.LoginUserInterceptor”
@Component
public class LoginUserInterceptor implements HandlerInterceptor {public static ThreadLocal<MemberResponseVO> loginUser = new ThreadLocal<>();@Overridepublic boolean preHandle(HttpServletRequest request, HttpServletResponse response, Object handler) throws Exception {String requestURI = request.getRequestURI();AntPathMatcher matcher = new AntPathMatcher();boolean status = matcher.match("/member/**", requestURI);if (status){return true;}MemberResponseVO attribute = (MemberResponseVO) request.getSession().getAttribute(AuthServerConstant.LOGIN_USER);if (attribute != null){loginUser.set(attribute);return true;}else {//没登录就去登录request.getSession().setAttribute("msg","请先进行登录");response.sendRedirect("http://auth.gulimall.com/login.html");return false;}}
}
把登录拦截器配置到spring里
添加“com.yr.gulimall.member.config.MemberWebConfig”类,代码如下:
@Configuration
public class MemberWebConfig implements WebMvcConfigurer {@AutowiredLoginUserInterceptor loginUserInterceptor;@Overridepublic void addInterceptors(InterceptorRegistry registry) {registry.addInterceptor(loginUserInterceptor).addPathPatterns("/**");}
}
在gulimall-gateway配置路由:
- id: gulimall_member_routeuri: lb://gulimall-memberpredicates:- Host=member.gulimall.com添加域名(C:\Windows\System32\drivers\etc\hosts)
#----------gulimall----------
192.168.56.16 gulimall.com
192.168.56.16 search.gulimall.com
192.168.56.16 item.gulimall.com
192.168.56.16 auth.gulimall.com
192.168.56.16 cart.gulimall.com
192.168.56.16 order.gulimall.com
192.168.56.16 member.gulimall.com
修改首页我的订单地访问路径gulimall-product (index.html)
<li><a href="http://member.gulimall.com/memberOrder.html">我的订单</a></li>找到沙箱环境里面有沙箱账号
15.3.3 订单列表页渲染完成
修改“com.yr.gulimall.member.web.MemberWebController”类,代码如下“:
@Controller
public class MemberWebController {@Autowiredprivate OrderFeignService orderFeignService;@GetMapping("/memberOrder.html")public String memberOrderPage(@RequestParam(value = "pageNum", defaultValue = "1") Integer pageNum, Model model) {//查出当前登录用户的所有订单列表数据Map<String, Object> page = new HashMap<>();page.put("page", pageNum.toString());//分页查询当前用户的所有订单及对应订单项R r = orderFeignService.listWithItem(page);model.addAttribute("orders", r);return "orderList";}
}
添加“com.yr.gulimall.member.feign.OrderFeignService”类,代码如下:
@FeignClient("gulimall-order")
public interface OrderFeignService {@PostMapping("/order/order/listWithItem")public R listWithItem(@RequestBody Map<String, Object> params);
}
因为订单服务做了用户登录的拦截,所以远程调用订单服务需要用户信息,我们给它共享cookies
添加“com.yr.gulimall.member.config.GuliFeignConfig”类,代码如下:
@Configuration
public class GuliFeignConfig {@Bean("requestInterceptor")public RequestInterceptor requestInterceptor() {return new RequestInterceptor() {@Overridepublic void apply(RequestTemplate requestTemplate) {System.out.println("RequestInterceptor线程..." + Thread.currentThread().getId());//1、RequestContextHolder拿到刚进来的请求ServletRequestAttributes attributes = (ServletRequestAttributes) RequestContextHolder.getRequestAttributes();if (attributes != null) {HttpServletRequest request = attributes.getRequest();//老请求if (request != null) {//同步请求头数据。CookieString cookie = request.getHeader("Cookie");//给新请求同步了老请求的cookierequestTemplate.header("Cookie", cookie);System.out.println("feign远程之前先执行RequestInterceptor.apply()");}}}};}
}
远程服务:gulimall-order
修改“com.yr.gulimall.order.controller.OrderController”类,代码如下:
/*** 分页查询当前登录用户的所有订单* @param params* @return*/@PostMapping("/listWithItem")public R listWithItem(@RequestBody Map<String, Object> params){PageUtils page = orderService.queryPageWithItem(params);return R.ok().put("page", page);}修改“com.yr.gulimall.order.service.OrderService”类,代码如下:
PageUtils queryPageWithItem(Map<String, Object> params);修改“com.yr.gulimall.order.service.impl.OrderServiceImpl”类,代码如下:
@Overridepublic PageUtils queryPageWithItem(Map<String, Object> params) {MemberResponseVO memberResponseVO = LoginUserInterceptor.loginUser.get();IPage<OrderEntity> page = this.page(new Query<OrderEntity>().getPage(params),new QueryWrapper<OrderEntity>().eq("member_id", memberResponseVO.getId()).orderByDesc("id"));List<OrderEntity> order_sn = page.getRecords().stream().map(order -> {List<OrderItemEntity> entities = orderItemService.list(new QueryWrapper<OrderItemEntity>().eq("order_sn", order.getOrderSn()));order.setItemEntities(entities);return order;}).collect(Collectors.toList());page.setRecords(order_sn);return new PageUtils(page);}修改OrderEntity

修改orderList.html
<table class="table" th:each="order:${orders.page.list}"><tr><td colspan="7" style="background:#F7F7F7" ><span style="color:#AAAAAA">2017-12-09 20:50:10</span><span><ruby style="color:#AAAAAA">订单号:</ruby>[[${order.orderSn}]] 70207298274</span><span>谷粒商城<i class="table_i"></i></span><i class="table_i5 isShow"></i></td></tr><tr class="tr" th:each="item,itemStat:${order.itemEntities}"><td colspan="3" style="border-right: 1px solid #ccc"><img style="height: 60px; width: 60px;" th:src="${item.skuPic}" alt="" class="img"><div><p style="width: 242px; height: auto;overflow: auto">[[${item.skuName}]]</p><div><i class="table_i4"></i>找搭配</div></div><div style="margin-left:15px;">x[[${item.skuQuantity}]]</div><div style="clear:both"></div></td><td th:if="${itemStat.index==0}" th:rowspan="${itemStat.size}">[[${order.receiverName}]]<i><i class="table_i1"></i></i></td><td th:if="${itemStat.index==0}" th:rowspan="${itemStat.size}" style="padding-left:10px;color:#AAAAB1;"><p style="margin-bottom:5px;">总额 ¥[[${order.payAmount}]]</p><hr style="width:90%;"><p>在线支付</p></td><td th:if="${itemStat.index==0}" th:rowspan="${itemStat.size}"><ul><li style="color:#71B247;" th:if="${order.status==0}">待付款</li><li style="color:#71B247;" th:if="${order.status==1}">已付款</li><li style="color:#71B247;" th:if="${order.status==2}">已发货</li><li style="color:#71B247;" th:if="${order.status==3}">已完成</li><li style="color:#71B247;" th:if="${order.status==4}">已取消</li><li style="color:#71B247;" th:if="${order.status==5}">售后中</li><li style="color:#71B247;" th:if="${order.status==6}">售后完成</li><li style="margin:4px 0;" class="hide"><i class="table_i2"></i>跟踪<i class="table_i3"></i><div class="hi"><div class="p-tit">普通快递 运单号:390085324974</div><div class="hideList"><ul><li>[北京市] 在北京昌平区南口公司进行签收扫描,快件已被拍照(您的快件已签收,感谢您使用韵达快递)签收</li><li>[北京市] 在北京昌平区南口公司进行签收扫描,快件已被拍照(您的快件已签收,感谢您使用韵达快递)签收</li><li>[北京昌平区南口公司] 在北京昌平区南口公司进行派件扫描</li><li>[北京市] 在北京昌平区南口公司进行派件扫描;派送业务员:业务员;联系电话:17319268636</li></ul></div></div></li><li class="tdLi">订单详情</li></ul></td><td th:if="${itemStat.index==0}" th:rowspan="${itemStat.size}"><button>确认收货</button><p style="margin:4px 0; ">取消订单</p><p>催单</p></td></tr></table> 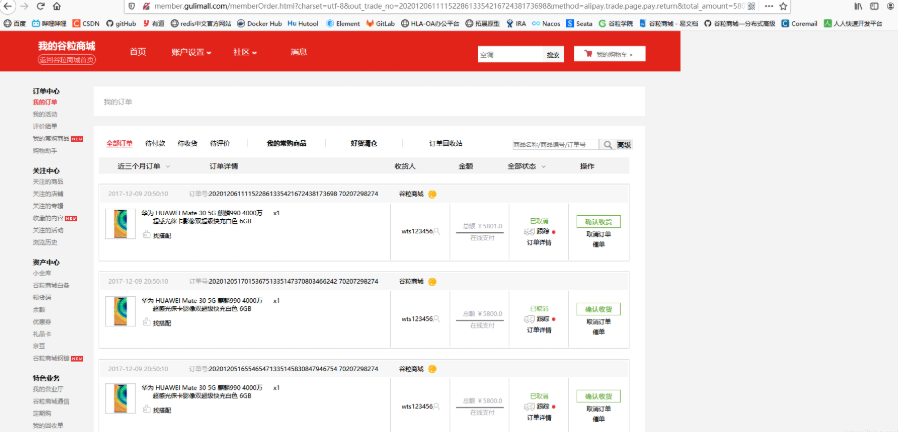
15.3.4 异步通知内网穿透环境搭建
- 订单支付成功后支付宝会回调商户接口,这个时候需要修改订单状态
- 由于同步跳转可能由于网络问题失败,所以使用异步通知
- 支付宝使用的是最大努力通知方案,保障数据一致性,隔一段时间会通知商户支付成功,直到返回
success
1)、内网穿透设置异步通知地址
内网穿透联调流程

下面我们根据内网穿透联调的流程进行具体操作:
将外网映射到本地的
order.gulimall.com:80由于回调的请求头不是
order.gulimall.com,因此nginx转发到网关后找不到对应的服务,所以需要对nginx进行设置将/payed/notify异步通知转发至订单服务
1、设置异步通知的地址
// 服务器[异步通知]页面路径  需http://格式的完整路径,不能加?id=123这类自定义参数,必须外网可以正常访问
// 支付宝会悄悄的给我们发送一个请求,告诉我们支付成功的信息
private String notify_url = "http://8xlc1ea491.*****.tech/payed/notify"; 2、修改内网穿透:将外网映射到本地的order.gulimall.com:80

3、nginx配置访问/payed/notify异步通知转发至订单服务
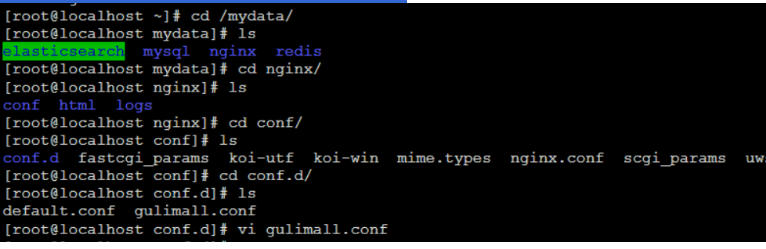
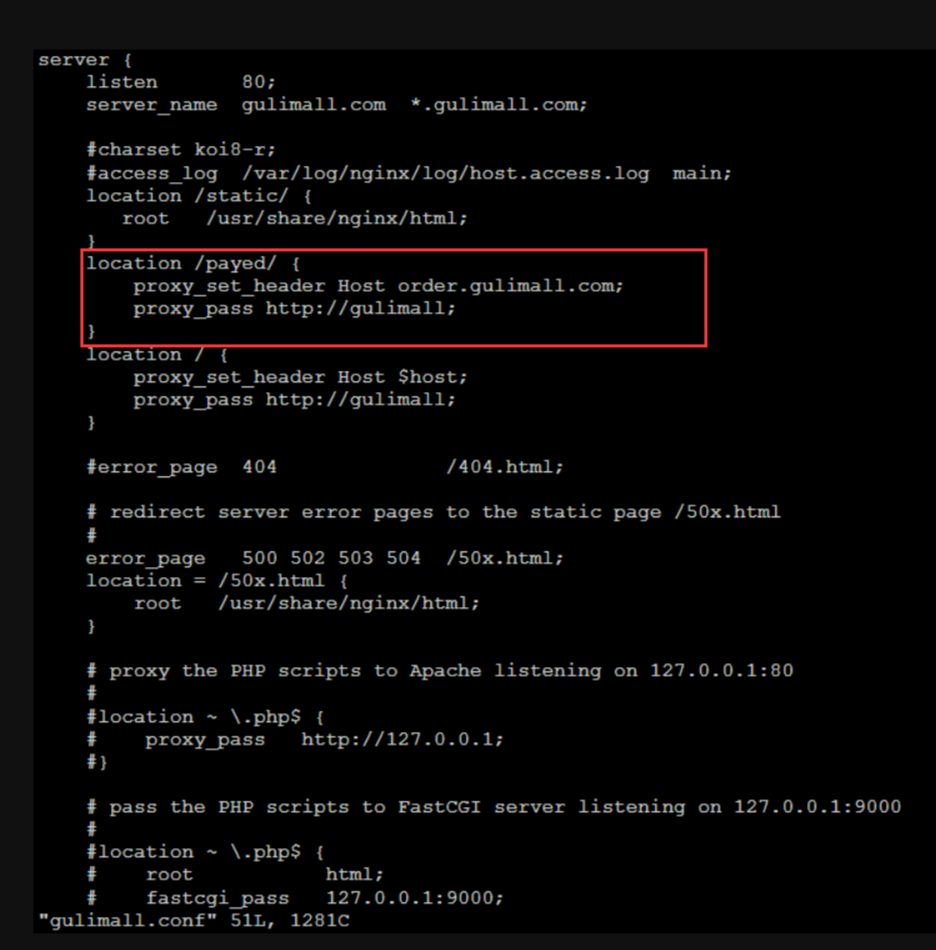
配置好之后,重启nginx

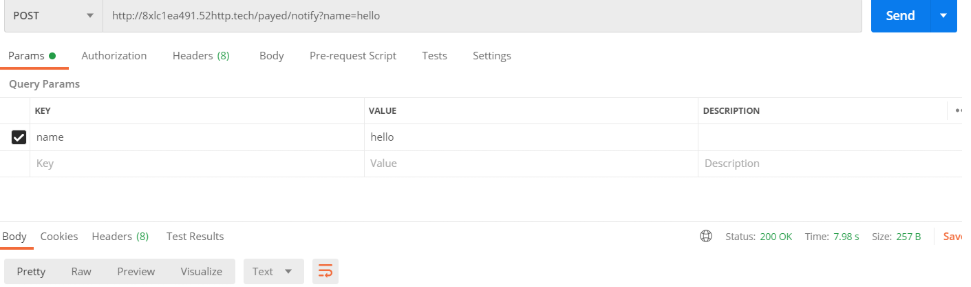
http://8xlc1ea491.52http.tech/payed/notify?name=hello 访问还是404,查看日志
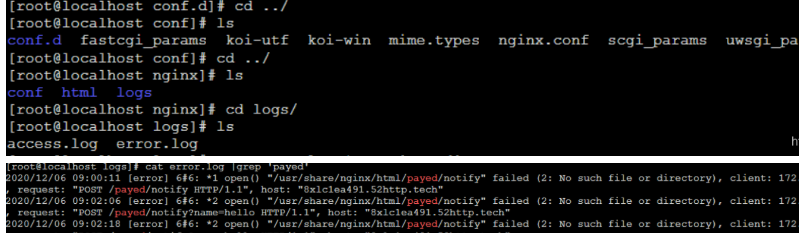
上面日志显示默认以本地的方式访问所以直接访问静态资源/static/..,我们访问这个域名下的/payed路径,我们要添加这个域名,并把host改成order.gulimall.com服务。不然默认以本地的方式访问

再次重启niginx
![]()
修改登录拦截器给他放行
修改“com.yr.gulimall.order.interceptor.LoginUserInterceptor”类,代码如下:
@Component
public class LoginUserInterceptor implements HandlerInterceptor {public static ThreadLocal<MemberResponseVO> loginUser = new ThreadLocal<>();@Overridepublic boolean preHandle(HttpServletRequest request, HttpServletResponse response, Object handler) throws Exception {String uri = request.getRequestURI();// 该路径只是远程调用,你不需要登录拦截String requestURI = request.getRequestURI();AntPathMatcher matcher = new AntPathMatcher();boolean status = matcher.match("/order/order/status/**", requestURI);boolean payed = matcher.match("/payed/**", requestURI);if (status || payed) {return true;}MemberResponseVO attribute = (MemberResponseVO) request.getSession().getAttribute(AuthServerConstant.LOGIN_USER);if (attribute != null) {loginUser.set(attribute);return true;} else {// 没登录就去登录request.getSession().setAttribute("msg", "请先进行登录");response.sendRedirect("http://auth.gulimall.com/login.html");return false;}}
}
2)、验证签名
添加“com.yr.gulimall.order.listener.OrderPayedListener”类,代码如下:
@Slf4j
@RestController
public class OrderPayedListener {@Autowiredprivate OrderService orderService;@Autowiredprivate AlipayTemplate alipayTemplate;/*** 支付宝成功异步通知** @param request* @return*/@PostMapping("/payed/notify")public String handleAlipayed(PayAsyncVo vo, HttpServletRequest request) throws AlipayApiException {log.info("收到支付宝异步通知******************");// 只要收到支付宝的异步通知,返回 success 支付宝便不再通知// 获取支付宝POST过来反馈信息// 需要验签Map<String, String> params = new HashMap<>();Map<String, String[]> requestParams = request.getParameterMap();for (String name : requestParams.keySet()) {String[] values = requestParams.get(name);String valueStr = "";for (int i = 0; i < values.length; i++) {valueStr = (i == values.length - 1) ? valueStr + values[i]: valueStr + values[i] + ",";}// 乱码解决,这段代码在出现乱码时使用// valueStr = new String(valueStr.getBytes("ISO-8859-1"), "utf-8");params.put(name, valueStr);}boolean signVerified = AlipaySignature.rsaCheckV1(params, alipayTemplate.getAlipay_public_key(),alipayTemplate.getCharset(), alipayTemplate.getSign_type()); //调用SDK验证签名if (signVerified){log.info("支付宝异步通知验签成功");// 修改订单状态orderService.handlePayResult(vo);return "success";}else {log.info("支付宝异步通知验签失败");return "error";}}}
添加“com.yr.gulimall.order.vo.PayAsyncVo”类,代码如下:
@ToString
@Data
public class PayAsyncVo {private String gmt_create;private String charset;private String gmt_payment;private Date notify_time;private String subject;private String sign;private String buyer_id;//支付者的idprivate String body;//订单的信息private String invoice_amount;//支付金额private String version;private String notify_id;//通知idprivate String fund_bill_list;private String notify_type;//通知类型; trade_status_syncprivate String out_trade_no;//订单号private String total_amount;//支付的总额private String trade_status;//交易状态  TRADE_SUCCESSprivate String trade_no;//流水号private String auth_app_id;//private String receipt_amount;//商家收到的款private String point_amount;//private String app_id;//应用idprivate String buyer_pay_amount;//最终支付的金额private String sign_type;//签名类型private String seller_id;//商家的id}
修改“com.yr.gulimall.order.service.OrderService”类,代码如下:
/*** 处理支付成功返回结果** @param vo*/String handlePayResult(PayAsyncVo vo);修改“com.yr.gulimall.order.service.impl.OrderServiceImpl”类,代码如下:
@Overridepublic String handlePayResult(PayAsyncVo vo) {// 1、保存交易流水PaymentInfoEntity infoEntity = new PaymentInfoEntity();infoEntity.setAlipayTradeNo(vo.getTrade_no());infoEntity.setAlipayTradeNo(vo.getOut_trade_no());infoEntity.setPaymentStatus(vo.getTrade_status());infoEntity.setCallbackTime(vo.getNotify_time());paymentInfoService.save(infoEntity);// 2、修改订单状态信息if (vo.getTrade_status().equals("TRADE_SUCCESS") || vo.getTrade_status().equals("TRADE_FINISHED")){//支付成功状态String outTradeNo = vo.getOut_trade_no();this.baseMapper.updateOrderStatus(outTradeNo,OrderStatusEnum.PAYED.getCode());}return "success";}修改“com.yr.gulimall.order.dao.OrderDao”类,代码如下:
@Mapper
public interface OrderDao extends BaseMapper<OrderEntity> {/*** 修改订单状态** @param outTradeNo* @param code*/void updateOrderStatus(@Param("outTradeNo") String outTradeNo, @Param("code") Integer code);
}
OrderDao.xml
<update id="updateOrderStatus">update oms_order set status = #{code} where order_sn = #{outTradeNo}</update>#springMVC的日期格式化
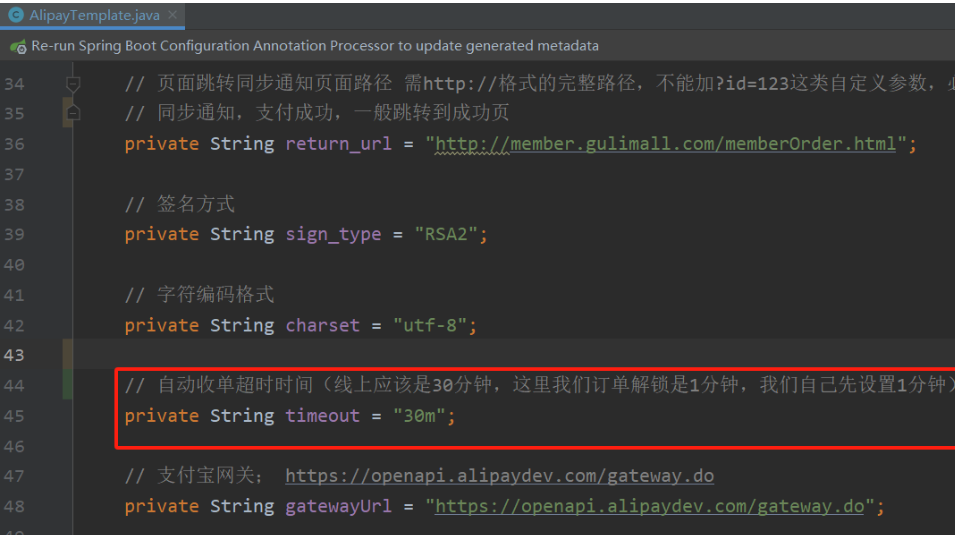
spring.mvc.date-format=yyyy-MM-dd HH:mm:ss15.3.5 收单
- 订单在支付页,不支付,一直刷新,订单过期了才支付,订单状态改为已支付了,但是库 存解锁了。
- 使用支付宝自动收单功能解决。只要一段时间不支付,就不能支付了。
- 由于时延等问题。订单解锁完成,正在解锁库存的时候,异步通知才到订单解锁,手动调用收单。
- 网络阻塞问题,订单支付成功的异步通知一直不到达。
- 查询订单列表时,ajax获取当前未支付的订单状态,查询订单状态时,再获取一下支付宝 此订单的状态。
- 其他各种问题
- 每天晚上闲时下载支付宝对账单,一一进行对账。
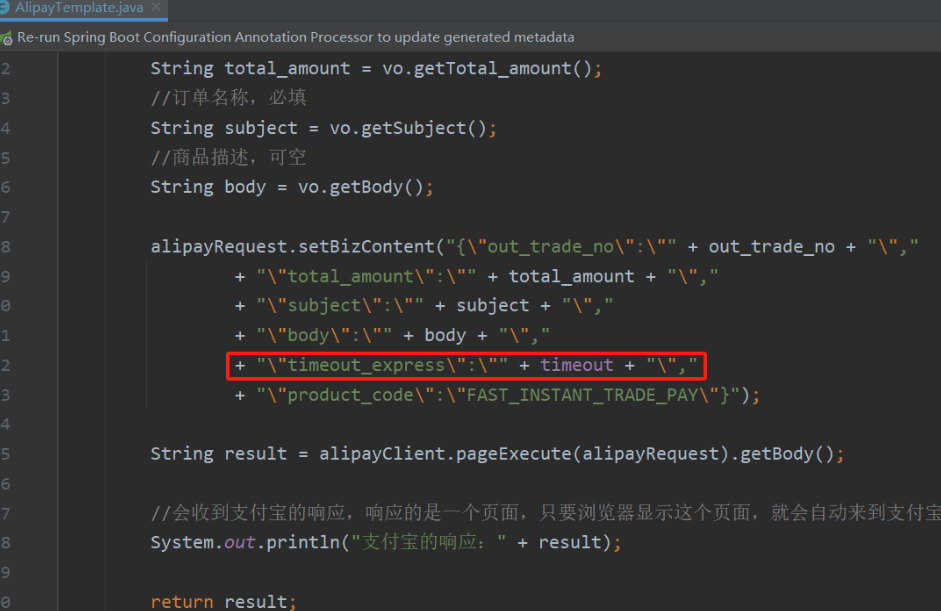
添加超时时间


- 多实体建模拆图案例)

)

![[蓝桥杯C++ 2024 国 B ] 立定跳远(二分)](http://pic.xiahunao.cn/[蓝桥杯C++ 2024 国 B ] 立定跳远(二分))


)
)
