0.配置Autudl
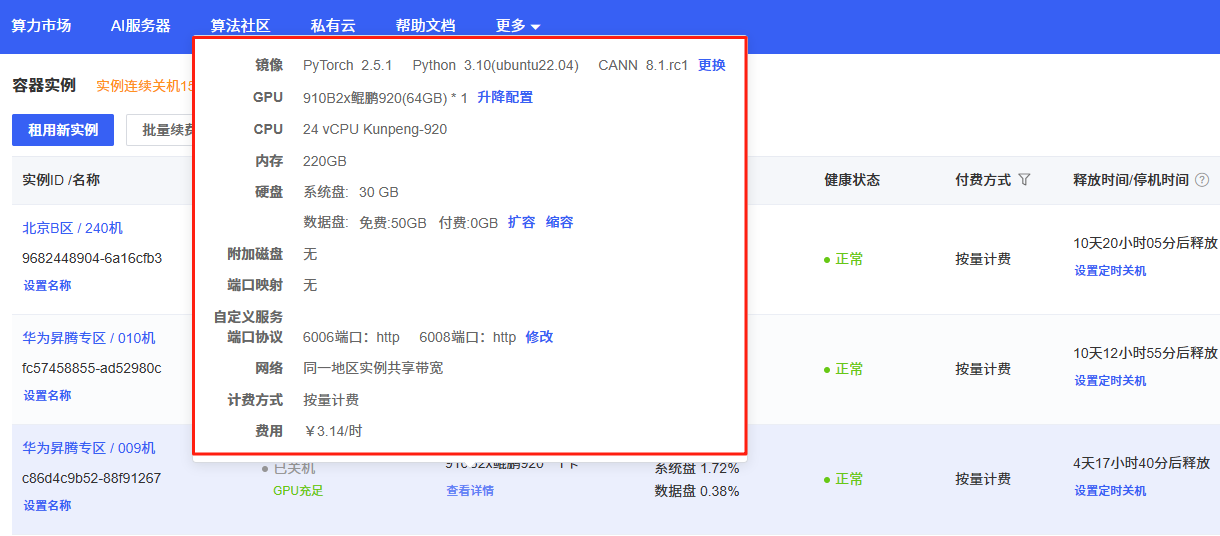
下面图片是我所租的昇腾卡和具体环境版本,太具体的就不说了,有需要的话我单独出一期Autudl租显卡的教程,主要是为了学习昇腾环境如何运行Yolo系列模型。
0.1华为昇腾芯片(Ascend)简介
1.Ascend 310( 边缘推理 SoC)
在仅 8 W 的功耗下,支持 FP16 达 8 TOPS,INT8 达 16 TOPS。
支持多通道高清视频处理:最高可实现 16 路 1080p H.264/H.265 解码、1 路 1080p 视频编码,以及 JPEG/PNG 编解码功能。
内含 2 个 Da Vinci Max AI 核心、8 个 ARM Cortex‑A55 CPU 核心和 8 MB 片上缓存。
2.Ascend 910(数据中心级训练 NPU)
于 2019 年发布,代号 Ascend‑Max,基于 Da Vinci 架构,拥有 32 个 Da Vinci Max AI 核心,FP16 达 256 TFLOPS,INT8 达 512 TOPS。
配备高带宽互联(NoC Mesh 1024 位,HBM2E 带宽 1.2 TB/s,350 W 功耗)
3.Ascend 910C(2025 年主打产品)
基于 SMIC 的 7 nm (N+2) 工艺,采用双 910B Die 封装设计,拥有约 53 亿晶体管。
实现 FP16 约 800 TFLOPS 性能,搭载高达 128 GB 的 HBM3 存储(领先于 NVIDIA H100 的 80 GB)。推测性能约为 NVIDIA H100 推理性能的 60%
0.2MindSpore框架
MindSpore 是华为自主研发的全场景 AI 计算框架,覆盖云、边、端多种部署环境。向上支持自然语言处理、计算机视觉、科学计算等多类 AI 应用,向下通过 CANN 对接昇腾 AI 处理器,实现软硬件协同优化。
提供端到端的模型开发能力,包括数据处理、模型构建、训练、推理与部署,内置自动并行、算子融合、混合精度等优化机制,显著提升性能与算力利用率。其功能定位类似于 TensorFlow 或 PyTorch,在昇腾生态中承担核心 AI 框架的角色。
0.3CANN计算架构(Compute Architecture for Neural Networks)
华为面向AI场景推出的异构计算架构 CANN,作为昇腾AI处理器的软件驱动与算子加速平台,向上兼容多种主流AI框架(如 MindSpore、PyTorch、TensorFlow 等),向下对接昇腾系列AI处理器的算子库、运行时与调度层,发挥承上启下的关键作用。CANN 屏蔽了底层硬件差异,使开发者能够在不关心硬件细节的情况下无缝使用主流深度学习框架进行模型开发与部署。
同时,CANN 针对多样化的应用场景提供多层次编程接口(如算子级、图级、应用级),支持用户快速构建和优化基于昇腾平台的AI应用与业务,显著提升模型的执行效率与硬件算力利用率,其功能定位类似于 NVIDIA 的 CUDA 平台。
总结:CANN用来屏蔽底层硬件差异,使得用户能够无缝使用Pytorch等主流深度学习框架进行开发
1配置环境
1.1创建一个yolo环境并进入
conda create -n yolo11 python=3.10
conda activate yolo11
1.2安装yolo所需要的库
pip install ultralytics1.3安装ais_bench推理工具,和aclruntime
根据自己使用的python、版本系统和架构选择具体的whl文件
tools: Ascend tools - Gitee.com![]() https://gitee.com/ascend/tools/tree/master/ais-bench_workload/tool/ais_bench#%E4%B8%8B%E8%BD%BDwhl%E5%8C%85%E5%AE%89%E8%A3%85
https://gitee.com/ascend/tools/tree/master/ais-bench_workload/tool/ais_bench#%E4%B8%8B%E8%BD%BDwhl%E5%8C%85%E5%AE%89%E8%A3%85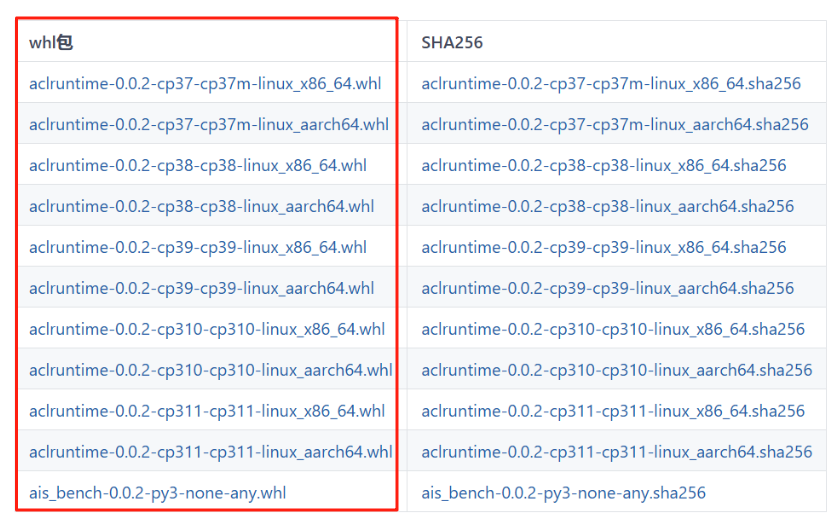
下载到本地后,安装两个whl文件
1.3.1安装ais_bench
pip install ais_bench-0.0.2-py3-none-any.whl -i https://mirrors.tuna.tsinghua.edu.cn/pypi/web/simple1.3.2安装aclruntime
pip install aclruntime-0.0.2-cp310-cp310-linux_aarch64.whl后面启动可能会报一些错误,让ai解决一下,很好解决
NEW_LIB=~/autodl-tmp/libstdcpp_arm64/usr/lib/aarch64-linux-gnu/libstdc++.so.6ln -sf /usr/lib/aarch64-linux-gnu/libstdc++.so.6 /root/miniconda3/lib/libstdc++.so.62准备源码和模型
模型可以是自己的,也可以从官网上下载
2.1下载源码
https://github.com/ultralytics/ultralytics
2.2下载模型权重
Ultralytics YOLO11 - Ultralytics YOLO 文档
3转换模型
3.1将.pt格式转换为.ONNX格式
from ultralytics import YOLO# Load a model
model = YOLO(r"/home/ultralytics-main/runs/train/yolo11n/weights/best.pt")# Export onnx,一定要设置opset=11 不然会报错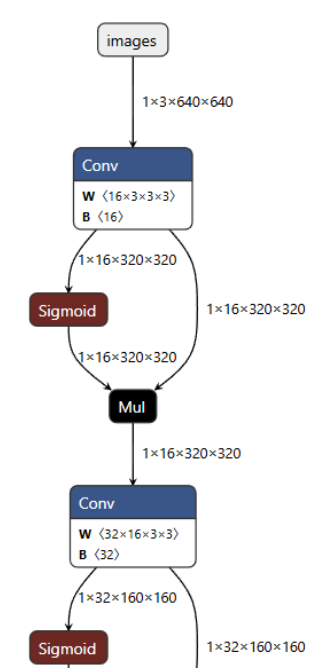
model.export(format="onnx",opset=11)3.1.1查看ONNX⽹络结构和输⼊输出shape
Netron
进入网站后,上传ONNX模型文件
3.2将.ONNX格式转换为.om格式
atc \--model=/root/autodl-tmp/ultralytics-main/runs/train/exp4/weights/best.onnx \--framework=5 \--output=yolo11s \--input_format=NCHW \--input_shape="images:1,3,640,640" \--soc_version=Ascend910B2参数分别是:
--model 需要转换模型的路径
--framework 框架,ONNX就用5
--output 输出.om文件的名字
--input_shape 模型的输入shape,640 640是训练时图片的大小,根据需要修改
--soc_version NPU的型号
根据下面的指令查询npu型号后,替换910B2
npu-smi info #用这个指令可以查询npu型号4.推理源码
在ultralytics路径下创建run_seg.py
将下述代码复制进去
import argparse
import time
import cv2
import numpy as np
import osfrom ais_bench.infer.interface import InferSessionclass YOLO:"""YOLO segmentation model class for handling inference"""def __init__(self, om_model, imgsz=(640, 640), device_id=0, model_ndtype=np.single, mode="static", postprocess_type="v8", aipp=False):"""Initialization.Args:om_model (str): Path to the om model."""# 构建ais_bench推理引擎self.session = InferSession(device_id=device_id, model_path=om_model)# Numpy dtype: support both FP32(np.single) and FP16(np.half) om modelself.ndtype = model_ndtypeself.mode = modeself.postprocess_type = postprocess_typeself.aipp = aipp self.model_height, self.model_width = imgsz[0], imgsz[1]  # 图像resize大小def __call__(self, im0, conf_threshold=0.4, iou_threshold=0.45):"""The whole pipeline: pre-process -> inference -> post-process.Args:im0 (Numpy.ndarray): original input image.conf_threshold (float): confidence threshold for filtering predictions.iou_threshold (float): iou threshold for NMS.Returns:boxes (List): list of bounding boxes."""# 前处理Pre-processt1 = time.time()im, ratio, (pad_w, pad_h) = self.preprocess(im0)pre_time = round(time.time() - t1, 3)# 推理 inferencet2 = time.time()preds = self.session.infer([im], mode=self.mode)  # mode有动态"dymshape"和静态"static"等det_time = round(time.time() - t2, 3)# 后处理Post-processt3 = time.time()if self.postprocess_type == "v5":boxes, segments, masks = self.postprocess_v5(preds,im0=im0,ratio=ratio,pad_w=pad_w,pad_h=pad_h,conf_threshold=conf_threshold,iou_threshold=iou_threshold,)elif self.postprocess_type == "v8":boxes, segments, masks = self.postprocess_v8(preds,im0=im0,ratio=ratio,pad_w=pad_w,pad_h=pad_h,conf_threshold=conf_threshold,iou_threshold=iou_threshold,)else:boxes=[], segments=[], masks=[]post_time = round(time.time() - t3, 3)return boxes, segments, masks, (pre_time, det_time, post_time)# 前处理,包括:resize, pad, 其中HWC to CHW,BGR to RGB,归一化,增加维度CHW -> BCHW可选择是否开启AIPP加速处理def preprocess(self, img):"""Pre-processes the input image.Args:img (Numpy.ndarray): image about to be processed.Returns:img_process (Numpy.ndarray): image preprocessed for inference.ratio (tuple): width, height ratios in letterbox.pad_w (float): width padding in letterbox.pad_h (float): height padding in letterbox."""# Resize and pad input image using letterbox() (Borrowed from Ultralytics)shape = img.shape[:2]  # original image shapenew_shape = (self.model_height, self.model_width)r = min(new_shape[0] / shape[0], new_shape[1] / shape[1])ratio = r, rnew_unpad = int(round(shape[1] * r)), int(round(shape[0] * r))pad_w, pad_h = (new_shape[1] - new_unpad[0]) / 2, (new_shape[0] - new_unpad[1]) / 2  # wh paddingif shape[::-1] != new_unpad:  # resizeimg = cv2.resize(img, new_unpad, interpolation=cv2.INTER_LINEAR)top, bottom = int(round(pad_h - 0.1)), int(round(pad_h + 0.1))left, right = int(round(pad_w - 0.1)), int(round(pad_w + 0.1))img = cv2.copyMakeBorder(img, top, bottom, left, right, cv2.BORDER_CONSTANT, value=(114, 114, 114))  # 填充# 是否开启aipp加速预处理,需atc中完成if self.aipp:return img, ratio, (pad_w, pad_h)# Transforms: HWC to CHW -> BGR to RGB -> div(255) -> contiguous -> add axis(optional)img = np.ascontiguousarray(np.einsum('HWC->CHW', img)[::-1], dtype=self.ndtype) / 255.0img_process = img[None] if len(img.shape) == 3 else imgreturn img_process, ratio, (pad_w, pad_h)# YOLOv5/6/7通用后处理,包括:阈值过滤与NMS+masks处理def postprocess_v5(self, preds, im0, ratio, pad_w, pad_h, conf_threshold, iou_threshold, nm=32):"""Post-process the prediction.Args:preds (Numpy.ndarray): predictions come from ort.session.run().im0 (Numpy.ndarray): [h, w, c] original input image.ratio (tuple): width, height ratios in letterbox.pad_w (float): width padding in letterbox.pad_h (float): height padding in letterbox.conf_threshold (float): conf threshold.iou_threshold (float): iou threshold.nm (int): the number of masks.Returns:boxes (List): list of bounding boxes.segments (List): list of segments.masks (np.ndarray): [N, H, W], output masks."""# (Batch_size, Num_anchors, xywh_score_conf_cls), v5和v6_1.0的[..., 4]是置信度分数,v8v9采用类别里面最大的概率作为置信度scorex, protos = preds[0], preds[1]  # 与bbox区别:Two outputs: 检测头的输出(1, 8400*3, 117), 分割头的输出(1, 32, 160, 160)# Predictions filtering by conf-thresholdx = x[x[..., 4] > conf_threshold]# Create a new matrix which merge these(box, score, cls, nm) into one# For more details about `numpy.c_()`: https://numpy.org/doc/1.26/reference/generated/numpy.c_.htmlx = np.c_[x[..., :4], x[..., 4], np.argmax(x[..., 5:-nm], axis=-1), x[..., -nm:]]# NMS filtering# 经过NMS后的值, np.array([[x, y, w, h, conf, cls, nm], ...]), shape=(-1, 4 + 1 + 1 + 32)x = x[cv2.dnn.NMSBoxes(x[:, :4], x[:, 4], conf_threshold, iou_threshold)]# 重新缩放边界框,为画图做准备if len(x) > 0:# Bounding boxes format change: cxcywh -> xyxyx[..., [0, 1]] -= x[..., [2, 3]] / 2x[..., [2, 3]] += x[..., [0, 1]]# Rescales bounding boxes from model shape(model_height, model_width) to the shape of original imagex[..., :4] -= [pad_w, pad_h, pad_w, pad_h]x[..., :4] /= min(ratio)# Bounding boxes boundary clampx[..., [0, 2]] = x[:, [0, 2]].clip(0, im0.shape[1])x[..., [1, 3]] = x[:, [1, 3]].clip(0, im0.shape[0])# 与bbox区别:增加masks处理# Process masksmasks = self.process_mask(protos[0], x[:, 6:], x[:, :4], im0.shape)# Masks -> Segments(contours)segments = self.masks2segments(masks)return x[..., :6], segments, masks  # boxes, segments, maskselse:return [], [], []def postprocess_v8(self, preds, im0, ratio, pad_w, pad_h, conf_threshold, iou_threshold):x, protos = preds[0], preds[1]  # x: (1, 37, 8400), protos: (1, 32, 160, 160)# 统一为 (8400, 37)if x.ndim == 3:if x.shape[1] < x.shape[2]:    # (1, 37, 8400)x = np.einsum('bcn->bnc', x)[0]  # -> (8400, 37)else:                          # (1, 8400, 37)x = x[0]else:raise ValueError(f'unexpected pred0 shape: {x.shape}')# 动态确定 nm(此模型就是 32)nm = protos.shape[1] if (protos.ndim == 4 and protos.shape[1] in (16, 32, 64)) else 32# 取类别分支并按需做 sigmoidcls_blob = x[:, 4:-nm]  # 维度应为 (8400, num_classes);你的模型 num_classes=1if cls_blob.size and (cls_blob.max() > 1 or cls_blob.min() < 0):cls_scores = 1.0 / (1.0 + np.exp(-cls_blob))else:cls_scores = cls_blobif cls_scores.size == 0:return [], [], []scores = cls_scores.max(axis=-1)clses  = cls_scores.argmax(axis=-1)keep = scores > conf_thresholdif not np.any(keep):return [], [], []# 拼接为统一数组x = np.c_[x[keep, :4], scores[keep], clses[keep], x[keep, -nm:]]  # [cx,cy,w,h,score,cls, 32-vec]# === NMS 前先把 cx,cy,w,h -> x,y,w,h(左上+宽高)===tlwh = np.c_[x[:, 0] - x[:, 2] / 2,x[:, 1] - x[:, 3] / 2,x[:, 2],x[:, 3]]idxs = cv2.dnn.NMSBoxes(tlwh.tolist(), x[:, 4].astype(float).tolist(),conf_threshold, iou_threshold)if len(idxs) == 0:return [], [], []idxs = np.array(idxs).reshape(-1)x = x[idxs]# 转回 xyxy 并映射回原图x[..., [0, 1]] -= x[..., [2, 3]] / 2x[..., [2, 3]] += x[..., [0, 1]]x[:, :4] -= [pad_w, pad_h, pad_w, pad_h]x[:, :4] /= min(ratio)x[:, [0, 2]] = x[:, [0, 2]].clip(0, im0.shape[1])x[:, [1, 3]] = x[:, [1, 3]].clip(0, im0.shape[0])# 处理 maskmasks = self.process_mask(protos[0], x[:, 6:], x[:, :4], im0.shape)segments = self.masks2segments(masks)return x[:, :6], segments, masks@staticmethoddef masks2segments(masks):"""It takes a list of masks(n,h,w) and returns a list of segments(n,xy) (Borrowed fromhttps://github.com/ultralytics/ultralytics/blob/465df3024f44fa97d4fad9986530d5a13cdabdca/ultralytics/utils/ops.py#L750)Args:masks (numpy.ndarray): the output of the model, which is a tensor of shape (batch_size, 160, 160).Returns:segments (List): list of segment masks."""segments = []for x in masks.astype('uint8'):c = cv2.findContours(x, cv2.RETR_EXTERNAL, cv2.CHAIN_APPROX_NONE)[0]  # CHAIN_APPROX_SIMPLE  该函数用于查找二值图像中的轮廓。if c:# 这段代码的目的是找到图像x中的最外层轮廓,并从中选择最长的轮廓,然后将其转换为NumPy数组的形式。c = np.array(c[np.array([len(x) for x in c]).argmax()]).reshape(-1, 2)else:c = np.zeros((0, 2))  # no segments foundsegments.append(c.astype('float32'))return segmentsdef process_mask(self, protos, masks_in, bboxes, im0_shape):c, mh, mw = protos.shapemasks = np.matmul(masks_in, protos.reshape((c, -1))).reshape((-1, mh, mw))  # [n, mh, mw]# ★ 先 sigmoid,把线性叠加的 logits 转成概率masks = 1.0 / (1.0 + np.exp(-masks))masks = np.transpose(masks, (1, 2, 0))                  # -> [mh, mw, n]masks = np.ascontiguousarray(masks)masks = self.scale_mask(masks, im0_shape)               # -> [H, W, n]masks = np.einsum('HWN -> NHW', masks)                  # -> [n, H, W]masks = self.crop_mask(masks, bboxes)                   # 裁剪到框内return masks > 0.5@staticmethoddef scale_mask(masks, im0_shape, ratio_pad=None):"""Takes a mask, and resizes it to the original image size. (Borrowed fromhttps://github.com/ultralytics/ultralytics/blob/465df3024f44fa97d4fad9986530d5a13cdabdca/ultralytics/utils/ops.py#L305)Args:masks (np.ndarray): resized and padded masks/images, [h, w, num]/[h, w, 3].im0_shape (tuple): the original image shape.ratio_pad (tuple): the ratio of the padding to the original image.Returns:masks (np.ndarray): The masks that are being returned."""im1_shape = masks.shape[:2]if ratio_pad is None:  # calculate from im0_shapegain = min(im1_shape[0] / im0_shape[0], im1_shape[1] / im0_shape[1])  # gain  = old / newpad = (im1_shape[1] - im0_shape[1] * gain) / 2, (im1_shape[0] - im0_shape[0] * gain) / 2  # wh paddingelse:pad = ratio_pad[1]# Calculate tlbr of masktop, left = int(round(pad[1] - 0.1)), int(round(pad[0] - 0.1))  # y, xbottom, right = int(round(im1_shape[0] - pad[1] + 0.1)), int(round(im1_shape[1] - pad[0] + 0.1))if len(masks.shape) < 2:raise ValueError(f'"len of masks shape" should be 2 or 3, but got {len(masks.shape)}')masks = masks[top:bottom, left:right]masks = cv2.resize(masks, (im0_shape[1], im0_shape[0]),interpolation=cv2.INTER_LINEAR)  # INTER_CUBIC would be betterif len(masks.shape) == 2:masks = masks[:, :, None]return masks@staticmethoddef crop_mask(masks, boxes):"""It takes a mask and a bounding box, and returns a mask that is cropped to the bounding box. (Borrowed fromhttps://github.com/ultralytics/ultralytics/blob/465df3024f44fa97d4fad9986530d5a13cdabdca/ultralytics/utils/ops.py#L599)Args:masks (Numpy.ndarray): [n, h, w] tensor of masks.boxes (Numpy.ndarray): [n, 4] tensor of bbox coordinates in relative point form.Returns:(Numpy.ndarray): The masks are being cropped to the bounding box."""n, h, w = masks.shapex1, y1, x2, y2 = np.split(boxes[:, :, None], 4, 1)r = np.arange(w, dtype=x1.dtype)[None, None, :]c = np.arange(h, dtype=x1.dtype)[None, :, None]return masks * ((r >= x1) * (r < x2) * (c >= y1) * (c < y2))if __name__ == '__main__':# Create an argument parser to handle command-line argumentsparser = argparse.ArgumentParser()parser.add_argument('--seg_model', type=str, default=r"yolov8s-seg.om", help='Path to OM model')parser.add_argument('--source', type=str, default=r'images', help='Path to input image')parser.add_argument('--out_path', type=str, default=r'results', help='结果保存文件夹')parser.add_argument('--imgsz_seg', type=tuple, default=(640, 640), help='Image input size')parser.add_argument('--classes', type=list, default=['person', 'bicycle', 'car', 'motorcycle', 'airplane', 'bus', 'train', 'truck', 'boat', 'traffic light','fire hydrant', 'stop sign', 'parking meter', 'bench', 'bird', 'cat', 'dog', 'horse', 'sheep', 'cow','elephant', 'bear', 'zebra', 'giraffe', 'backpack', 'umbrella', 'handbag', 'tie', 'suitcase', 'frisbee','skis', 'snowboard', 'sports ball', 'kite', 'baseball bat', 'baseball glove', 'skateboard', 'surfboard','tennis racket', 'bottle', 'wine glass', 'cup', 'fork', 'knife', 'spoon', 'bowl', 'banana', 'apple', 'sandwich','orange', 'broccoli', 'carrot', 'hot dog', 'pizza', 'donut', 'cake', 'chair', 'couch', 'potted plant', 'bed','dining table', 'toilet', 'tv', 'laptop', 'mouse', 'remote', 'keyboard', 'cell phone', 'microwave', 'oven','toaster', 'sink', 'refrigerator', 'book', 'clock', 'vase', 'scissors', 'teddy bear', 'hair drier', 'toothbrush'], help='类别')parser.add_argument('--conf', type=float, default=0.7, help='Confidence threshold')parser.add_argument('--iou', type=float, default=0.7, help='NMS IoU threshold')parser.add_argument('--device_id', type=int, default=0, help='device id')parser.add_argument('--mode', default='static', help='om是动态dymshape或静态static')parser.add_argument('--model_ndtype', default=np.single, help='om是fp32或fp16')parser.add_argument('--postprocess_type', type=str, default='v8', help='后处理方式, 对应v5/v8两种后处理')parser.add_argument('--aipp', default=False, action='store_true', help='是否开启aipp加速YOLO预处理, 需atc中完成om集成')args = parser.parse_args()# 创建结果保存文件夹if not os.path.exists(args.out_path):os.mkdir(args.out_path)print('开始运行:')# Build modelseg_model = YOLO(args.seg_model, args.imgsz_seg, args.device_id, args.model_ndtype, args.mode, args.postprocess_type, args.aipp)color_palette = np.random.uniform(0, 255, size=(len(args.classes), 3))  # 为每个类别生成调色板for i, img_name in enumerate(os.listdir(args.source)):try:t1 = time.time()# Read image by OpenCVimg = cv2.imread(os.path.join(args.source, img_name))# 检测Inferenceboxes, segments, _ , (pre_time, det_time, post_time) = seg_model(img, conf_threshold=args.conf, iou_threshold=args.iou)print('{}/{} ==>总耗时间: {:.3f}s, 其中, 预处理: {:.3f}s, 推理: {:.3f}s, 后处理: {:.3f}s, 识别{}个目标'.format(i+1, len(os.listdir(args.source)), time.time() - t1, pre_time, det_time, post_time, len(boxes)))# Draw rectangles and polygonsim_canvas = img.copy()# 在绘制循环里加健壮性判断for (*box, conf, cls_), segment in zip(boxes, segments):# segment 可能为空或很短;也可能是 float,需要转 int32if segment is None or len(segment) < 3:continueseg = np.round(segment).astype(np.int32).reshape(-1, 1, 2)  # -> Nx1x2, int32# 先画边,再填充cv2.polylines(img, [seg], True, (255, 255, 255), 2)cv2.fillPoly(im_canvas, [seg], (255, 0, 0))# 画 bbox 和标签x1, y1, x2, y2 = map(int, box[:4])cls_i = int(cls_)cv2.rectangle(img, (x1, y1), (x2, y2), color_palette[cls_i], 1, cv2.LINE_AA)label = args.classes[cls_i] if 0 <= cls_i < len(args.classes) else f'cls{cls_i}'cv2.putText(img, f'{label}: {conf:.3f}', (x1, max(0, y1 - 9)),cv2.FONT_HERSHEY_SIMPLEX, 0.7, color_palette[cls_i], 2, cv2.LINE_AA)# Mix imageimg = cv2.addWeighted(im_canvas, 0.3, img, 0.7, 0)cv2.imwrite(os.path.join(args.out_path, img_name), img)except Exception as e:print(e)
5.启动命令
python ~/autodl-tmp/ultralytics-main/run_seg.py   \
--seg_model /root/autodl-tmp/ultralytics-main/yolo11n-seg1.om   \
--source /root/autodl-tmp/ultralytics-main/test   \
--classes [person]  \
--postprocess_type v8
--classes 是模型检测标签名
--source 推理文件所在文件夹
--det_model om模型参数路径
--postprocess_type yolov8 v9 v11都用v8,使用的yolov5的话改为yolov5


详解)


——文本、按钮、多选框和单选框、输入框和拖动条、图片绘制和框绘制)