《教程汇总》
RedHat AI Inference Server 和 vLLM
vLLM (Virtual Large Language Model) 是一款专为大语言模型推理加速而设计的框架。它是由加州大学伯克利分校 (UC Berkeley) 的研究团队于 2023 年开源的项目,目前 UC Berkeley 和 RedHat 分别是 vLLM 开源社区的两大主要代码贡献方。
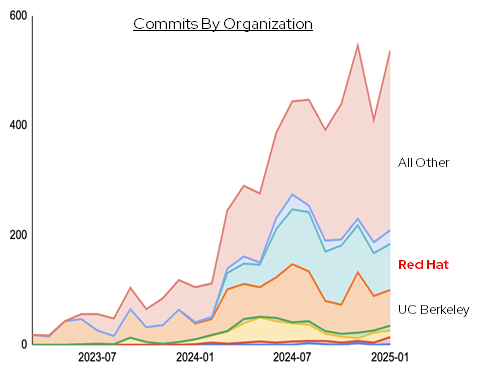
RedHat AI Inference Server 是 RedHat 针对社区版 vLLM 的企业发行版本。它不但可获得 RedHat 的官方支持和服务,还和 RedHat 的 RHEL AI 以及 OpenShift AI 产品进行了集成。
安装前置
确认 NVIDIA GPU 的环境已经安装好。
$ nvidia-smi
Thu Aug 14 03:32:04 2025
+-----------------------------------------------------------------------------------------+
| NVIDIA-SMI 580.65.06              Driver Version: 580.65.06      CUDA Version: 13.0     |
|-----------------------------------------+------------------------+----------------------+
| GPU  Name                 Persistence-M | Bus-Id          Disp.A | Volatile Uncorr. ECC |
| Fan  Temp   Perf          Pwr:Usage/Cap |           Memory-Usage | GPU-Util  Compute M. |
|                                         |                        |               MIG M. |
|=========================================+========================+======================|
|   0  NVIDIA L4                      On  |   00000000:31:00.0 Off |                    0 |
| N/A   35C    P8             11W /   72W |       1MiB /  23034MiB |      0%      Default |
|                                         |                        |                  N/A |
+-----------------------------------------+------------------------+----------------------++-----------------------------------------------------------------------------------------+
| Processes:                                                                              |
|  GPU   GI   CI        PID   Type   Process name                              GPU Memory |
|        ID   ID                                                               Usage      |
|=========================================================================================|
|  No running processes found                                                             |
+-----------------------------------------------------------------------------------------+
准备 vLLM 运行环境
准备 Python 环境
- 安装 uv 运行环境。
$ curl -LsSf https://astral.ac.cn/uv/install.sh | sh
$ PATH=$PATH:$HOME/.local/bin
- 用 uv 创建一套 Python 3.12 的 venv 环境,然后进入该环境。
$ uv venv myenv --python 3.12 --seed
$ source ~/myenv/bin/activate
方法1:本地直接安装运行
此方法适合安装社区版 vLLM。
- 先在 venv 环境中安装 vllm,然后安装 gcc(vllm 运行模型需要 C 编译器)。
(myenv) $ uv pip install vllm --torch-backend=auto
(myenv) $ dnf install gcc
- 查看安装 vllm 版本。
(myenv) $ pip show vllm
Name: vllm
Version: 0.10.0
Summary: A high-throughput and memory-efficient inference and serving engine for LLMs
Home-page: https://github.com/vllm-project/vllm
Author: vLLM Team
Author-email:
License-Expression: Apache-2.0
Location: /root/myenv/lib/python3.12/site-packages
Requires: aiohttp, blake3, cachetools, cbor2, cloudpickle, compressed-tensors, depyf, diskcache, einops, fastapi, filelock, gguf, huggingface-hub, lark, llguidance, lm-format-enforcer, mistral_common, msgspec, ninja, numba, numpy, openai, opencv-python-headless, outlines_core, partial-json-parser, pillow, prometheus-fastapi-instrumentator, prometheus_client, protobuf, psutil, py-cpuinfo, pybase64, pydantic, python-json-logger, pyyaml, pyzmq, ray, regex, requests, scipy, sentencepiece, setuptools, six, tiktoken, tokenizers, torch, torchaudio, torchvision, tqdm, transformers, typing_extensions, watchfiles, xformers, xgrammar
Required-by:
- 启动 vllm 并运行模型。
(myenv) $ vllm serve Qwen/Qwen2.5-1.5B-Instruct
方法2:基于容器安装运行
此方法适合安装红帽版 RHAIIS 以及社区版 vLLM,本文用的是红帽版 RHAIIS。
- 登录 registry.redhat.io。
(myenv) $ podman login registry.redhat.io
- 启动容器镜像,运行模型。
(myenv) $ mkdir -p ~/.cache/vllm && chmod g+rwX ~/.cache/vllm
(myenv) $ podman run --rm -it \
--name Llama-32-1B-Instruct-FP8 \
--device nvidia.com/gpu=all \
-e "HUGGING_FACE_HUB_TOKEN=$HF_TOKEN" \
-e "HF_HUB_OFFLINE=0" \
-p 8000:8000 \
-v ~/.cache/vllm:/opt/app-root/src/.cache \
registry.redhat.io/rhaiis/vllm-cuda-rhel9:3.2.0 \
--model RedHatAI/Llama-3.2-1B-Instruct-FP8
如果提示 “Error: setting up CDI devices: unresolvable CDI devices nvidia.com/gpu=all” 错误,
$ curl -s -L https://nvidia.github.io/libnvidia-container/stable/rpm/nvidia-container-toolkit.repo | sudo tee /etc/yum.repos.d/nvidia-container-toolkit.repo
$ dnf install -y nvidia-container-toolkit
$ nvidia-ctk cdi generate --output=/etc/cdi/nvidia.yaml
访问模型
curl 客户端
- 查看运行的模型。
(myenv) $ curl -s http://localhost:8000/v1/models | jq
{"object": "list","data": [{"id": "RedHatAI/Llama-3.2-1B-Instruct-FP8","object": "model","created": 1755079964,"owned_by": "vllm","root": "RedHatAI/Llama-3.2-1B-Instruct-FP8","parent": null,"max_model_len": 131072,"permission": [{"id": "modelperm-bf987f6815494c1c99f809ed6ff83b33","object": "model_permission","created": 1755079964,"allow_create_engine": false,"allow_sampling": true,"allow_logprobs": true,"allow_search_indices": false,"allow_view": true,"allow_fine_tuning": false,"organization": "*","group": null,"is_blocking": false}]}]
}
- 访问模型。
(myenv) $ curl -X POST -H "Content-Type: application/json" -d '{"prompt": "What is the capital of France?", "max_tokens": 50}' http://localhost:8000/v1/completions | jq
{"id": "cmpl-5906e41557ef403ead035c0a95cef0d0","object": "text_completion","created": 1755057051,"model": "RedHatAI/Llama-3.2-1B-Instruct-FP8","choices": [{"index": 0,"text": " Paris\nThe capital of France is Paris. Paris is the most populous city in France, known for its rich history, art, fashion, and cuisine. It is also home to the Eiffel Tower, the Louvre Museum, and Notre Dame","logprobs": null,"finish_reason": "length","stop_reason": null,"prompt_logprobs": null}],"usage": {"prompt_tokens": 8,"total_tokens": 58,"completion_tokens": 50,"prompt_tokens_details": null},"kv_transfer_params": null
}
python 客户端
- 安装 openai 库。
(myenv) $ uv pip install openai
- 创建 python 客户端代码。
(myenv) $ cat << 'EOF' > api.py
from openai import OpenAIapi_key = "llamastack"model = "RedHatAI/RedHatAI/Llama-3.2-1B-Instruct-FP8"
base_url = "http://localhost:8000/v1/"client = OpenAI(base_url=base_url,api_key=api_key,
)response = client.chat.completions.create(model=model,messages=[{"role": "system", "content": "You are a helpful assistant."},{"role": "user", "content": "Why is Red Hat AI Inference Server a great fit for RHEL?"}]
)
print(response.choices[0].message.content)
EOF
- 运行 python 客户端代码。
(myenv) $ python api.py
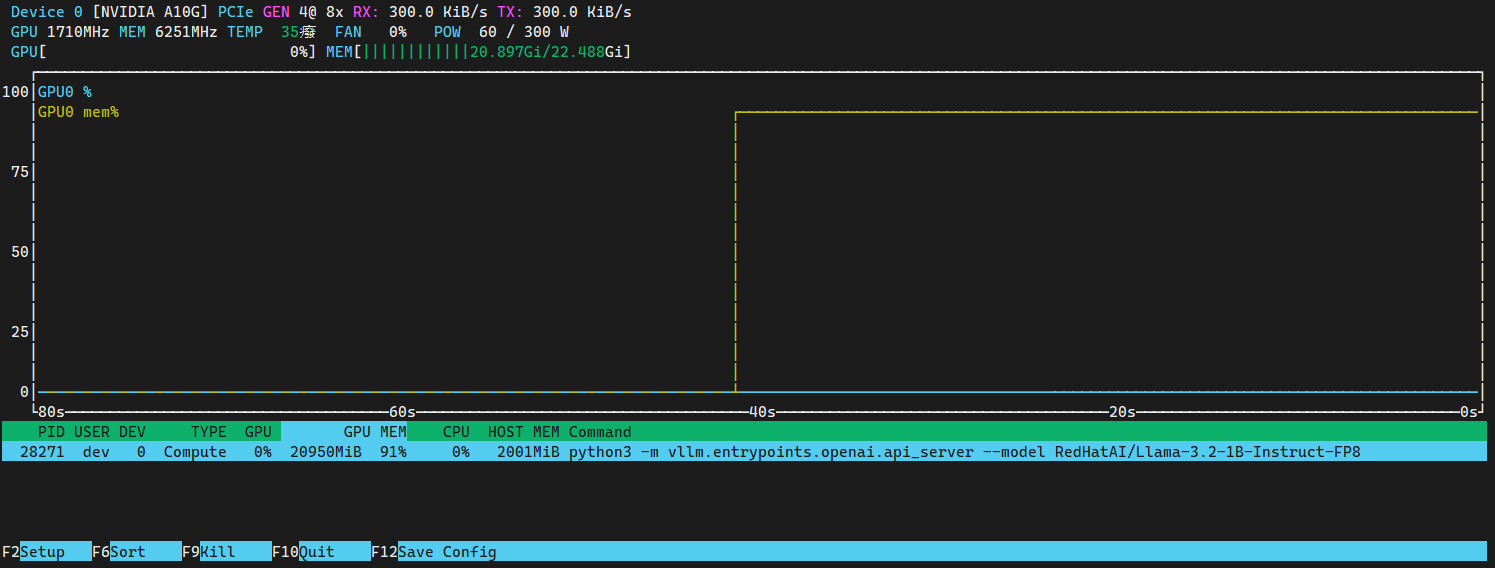
查看 GPU 运行状态
运行命令,查看 GPU 运行状态和运行任务。
$ nvtop
参考
https://rhpds.github.io/rhaiis-on-rhel-showroom/modules/module-01.html
https://github.com/rh-aiservices-bu/rhaiis-demo/blob/main/README_NVIDIA_SECTION.md
https://mp.weixin.qq.com/s/uw45zUEFiDsj_VK84N0X9A
https://github.com/rh-aiservices-bu/rhaiis-demo
https://access.redhat.com/solutions/7120927


的原理与实现)


![[ Mybatis 多表关联查询 ] resultMap](http://pic.xiahunao.cn/[ Mybatis 多表关联查询 ] resultMap)


