1.先修改基础配置
make menuconfig打开配置菜单
选择component config
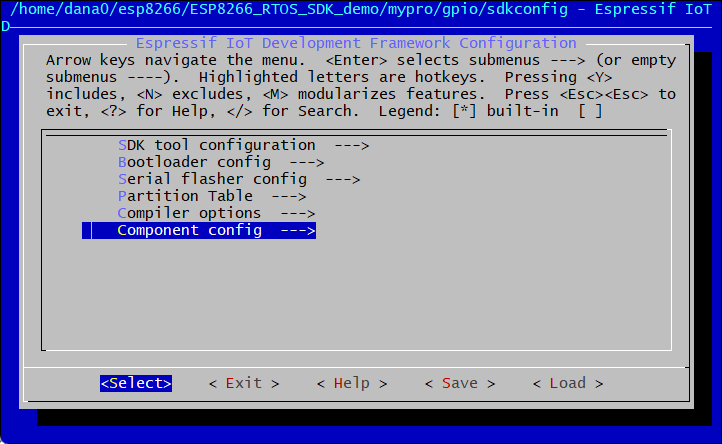
然后选择
修改波特率为115200

保存退出
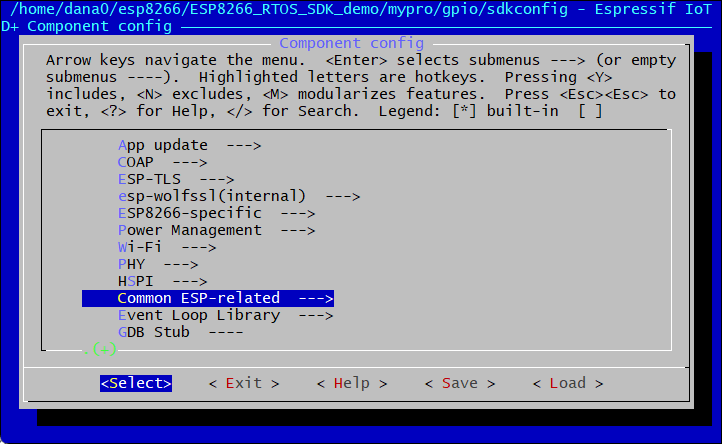
2.修改彩色日志打印的
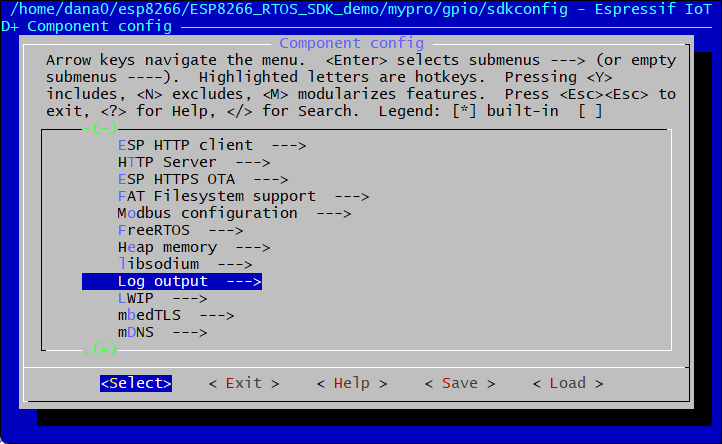
在component config目录下找到log output
选中点击空格关掉彩色日志输出,这样正常串口打印就没有乱码了
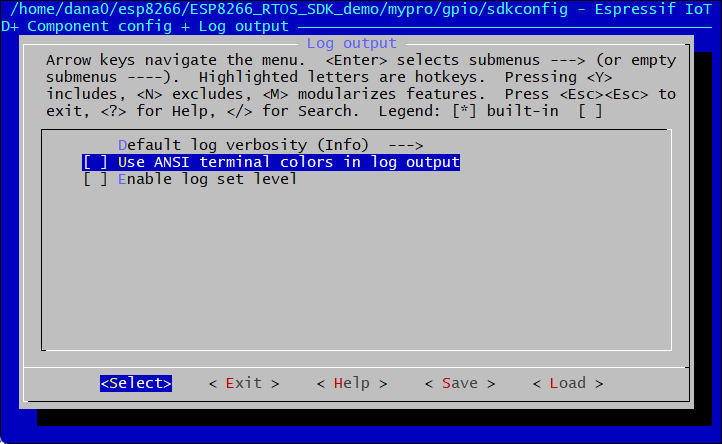
然后保存退出
3.串口接收json,http发送云代码
设备 HTTP 接入 | ThingsCloud 使用文档
#include "freertos/FreeRTOS.h"
#include "freertos/task.h"
#include "freertos/semphr.h"
#include "driver/uart.h"
#include "driver/gpio.h"
#include "esp_wifi.h"
#include "esp_event_loop.h"
#include "esp_log.h"
#include "nvs_flash.h"
#include "esp_http_client.h"
#include "cJSON.h"
#include <stdio.h>
#include <string.h>#define LED_GPIO 2
#define PROJECT_KEY "*"char g_wifi_ssid[64] = "";
char g_wifi_pass[64] = "";
char g_post_json[512] = "";SemaphoreHandle_t xPostSemaphore;// WiFi Event Handler
esp_err_t event_handler(void *ctx, system_event_t *event)
{switch (event->event_id){case SYSTEM_EVENT_STA_START:esp_wifi_connect();break;case SYSTEM_EVENT_STA_GOT_IP:printf("Got IP: %s\n", ip4addr_ntoa(&event->event_info.got_ip.ip_info.ip));break;case SYSTEM_EVENT_STA_DISCONNECTED:printf("Disconnected, retrying...\n");esp_wifi_connect();break;default:break;}return ESP_OK;
}// init once
void wifi_driver_init()
{tcpip_adapter_init();ESP_ERROR_CHECK(esp_event_loop_init(event_handler, NULL));wifi_init_config_t cfg = WIFI_INIT_CONFIG_DEFAULT();ESP_ERROR_CHECK(esp_wifi_init(&cfg));ESP_ERROR_CHECK(esp_wifi_set_mode(WIFI_MODE_STA));ESP_ERROR_CHECK(esp_wifi_start());
}//  change WiFi connect
void wifi_connect()
{wifi_config_t wifi_config = {0};strcpy((char *)wifi_config.sta.ssid, g_wifi_ssid);strcpy((char *)wifi_config.sta.password, g_wifi_pass);// 先断开esp_wifi_disconnect();vTaskDelay(pdMS_TO_TICKS(100));// 设置新配置ESP_ERROR_CHECK(esp_wifi_set_config(ESP_IF_WIFI_STA, &wifi_config));// 连接ESP_ERROR_CHECK(esp_wifi_connect());
}// uart receive task
void uart_receive_task(void *pvParams)
{const int uart_num = UART_NUM_0;uart_config_t uart_config = {.baud_rate = 115200,.data_bits = UART_DATA_8_BITS,.parity    = UART_PARITY_DISABLE,.stop_bits = UART_STOP_BITS_1,.flow_ctrl = UART_HW_FLOWCTRL_DISABLE};uart_param_config(uart_num, &uart_config);uart_driver_install(uart_num, 2048, 0, 0, NULL, 0);uint8_t data[512];while (1){int len = uart_read_bytes(uart_num, data, sizeof(data) - 1, pdMS_TO_TICKS(1000));if (len > 0){data[len] = '\0';printf("UART Received: %s\n", data);cJSON *root = cJSON_Parse((char *)data);if (!root){printf("JSON Parse Error\n");}else{cJSON *ssid = cJSON_GetObjectItem(root, "ssid");cJSON *pass = cJSON_GetObjectItem(root, "pass");if (ssid && pass){// WiFi 账号密码配置strncpy(g_wifi_ssid, ssid->valuestring, sizeof(g_wifi_ssid) - 1);strncpy(g_wifi_pass, pass->valuestring, sizeof(g_wifi_pass) - 1);printf("Set WiFi SSID: %s\n", g_wifi_ssid);printf("Set WiFi PASS: %s\n", g_wifi_pass);wifi_connect();}else{// 透传 POST 数据strncpy(g_post_json, (char *)data, sizeof(g_post_json) - 1);g_post_json[sizeof(g_post_json) - 1] = '\0';printf("POST JSON set: %s\n", g_post_json);xSemaphoreGive(xPostSemaphore); // 通知 POST 任务}cJSON_Delete(root);}}}
}// HTTP POST task
void http_post_task(void *pvParameters)
{while (1){if (xSemaphoreTake(xPostSemaphore, portMAX_DELAY) == pdTRUE){esp_http_client_config_t config = {.url = "http://sh-3-api.iot-api.com/device/v1/<*your tocken>/attributes",};esp_http_client_handle_t client = esp_http_client_init(&config);esp_http_client_set_method(client, HTTP_METHOD_POST);esp_http_client_set_header(client, "Content-Type", "application/json");esp_http_client_set_header(client, "Project-Key", PROJECT_KEY);esp_http_client_set_post_field(client, g_post_json, strlen(g_post_json));esp_err_t err = esp_http_client_perform(client);if (err == ESP_OK){printf("HTTP POST Status = %d, content_length = %d\n",esp_http_client_get_status_code(client),esp_http_client_get_content_length(client));}else{printf("HTTP POST request failed: %s\n", esp_err_to_name(err));}esp_http_client_cleanup(client);}}
}// LED task
void led_blink_task(void *pvParams)
{gpio_set_direction(LED_GPIO, GPIO_MODE_OUTPUT);while (1){gpio_set_level(LED_GPIO, 1);vTaskDelay(pdMS_TO_TICKS(500));gpio_set_level(LED_GPIO, 0);vTaskDelay(pdMS_TO_TICKS(500));}
}// Main
void app_main()
{nvs_flash_init();wifi_driver_init();xPostSemaphore = xSemaphoreCreateBinary();xTaskCreate(uart_receive_task, "uart_receive_task", 4096, NULL, 5, NULL);xTaskCreate(http_post_task, "http_post_task", 8192, NULL, 5, NULL);xTaskCreate(led_blink_task, "led_blink_task", 2048, NULL, 5, NULL);
}
4.使用方法
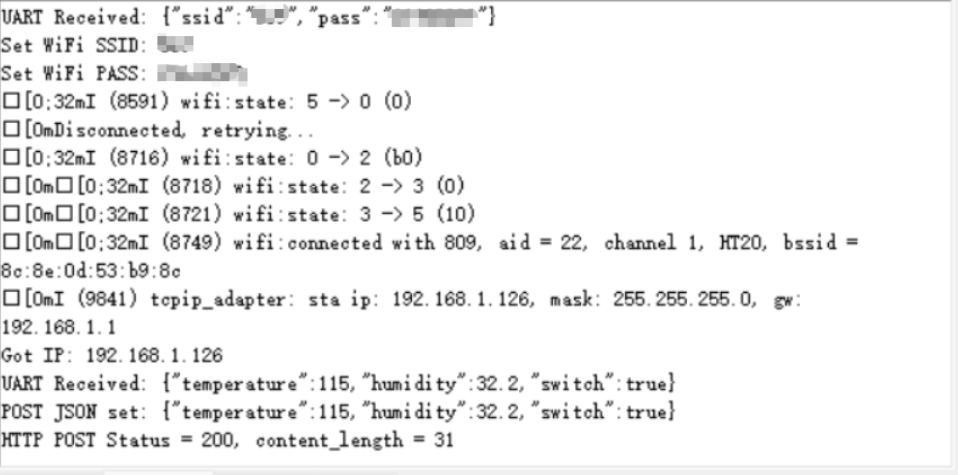
(1)串口接收数据配网(不要有空格)
{"ssid":"***","pass":"********"}(2)串口接收数据http发送云(不要有空格,数据可以自己往后添加)
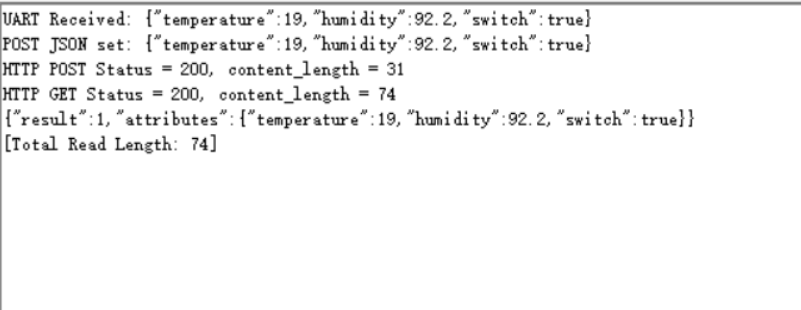
{"temperature":115,"humidity":32.2,"switch":true}5.效果
6.get线程获取云服务数据(需要修改两个url的token)
#include "freertos/FreeRTOS.h"
#include "freertos/task.h"
#include "freertos/semphr.h"
#include "driver/uart.h"
#include "driver/gpio.h"
#include "esp_wifi.h"
#include "esp_event_loop.h"
#include "esp_log.h"
#include "nvs_flash.h"
#include "esp_http_client.h"
#include "cJSON.h"
#include <stdio.h>
#include <string.h>#define LED_GPIO 2
#define PROJECT_KEY "*"char g_wifi_ssid[64] = "";
char g_wifi_pass[64] = "";
char g_post_json[512] = "";SemaphoreHandle_t xPostSemaphore;// WiFi Event Handler
esp_err_t event_handler(void *ctx, system_event_t *event)
{switch (event->event_id){case SYSTEM_EVENT_STA_START:esp_wifi_connect();break;case SYSTEM_EVENT_STA_GOT_IP:printf("Got IP: %s\n", ip4addr_ntoa(&event->event_info.got_ip.ip_info.ip));break;case SYSTEM_EVENT_STA_DISCONNECTED:printf("Disconnected, retrying...\n");esp_wifi_connect();break;default:break;}return ESP_OK;
}// init once
void wifi_driver_init()
{tcpip_adapter_init();ESP_ERROR_CHECK(esp_event_loop_init(event_handler, NULL));wifi_init_config_t cfg = WIFI_INIT_CONFIG_DEFAULT();ESP_ERROR_CHECK(esp_wifi_init(&cfg));ESP_ERROR_CHECK(esp_wifi_set_mode(WIFI_MODE_STA));ESP_ERROR_CHECK(esp_wifi_start());
}//  change WiFi connect
void wifi_connect()
{wifi_config_t wifi_config = {0};strcpy((char *)wifi_config.sta.ssid, g_wifi_ssid);strcpy((char *)wifi_config.sta.password, g_wifi_pass);// 先断开esp_wifi_disconnect();vTaskDelay(pdMS_TO_TICKS(100));// 设置新配置ESP_ERROR_CHECK(esp_wifi_set_config(ESP_IF_WIFI_STA, &wifi_config));// 连接ESP_ERROR_CHECK(esp_wifi_connect());
}// 串口接收任务
void uart_receive_task(void *pvParams)
{const int uart_num = UART_NUM_0;uart_config_t uart_config = {.baud_rate = 115200,.data_bits = UART_DATA_8_BITS,.parity    = UART_PARITY_DISABLE,.stop_bits = UART_STOP_BITS_1,.flow_ctrl = UART_HW_FLOWCTRL_DISABLE};uart_param_config(uart_num, &uart_config);uart_driver_install(uart_num, 2048, 0, 0, NULL, 0);uint8_t data[512];while (1){int len = uart_read_bytes(uart_num, data, sizeof(data) - 1, pdMS_TO_TICKS(1000));if (len > 0){data[len] = '\0';printf("UART Received: %s\n", data);cJSON *root = cJSON_Parse((char *)data);if (!root){printf("JSON Parse Error\n");}else{cJSON *ssid = cJSON_GetObjectItem(root, "ssid");cJSON *pass = cJSON_GetObjectItem(root, "pass");if (ssid && pass){// WiFi 账号密码配置strncpy(g_wifi_ssid, ssid->valuestring, sizeof(g_wifi_ssid) - 1);strncpy(g_wifi_pass, pass->valuestring, sizeof(g_wifi_pass) - 1);printf("Set WiFi SSID: %s\n", g_wifi_ssid);printf("Set WiFi PASS: %s\n", g_wifi_pass);wifi_connect();}else{// 透传 POST 数据strncpy(g_post_json, (char *)data, sizeof(g_post_json) - 1);g_post_json[sizeof(g_post_json) - 1] = '\0';printf("POST JSON set: %s\n", g_post_json);xSemaphoreGive(xPostSemaphore); // 通知 POST 任务}cJSON_Delete(root);}}}
}// HTTP POST 任务
void http_post_task(void *pvParameters)
{while (1){if (xSemaphoreTake(xPostSemaphore, portMAX_DELAY) == pdTRUE){esp_http_client_config_t config = {.url = "http://sh-3-api.iot-api.com/device/v1/******/attributes",};esp_http_client_handle_t client = esp_http_client_init(&config);esp_http_client_set_method(client, HTTP_METHOD_POST);esp_http_client_set_header(client, "Content-Type", "application/json");esp_http_client_set_header(client, "Project-Key", PROJECT_KEY);esp_http_client_set_post_field(client, g_post_json, strlen(g_post_json));esp_err_t err = esp_http_client_perform(client);if (err == ESP_OK){printf("HTTP POST Status = %d, content_length = %d\n",esp_http_client_get_status_code(client),esp_http_client_get_content_length(client));}else{printf("HTTP POST request failed: %s\n", esp_err_to_name(err));}esp_http_client_cleanup(client);}}
}// ========== HTTP GET Task ==========
void http_get_task(void *pvParameters)
{while (1){esp_http_client_config_t config = {.url = "http://sh-3-api.iot-api.com/device/v1/*****/attributes",};esp_http_client_handle_t client = esp_http_client_init(&config);esp_http_client_set_method(client, HTTP_METHOD_GET);esp_http_client_set_header(client, "Content-Type", "application/json");esp_http_client_set_header(client, "Project-Key", PROJECT_KEY);esp_err_t err = esp_http_client_perform(client);if (err == ESP_OK){printf("HTTP GET Status = %d, content_length = %d\n",esp_http_client_get_status_code(client),esp_http_client_get_content_length(client));// ========== 循环读取完整内容 ==========char buffer[512];int total_len = 0;while (1){int data_read = esp_http_client_read(client, buffer, sizeof(buffer) - 1);if (data_read <= 0)break;buffer[data_read] = 0; // 添加结束符printf("%s", buffer);  // 分块打印total_len += data_read;}printf("\n[Total Read Length: %d]\n", total_len);}else{printf("HTTP GET request failed: %s\n", esp_err_to_name(err));}esp_http_client_cleanup(client);vTaskDelay(pdMS_TO_TICKS(15000)); // 每15s获取一次}
}// LED 任务
void led_blink_task(void *pvParams)
{gpio_set_direction(LED_GPIO, GPIO_MODE_OUTPUT);while (1){gpio_set_level(LED_GPIO, 1);vTaskDelay(pdMS_TO_TICKS(500));gpio_set_level(LED_GPIO, 0);vTaskDelay(pdMS_TO_TICKS(500));}
}// Main
void app_main()
{nvs_flash_init();wifi_driver_init();xPostSemaphore = xSemaphoreCreateBinary();xTaskCreate(uart_receive_task, "uart_receive_task", 4096, NULL, 5, NULL);xTaskCreate(http_post_task, "http_post_task", 8192, NULL, 5, NULL);xTaskCreate(http_get_task, "http_get_task", 8192, NULL, 5, NULL);xTaskCreate(led_blink_task, "led_blink_task", 2048, NULL, 5, NULL);
}
7.效果(连接过的wifi会保存flash,每次发送WiFi账密,会重新连接)


:裸金属单机和集群部署)

_VueCompinent构造函数、Vue实例对象与组件实例对象)


)

