自定义组件双重支付密码
父组件
<template><view class="container"><view class="top"></view><navbar navTitle="修改支付密码"></navbar><!-- 双重支付密码 --><view class="box">//核心代码<paypassworddouble v-model="passwordValue" @complete="onPasswordComplete"></paypassworddouble></view></view>
</template><script setup>import { ref } from 'vue'import navbar from '@/pages/components/navbar.vue'import paypassworddouble from '../components/paypassworddouble.vue' //核心代码const passwordValue = ref('')// 密码输入完成回调const onPasswordComplete = (password) => {console.log('密码输入完成获取最新密码:', password)passwordValue.value = password;// uni.showToast({//   title: '支付密码修改完成',//   icon: 'success'// })}</script><style lang="scss" scoped>.container{width: 750rpx;height: 100%;background: #ffffff;.top{width: 100%;height: 88rpx;}.box{padding: 0 48rpx;}}
</style>
子组件 全部复制过去直接用就完事了
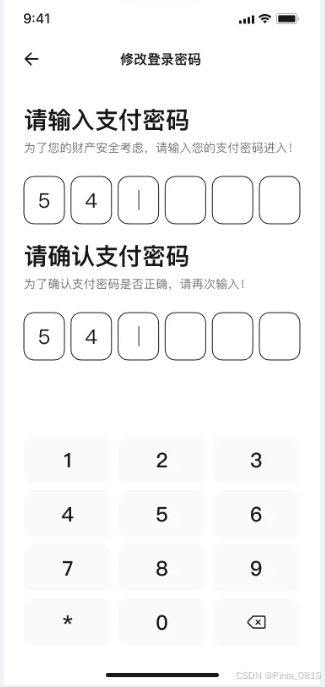
<template><!-- 双重验证支付密码组件 --><view class="password-container"><!-- 第一行:标题"请输入支付密码" --><view class="password-title">请输入支付密码</view><view class="password-tips">为了您的财产安全考虑,请输入您的支付密码进入!</view><!-- 第二行:6个密码输入框(第一组密码) --><view class="password-input-container"><view class="password-input-row"><view v-for="index in 6" :key="index"class="password-input-box":class="{ 'active': currentInputGroup === 1 && currentFirstIndex === index - 1 }"><view v-if="firstPassword[index - 1]" class="password-text">{{ firstPassword[index - 1] }}</view><view v-else-if="firstPassword[index - 1] === ''" class="password-dot"></view></view></view></view><!-- 第三行:标题"请确认支付密码" --><view class="password-title">请确认支付密码</view><view class="password-tips">为了确认支付密码是否正确,请再次输入!</view><!-- 第四行:6个密码输入框(第二组密码) --><view class="password-input-container password-input-container-two"><view class="password-input-row"><view v-for="index in 6" :key="index"class="password-input-box":class="{ 'active': currentInputGroup === 2 && currentSecondIndex === index - 1 }"><view v-if="secondPassword[index - 1]" class="password-text">{{ secondPassword[index - 1] }}</view><view v-else-if="secondPassword[index - 1] === ''" class="password-dot"></view></view></view></view><!-- 第五行:12宫格数字键盘 --><view class="number-keyboard"><view class="keyboard-row" v-for="(row, rowIndex) in keyboardLayout" :key="rowIndex"><view v-for="(key, keyIndex) in row" :key="keyIndex"class="keyboard-key"@click="handleKeyClick(key)"><text v-if="key.type === 'number'" class="key-text">{{ key.value }}</text><image class="delImg" v-if="key.type === 'delete'" src="/static/image/home/Frame.png" mode=""></image></view></view></view><!-- 密码一致性提示 --><view class="password-match-tip" v-if="showMatchTip"><view v-if="isPasswordMatch && secondPassword.length === 6" class="tip-success"><uni-icons type="checkbox-filled" size="28rpx" color="#12a58c"></uni-icons><text class="tip-text success">两次密码输入一致</text></view><view v-else-if="!isPasswordMatch && secondPassword.length === 6" class="tip-error"><uni-icons type="info-filled" size="28rpx" color="#ff0000"></uni-icons><text class="tip-text error">两次密码输入不一致</text></view></view></view>
</template><script setup>
import { ref, computed, watch } from 'vue'// 定义props
const props = defineProps({modelValue: {type: String,default: ''}
})// 定义emits
const emits = defineEmits(['update:modelValue', 'complete', 'match'])// 数据状态
const firstPassword = ref([])  // 第一组密码
const secondPassword = ref([]) // 第二组密码
const currentFirstIndex = ref(0)   // 第一组当前输入位置
const currentSecondIndex = ref(0)  // 第二组当前输入位置
const currentInputGroup = ref(1)   // 当前输入组(1:第一组, 2:第二组)
const isCompleted = ref(false)     // 是否完成输入// 键盘布局
const keyboardLayout = [[{ type: 'number', value: '1' },{ type: 'number', value: '2' },{ type: 'number', value: '3' }],[{ type: 'number', value: '4' },{ type: 'number', value: '5' },{ type: 'number', value: '6' }],[{ type: 'number', value: '7' },{ type: 'number', value: '8' },{ type: 'number', value: '9' }],[{ type: 'number', value: '*' },{ type: 'number', value: '0' },{ type: 'delete'}]
]// 计算属性:密码是否一致
const isPasswordMatch = computed(() => {return firstPassword.value.join('') === secondPassword.value.join('')
})// 计算属性:第二行输入完成开启匹配是否显示匹配提示
const showMatchTip = computed(() => {return secondPassword.value.length === 6
})// 监听密码完成状态
watch([firstPassword, secondPassword], ([newFirst, newSecond]) => {// 当两组密码都输入完成时if (newFirst.length === 6 && newSecond.length === 6) {isCompleted.value = trueconst firstPwd = newFirst.join('')const secondPwd = newSecond.join('')// 检查密码是否一致if (firstPwd === secondPwd) {emits('update:modelValue', firstPwd)emits('complete', firstPwd)emits('match', true)} else {emits('match', false)}} else {isCompleted.value = false}
},{ deep: true })
// 处理按键点击
const handleKeyClick = (key) => {if (key.type === 'number') {// 输入数字if (currentInputGroup.value === 1 && firstPassword.value.length < 6) {firstPassword.value.push(key.value)currentFirstIndex.value = firstPassword.value.length// 第一组输入完成后自动切换到第二组if (firstPassword.value.length === 6) {currentInputGroup.value = 2}} else if (currentInputGroup.value === 2 && secondPassword.value.length < 6) {secondPassword.value.push(key.value)currentSecondIndex.value = secondPassword.value.length}} else if (key.type === 'delete') {// 删除逻辑优化if (currentInputGroup.value === 1 && firstPassword.value.length > 0) {// 删除第一组密码firstPassword.value.pop()currentFirstIndex.value = firstPassword.value.length} else if (currentInputGroup.value === 2 && secondPassword.value.length > 0) {// 删除第二组密码secondPassword.value.pop()currentSecondIndex.value = secondPassword.value.length} else if (currentInputGroup.value === 2 && secondPassword.value.length === 0 && firstPassword.value.length === 6) {// 当第二组密码为空时,切换回第一组currentInputGroup.value = 1currentFirstIndex.value = firstPassword.value.length}}
}// 重置密码
const resetPassword = () => {firstPassword.value = []secondPassword.value = []currentFirstIndex.value = 0currentSecondIndex.value = 0currentInputGroup.value = 1isCompleted.value = false
}// 暴露方法给父组件
defineExpose({resetPassword
})
</script><style lang="scss" scoped>
.password-container {width: 100%;padding-top: 60rpx;box-sizing: border-box;.password-title {height: 56rpx;font-family: PingFang SC, PingFang SC;font-weight: 600;font-size: 56rpx;color: #171717;line-height: 56rpx;margin-bottom: 16rpx;}.password-tips {height: 42rpx;font-family: PingFang SC, PingFang SC;font-weight: 400;font-size: 28rpx;color: #737373;line-height: 42rpx;margin-bottom: 48rpx;}.password-input-container {margin-bottom: 48rpx;.password-input-row {display: flex;justify-content: space-between;.password-input-box {width: 96rpx;height: 112rpx;border-radius: 24rpx;border: 2rpx solid #171717;display: flex;align-items: center;justify-content: center;position: relative;&.active {border-color: #FF4001;}.password-text {font-family: PingFang SC, PingFang SC;font-weight: 500;font-size: 48rpx;color: #171717;}.password-dot {width: 20rpx;height: 20rpx;border-radius: 50%;background: #333;}}}}.password-input-container-two{margin-bottom: 156rpx;}.number-keyboard {margin-top: 40rpx;.keyboard-row {display: flex;justify-content: space-around;margin-bottom: 20rpx;.keyboard-key {width: 207rpx;height: 112rpx;background: #FAFAFA;border-radius: 24rpx;display: flex;align-items: center;justify-content: center;.key-text {font-family: PingFang SC, PingFang SC;font-weight: 500;font-size: 48rpx;color: #171717;}.delImg {width: 56rpx;height: 56rpx;}}}}.password-match-tip {margin-top: 30rpx;display: flex;justify-content: center;.tip-success, .tip-error {display: flex;align-items: center;.tip-text {font-size: 24rpx;margin-left: 10rpx;}.tip-text.success {color: #12a58c;}.tip-text.error {color: #ff0000;}}}
}
</style>
效果图


排序算法—交换排序(快速排序)(动图演示))


)


排序算法——非比较排序(计数排序·动图演示)、排序算法总结)

程序安装+数据库初始+前端配置+服务启动+Web登录)

安全管理(3)-数据库审计)
—— 数组(超绝详细总结))