在腾讯云CodeBuddy上实现一个AI聊天助手项目
在当今数字化时代,AI聊天助手已经成为一种非常流行的应用,广泛应用于客户服务、智能助手等领域。今天,我们将通过腾讯云CodeBuddy平台,实现一个基于Spring Boot和OpenAI API的AI聊天助手项目。这个项目将帮助你快速搭建一个功能强大的聊天助手,同时展示腾讯云CodeBuddy的强大开发能力。
项目背景
我们选择的项目是 Spring AI 聊天助手,这是一个基于Spring Boot和OpenAI API的开源项目。它使用了DeepSeek-R1-Distill-Llama-8B模型,通过SiliconFlow API提供服务。这个项目具备以下功能特点:
- 基于Spring AI框架实现的聊天功能
- 使用OpenAI兼容的API接口
- 响应式Web界面
- 聊天历史记录管理
- 支持代码高亮显示
环境准备
在开始之前,我们需要准备以下环境和工具:
- 腾讯云CodeBuddy账号:用于开发和部署项目。
- JDK 17或更高版本:用于运行Spring Boot项目。
- Maven 3.6或更高版本:用于项目构建。
- OpenAI API密钥或兼容的API密钥:用于接入AI服务。
项目搭建
1. 安装好CodeBuddy
首先,我们需要安装好CodeBuddy,可以参考我上一篇博客,然后在项目里给出命令,让AI创建代码,要加上技术栈和版本,比如本博客使用的版本是1.0.0-M5
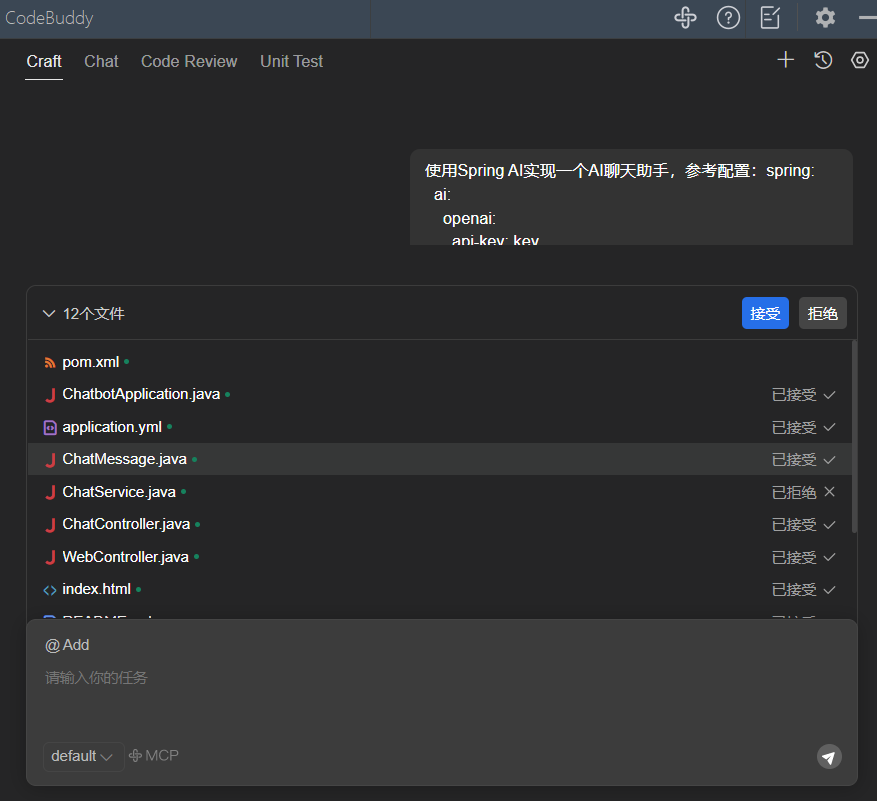
这个过程比较长,需要一点引导AI创建修改代码
2. 配置项目
在腾讯云CodeBuddy中,找到项目的 application.yml 文件,进行以下配置:
spring:ai:openai:api-key: your-api-key-herebase-url: https://api.siliconflow.cnchat:options:model: deepseek-ai/DeepSeek-R1-Distill-Llama-8B
你也可以通过环境变量设置API密钥,例如:
export OPENAI_API_KEY=your-api-key-here
3. 构建和运行项目
在腾讯云CodeBuddy的终端中,运行以下命令构建项目:
mvn clean package
构建完成后,运行项目:
java -jar target/springboot-ai-chatbot-0.0.1-SNAPSHOT.jar
项目将在 http://localhost:8080 上运行。你可以通过浏览器访问该地址,开始使用AI聊天助手。
4. 使用Web界面与AI交互
打开浏览器,访问 http://localhost:8080。在输入框中输入你的问题,点击“发送”按钮或按Enter键,即可查看AI助手的回复。
5. 通过API与AI交互
你也可以通过API与AI进行交互。以下是几个常用的API端点:
-
发送聊天消息:
curl -X POST http://localhost:8080/api/chat \-H "Content-Type: application/json" \-d '{"message":"你好,请介绍一下自己"}' -
获取聊天历史:
curl -X GET http://localhost:8080/api/chat/history -
清除聊天历史:
curl -X POST http://localhost:8080/api/chat/clear
代码说明
1. ChatService.java
ChatService.java 是项目的核心服务类,它负责与OpenAI API进行交互,处理聊天逻辑。以下是代码的关键部分:
package com.example.chatbot.service;import com.example.chatbot.exception.ChatException;
import com.example.chatbot.model.ChatMessage;
import org.slf4j.Logger;
import org.slf4j.LoggerFactory;
import org.springframework.ai.chat.client.ChatClient;
import org.springframework.ai.chat.messages.AssistantMessage;
import org.springframework.ai.chat.messages.Message;
import org.springframework.ai.chat.messages.SystemMessage;
import org.springframework.ai.chat.messages.UserMessage;
import org.springframework.ai.chat.prompt.Prompt;
import org.springframework.beans.factory.annotation.Autowired;
import org.springframework.beans.factory.annotation.Value;
import org.springframework.stereotype.Service;import java.util.ArrayList;
import java.util.List;
import java.util.concurrent.locks.ReentrantLock;
import java.util.stream.Collectors;@Service
public class ChatService {private static final Logger log = LoggerFactory.getLogger(ChatService.class);private final ChatClient chatClient;private final String systemPrompt;private final int maxHistorySize;private final List<Message> chatHistory = new ArrayList<>();private final ReentrantLock historyLock = new ReentrantLock();public ChatService(ChatClient.Builder builder,@Value("${spring.ai.openai.system-prompt:你是一个友好、乐于助人的AI助手。请提供简洁、准确的回答。}") String systemPrompt,@Value("${spring.ai.chat.history.max-size:50}") int maxHistorySize) {this.chatClient = builder.defaultSystem(systemPrompt).build();this.systemPrompt = systemPrompt;this.maxHistorySize = maxHistorySize;initializeChatHistory();}/*** 初始化聊天历史,添加系统消息*/private void initializeChatHistory() {historyLock.lock();try {chatHistory.clear();chatHistory.add(new SystemMessage(systemPrompt));log.info("聊天历史已初始化,系统提示: {}", systemPrompt);} finally {historyLock.unlock();}}/*** 处理聊天请求* @param userInput 用户输入内容* @return AI响应内容*/public String chat(String userInput) {if (userInput == null || userInput.trim().isEmpty()) {throw new ChatException("输入内容不能为空");}try {String processedInput = userInput.trim();log.info("收到用户输入: {}", processedInput);// 添加用户消息到历史记录UserMessage userMessage = new UserMessage(processedInput);addToHistory(userMessage);// 检查历史记录大小,超过限制则清理trimHistoryIfNeeded();// 创建提示并获取响应(直接使用框架Message列表)Prompt prompt = new Prompt(new ArrayList<>(getFrameworkChatHistory()));log.info("发送请求到AI模型,历史消息数量: {}", prompt.getInstructions().size());String responseContent = chatClient.prompt(prompt).call().chatResponse().getResult().getOutput().getContent();// 处理空响应if (responseContent == null || responseContent.trim().isEmpty()) {responseContent = "抱歉,未能生成有效响应,请尝试重新提问。";log.warn("AI返回空响应,使用默认回复");}// 添加助手响应到历史记录addToHistory(new AssistantMessage(responseContent));log.info("AI响应处理完成,响应长度: {}", responseContent.length());return responseContent;} catch (Exception e) {log.error("处理聊天请求失败", e);throw new ChatException("处理聊天请求失败: " + e.getMessage(), e);}}/*** 获取前端需要的聊天历史(不含系统消息)* @return 聊天历史列表*/public List<ChatMessage> getChatHistory() {historyLock.lock();try {return chatHistory.stream().skip(1) // 跳过系统消息.map(message -> {String role = message instanceof UserMessage ? "user" : "assistant";return new ChatMessage(role, message.getContent());}).collect(Collectors.toList());} finally {historyLock.unlock();}}/*** 获取框架需要的完整聊天历史(包含系统消息)* @return 框架消息列表*/private List<Message> getFrameworkChatHistory() {historyLock.lock();try {return new ArrayList<>(chatHistory);} finally {historyLock.unlock();}}/*** 清除聊天历史*/public void clearHistory() {initializeChatHistory();log.info("聊天历史已清除");}/*** 添加消息到历史记录*/private void addToHistory(Message message) {historyLock.lock();try {chatHistory.add(message);log.debug("添加消息到历史,角色: {}, 内容长度: {}",message.getClass().getSimpleName(),message.getContent().length());} finally {historyLock.unlock();}}/*** 如果历史记录超过最大限制,清理部分历史*/private void trimHistoryIfNeeded() {historyLock.lock();try {// 保留系统消息,只清理用户和助手的消息if (chatHistory.size() > maxHistorySize) {int messagesToRemove = chatHistory.size() - maxHistorySize;for (int i = 0; i < messagesToRemove; i++) {chatHistory.remove(1); // 从索引1开始删除(保留系统消息)}log.info("聊天历史已修剪,移除了 {} 条消息,当前大小: {}",messagesToRemove, chatHistory.size());}} finally {historyLock.unlock();}}
}
OpenAIClient:这是Spring AI提供的客户端,用于与OpenAI API进行交互。ChatRequest:这是发送给AI的请求对象,包含用户的消息。ChatResponse:这是从AI返回的响应对象,包含AI的回复。
2. ChatController.java
ChatController.java 是项目的控制器类,负责处理HTTP请求和响应。以下是代码的关键部分:
package com.example.chatbot.controller;import com.example.chatbot.model.ChatMessage;
import com.example.chatbot.service.ChatService;
import org.springframework.beans.factory.annotation.Autowired;
import org.springframework.http.ResponseEntity;
import org.springframework.web.bind.annotation.*;import java.util.List;
import java.util.Map;@RestController
@RequestMapping("/api/chat")
public class ChatController {private final ChatService chatService;@Autowiredpublic ChatController(ChatService chatService) {this.chatService = chatService;}@PostMappingpublic ResponseEntity<ChatMessage> chat(@RequestBody Map<String, String> request) {String userMessage = request.get("message");String response = chatService.chat(userMessage);return ResponseEntity.ok(new ChatMessage("assistant", response));}@GetMapping("/history")public ResponseEntity<List<ChatMessage>> getChatHistory() {return ResponseEntity.ok(chatService.getChatHistory());}@PostMapping("/clear")public ResponseEntity<Void> clearHistory() {chatService.clearHistory();return ResponseEntity.ok().build();}
}@PostMapping:处理发送聊天消息的POST请求。@GetMapping("/history"):处理获取聊天历史的GET请求。@PostMapping("/clear"):处理清除聊天历史的POST请求。
3. index.html
index.html 是项目的前端页面,提供了一个响应式的Web界面,用户可以通过这个界面与AI进行交互。以下是代码的关键部分:
<!DOCTYPE html>
<html xmlns:th="http://www.thymeleaf.org">
<head><meta charset="UTF-8"><meta name="viewport" content="width=device-width, initial-scale=1.0"><title>AI 聊天助手</title><!-- 引入Tailwind CSS --><script src="https://cdn.tailwindcss.com"></script><!-- 引入Font Awesome --><link href="https://cdn.jsdelivr.net/npm/font-awesome@4.7.0/css/font-awesome.min.css" rel="stylesheet"><!-- 配置Tailwind自定义颜色和字体 --><script>tailwind.config = {theme: {extend: {colors: {primary: '#3B82F6',secondary: '#10B981',neutral: '#F3F4F6',dark: '#1F2937',light: '#F9FAFB'},fontFamily: {inter: ['Inter', 'system-ui', 'sans-serif'],},}}}</script><style type="text/tailwindcss">@layer utilities {.content-auto {content-visibility: auto;}.message-appear {animation: fadeIn 0.3s ease-out forwards;}.typing-pulse span {animation: pulse 1.4s infinite ease-in-out both;}.typing-pulse span:nth-child(1) { animation-delay: -0.32s; }.typing-pulse span:nth-child(2) { animation-delay: -0.16s; }}@keyframes fadeIn {from { opacity: 0; transform: translateY(10px); }to { opacity: 1; transform: translateY(0); }}@keyframes pulse {0%, 80%, 100% { transform: scale(0); }40% { transform: scale(1); }}</style>
</head>
<body class="font-inter bg-gradient-to-br from-light to-neutral min-h-screen flex flex-col">
<!-- 顶部导航栏 -->
<header class="bg-white shadow-md py-4 px-6 sticky top-0 z-10"><div class="max-w-4xl mx-auto flex items-center justify-between"><div class="flex items-center gap-2"><i class="fa fa-comments text-primary text-2xl"></i><h1 class="text-[clamp(1.25rem,3vw,1.75rem)] font-bold text-dark">AI 聊天助手</h1></div><div class="text-sm text-gray-500"><span class="flex items-center gap-1"><span class="h-2 w-2 bg-green-500 rounded-full animate-pulse"></span>在线</span></div></div>
</header><!-- 主内容区 -->
<main class="flex-grow flex flex-col max-w-4xl w-full mx-auto w-full px-4 py-6 md:py-8"><!-- 聊天容器 --><div class="chat-container bg-white rounded-2xl shadow-lg p-4 md:p-6 h-[70vh] overflow-y-auto mb-6"><div th:each="message : ${chatHistory}"><div th:class="${message.role == 'user' ? 'message user-message' : 'message assistant-message'}"th:utext="${#strings.replace(#strings.escapeXml(message.content), ' ', '<br/>')}"></div></div><!-- 输入指示器 --><div class="message assistant-message typing opacity-0" id="typing-indicator"><div class="flex items-center gap-2"><div class="w-2 h-2 bg-gray-400 rounded-full typing-pulse"><span class="absolute w-2 h-2 bg-gray-400 rounded-full"></span><span class="absolute w-2 h-2 bg-gray-400 rounded-full ml-3"></span><span class="absolute w-2 h-2 bg-gray-400 rounded-full ml-6"></span></div><span>正在思考...</span></div></div></div><!-- 输入区域 --><div class="input-container bg-white rounded-2xl shadow-md p-3 flex gap-3"><inputtype="text"id="user-input"placeholder="输入你的问题..."autocomplete="off"class="flex-grow px-4 py-3 rounded-xl border border-gray-200 focus:border-primary focus:ring-2 focus:ring-primary/20 outline-none transition-all"><button id="send-btn" class="bg-primary hover:bg-primary/90 text-white p-3 rounded-xl transition-all shadow-md hover:shadow-lg flex items-center justify-center"><i class="fa fa-paper-plane"></i></button><button id="clear-btn" class="bg-gray-200 hover:bg-gray-300 text-gray-700 p-3 rounded-xl transition-all shadow-sm hover:shadow"><i class="fa fa-trash"></i></button></div>
</main><!-- 页脚 -->
<footer class="py-4 px-6 text-center text-gray-500 text-sm"><p>© 2025 AI 聊天助手 | 提供智能对话服务</p>
</footer><script>document.addEventListener('DOMContentLoaded', function() {const chatContainer = document.querySelector('.chat-container');const userInput = document.getElementById('user-input');const sendBtn = document.getElementById('send-btn');const clearBtn = document.getElementById('clear-btn');const typingIndicator = document.getElementById('typing-indicator');// 滚动到底部function scrollToBottom() {chatContainer.scrollTop = chatContainer.scrollHeight;}// 初始滚动到底部scrollToBottom();// 添加消息到聊天界面function addMessage(content, isUser) {const messageDiv = document.createElement('div');messageDiv.className = `message message-appear ${isUser ? 'user-message' : 'assistant-message'} mb-4 opacity-0`;// 处理代码块格式if (content.includes('```')) {content = content.replace(/```([\s\S]*?)```/g,'<pre class="bg-gray-100 p-3 rounded-lg my-2 overflow-x-auto"><code>$1</code></pre>');}messageDiv.innerHTML = content.replace(/\n/g, '<br/>');chatContainer.appendChild(messageDiv);// 触发动画setTimeout(() => {messageDiv.classList.remove('opacity-0');}, 10);scrollToBottom();}// 发送消息function sendMessage() {const message = userInput.value.trim();if (message === '') return;// 添加用户消息addMessage(message, true);userInput.value = '';// 显示正在输入指示器typingIndicator.style.display = 'block';setTimeout(() => {typingIndicator.classList.remove('opacity-0');}, 10);scrollToBottom();// 发送请求到服务器fetch('/api/chat', {method: 'POST',headers: {'Content-Type': 'application/json'},body: JSON.stringify({ message: message })}).then(response => response.json()).then(data => {// 隐藏正在输入指示器typingIndicator.classList.add('opacity-0');setTimeout(() => {typingIndicator.style.display = 'none';}, 300);// 添加AI响应addMessage(data.content, false);}).catch(error => {console.error('Error:', error);typingIndicator.classList.add('opacity-0');setTimeout(() => {typingIndicator.style.display = 'none';}, 300);addMessage('发生错误,请重试。', false);});}// 清除聊天历史function clearChat() {fetch('/api/chat/clear', {method: 'POST'}).then(() => {// 清除聊天界面const messages = chatContainer.querySelectorAll('.message:not(.typing)');messages.forEach(msg => {msg.classList.add('opacity-0');setTimeout(() => msg.remove(), 300);});}).catch(error => {console.error('Error:', error);});}// 事件监听器sendBtn.addEventListener('click', sendMessage);clearBtn.addEventListener('click', clearChat);userInput.addEventListener('keypress', function(e) {if (e.key === 'Enter') {sendMessage();}});// 样式定义const style = document.createElement('style');style.textContent = `.user-message {background-color: #3B82F6;color: white;margin-left: auto;border-radius: 18px 18px 4px 18px;padding: 12px 18px;max-width: 75%;word-wrap: break-word;box-shadow: 0 2px 4px rgba(59, 130, 246, 0.2);}.assistant-message {background-color: #F3F4F6;color: #1F2937;margin-right: auto;border-radius: 18px 18px 18px 4px;padding: 12px 18px;max-width: 75%;word-wrap: break-word;box-shadow: 0 2px 4px rgba(0, 0, 0, 0.05);}pre {font-family: 'Consolas', 'Monaco', monospace;}.chat-container::-webkit-scrollbar {width: 6px;}.chat-container::-webkit-scrollbar-track {background: #f1f1f1;border-radius: 10px;}.chat-container::-webkit-scrollbar-thumb {background: #c1c1c1;border-radius: 10px;}.chat-container::-webkit-scrollbar-thumb:hover {background: #a8a8a8;}`;document.head.appendChild(style);});</script>
</body>
</html>chat-container:聊天界面的容器。chat-history:显示聊天历史的区域。chat-input:用户输入消息的输入框。send-button:发送消息的按钮。
4. scripts.js
scripts.js 是前端的JavaScript脚本,负责处理用户输入和与后端API的交互。以下是代码的关键部分:
document.getElementById('send-button').addEventListener('click', function() {const message = document.getElementById('chat-input').value;if (message) {fetch('/api/chat', {method: 'POST',headers: {'Content-Type': 'application/json'},body: JSON.stringify({ message: message })}).then(response => response.json()).then(data => {const chatHistory = document.getElementById('chat-history');chatHistory.innerHTML += `<p><strong>User:</strong> ${message}</p>`;chatHistory.innerHTML += `<p><strong>AI:</strong> ${data.choices[0].message.content}</p>`;document.getElementById('chat-input').value = '';});}
});
fetch:发送POST请求到后端API。response.json():解析返回的JSON数据。innerHTML:将聊天内容动态显示到页面上。
自定义项目
你可以通过修改以下文件来自定义聊天助手的行为:
ChatService.java:修改系统提示信息和聊天逻辑。index.html:自定义Web界面。application.yml:调整模型参数和API设置。
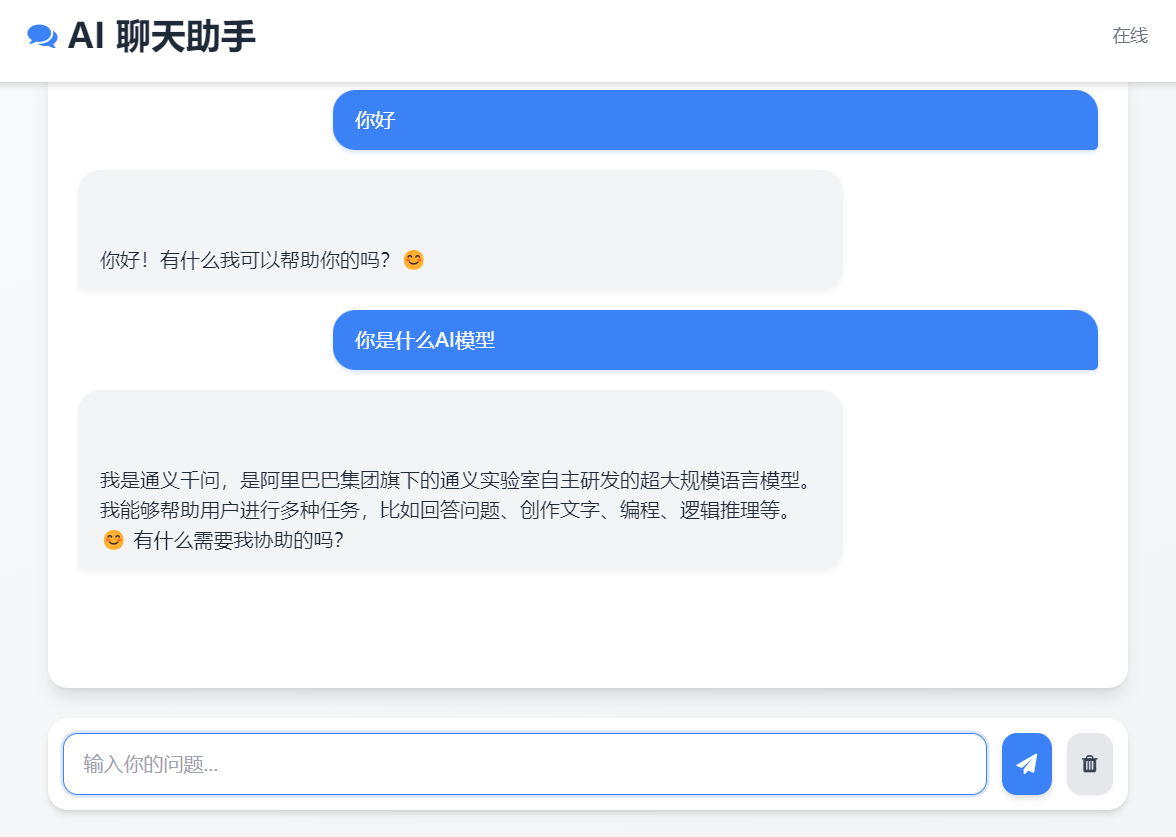
项目截图
以下是项目运行的截图:
总结
通过腾讯云CodeBuddy,我们快速搭建了一个基于Spring Boot和OpenAI API的AI聊天助手项目。这个项目不仅具备强大的功能,还提供了灵活的自定义选项。希望这篇文章能帮助你更好地理解和使用腾讯云CodeBuddy进行项目开发。
如果你有任何问题或建议,欢迎在评论区留言。让我们一起探索更多有趣的技术项目!
:数组 “扁平化 + 映射” 的高效组合拳)

)
)

)


)

)


