新增员工
需求分析和设计
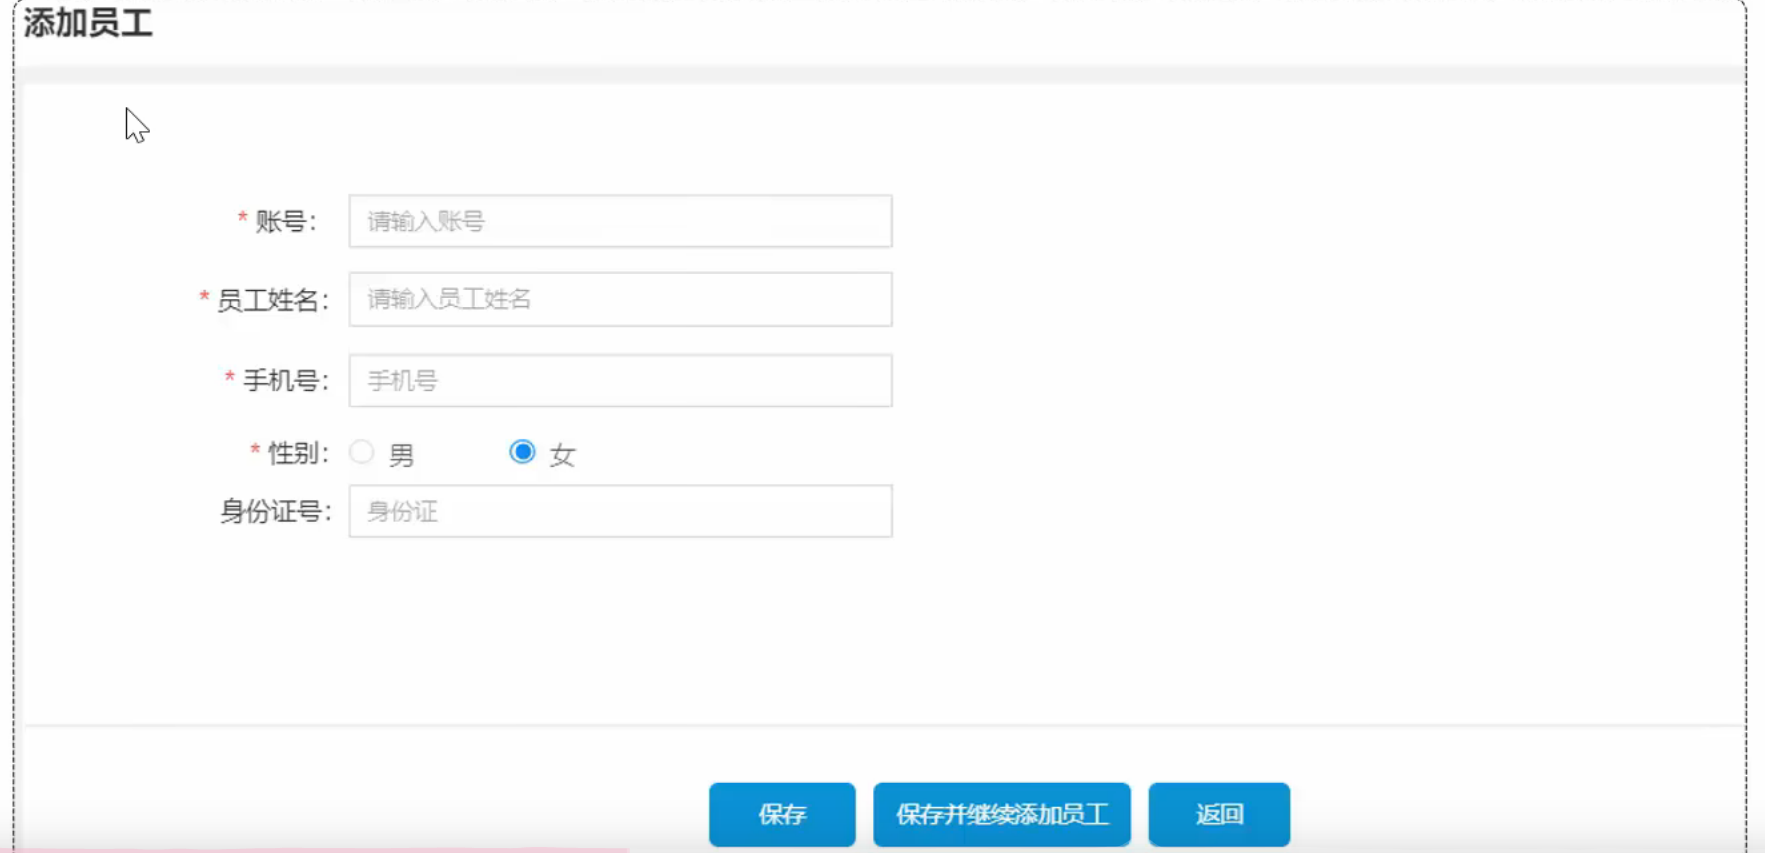
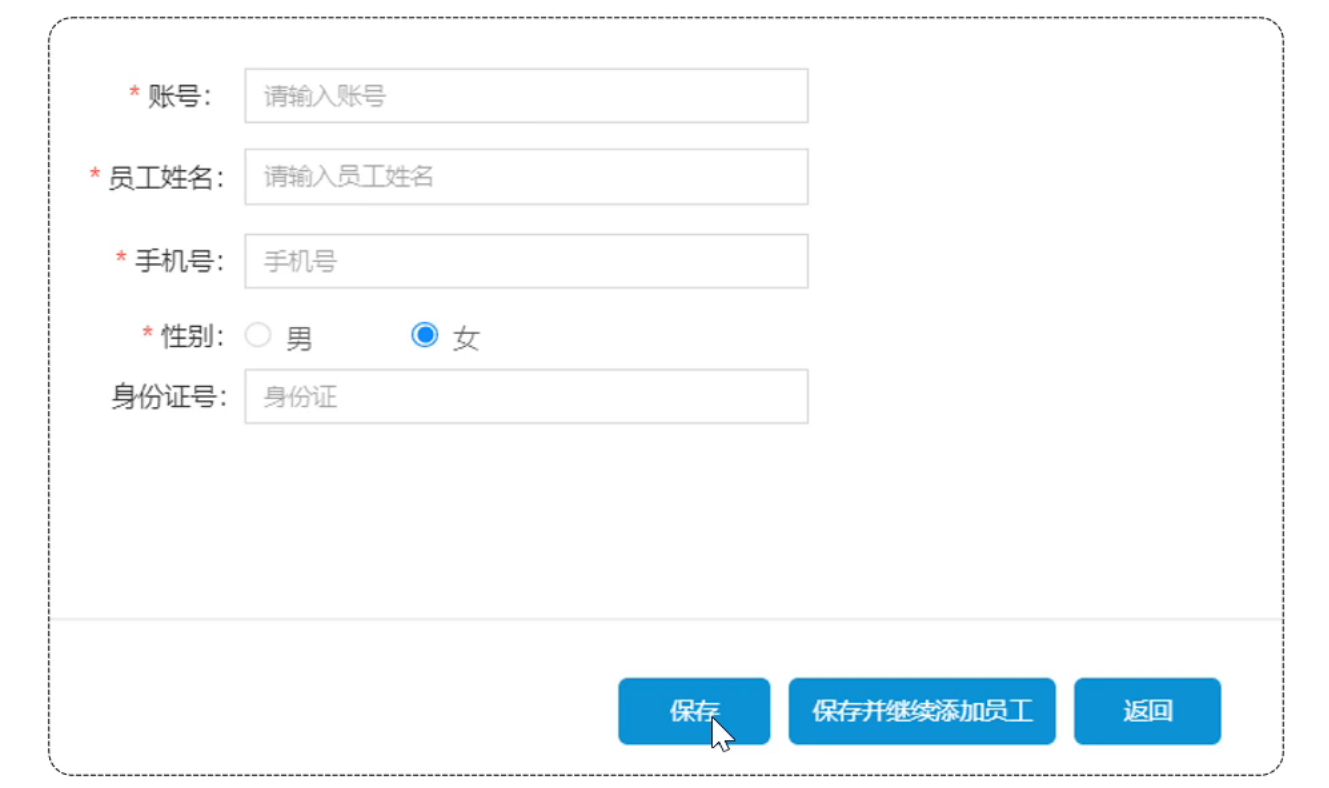
产品原型:
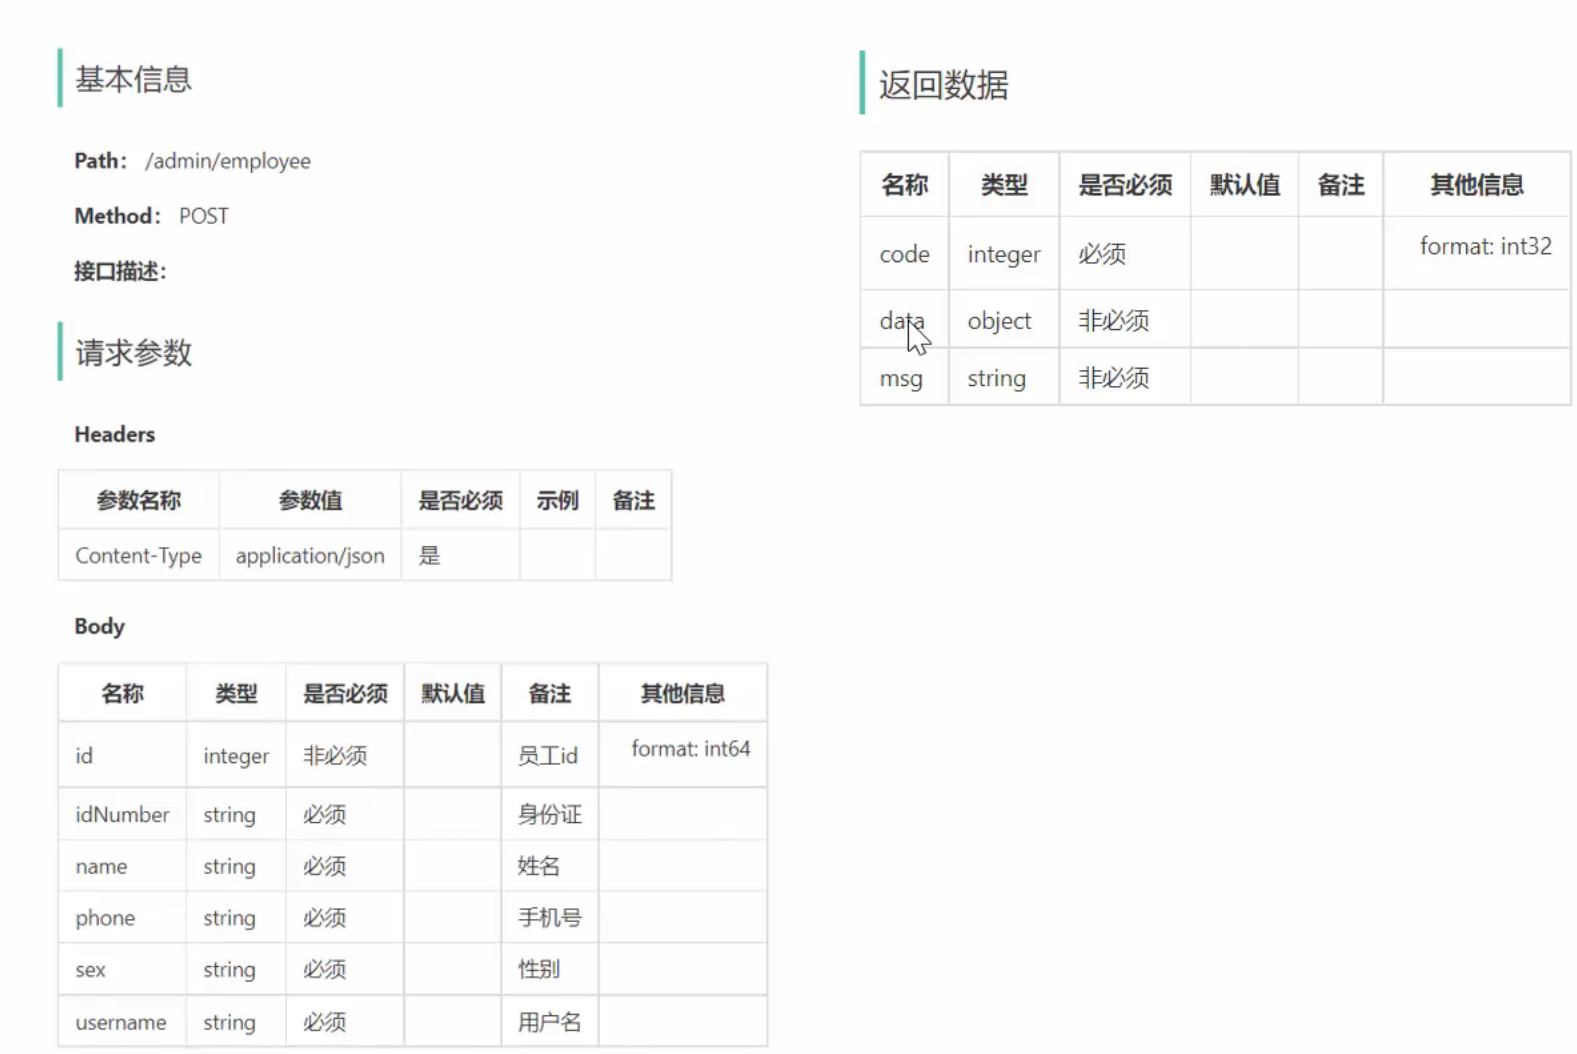
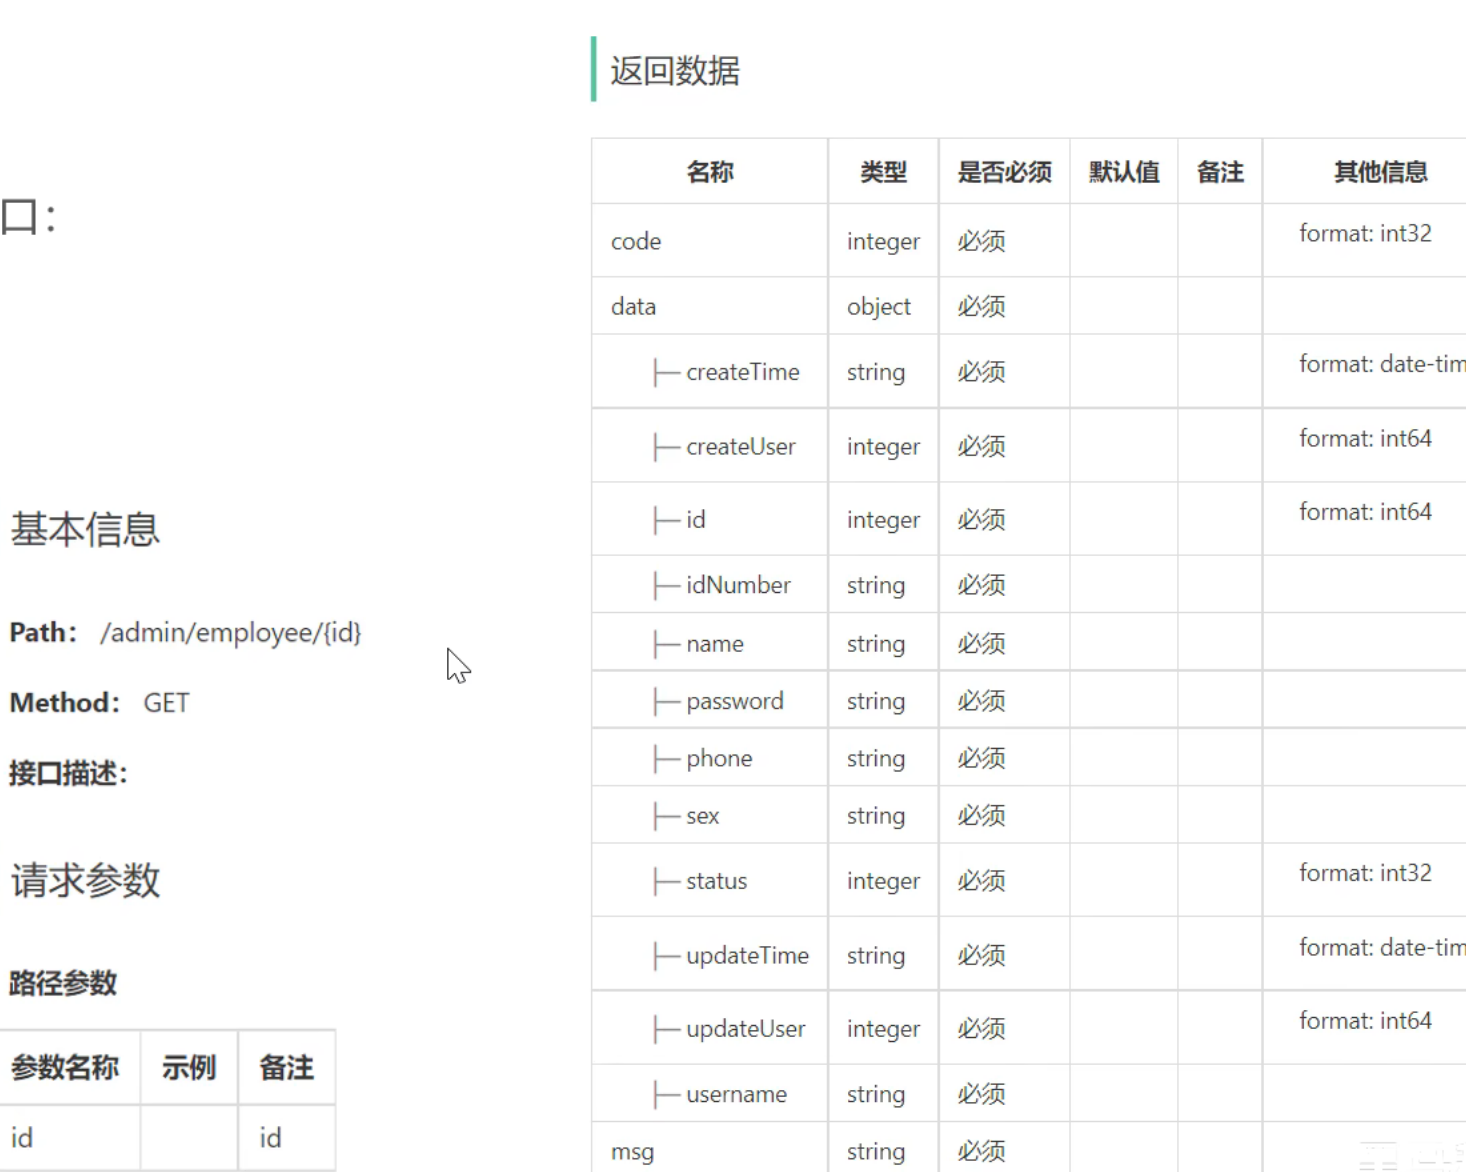
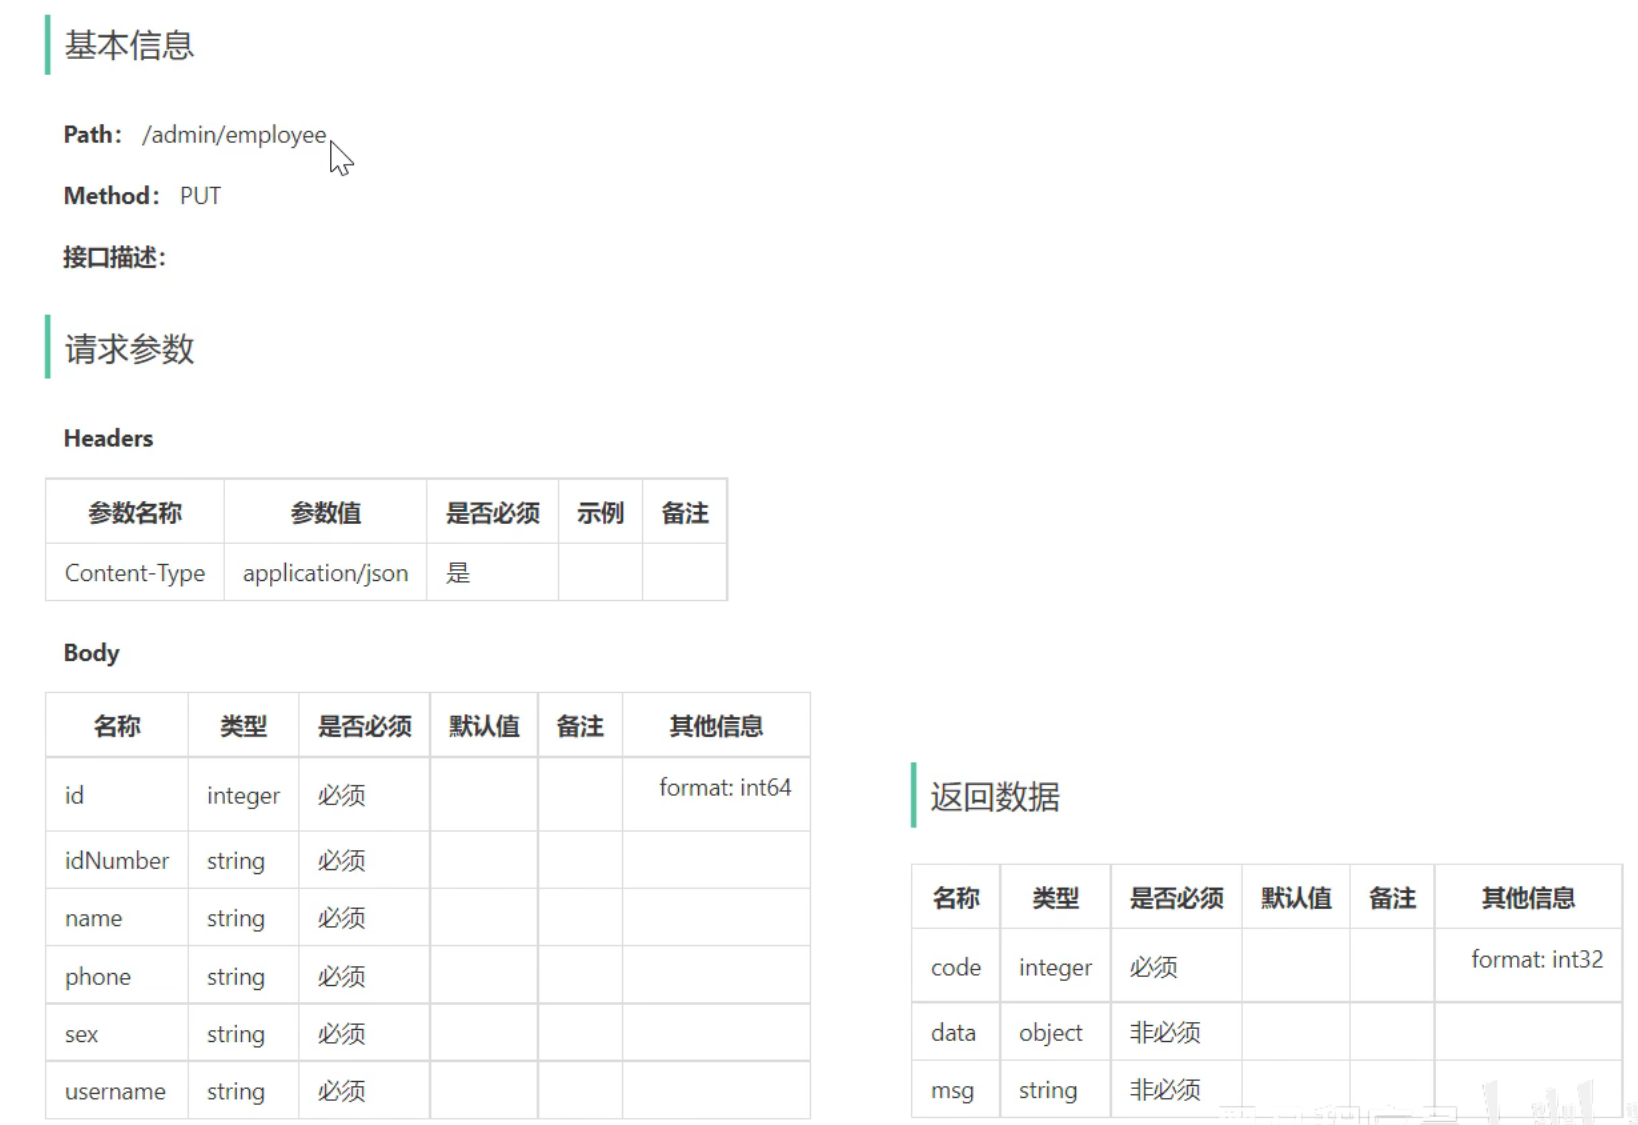
接口设计:
本项目约定:
管理端发出的请求,统一使用 /admin 作为前缀
用户端发出的请求,统一使用 /user 作为前缀
数据库表设计:

代码开发
根据新增员工接口设计对应的 DTO:
package com.sky.dto;import lombok.Data;import java.io.Serializable;@Data
public class EmployeeDTO implements Serializable {private Long id;private String username;private String name;private String phone;private String sex;private String idNumber;}
@PostMapping@ApiOperation("新增员工")public Result save(@RequestBody EmployeeDTO employeeDTO){log.info("新增了员工: {}", employeeDTO);employeeService.save(employeeDTO);return Result.success();}
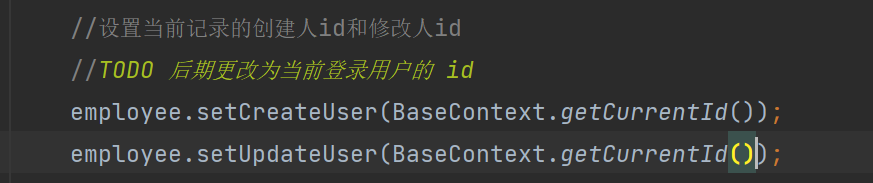
@Overridepublic void save(EmployeeDTO employeeDTO) {Employee employee = new Employee();//对象属性拷贝BeanUtils.copyProperties(employeeDTO,employee);//设置账号状态,默认正常状态,1表示正常,0表示锁定employee.setStatus(StatusConstant.ENABLE);//设置加密后的密码employee.setPassword(DigestUtils.md5DigestAsHex(PasswordConstant.DEFAULT_PASSWORD.getBytes()));//设置当前记录的创建时间employee.setUpdateTime(LocalDateTime.now());employee.setCreateTime(LocalDateTime.now());//设置当前记录的创建人id和修改人id//TODO 后期更改为当前登录用户的 idemployee.setCreateUser(10L);employee.setUpdateUser(10L);log.info("新增了员工: {}", employee);employeeMapper.save(employee);}
    @Insert("insert into sky_take_out.employee (name, username, password, phone, sex, id_number, status, create_time, update_time, create_user, update_user) " +"values (#{name},#{username},#{password},#{phone},#{sex},#{idNumber},#{status},#{createTime},#{updateTime},#{createUser},#{updateUser})")void save(Employee employee);
}
功能测试
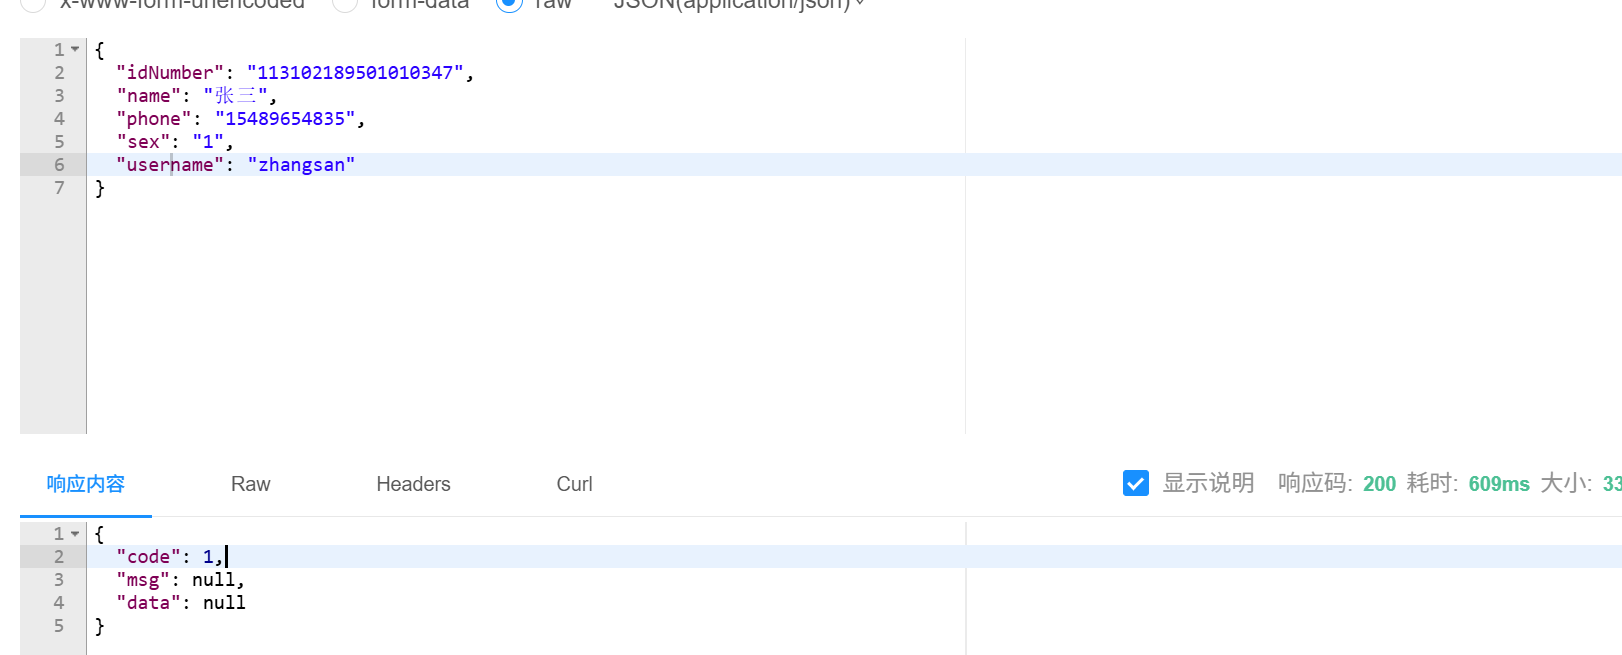
功能测试方法:
通过接口文档测试
通过前后端联调测试
注意:由于开发阶段前端和后端是并行开发的,后端完成某个功能后,此时前端对应的功能可能还没有开发完成,导致无法进行前后端联调测试,所以在开发阶段,后端测试主要以接口文档测试为主。
代码完善
程序存在的问题:
录入的用户名已存在,抛出异常后没有处理
新增员工时,创建人 id 和 修改人 id 设置了固定值
先在全局异常处理类中完成第一个问题
![]()
    @ExceptionHandlerpublic Result exceptionHandler(BaseException ex){log.error("异常信息:{}", ex.getMessage());return Result.error(ex.getMessage());}@ExceptionHandlerpublic Result exceptionHandler(SQLIntegrityConstraintViolationException ex){// Duplicate entry 'zhangsan' for key 'employee.idx_username'String message = ex.getMessage();if(message.contains("Duplicate entry")){String[] split = message.split(" ");String username = split[2];String msg = username + MessageConstant.ALREADY_EXISTS;return Result.error(msg);}else{return Result.error(MessageConstant.UNKNOWN_ERROR);}}
}
这里用到了方法重载
针对第二个问题,需要通过某种方式动态获取当前登录员工的 id
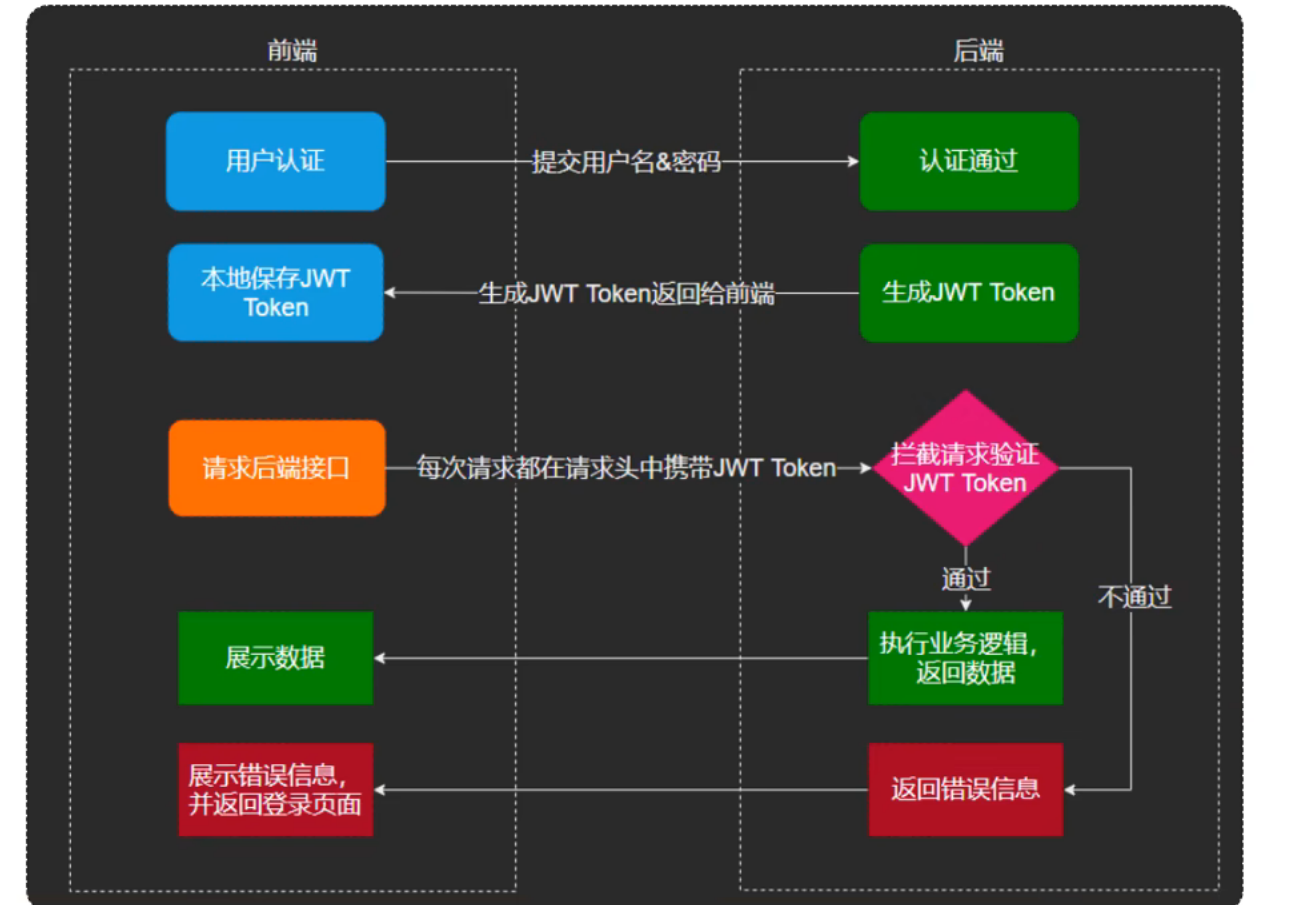
当登录成功时,我们的 id 就已经在 claims 里面了,所以如果我们想反向拿出来也是可以办到的

package com.sky.interceptor;import com.sky.constant.JwtClaimsConstant;
import com.sky.properties.JwtProperties;
import com.sky.utils.JwtUtil;
import io.jsonwebtoken.Claims;
import lombok.extern.slf4j.Slf4j;
import org.springframework.beans.factory.annotation.Autowired;
import org.springframework.stereotype.Component;
import org.springframework.web.method.HandlerMethod;
import org.springframework.web.servlet.HandlerInterceptor;
import javax.servlet.http.HttpServletRequest;
import javax.servlet.http.HttpServletResponse;/*** jwt令牌校验的拦截器*/
@Component
@Slf4j
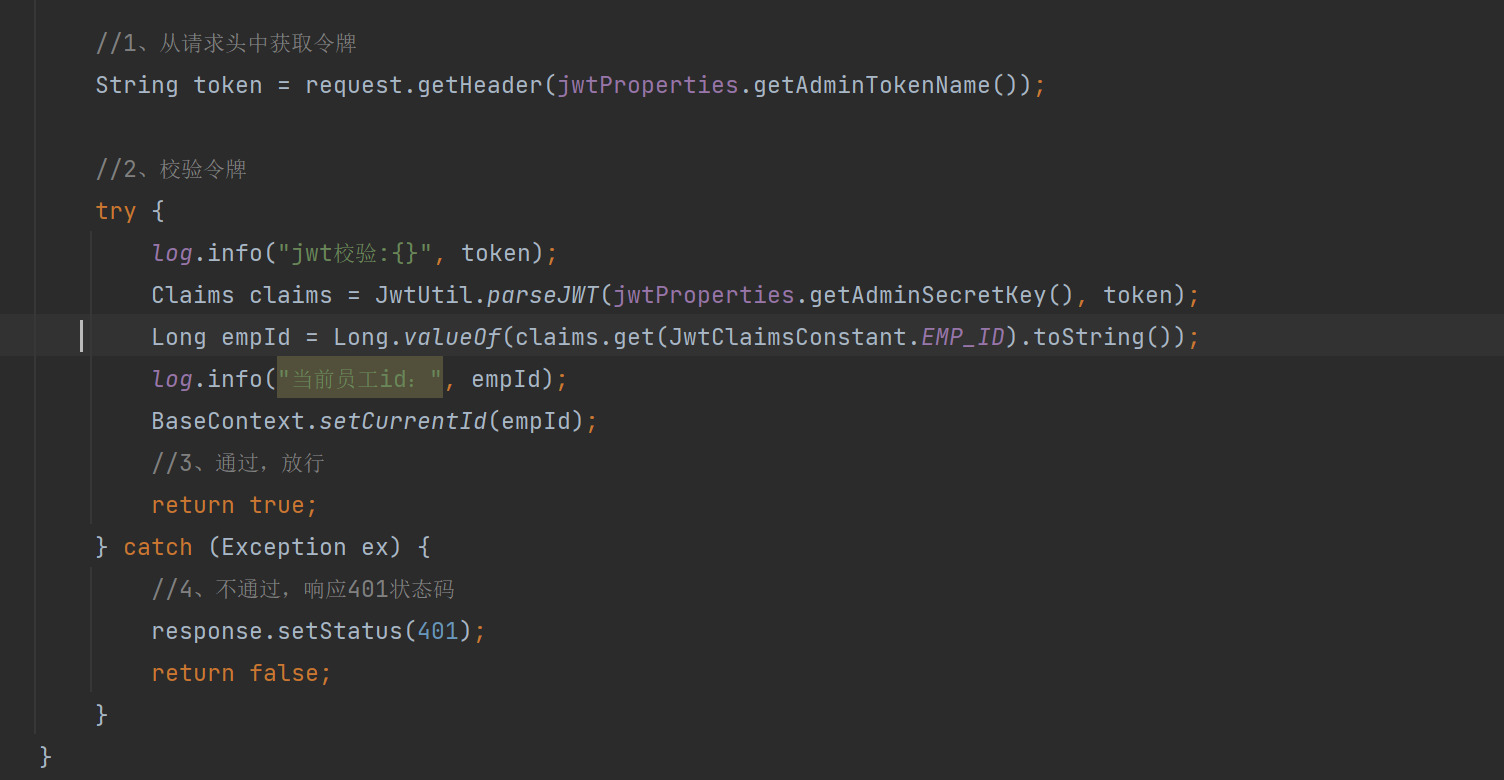
public class JwtTokenAdminInterceptor implements HandlerInterceptor {@Autowiredprivate JwtProperties jwtProperties;/*** 校验jwt** @param request* @param response* @param handler* @return* @throws Exception*/public boolean preHandle(HttpServletRequest request, HttpServletResponse response, Object handler) throws Exception {//判断当前拦截到的是Controller的方法还是其他资源if (!(handler instanceof HandlerMethod)) {//当前拦截到的不是动态方法,直接放行return true;}//1、从请求头中获取令牌String token = request.getHeader(jwtProperties.getAdminTokenName());//2、校验令牌try {log.info("jwt校验:{}", token);Claims claims = JwtUtil.parseJWT(jwtProperties.getAdminSecretKey(), token);Long empId = Long.valueOf(claims.get(JwtClaimsConstant.EMP_ID).toString());log.info("当前员工id:", empId);//3、通过,放行return true;} catch (Exception ex) {//4、不通过,响应401状态码response.setStatus(401);return false;}}
}
注意第48行,就是我们需要的 empId,那么现在的问题就是怎么将这个 id 传给我们的 service
的 save 方法。这里需要用到一个重要的知识 ThreadLocal
ThreadLocal 并不是一个 Thread,而是 Thread 的局部变量。
ThreadLocal 为每一个线程提供单独一份存储空间,具有线程隔离效果,只有在线程内才能获取到对应的值,线程外则不能访问
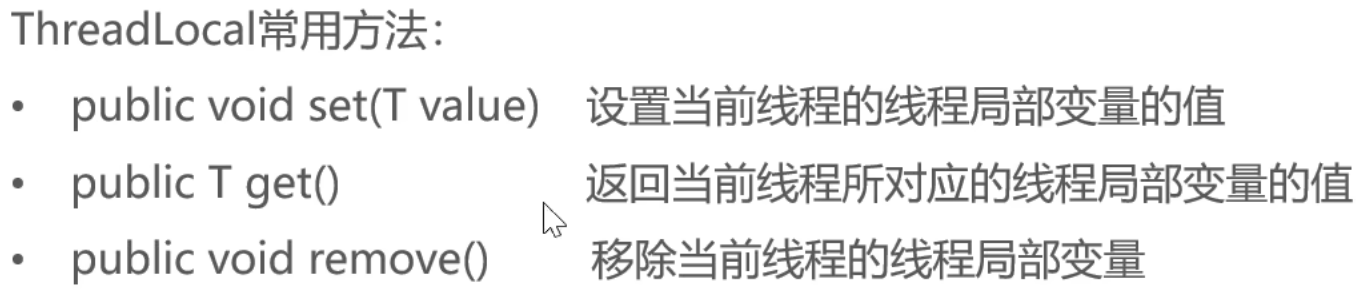
我们需要一个工具类用来调用 ThreadLocal 方法
package com.sky.context;public class BaseContext {public static ThreadLocal<Long> threadLocal = new ThreadLocal<>();public static void setCurrentId(Long id) {threadLocal.set(id);}public static Long getCurrentId() {return threadLocal.get();}public static void removeCurrentId() {threadLocal.remove();}}
然后在校验令牌时取出 empId,,并将他放入 threadlocal
最后要用的时候拿出来
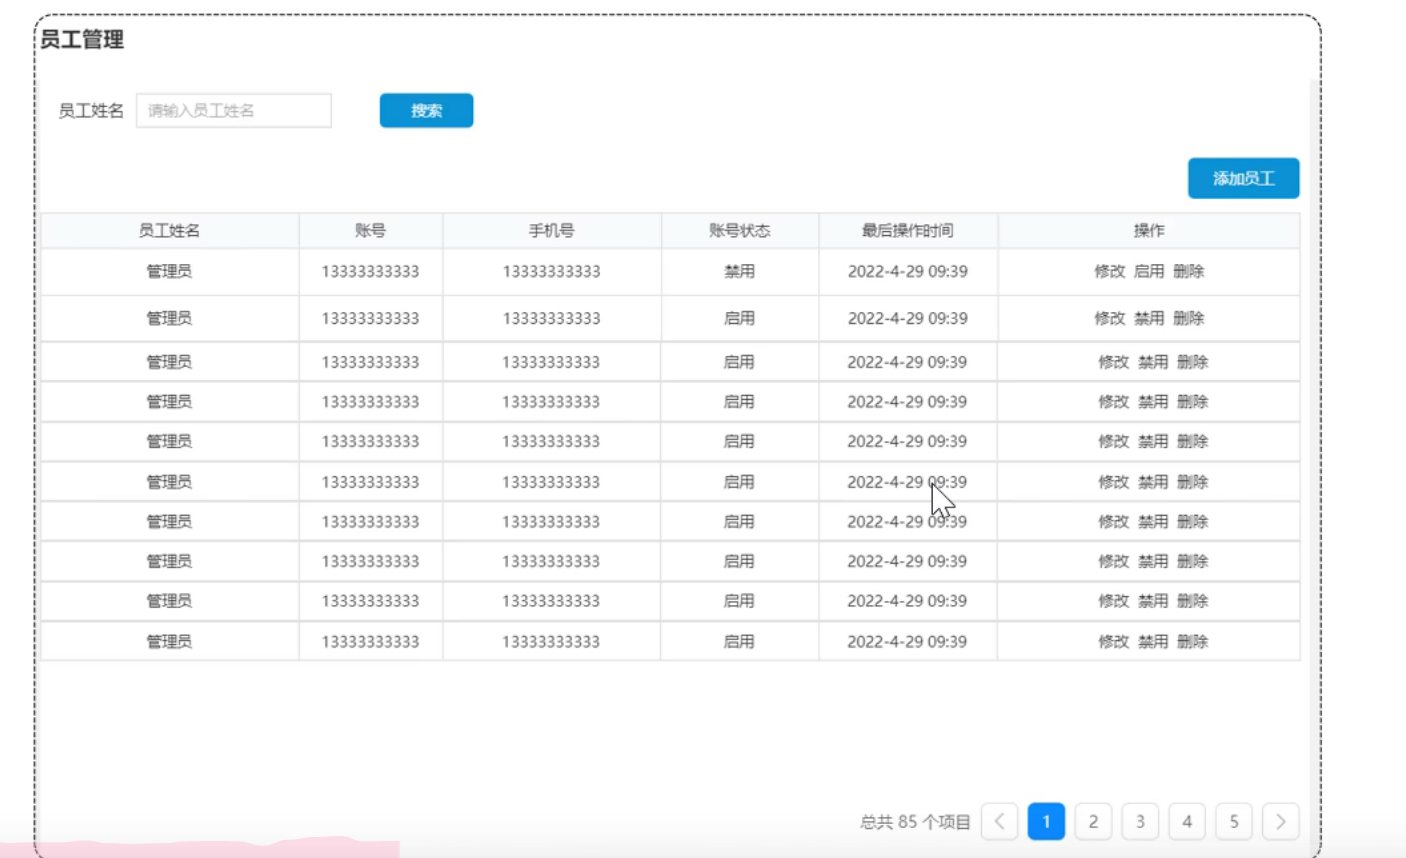
员工分页查询
需求分析和设计
产品原型
接口设计
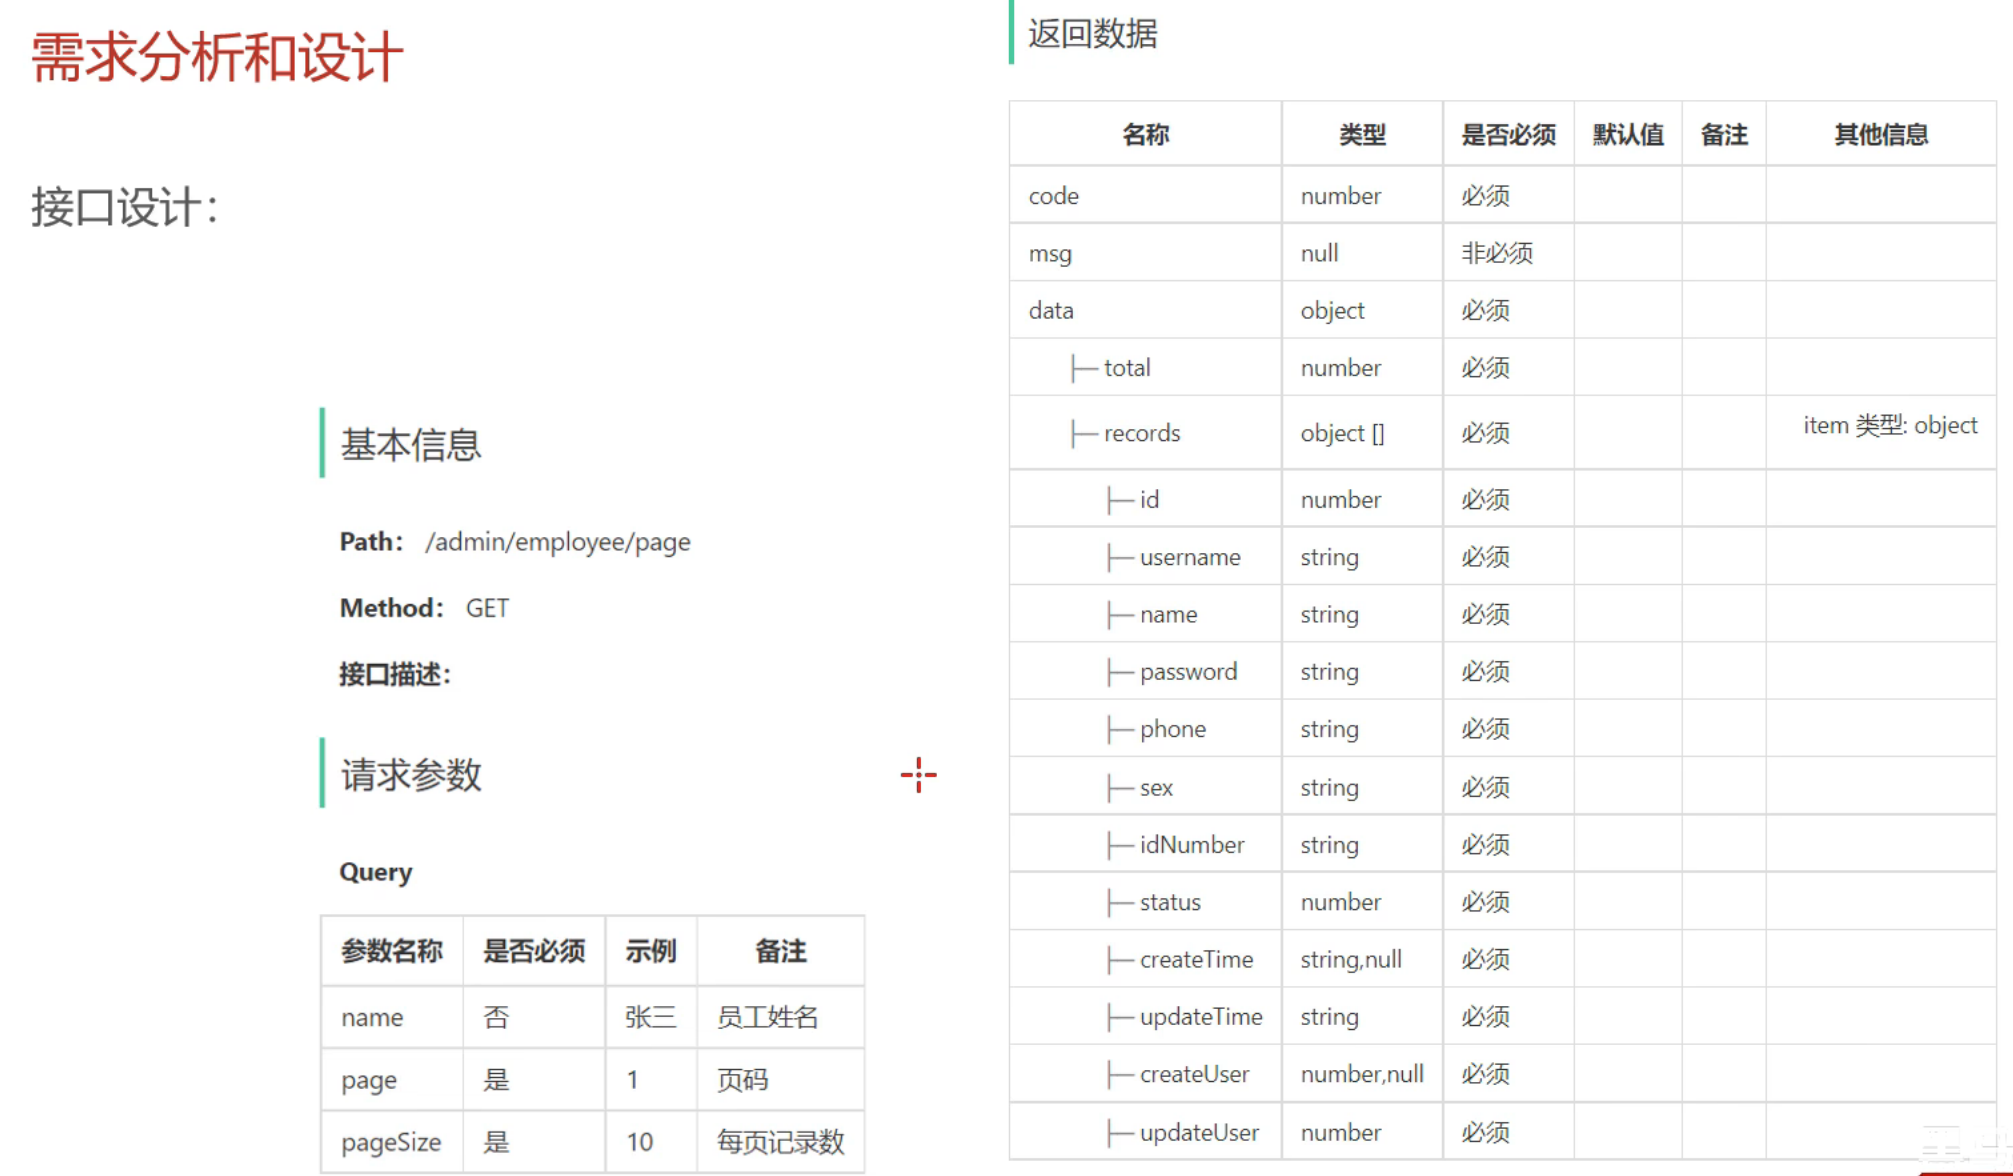
代码开发
和前面新增员工一样,我们需要一个与接口设计相对应的 DTO:
package com.sky.dto;import lombok.Data;import java.io.Serializable;@Data
public class EmployeePageQueryDTO implements Serializable {//员工姓名private String name;//页码private int page;//每页显示记录数private int pageSize;}
@GetMapping("/page")@ApiOperation("分页查询")public Result<PageResult> page(EmployeePageQueryDTO employeePageQueryDTO){log.info("分页查询:{}", employeePageQueryDTO);PageResult pageResult = employeeService.page(employeePageQueryDTO);return Result.success(pageResult);}
@Overridepublic PageResult page(EmployeePageQueryDTO employeePageQueryDTO) {PageHelper.startPage(employeePageQueryDTO.getPage(), employeePageQueryDTO.getPageSize());Page<Employee> page = employeeMapper.pagequery(employeePageQueryDTO);return new PageResult(page.getTotal(), page.getResult());}拓展:PageHelper 的底层时 ThreadLocal 实现的
<select id="pagequery" resultType="com.sky.entity.Employee">select * from sky_take_out.employee<where><if test="name != null and name != ' '">and name like concat('%', #{name}, '%')</if></where></select>功能测试
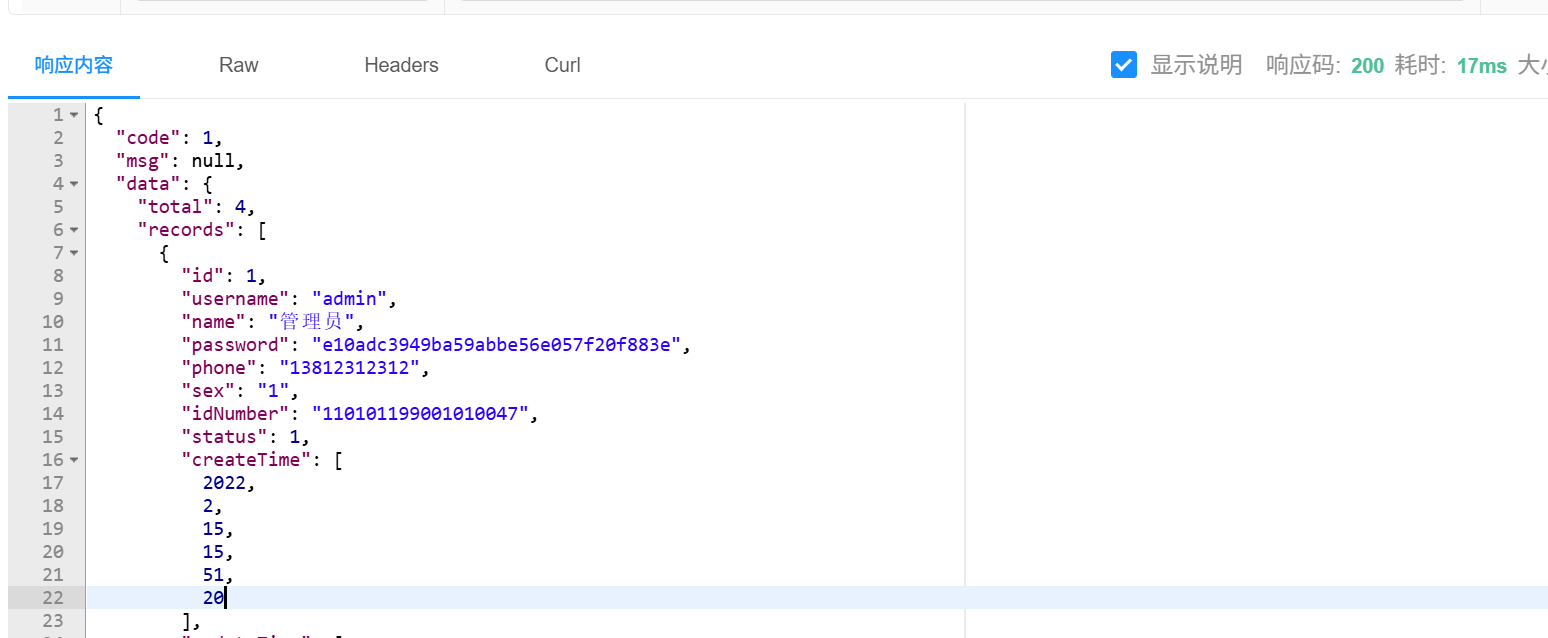
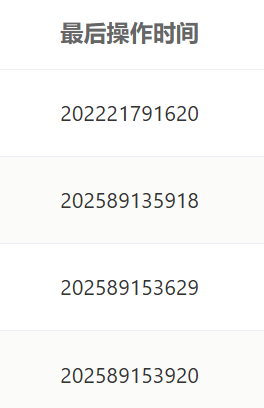
这里会发现日期这边看起来不舒服,接下来完善代码解决这个问题
代码完善
package com.sky.json;import com.fasterxml.jackson.databind.DeserializationFeature;
import com.fasterxml.jackson.databind.ObjectMapper;
import com.fasterxml.jackson.databind.module.SimpleModule;
import com.fasterxml.jackson.datatype.jsr310.deser.LocalDateDeserializer;
import com.fasterxml.jackson.datatype.jsr310.deser.LocalDateTimeDeserializer;
import com.fasterxml.jackson.datatype.jsr310.deser.LocalTimeDeserializer;
import com.fasterxml.jackson.datatype.jsr310.ser.LocalDateSerializer;
import com.fasterxml.jackson.datatype.jsr310.ser.LocalDateTimeSerializer;
import com.fasterxml.jackson.datatype.jsr310.ser.LocalTimeSerializer;import java.time.LocalDate;
import java.time.LocalDateTime;
import java.time.LocalTime;
import java.time.format.DateTimeFormatter;import static com.fasterxml.jackson.databind.DeserializationFeature.FAIL_ON_UNKNOWN_PROPERTIES;/*** 对象映射器:基于jackson将Java对象转为json,或者将json转为Java对象* 将JSON解析为Java对象的过程称为 [从JSON反序列化Java对象]* 从Java对象生成JSON的过程称为 [序列化Java对象到JSON]*/
public class JacksonObjectMapper extends ObjectMapper {public static final String DEFAULT_DATE_FORMAT = "yyyy-MM-dd";//public static final String DEFAULT_DATE_TIME_FORMAT = "yyyy-MM-dd HH:mm:ss";public static final String DEFAULT_DATE_TIME_FORMAT = "yyyy-MM-dd HH:mm";public static final String DEFAULT_TIME_FORMAT = "HH:mm:ss";public JacksonObjectMapper() {super();//收到未知属性时不报异常this.configure(FAIL_ON_UNKNOWN_PROPERTIES, false);//反序列化时,属性不存在的兼容处理this.getDeserializationConfig().withoutFeatures(DeserializationFeature.FAIL_ON_UNKNOWN_PROPERTIES);SimpleModule simpleModule = new SimpleModule().addDeserializer(LocalDateTime.class, new LocalDateTimeDeserializer(DateTimeFormatter.ofPattern(DEFAULT_DATE_TIME_FORMAT))).addDeserializer(LocalDate.class, new LocalDateDeserializer(DateTimeFormatter.ofPattern(DEFAULT_DATE_FORMAT))).addDeserializer(LocalTime.class, new LocalTimeDeserializer(DateTimeFormatter.ofPattern(DEFAULT_TIME_FORMAT))).addSerializer(LocalDateTime.class, new LocalDateTimeSerializer(DateTimeFormatter.ofPattern(DEFAULT_DATE_TIME_FORMAT))).addSerializer(LocalDate.class, new LocalDateSerializer(DateTimeFormatter.ofPattern(DEFAULT_DATE_FORMAT))).addSerializer(LocalTime.class, new LocalTimeSerializer(DateTimeFormatter.ofPattern(DEFAULT_TIME_FORMAT)));//注册功能模块 例如,可以添加自定义序列化器和反序列化器this.registerModule(simpleModule);}
}
解决方式:
方式一:在属性上加入注解,对日期进行格式化 ![]()
方式二:在 WebMvcConfiguration 中拓展 Spring MVC 的消息转换器,统一对日期类型进行 格式化处理
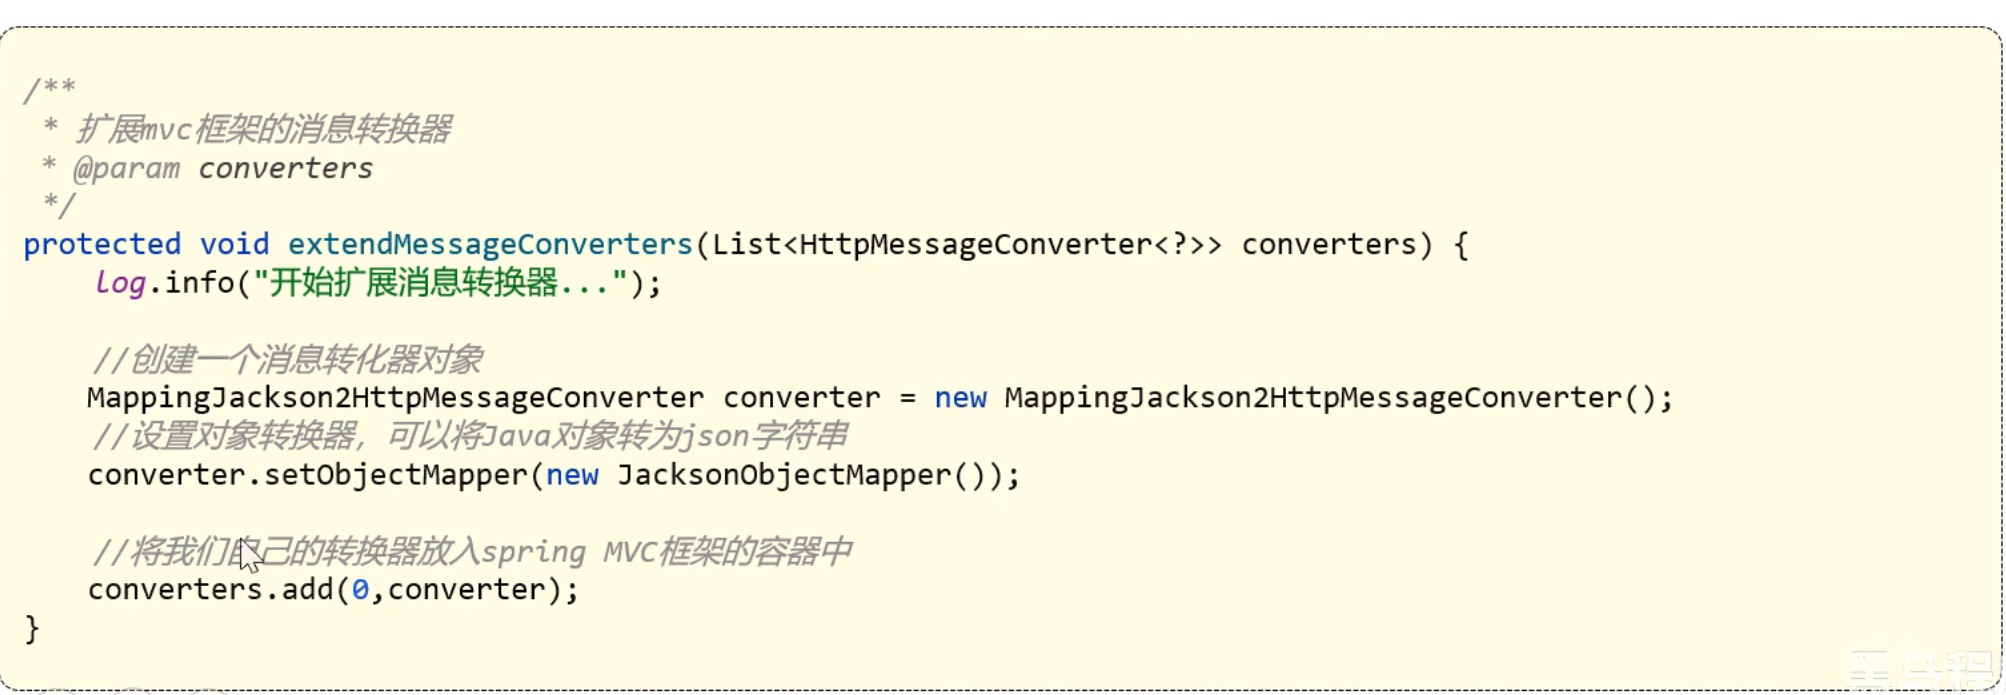
建议使用第二种,这个方法是固定的,是我们这个配置类继承的父类里面就有的
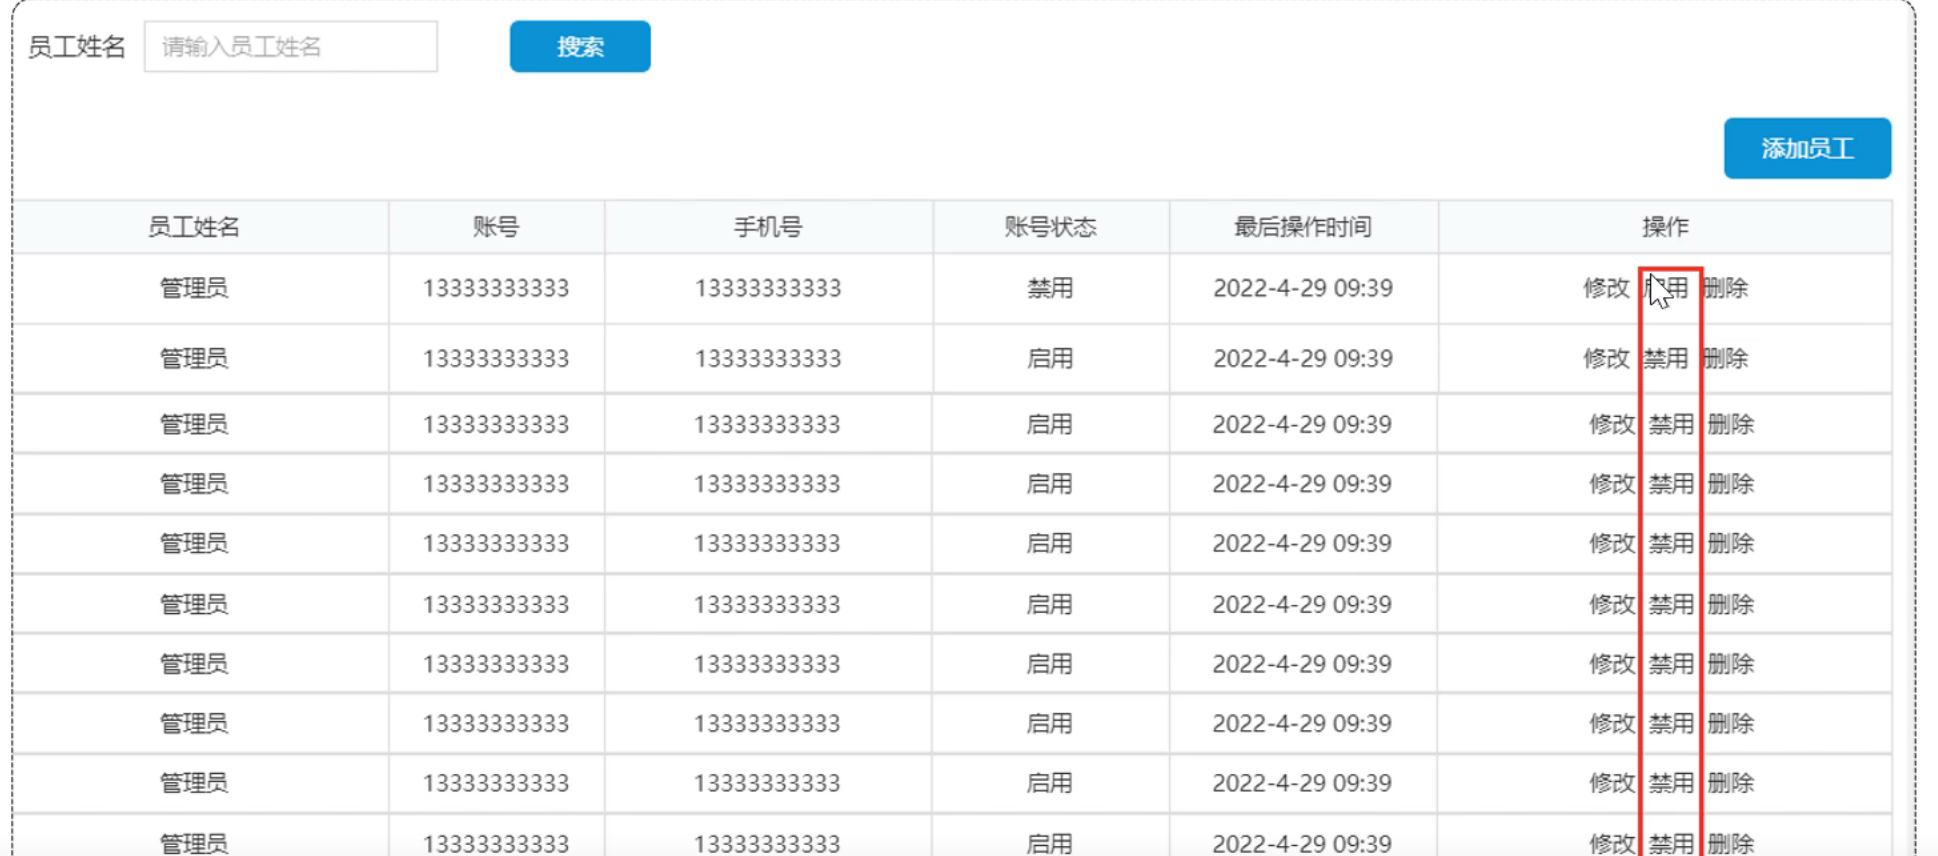
启用禁用员工账号
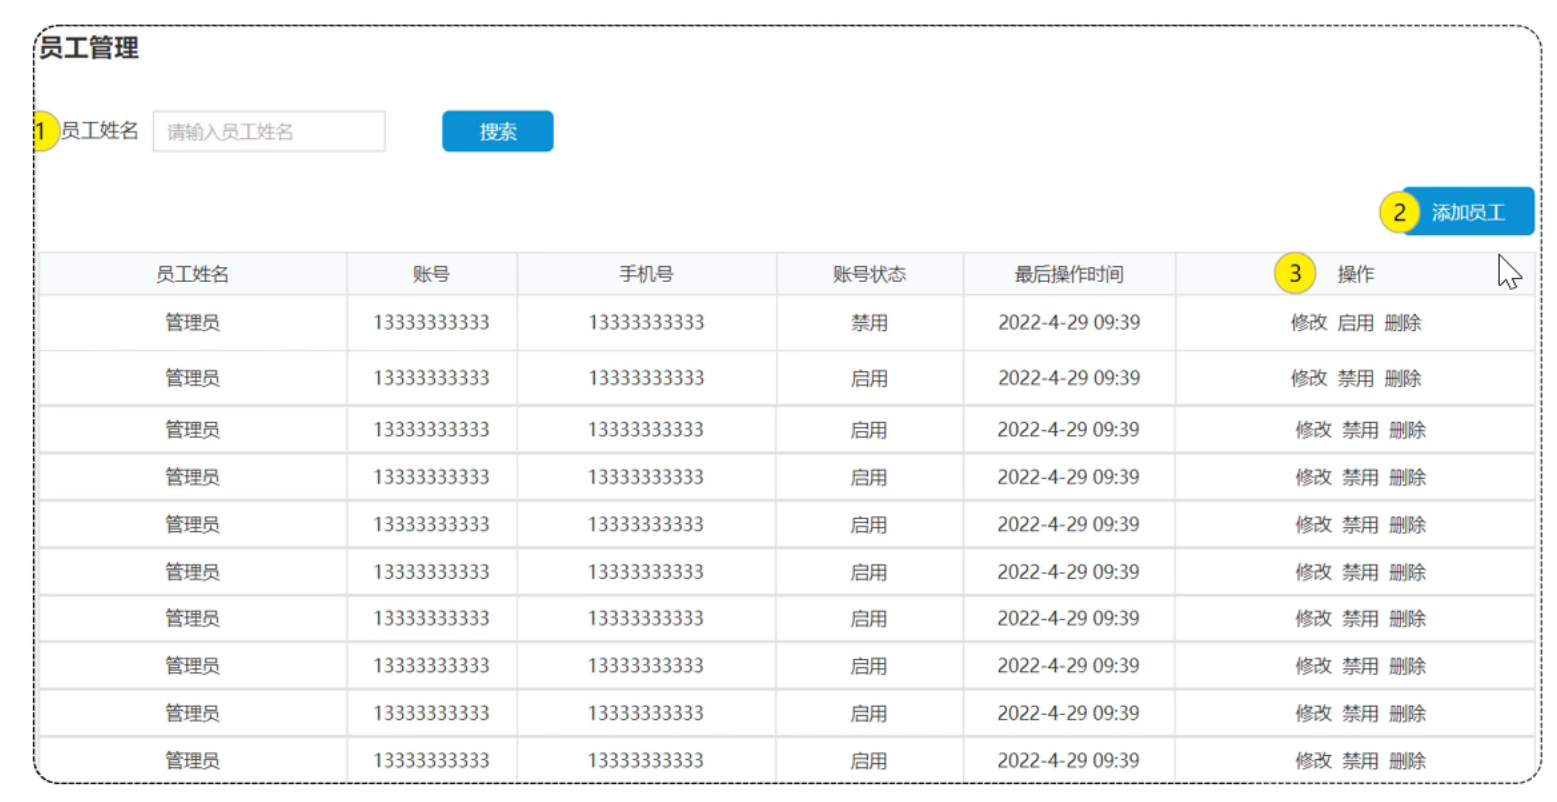
需求分析和设计
产品原型
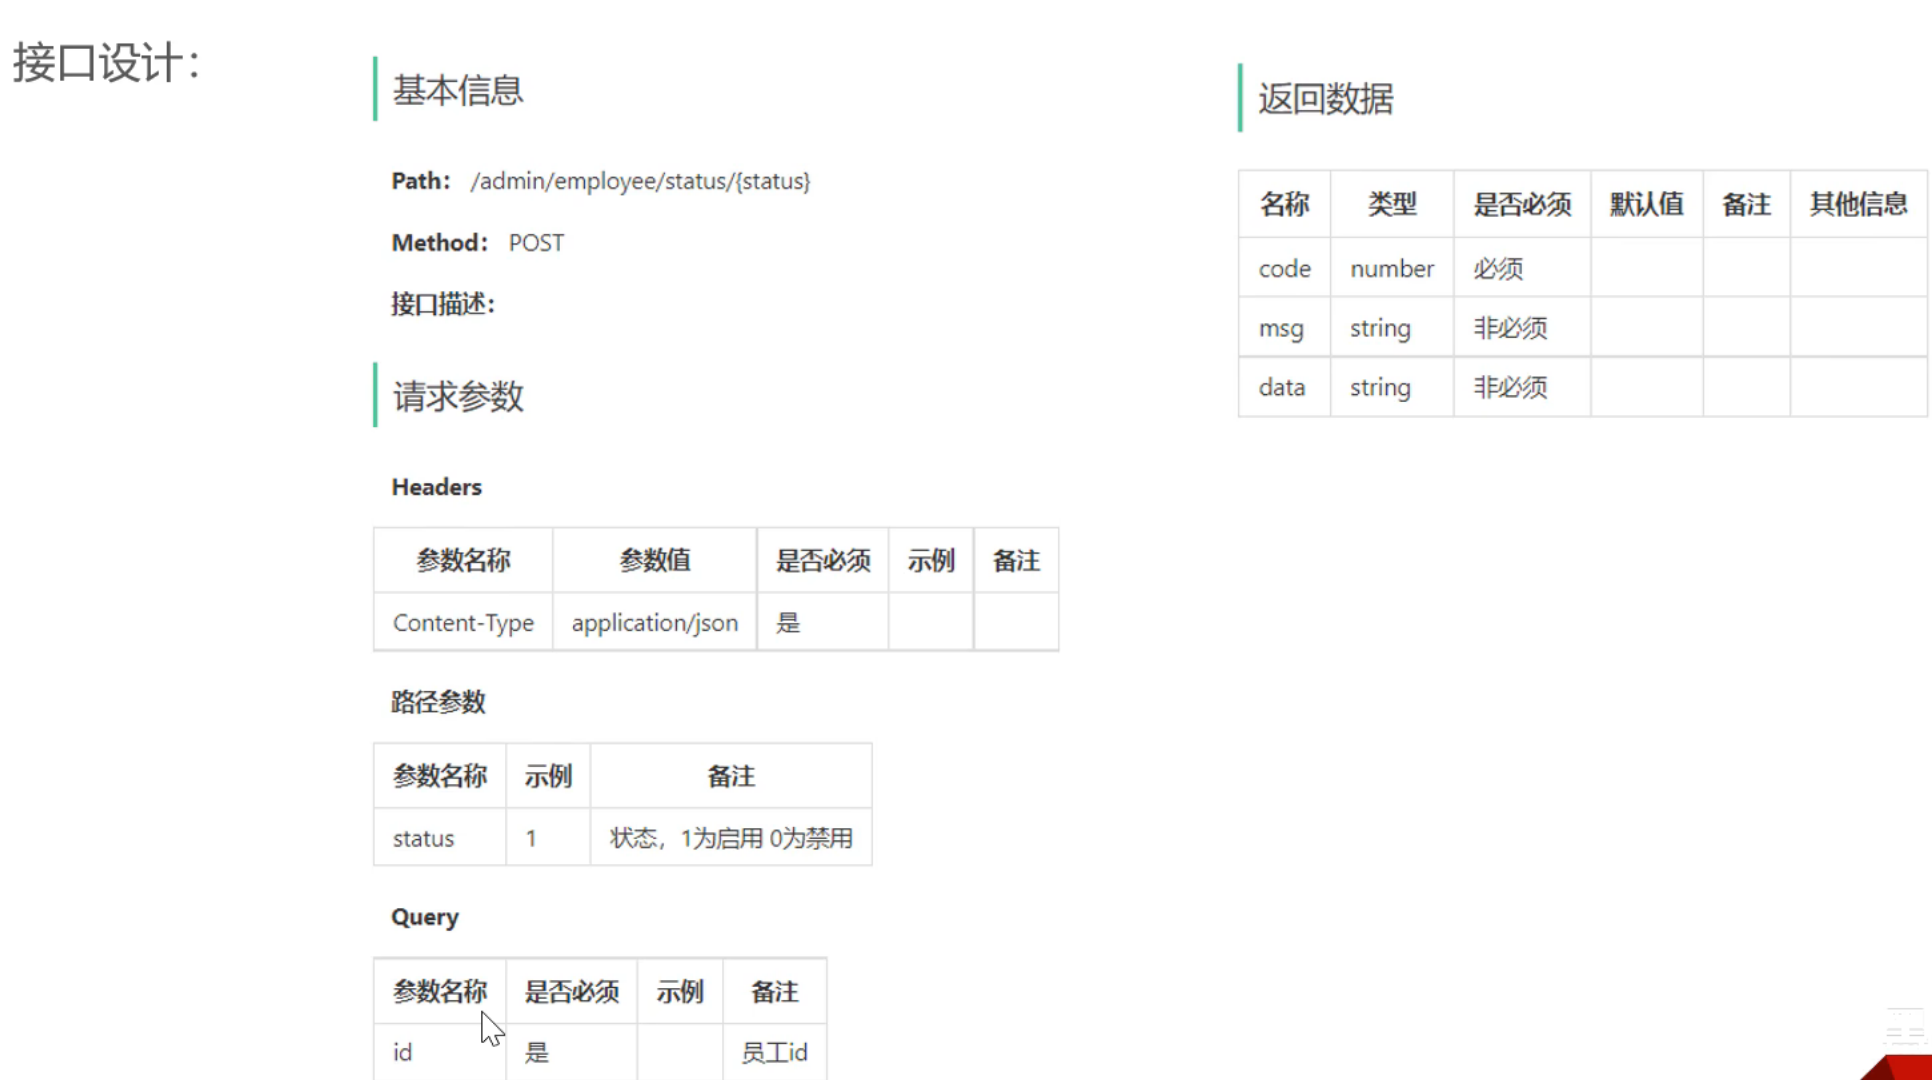
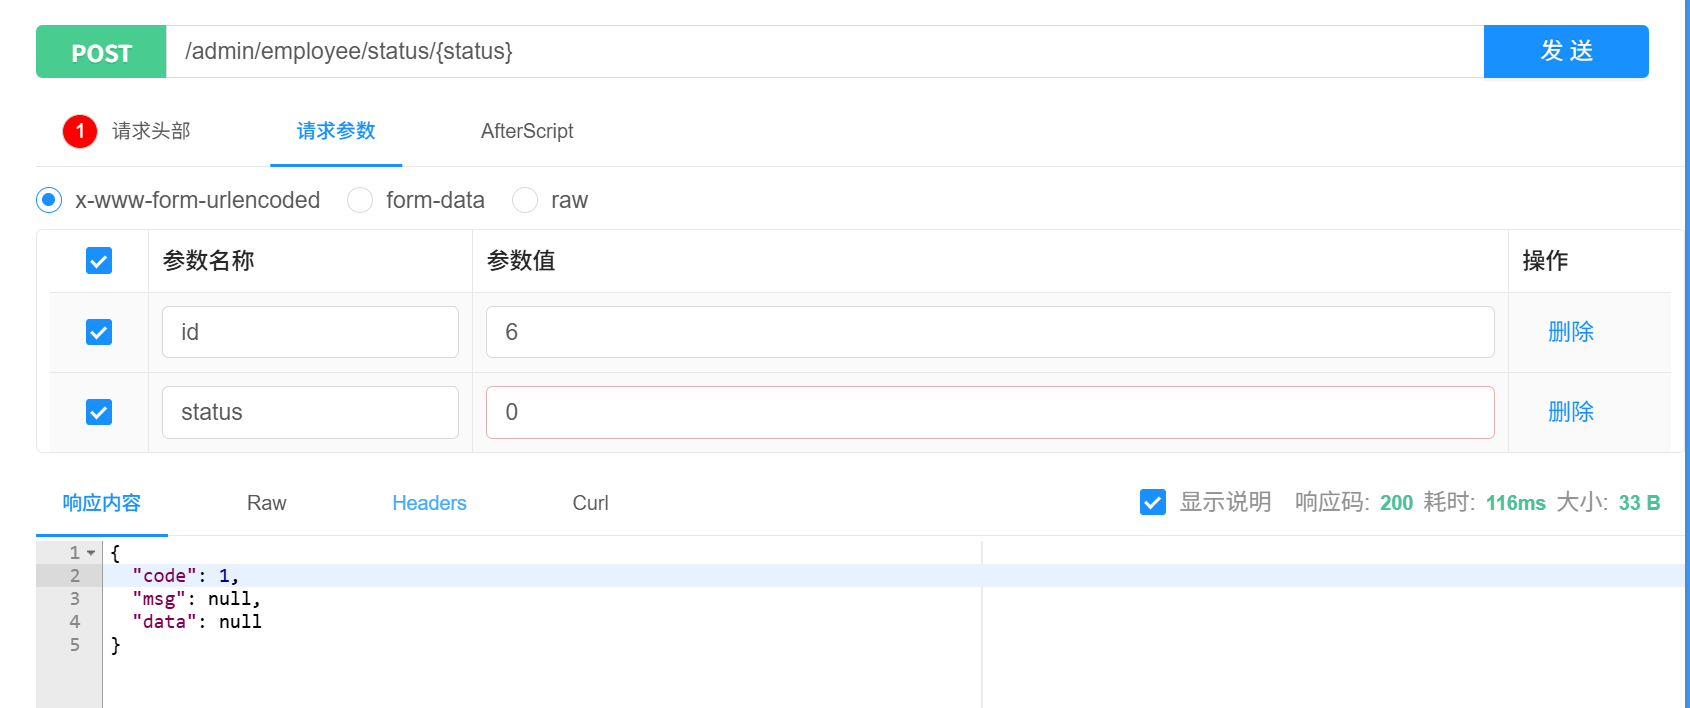
接口设计
代码开发
@PostMapping("/status/{status}")@ApiOperation("启用或禁用员工")public Result start_or_stop(@PathVariable Integer status, Long id){log.info("启用或禁用员工:{},{}", status, id);employeeService.start_or_stop(status, id);return Result.success();}
@Overridepublic void start_or_stop(Integer status, Long id) {Employee employee = Employee.builder().status(status).id(id).build();employeeMapper.update(employee);}
<update id="update">UPDATE sky_take_out.employee<set><if test="name != null and name != ''">name = #{name},</if><if test="username != null and username != ''">username = #{username},</if><if test="password != null and password != ''">password = #{password},</if><if test="phone != null and phone != ''">phone = #{phone},</if><if test="sex != null and sex != ''">sex = #{sex},</if><if test="idNumber != null and idNumber != ''">id_number = #{idNumber},</if><if test="status != null">status = #{status},</if><if test="updateTime != null">update_time = #{updateTime},</if><if test="updateUser!= null">update_user = #{updateUser}</if></set>WHERE id = #{id}</update>功能测试
编辑员工
需求分析和设计
产品原型
接口设计
注意这里需要两个接口
1:根据 id 查询员工信息,也就是查询回显
2:编辑员工信息
代码开发
首先是查询回显
@GetMapping("/{id}")@ApiOperation("根据 id 查询员工")public Result<Employee> queryById(@PathVariable Long id){log.info("查询的员工的 id 为:{}", id);Employee employee = employeeService.queryById(id);return Result.success(employee);}
@Overridepublic Employee queryById(Long id) {Employee employee = employeeMapper.queryById(id);return employee;}
<select id="queryById" resultType="com.sky.entity.Employee">select * from sky_take_out.employee where id = #{id}</select>然后是更新员工
@PutMapping@ApiOperation("修改员工数据")public Result update(@RequestBody EmployeeDTO employeeDTO){log.info("修改员工:{}", employeeDTO);employeeService.update(employeeDTO);return Result.success();}
@Overridepublic void update(EmployeeDTO employeeDTO) {Employee employee = new Employee();BeanUtils.copyProperties(employeeDTO,employee);employee.setUpdateUser(BaseContext.getCurrentId());employee.setUpdateTime(LocalDateTime.now());employeeMapper.update(employee);}
<update id="update">UPDATE sky_take_out.employee<set><if test="name != null and name != ''">name = #{name},</if><if test="username != null and username != ''">username = #{username},</if><if test="password != null and password != ''">password = #{password},</if><if test="phone != null and phone != ''">phone = #{phone},</if><if test="sex != null and sex != ''">sex = #{sex},</if><if test="idNumber != null and idNumber != ''">id_number = #{idNumber},</if><if test="status != null">status = #{status},</if><if test="updateTime != null">update_time = #{updateTime},</if><if test="updateUser!= null">update_user = #{updateUser}</if></set>WHERE id = #{id}</update>功能测试

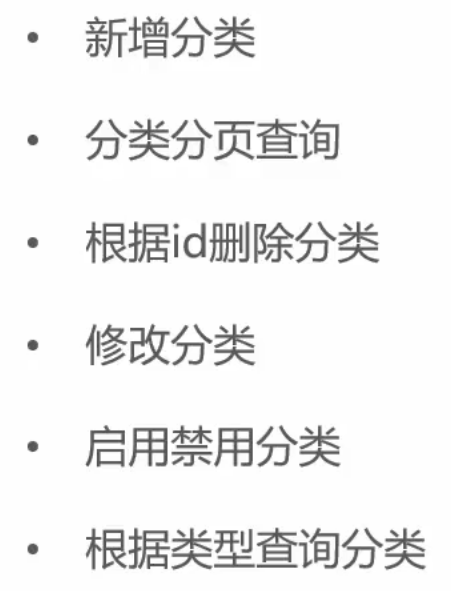
导入分类模块功能代码
需求分析和设计
产品原型: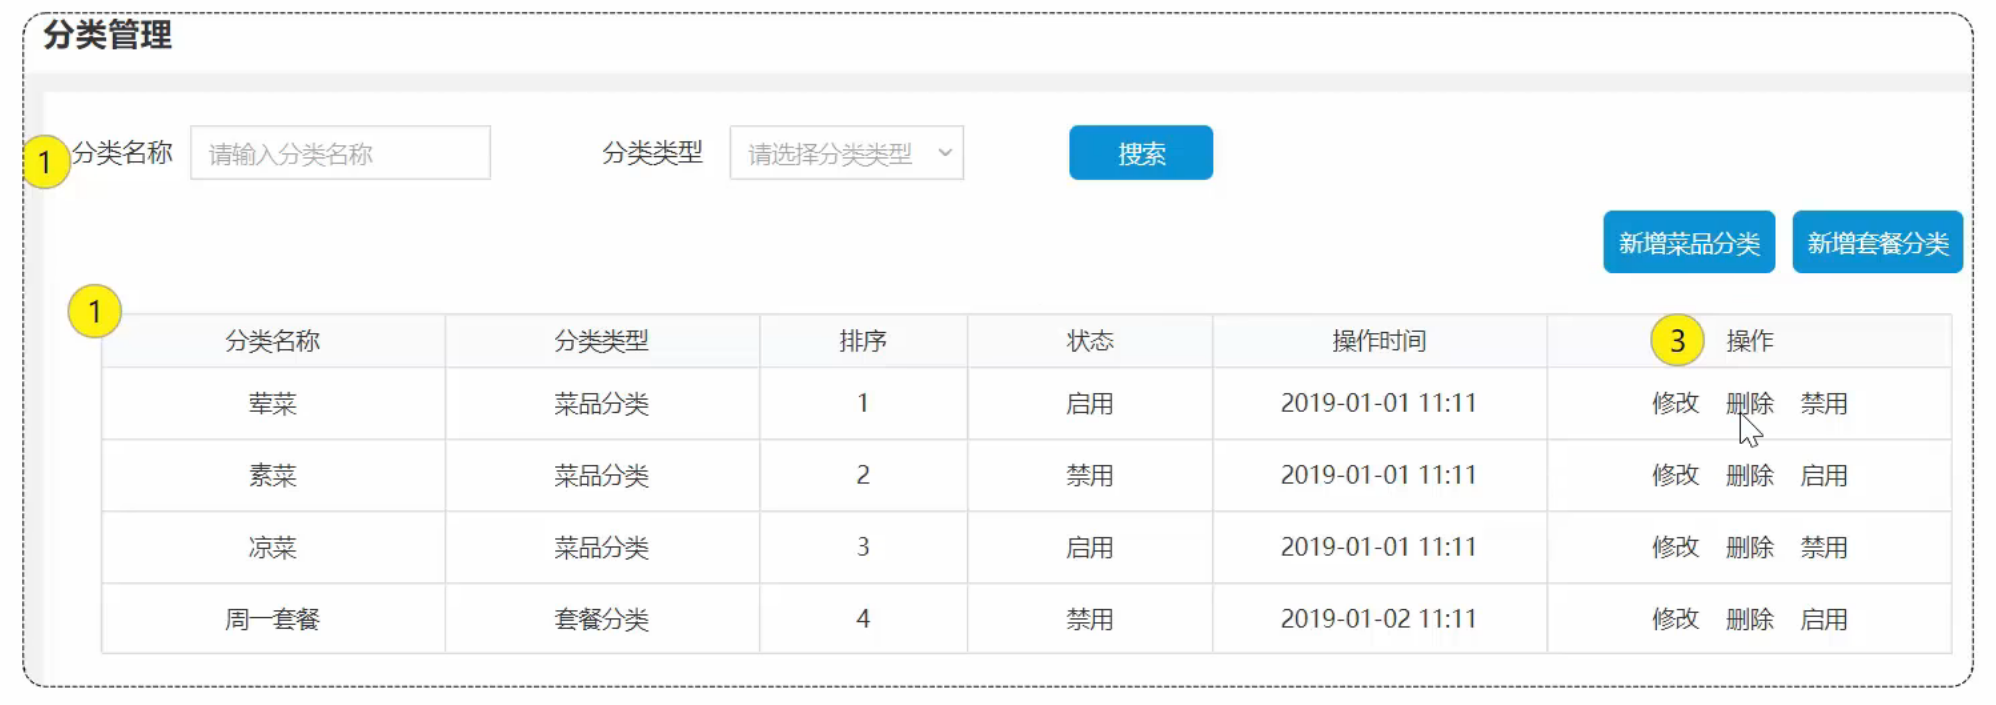
接口设计
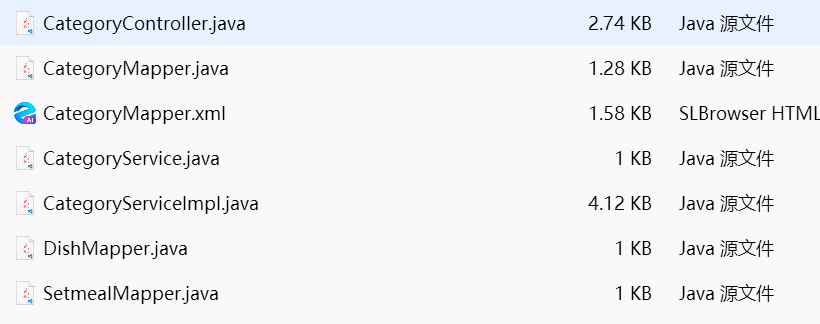
代码导入
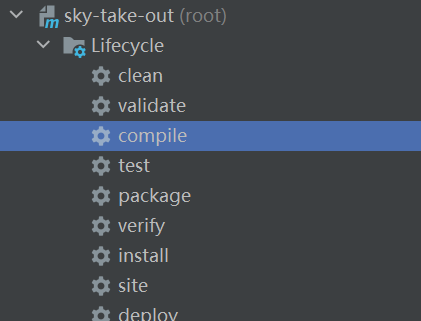
因为这里和之前员工管理的部分基本一样,所以直接导入即可,注意最好从后往前导入,也就是从Mapper 层开始导入,这样会减少报错,导入完之后记得手动编译
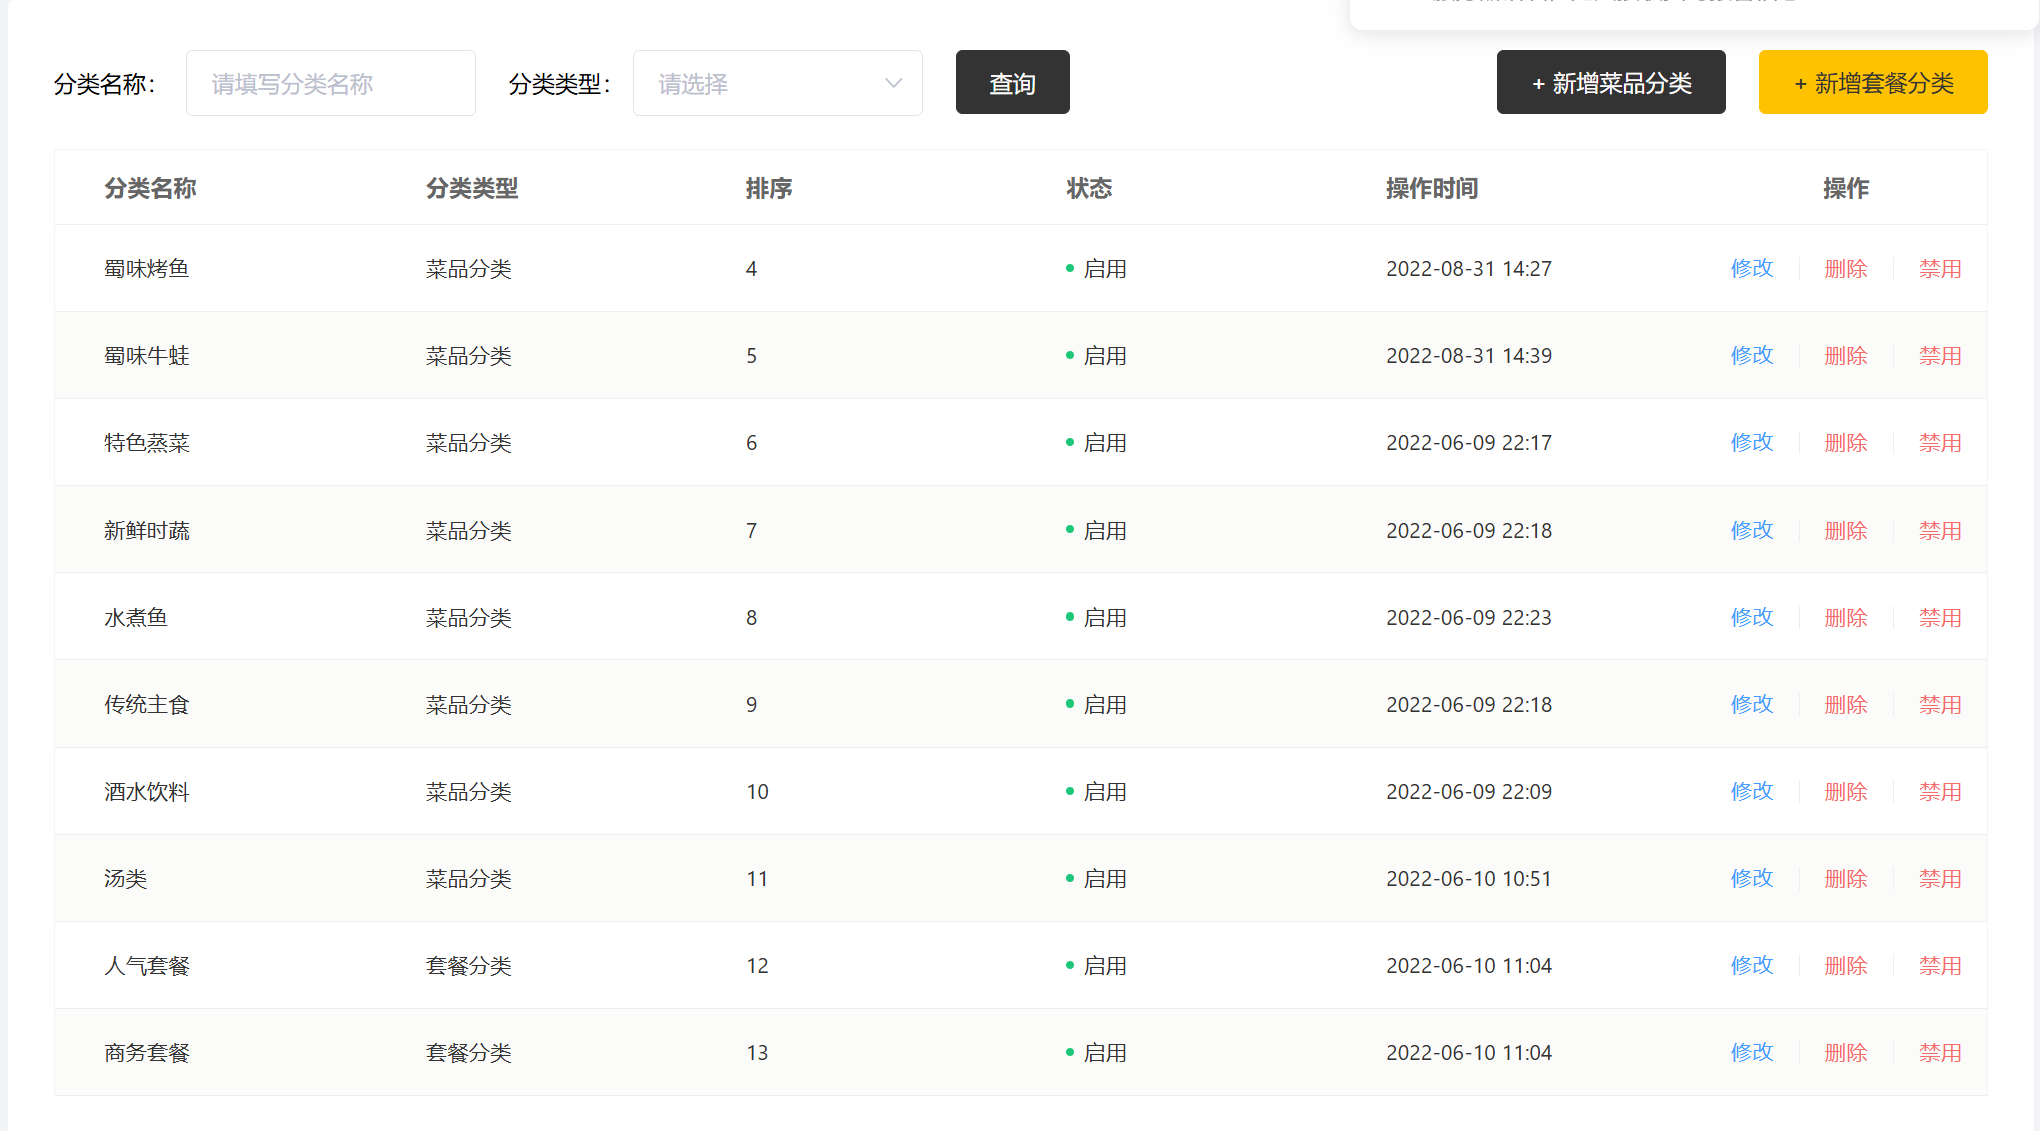
功能测试
![[SC]SystemC 常见的编译/语法错误与解法(三)](http://pic.xiahunao.cn/[SC]SystemC 常见的编译/语法错误与解法(三))


)


)


