学习目标:掌握Python程序性能分析和优化的通用方法,建立工程化开发的规范意识,为后续AI项目开发奠定坚实的编程基础
在数据科学和AI开发中,代码性能往往决定了项目的可行性。一个处理时间从几小时缩短到几分钟的优化,可能意味着从实验室概念到生产应用的跨越。本课将系统性地讲解Python性能优化的核心方法和工程化开发的最佳实践。
8.1 性能分析:发现代码瓶颈的科学方法
> 性能分析的基本原理
性能分析(Performance Profiling) 是通过测量程序运行时的各项指标来识别性能瓶颈的过程。在优化之前,我们必须先知道程序的时间都花在了哪里,这就是"测量优于猜测"的工程原则。
Python提供了多种性能分析工具,每种工具都有其特定的应用场景:
- cProfile:Python内置的函数级性能分析器,适合整体性能概览
- line_profiler:行级分析工具,能够精确定位到具体代码行
- memory_profiler:内存使用分析器,监控内存消耗模式
- py-spy:采样式分析器,对运行中的程序影响最小
pip install memory-profiler
import cProfile
import pstats
import numpy as np
import pandas as pd
import time
from memory_profiler import profile
import matplotlib.pyplot as plt# 创建测试函数来演示性能分析
def inefficient_data_processing():"""低效的数据处理函数:演示常见性能问题"""# 问题1:重复计算data = []for i in range(10000):# 每次循环都重新计算相同的值result = sum(range(100)) * np.sqrt(i)data.append(result)# 问题2:低效的数据结构操作processed_data = []for item in data:processed_data.append(item * 2)  # 应该使用列表推导式或NumPy# 问题3:不必要的数据复制df = pd.DataFrame({'values': processed_data})df_copy1 = df.copy()df_copy2 = df.copy()df_copy3 = df.copy()return df_copy3def optimized_data_processing():"""优化后的数据处理函数"""# 优化1:预计算常量constant_sum = sum(range(100))# 优化2:使用NumPy向量化操作indices = np.arange(10000)data = constant_sum * np.sqrt(indices)# 优化3:避免不必要的中间步骤processed_data = data * 2# 优化4:直接创建最终结果df = pd.DataFrame({'values': processed_data})return dfprint("=== 使用cProfile进行性能分析 ===")# 分析低效函数
profiler = cProfile.Profile()
profiler.enable()
result1 = inefficient_data_processing()
profiler.disable()# 保存分析结果
stats = pstats.Stats(profiler)
stats.sort_stats('cumulative')
print("低效函数的性能分析(前10个最耗时的函数):")
stats.print_stats(10)# 分析优化后的函数
profiler2 = cProfile.Profile()
profiler2.enable()
result2 = optimized_data_processing()
profiler2.disable()stats2 = pstats.Stats(profiler2)
stats2.sort_stats('cumulative')
print("\n优化后函数的性能分析(前10个最耗时的函数):")
stats2.print_stats(10)# 简单的时间对比
import timeittime_inefficient = timeit.timeit(inefficient_data_processing, number=3)
time_optimized = timeit.timeit(optimized_data_processing, number=3)print(f"\n=== 性能对比结果 ===")
print(f"低效版本平均时间: {time_inefficient/3:.4f} 秒")
print(f"优化版本平均时间: {time_optimized/3:.4f} 秒")
print(f"性能提升倍数: {time_inefficient/time_optimized:.2f}x")

> 内存使用分析
内存优化在处理大数据集时尤为重要。Python的内存管理机制决定了我们需要特别关注内存使用模式。
# 内存使用分析示例
@profile  # 需要安装memory_profiler:pip install memory_profiler
def memory_intensive_function():"""内存密集型函数示例"""# 创建大型数据结构large_list = list(range(1000000))# 数据转换(会创建新的内存副本)squared_list = [x**2 for x in large_list]# 转换为DataFrame(又一次内存复制)df = pd.DataFrame({'values': squared_list})# 添加计算列(更多内存使用)df['values_sqrt'] = np.sqrt(df['values'])return dfdef memory_efficient_function():"""内存优化版本"""# 直接使用NumPy创建和计算values = np.arange(1000000, dtype=np.int32)  # 指定更小的数据类型values_squared = values ** 2values_sqrt = np.sqrt(values_squared)# 一次性创建DataFramedf = pd.DataFrame({'values': values_squared,'values_sqrt': values_sqrt})return dfprint("\n=== 内存使用对比 ===")
print("运行memory_intensive_function时的内存使用情况:")
# 注意:需要在命令行运行:python -m memory_profiler your_script.py
print("(需要使用命令行工具查看详细内存分析)")# 简单的内存使用估算
import sys# 比较不同数据结构的内存效率
list_data = list(range(100000))
array_data = np.array(range(100000))print(f"Python列表内存使用: {sys.getsizeof(list_data) / 1024 / 1024:.2f} MB")
print(f"NumPy数组内存使用: {array_data.nbytes / 1024 / 1024:.2f} MB")
print(f"内存效率提升: {sys.getsizeof(list_data) / array_data.nbytes:.2f}x")
8.2 算法复杂度:从理论到实践的性能分析
> 时间复杂度的实际意义
时间复杂度(Time Complexity) 描述了算法运行时间如何随输入规模增长而变化。理解复杂度不仅有助于选择合适的算法,更能帮助我们预测代码在大规模数据下的表现。
常见复杂度等级及其实际含义:
- O(1):常数时间,如字典查找、数组索引
- O(log n):对数时间,如二分查找、平衡树操作
- O(n):线性时间,如列表遍历、简单查找
- O(n log n):线性对数时间,如高效排序算法
- O(n²):平方时间,如嵌套循环、冒泡排序
- O(2^n):指数时间,如递归斐波那契数列
import time
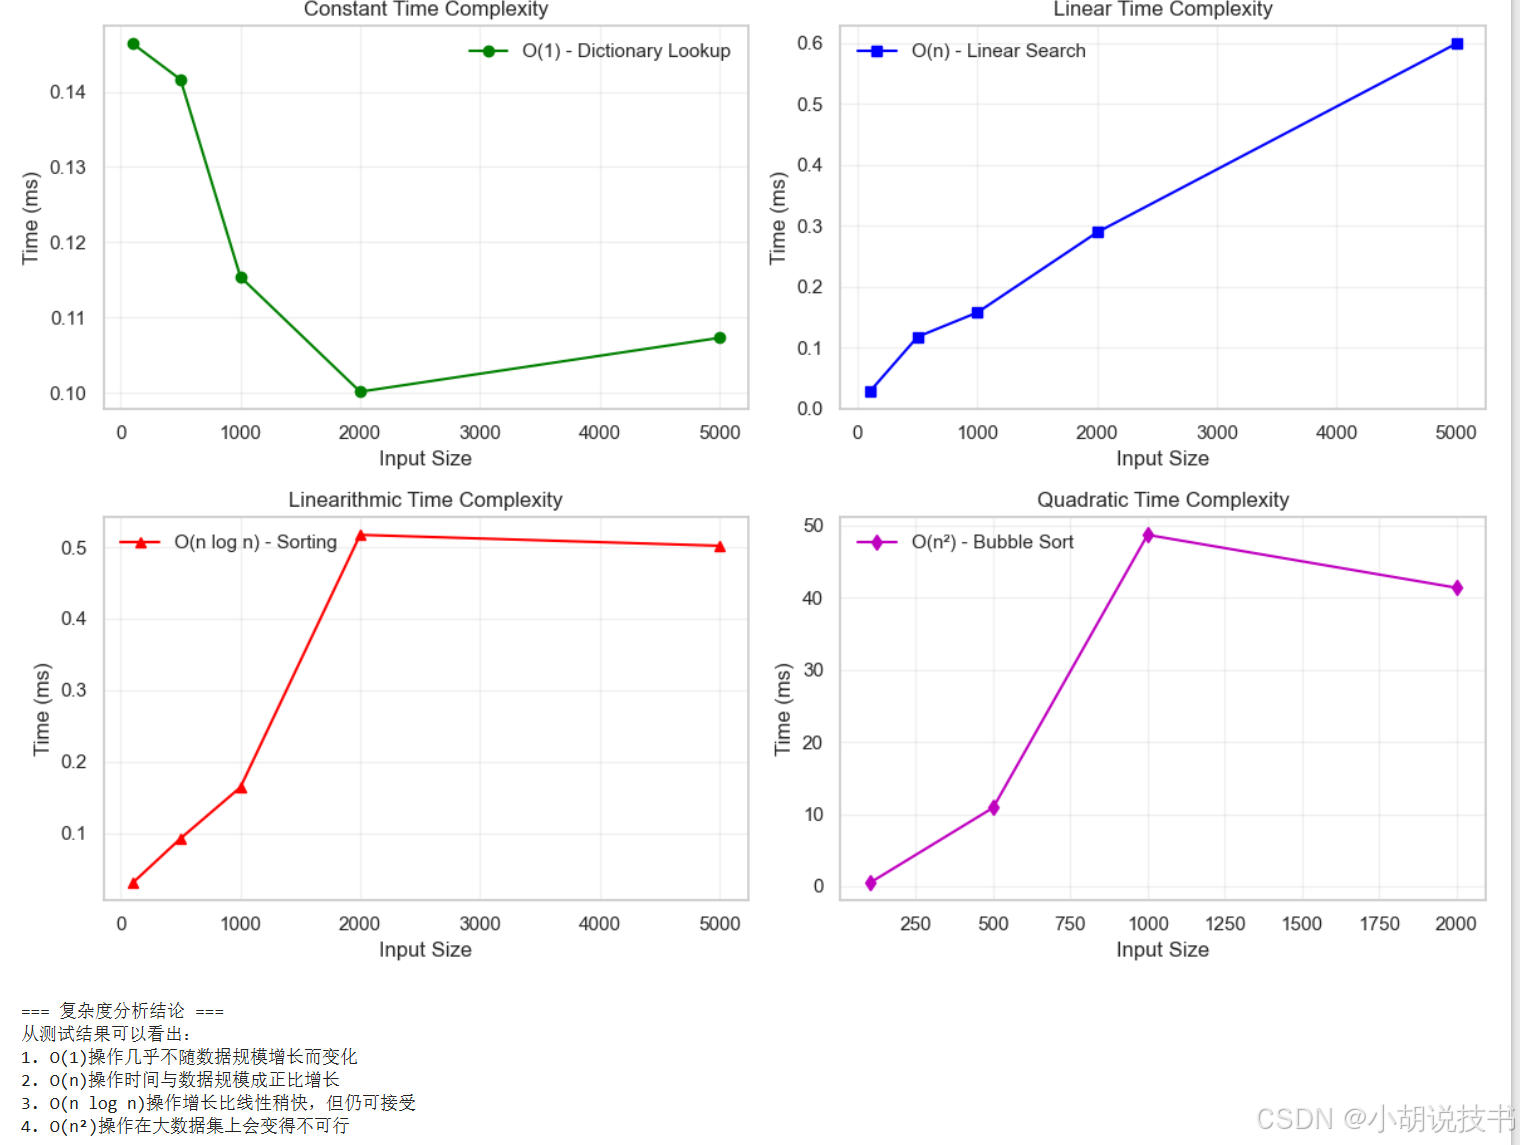
import matplotlib.pyplot as pltdef complexity_comparison():"""不同算法复杂度的实际性能对比"""# 测试不同规模的输入sizes = [100, 500, 1000, 2000, 5000]# 存储各算法的执行时间times_o1 = [] # O(1) - 常数时间times_on = [] # O(n) - 线性时间 times_onlogn = [] # O(n log n) - 线性对数时间times_on2 = [] # O(n²) - 平方时间for size in sizes:data = list(range(size))# O(1) 操作:字典查找lookup_dict = {i: i for i in data}start = time.time()for _ in range(1000): # 重复测试以获得稳定结果_ = lookup_dict.get(size//2, 0)times_o1.append((time.time() - start) * 1000) # 转换为毫秒# O(n) 操作:线性搜索start = time.time()for _ in range(10): # 减少重复次数因为较慢target = size // 2for item in data:if item == target:breaktimes_on.append((time.time() - start) * 1000)# O(n log n) 操作:排序start = time.time()for _ in range(10):_ = sorted(data[::-1]) # 对逆序数据排序times_onlogn.append((time.time() - start) * 1000)# O(n²) 操作:冒泡排序(仅对小数据集测试)if size <= 2000: # 避免过长等待时间start = time.time()test_data = data[:min(size, 1000)] # 限制数据规模# 简化的冒泡排序for i in range(len(test_data)):for j in range(len(test_data) - 1 - i):if test_data[j] > test_data[j + 1]:test_data[j], test_data[j + 1] = test_data[j + 1], test_data[j]times_on2.append((time.time() - start) * 1000)else:times_on2.append(None) # 对大数据集跳过测试# 可视化复杂度差异plt.figure(figsize=(12, 8))plt.subplot(2, 2, 1)plt.plot(sizes, times_o1, 'g-o', label='O(1) - Dictionary Lookup')plt.xlabel('Input Size')plt.ylabel('Time (ms)')plt.title('Constant Time Complexity')plt.legend()plt.grid(True, alpha=0.3)plt.subplot(2, 2, 2)plt.plot(sizes, times_on, 'b-s', label='O(n) - Linear Search')plt.xlabel('Input Size')plt.ylabel('Time (ms)')plt.title('Linear Time Complexity')plt.legend()plt.grid(True, alpha=0.3)plt.subplot(2, 2, 3)plt.plot(sizes, times_onlogn, 'r-^', label='O(n log n) - Sorting')plt.xlabel('Input Size')plt.ylabel('Time (ms)')plt.title('Linearithmic Time Complexity')plt.legend()plt.grid(True, alpha=0.3)plt.subplot(2, 2, 4)# 过滤掉None值valid_sizes = [s for s, t in zip(sizes, times_on2) if t is not None]valid_times = [t for t in times_on2 if t is not None]plt.plot(valid_sizes, valid_times, 'm-d', label='O(n²) - Bubble Sort')plt.xlabel('Input Size')plt.ylabel('Time (ms)')plt.title('Quadratic Time Complexity')plt.legend()plt.grid(True, alpha=0.3)plt.tight_layout()plt.show()return {'sizes': sizes,'O(1)': times_o1,'O(n)': times_on,'O(n log n)': times_onlogn,'O(n²)': times_on2}# 运行复杂度对比
print("=== 算法复杂度实际性能测试 ===")
complexity_results = complexity_comparison()# 分析结果
print("\n=== 复杂度分析结论 ===")
print("从测试结果可以看出:")
print("1. O(1)操作几乎不随数据规模增长而变化")
print("2. O(n)操作时间与数据规模成正比增长")
print("3. O(n log n)操作增长比线性稍快,但仍可接受")
print("4. O(n²)操作在大数据集上会变得不可行")
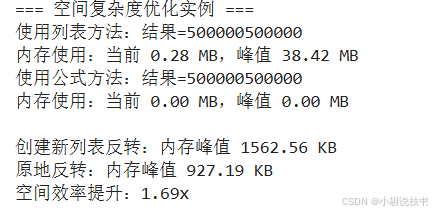
> 空间复杂度优化实例
空间复杂度(Space Complexity) 描述算法使用的额外内存空间如何随输入规模变化。在内存受限的环境中,空间优化同样重要。
def space_complexity_examples():"""空间复杂度优化示例"""print("=== 空间复杂度优化实例 ===")# 示例1:计算数列和 - O(n) vs O(1) 空间复杂度def sum_with_list(n):"""O(n)空间复杂度:存储所有中间结果"""numbers = list(range(1, n + 1)) # 需要O(n)空间return sum(numbers)def sum_without_list(n):"""O(1)空间复杂度:使用数学公式"""return n * (n + 1) // 2 # 只需要O(1)空间# 测试空间效率n = 1000000import tracemalloc# 测量第一种方法的内存使用tracemalloc.start()result1 = sum_with_list(n)current, peak = tracemalloc.get_traced_memory()tracemalloc.stop()print(f"使用列表方法:结果={result1}")print(f"内存使用:当前 {current / 1024 / 1024:.2f} MB,峰值 {peak / 1024 / 1024:.2f} MB")# 测量第二种方法的内存使用tracemalloc.start()result2 = sum_without_list(n)current, peak = tracemalloc.get_traced_memory()tracemalloc.stop()print(f"使用公式方法:结果={result2}")print(f"内存使用:当前 {current / 1024 / 1024:.2f} MB,峰值 {peak / 1024 / 1024:.2f} MB")# 示例2:原地算法 vs 创建新数据结构def reverse_create_new(arr):"""创建新列表进行反转:O(n)额外空间"""return arr[::-1]def reverse_in_place(arr):"""原地反转:O(1)额外空间"""left, right = 0, len(arr) - 1while left < right:arr[left], arr[right] = arr[right], arr[left]left += 1right -= 1return arr# 空间效率对比test_data = list(range(100000))tracemalloc.start()reversed1 = reverse_create_new(test_data.copy())current1, peak1 = tracemalloc.get_traced_memory()tracemalloc.stop()tracemalloc.start()reversed2 = reverse_in_place(test_data.copy())current2, peak2 = tracemalloc.get_traced_memory()tracemalloc.stop()print(f"\n创建新列表反转:内存峰值 {peak1 / 1024:.2f} KB")print(f"原地反转:内存峰值 {peak2 / 1024:.2f} KB")print(f"空间效率提升:{peak1/peak2:.2f}x")space_complexity_examples()
8.3 内存优化:高效数据处理的关键技术
> 生成器和迭代器模式
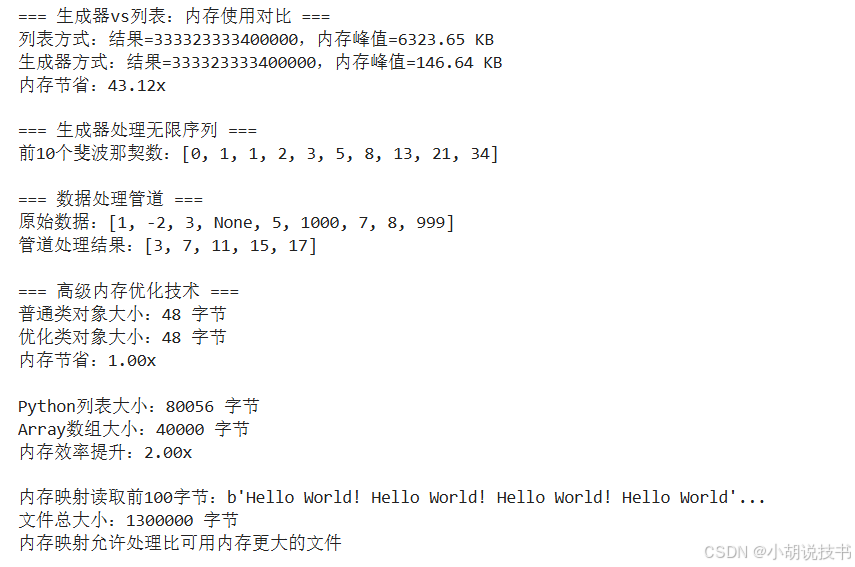
生成器(Generator) 是Python中实现惰性求值的重要工具。它允许我们处理无法完全装入内存的大数据集,这在数据科学应用中极为重要。
def memory_optimization_techniques():"""内存优化技术演示"""print("=== 生成器vs列表:内存使用对比 ===")# 传统列表方式:一次性创建所有数据def process_data_with_list(n):"""使用列表存储所有数据"""data = [x**2 for x in range(n)]  # 一次性创建所有平方数processed = [x * 2 for x in data if x % 2 == 0]  # 再次创建新列表return sum(processed)# 生成器方式:按需生成数据def process_data_with_generator(n):"""使用生成器按需处理数据"""# 生成器表达式:不会立即创建所有数据squares = (x**2 for x in range(n))even_doubles = (x * 2 for x in squares if x % 2 == 0)return sum(even_doubles)# 自定义生成器函数def fibonacci_generator():"""斐波那契数列生成器:无限序列,但只占用常数内存"""a, b = 0, 1while True:yield aa, b = b, a + b# 数据处理管道生成器def data_pipeline(data_source):"""数据处理管道:每次只处理一个元素"""for item in data_source:# 清洗数据if item is not None and item > 0:# 转换数据processed = item * 2 + 1# 过滤数据if processed < 1000:yield processed# 内存使用对比import tracemallocn = 100000# 测试列表方式tracemalloc.start()result1 = process_data_with_list(n)current1, peak1 = tracemalloc.get_traced_memory()tracemalloc.stop()# 测试生成器方式tracemalloc.start()result2 = process_data_with_generator(n)current2, peak2 = tracemalloc.get_traced_memory()tracemalloc.stop()print(f"列表方式:结果={result1},内存峰值={peak1/1024:.2f} KB")print(f"生成器方式:结果={result2},内存峰值={peak2/1024:.2f} KB")print(f"内存节省:{peak1/peak2:.2f}x")# 演示无限序列处理print(f"\n=== 生成器处理无限序列 ===")fib = fibonacci_generator()first_10_fibs = [next(fib) for _ in range(10)]print(f"前10个斐波那契数:{first_10_fibs}")# 演示数据管道print(f"\n=== 数据处理管道 ===")sample_data = [1, -2, 3, None, 5, 1000, 7, 8, 999]pipeline_result = list(data_pipeline(sample_data))print(f"原始数据:{sample_data}")print(f"管道处理结果:{pipeline_result}")memory_optimization_techniques()# 高级内存优化技术
def advanced_memory_techniques():"""高级内存优化技术"""print("\n=== 高级内存优化技术 ===")# 1. 使用__slots__减少内存开销class RegularClass:"""普通类:使用字典存储属性"""def __init__(self, x, y):self.x = xself.y = yclass OptimizedClass:"""优化类:使用__slots__固定属性"""__slots__ = ['x', 'y']  # 限制属性,节省内存def __init__(self, x, y):self.x = xself.y = y# 内存使用对比import sysregular_obj = RegularClass(1, 2)optimized_obj = OptimizedClass(1, 2)print(f"普通类对象大小:{sys.getsizeof(regular_obj)} 字节")print(f"优化类对象大小:{sys.getsizeof(optimized_obj)} 字节")print(f"内存节省:{sys.getsizeof(regular_obj)/sys.getsizeof(optimized_obj):.2f}x")# 2. 使用array模块替代列表(同类型数据)import array# Python列表(存储对象引用)python_list = list(range(10000))# array数组(直接存储值)int_array = array.array('i', range(10000))  # 'i'表示有符号整数print(f"\nPython列表大小:{sys.getsizeof(python_list)} 字节")print(f"Array数组大小:{int_array.buffer_info()[1] * int_array.itemsize} 字节")print(f"内存效率提升:{sys.getsizeof(python_list)/(int_array.buffer_info()[1] * int_array.itemsize):.2f}x")# 3. 内存映射文件处理大数据import mmapimport tempfileimport os# 创建大文件用于演示with tempfile.NamedTemporaryFile(delete=False) as tmp_file:# 写入大量数据data = b"Hello World! " * 100000tmp_file.write(data)tmp_file_path = tmp_file.nametry:# 传统方式:将整个文件读入内存with open(tmp_file_path, 'rb') as f:file_data = f.read()# 内存映射方式:按需读取with open(tmp_file_path, 'rb') as f:with mmap.mmap(f.fileno(), 0, access=mmap.ACCESS_READ) as mmapped_file:# 只读取文件的一部分partial_data = mmapped_file[0:100]print(f"\n内存映射读取前100字节:{partial_data[:50]}...")print(f"文件总大小:{len(mmapped_file)} 字节")print("内存映射允许处理比可用内存更大的文件")finally:# 清理临时文件os.unlink(tmp_file_path)advanced_memory_techniques()
8.4 并发编程:充分利用多核处理器
> 并发编程模式选择
Python提供了多种并发编程模式,每种都有其适用场景。理解何时使用哪种模式是提升程序性能的关键。
并发编程选择指南:
- 多线程(Threading):适用于I/O密集型任务(文件读写、网络请求)
- 多进程(Multiprocessing):适用于CPU密集型任务(数值计算、图像处理)
- 异步编程(Asyncio):适用于高并发I/O任务(Web服务器、API调用)
import threading
import multiprocessing
import asyncio
import time
from concurrent.futures import ThreadPoolExecutor, ProcessPoolExecutor
import sys# 将函数移到模块级别,避免多进程序列化问题
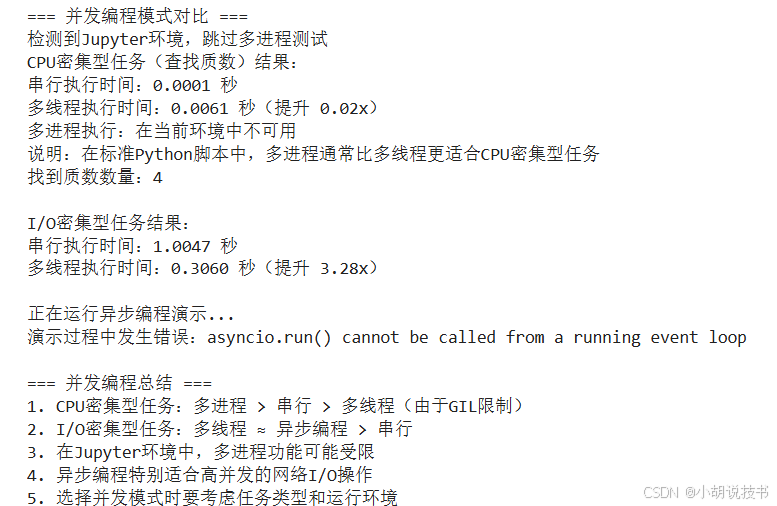
def is_prime(n):"""判断质数的CPU密集型函数"""if n < 2:return Falsefor i in range(2, int(n**0.5) + 1):if n % i == 0:return Falsereturn Truedef simulate_io_task(task_id):"""模拟I/O操作(如网络请求、文件读取)"""time.sleep(0.1) # 模拟I/O等待时间return f"Task {task_id} completed"def concurrent_programming_demo():"""并发编程模式对比演示"""print("=== 并发编程模式对比 ===")def find_primes_sequential(numbers):"""串行方式查找质数"""return [n for n in numbers if is_prime(n)]def find_primes_threaded(numbers, num_threads=4):"""多线程方式查找质数"""with ThreadPoolExecutor(max_workers=num_threads) as executor:results = list(executor.map(is_prime, numbers))return [n for n, is_p in zip(numbers, results) if is_p]def find_primes_multiprocess_safe(numbers, num_processes=4):"""安全的多进程方式查找质数"""try:# 在Jupyter或某些环境中,多进程可能不工作if 'ipykernel' in sys.modules:print("检测到Jupyter环境,跳过多进程测试")return Nonewith ProcessPoolExecutor(max_workers=num_processes) as executor:results = list(executor.map(is_prime, numbers))return [n for n, is_p in zip(numbers, results) if is_p]except Exception as e:print(f"多进程执行失败: {e}")print("这在Jupyter环境中是常见现象,使用备选方案...")return None# 测试CPU密集型任务test_numbers = list(range(10000, 10050)) # 减少数据量以加快演示# 串行执行start_time = time.time()primes_seq = find_primes_sequential(test_numbers)seq_time = time.time() - start_time# 多线程执行start_time = time.time()primes_thread = find_primes_threaded(test_numbers)thread_time = time.time() - start_time# 多进程执行(带异常处理)start_time = time.time()primes_mp = find_primes_multiprocess_safe(test_numbers)mp_time = time.time() - start_time if primes_mp is not None else Noneprint(f"CPU密集型任务(查找质数)结果:")print(f"串行执行时间:{seq_time:.4f} 秒")print(f"多线程执行时间:{thread_time:.4f} 秒(提升 {seq_time/thread_time:.2f}x)")if mp_time is not None:print(f"多进程执行时间:{mp_time:.4f} 秒(提升 {seq_time/mp_time:.2f}x)")else:print("多进程执行:在当前环境中不可用")print("说明:在标准Python脚本中,多进程通常比多线程更适合CPU密集型任务")print(f"找到质数数量:{len(primes_seq)}")# I/O密集型任务演示def run_io_sequential(num_tasks):"""串行执行I/O任务"""results = []for i in range(num_tasks):results.append(simulate_io_task(i))return resultsdef run_io_threaded(num_tasks, num_threads=4):"""多线程执行I/O任务"""with ThreadPoolExecutor(max_workers=num_threads) as executor:results = list(executor.map(simulate_io_task, range(num_tasks)))return results# 测试I/O密集型任务num_io_tasks = 10 # 减少任务数以加快演示# 串行I/Ostart_time = time.time()io_seq_results = run_io_sequential(num_io_tasks)io_seq_time = time.time() - start_time# 多线程I/Ostart_time = time.time()io_thread_results = run_io_threaded(num_io_tasks)io_thread_time = time.time() - start_timeprint(f"\nI/O密集型任务结果:")print(f"串行执行时间:{io_seq_time:.4f} 秒")print(f"多线程执行时间:{io_thread_time:.4f} 秒(提升 {io_seq_time/io_thread_time:.2f}x)")# 异步编程示例
async def async_task(task_id, duration):"""异步任务:模拟异步I/O操作"""print(f"任务 {task_id} 开始执行")await asyncio.sleep(duration) # 模拟异步等待print(f"任务 {task_id} 执行完成")return f"Task {task_id} result"async def run_async_tasks():"""并发执行多个异步任务"""tasks = [async_task(1, 0.3),async_task(2, 0.2),async_task(3, 0.4),async_task(4, 0.1)]# 并发执行所有任务results = await asyncio.gather(*tasks)return resultsasync def async_programming_demo():"""异步编程演示"""print(f"\n=== 异步编程演示 ===")# 运行异步任务start_time = time.time()results = await run_async_tasks()async_time = time.time() - start_timeprint(f"异步执行时间:{async_time:.4f} 秒")print(f"所有任务都是并发执行的,总时间约等于最长任务的时间")print(f"异步执行结果:{results}")# 运行演示
try:concurrent_programming_demo()# 运行异步演示print("\n正在运行异步编程演示...")asyncio.run(async_programming_demo())except Exception as e:print(f"演示过程中发生错误:{e}")# 添加并发编程总结
print(f"\n=== 并发编程总结 ===")
print("1. CPU密集型任务:多进程 > 串行 > 多线程(由于GIL限制)")
print("2. I/O密集型任务:多线程 ≈ 异步编程 > 串行")
print("3. 在Jupyter环境中,多进程功能可能受限")
print("4. 异步编程特别适合高并发的网络I/O操作")
print("5. 选择并发模式时要考虑任务类型和运行环境")
8.5 代码质量保证:构建可靠的软件系统
> 单元测试框架
单元测试(Unit Testing) 是确保代码质量的基础工具。它不仅能帮助发现bug,更重要的是促进良好的代码设计,提高代码的可维护性。
import unittest
import doctest
from typing import List, Optionalclass DataProcessor:"""数据处理类:演示测试驱动开发"""def __init__(self):self.data = []def add_data(self, value: float) -> None:"""添加数据点Args:value: 要添加的数值Raises:TypeError: 当value不是数字类型时Examples:>>> processor = DataProcessor()>>> processor.add_data(10.5)>>> len(processor.data)1"""if not isinstance(value, (int, float)):raise TypeError("Value must be a number")self.data.append(float(value))def calculate_mean(self) -> Optional[float]:"""计算平均值Returns:数据的平均值,如果没有数据则返回NoneExamples:>>> processor = DataProcessor()>>> processor.add_data(10)>>> processor.add_data(20)>>> processor.calculate_mean()15.0"""if not self.data:return Nonereturn sum(self.data) / len(self.data)def find_outliers(self, threshold: float = 2.0) -> List[float]:"""查找异常值(超出平均值±threshold*标准差的值)Args:threshold: 异常值判断的标准差倍数Returns:异常值列表"""if len(self.data) < 2:return []mean = self.calculate_mean()variance = sum((x - mean) ** 2 for x in self.data) / len(self.data)std_dev = variance ** 0.5outliers = []for value in self.data:if abs(value - mean) > threshold * std_dev:outliers.append(value)return outliersclass TestDataProcessor(unittest.TestCase):"""DataProcessor类的单元测试"""def setUp(self):"""测试前的准备工作"""self.processor = DataProcessor()def test_add_data_valid_input(self):"""测试添加有效数据"""self.processor.add_data(10.5)self.assertEqual(len(self.processor.data), 1)self.assertEqual(self.processor.data[0], 10.5)def test_add_data_invalid_input(self):"""测试添加无效数据"""with self.assertRaises(TypeError):self.processor.add_data("invalid")with self.assertRaises(TypeError):self.processor.add_data([1, 2, 3])def test_calculate_mean_empty_data(self):"""测试空数据的平均值计算"""result = self.processor.calculate_mean()self.assertIsNone(result)def test_calculate_mean_valid_data(self):"""测试有效数据的平均值计算"""test_data = [10, 20, 30]for value in test_data:self.processor.add_data(value)result = self.processor.calculate_mean()self.assertEqual(result, 20.0)def test_find_outliers(self):"""测试异常值检测"""# 添加正常数据和一个明显的异常值normal_data = [10, 12, 11, 13, 9, 10, 12]outlier = 100for value in normal_data:self.processor.add_data(value)self.processor.add_data(outlier)outliers = self.processor.find_outliers(threshold=2.0)self.assertIn(outlier, outliers)self.assertEqual(len(outliers), 1)def test_integration_workflow(self):"""集成测试:完整的工作流程"""# 模拟真实的使用场景sample_data = [1.0, 2.0, 1.5, 2.5, 1.8, 2.2, 10.0]  # 10.0是异常值for value in sample_data:self.processor.add_data(value)mean = self.processor.calculate_mean()outliers = self.processor.find_outliers()self.assertIsNotNone(mean)self.assertTrue(len(outliers) > 0)self.assertIn(10.0, outliers)def run_tests():"""运行所有测试"""print("=== 运行单元测试 ===")# 运行unittest测试unittest.TextTestRunner(verbosity=2).run(unittest.TestLoader().loadTestsFromTestCase(TestDataProcessor))# 运行doctest(文档字符串中的测试)print("\n=== 运行文档测试 ===")doctest.testmod(verbose=True)# 运行测试
run_tests()
> 代码质量工具
代码质量不仅包括功能正确性,还包括可读性、可维护性和一致性。Python生态系统提供了丰富的代码质量工具。
def code_quality_examples():"""代码质量最佳实践示例"""print("\n=== 代码质量最佳实践 ===")# 1. 类型注解:提高代码可读性和IDE支持from typing import Dict, List, Tuple, Uniondef process_user_data(user_id: int,user_info: Dict[str, Union[str, int]],preferences: List[str]) -> Tuple[bool, str]:"""处理用户数据的函数,使用类型注解提高代码清晰度Args:user_id: 用户IDuser_info: 用户信息字典preferences: 用户偏好列表Returns:处理结果元组:(是否成功, 结果消息)"""try:# 验证必要字段required_fields = ['name', 'email', 'age']for field in required_fields:if field not in user_info:return False, f"Missing required field: {field}"# 验证数据类型if not isinstance(user_info['age'], int) or user_info['age'] < 0:return False, "Invalid age value"# 处理用户偏好processed_preferences = [pref.lower().strip() for pref in preferences]return True, f"User {user_id} processed successfully"except Exception as e:return False, f"Processing error: {str(e)}"# 2. 错误处理最佳实践class DataValidationError(Exception):"""自定义数据验证异常"""passdef validate_and_process_data(data: List[Dict]) -> List[Dict]:"""数据验证和处理的最佳实践展示了:- 自定义异常- 早期错误检测- 详细的错误信息- 数据清洗"""if not data:raise DataValidationError("No data provided")processed_data = []for i, record in enumerate(data):try:# 验证必要字段if 'value' not in record:raise DataValidationError(f"Record {i}: missing 'value' field")# 数据类型转换和验证try:value = float(record['value'])except (ValueError, TypeError):raise DataValidationError(f"Record {i}: invalid value '{record['value']}'")# 业务逻辑验证if value < 0:raise DataValidationError(f"Record {i}: negative values not allowed")# 数据清洗和标准化cleaned_record = {'value': value,'timestamp': record.get('timestamp', 'unknown'),'source': record.get('source', 'default').lower()}processed_data.append(cleaned_record)except DataValidationError as e:print(f"警告:{e}")continue # 跳过有问题的记录,继续处理其他数据return processed_data# 3. 日志记录最佳实践import logging# 配置日志logging.basicConfig(level=logging.INFO,format='%(asctime)s - %(name)s - %(levelname)s - %(message)s')logger = logging.getLogger(__name__)def robust_data_processor(data_file: str) -> bool:"""健壮的数据处理函数,演示完整的错误处理和日志记录"""logger.info(f"开始处理数据文件: {data_file}")try:# 模拟数据处理过程logger.debug("正在验证文件格式...")# 这里应该是实际的文件处理逻辑sample_data = [{'value': '10.5', 'source': 'sensor1'},{'value': 'invalid', 'source': 'sensor2'}, # 无效数据{'value': '25.0', 'source': 'sensor3'},]logger.info(f"开始处理 {len(sample_data)} 条记录")processed = validate_and_process_data(sample_data)logger.info(f"成功处理 {len(processed)} 条记录")logger.warning(f"跳过 {len(sample_data) - len(processed)} 条无效记录")return Trueexcept DataValidationError as e:logger.error(f"数据验证错误: {e}")return Falseexcept Exception as e:logger.critical(f"未预期的错误: {e}")return Falsefinally:logger.info("数据处理完成")# 运行示例print("1. 类型注解示例:")result = process_user_data(user_id=123,user_info={'name': 'Alice', 'email': 'alice@example.com', 'age': 25},preferences=['Python', 'Data Science', 'Machine Learning'])print(f"处理结果:{result}")print("\n2. 数据验证示例:")robust_data_processor("sample_data.txt")print("\n3. 代码文档化示例:")help(process_user_data) # 显示函数文档code_quality_examples()
8.6 实战项目:高性能数据处理流水线
现在让我们将所有学到的技能整合到一个完整的高性能数据处理项目中。
import asyncio
import multiprocessing as mp
from concurrent.futures import ProcessPoolExecutor, ThreadPoolExecutor
import time
import logging
from pathlib import Path
import json
from typing import List, Dict, Iterator, Optional
from dataclasses import dataclass
import numpy as np
import pandas as pd
import sys@dataclass
class ProcessingConfig:"""数据处理配置类"""batch_size: int = 1000num_workers: int = mp.cpu_count()chunk_size: int = 10000output_format: str = 'parquet'enable_parallel: bool = Trueuse_threading: bool = False  # 新增:是否使用线程而非进程log_level: str = 'INFO'class HighPerformanceDataPipeline:"""高性能数据处理流水线"""def __init__(self, config: ProcessingConfig):self.config = configself.setup_logging()self.processed_count = 0self.error_count = 0# 检测运行环境self.is_jupyter = 'ipykernel' in sys.modulesif self.is_jupyter and not self.config.use_threading:self.logger.warning("检测到Jupyter环境,将使用线程代替进程进行并行处理")self.config.use_threading = Truedef setup_logging(self):"""配置日志系统"""logging.basicConfig(level=getattr(logging, self.config.log_level),format='%(asctime)s - %(name)s - %(levelname)s - %(message)s')self.logger = logging.getLogger(__name__)def generate_sample_data(self, num_records: int = 100000) -> Iterator[Dict]:"""生成示例数据的生成器"""self.logger.info(f"生成 {num_records} 条示例数据")np.random.seed(42)for i in range(num_records):yield {'id': i,'timestamp': f"2024-01-{(i % 30) + 1:02d} {(i % 24):02d}:{(i % 60):02d}:00",'user_id': np.random.randint(1, 10000),'product_id': np.random.choice(['P001', 'P002', 'P003', 'P004', 'P005']),'amount': np.random.exponential(100),'quantity': np.random.poisson(2) + 1,'category': np.random.choice(['A', 'B', 'C'], p=[0.5, 0.3, 0.2]),'region': np.random.choice(['North', 'South', 'East', 'West']),'is_premium': np.random.choice([True, False], p=[0.2, 0.8])}@staticmethoddef process_data_chunk(chunk_data: List[Dict]) -> Dict:"""处理数据块的静态方法"""processed_records = []error_count = 0for record in chunk_data:try:# 数据验证if record['amount'] < 0:raise ValueError("负金额")# 数据转换和计算processed_record = {'id': record['id'],'user_id': record['user_id'],'total_value': record['amount'] * record['quantity'],'category': record['category'],'region': record['region'],'is_premium': record['is_premium'],'processed_timestamp': time.time()}# 业务逻辑处理if record['is_premium']:processed_record['total_value'] *= 1.1processed_records.append(processed_record)except Exception as e:error_count += 1continuereturn {'processed_records': processed_records,'processed_count': len(processed_records),'error_count': error_count}def process_parallel_safe(self, data_generator: Iterator[Dict]) -> pd.DataFrame:"""安全的并行处理数据"""parallel_type = "线程" if self.config.use_threading else "进程"self.logger.info(f"开始并行数据处理,使用 {self.config.num_workers} 个{parallel_type}")start_time = time.time()# 将数据分块chunks = []current_chunk = []for record in data_generator:current_chunk.append(record)if len(current_chunk) >= self.config.chunk_size:chunks.append(current_chunk)current_chunk = []if current_chunk:chunks.append(current_chunk)self.logger.info(f"数据分为 {len(chunks)} 个块进行并行处理")# 选择执行器all_processed = []try:if self.config.use_threading:# 使用线程池with ThreadPoolExecutor(max_workers=self.config.num_workers) as executor:future_to_chunk = {executor.submit(self.process_data_chunk, chunk): chunk for chunk in chunks}for future in future_to_chunk:try:result = future.result()all_processed.extend(result['processed_records'])self.processed_count += result['processed_count']self.error_count += result['error_count']except Exception as e:self.logger.error(f"处理块时发生错误: {e}")self.error_count += len(future_to_chunk[future])else:# 使用进程池(仅在非Jupyter环境)with ProcessPoolExecutor(max_workers=self.config.num_workers) as executor:future_to_chunk = {executor.submit(self.process_data_chunk, chunk): chunk for chunk in chunks}for future in future_to_chunk:try:result = future.result()all_processed.extend(result['processed_records'])self.processed_count += result['processed_count']self.error_count += result['error_count']except Exception as e:self.logger.error(f"处理块时发生错误: {e}")self.error_count += len(future_to_chunk[future])except Exception as e:self.logger.error(f"并行处理完全失败: {e}")self.logger.info("回退到串行处理")return self.process_serial(self.generate_sample_data(len(chunks) * self.config.chunk_size))processing_time = time.time() - start_timeself.logger.info(f"并行处理完成,耗时 {processing_time:.2f} 秒")return pd.DataFrame(all_processed)def process_serial(self, data_generator: Iterator[Dict]) -> pd.DataFrame:"""串行处理数据"""self.logger.info("开始串行数据处理")start_time = time.time()all_processed = []chunk = []for record in data_generator:chunk.append(record)if len(chunk) >= self.config.chunk_size:result = self.process_data_chunk(chunk)all_processed.extend(result['processed_records'])self.processed_count += result['processed_count']self.error_count += result['error_count']chunk = []# 处理最后一个块if chunk:result = self.process_data_chunk(chunk)all_processed.extend(result['processed_records'])self.processed_count += result['processed_count']self.error_count += result['error_count']processing_time = time.time() - start_timeself.logger.info(f"串行处理完成,耗时 {processing_time:.2f} 秒")return pd.DataFrame(all_processed)def save_results(self, df: pd.DataFrame, output_path: str):"""保存处理结果"""try:output_file = Path(output_path)if self.config.output_format == 'csv':df.to_csv(output_file.with_suffix('.csv'), index=False)elif self.config.output_format == 'parquet':df.to_parquet(output_file.with_suffix('.parquet'), index=False)elif self.config.output_format == 'json':df.to_json(output_file.with_suffix('.json'), orient='records')self.logger.info(f"结果已保存到 {output_file}")except Exception as e:self.logger.error(f"保存结果失败: {e}")def generate_performance_report(self, processing_time: float, total_records: int) -> Dict:"""生成性能报告"""return {'total_records': total_records,'processed_records': self.processed_count,'error_records': self.error_count,'processing_time_seconds': processing_time,'records_per_second': self.processed_count / processing_time if processing_time > 0 else 0,'success_rate': (self.processed_count / total_records * 100) if total_records > 0 else 0,'configuration': {'batch_size': self.config.batch_size,'num_workers': self.config.num_workers,'chunk_size': self.config.chunk_size,'parallel_enabled': self.config.enable_parallel,'using_threading': self.config.use_threading}}def run_pipeline(self, num_records: int = 100000, output_path: str = "processed_data") -> Dict:"""运行完整的数据处理流水线"""self.logger.info("=== 开始高性能数据处理流水线 ===")# 重置计数器self.processed_count = 0self.error_count = 0start_time = time.time()try:# 生成数据data_gen = self.generate_sample_data(num_records)# 选择处理模式if self.config.enable_parallel:processed_df = self.process_parallel_safe(data_gen)else:processed_df = self.process_serial(data_gen)# 保存结果self.save_results(processed_df, output_path)# 生成报告total_time = time.time() - start_timereport = self.generate_performance_report(total_time, num_records)self.logger.info("=== 数据处理流水线完成 ===")return reportexcept Exception as e:self.logger.error(f"流水线执行失败: {e}")raisedef benchmark_pipeline_performance():"""性能基准测试"""print("=== 高性能数据处理流水线性能测试 ===")test_configs = [ProcessingConfig(enable_parallel=False, chunk_size=5000),ProcessingConfig(enable_parallel=True, num_workers=2, chunk_size=5000, use_threading=True),ProcessingConfig(enable_parallel=True, num_workers=4, chunk_size=5000, use_threading=True),]test_data_size = 20000  # 减少数据量以加快测试results = []for i, config in enumerate(test_configs):print(f"\n--- 测试配置 {i+1} ---")parallel_type = "线程并行" if config.use_threading and config.enable_parallel else "串行"if config.enable_parallel and not config.use_threading:parallel_type = "进程并行"print(f"处理模式: {parallel_type}")print(f"工作单元数: {config.num_workers if config.enable_parallel else 1}")print(f"数据块大小: {config.chunk_size}")pipeline = HighPerformanceDataPipeline(config)try:report = pipeline.run_pipeline(num_records=test_data_size,output_path=f"test_output_{i+1}")results.append(report)print(f"处理时间: {report['processing_time_seconds']:.2f} 秒")print(f"处理速度: {report['records_per_second']:.0f} 条/秒")print(f"成功率: {report['success_rate']:.1f}%")except Exception as e:print(f"测试失败: {e}")continue# 性能对比分析if len(results) > 1:print(f"\n=== 性能对比分析 ===")baseline_time = results[0]['processing_time_seconds']for i, result in enumerate(results):speedup = baseline_time / result['processing_time_seconds']print(f"配置 {i+1} 相对于串行的性能提升: {speedup:.2f}x")print(f"配置 {i+1} 成功处理: {result['processed_records']} 条记录")return results# 运行性能测试
try:performance_results = benchmark_pipeline_performance()except Exception as e:print(f"测试过程中发生错误: {e}")
8.7 学习总结与工程化开发指导
> 性能优化的系统性方法
通过本课学习,我们建立了完整的Python性能优化方法论。性能优化不是孤立的技巧收集,而是需要遵循科学的分析和改进流程:
分析阶段:使用性能分析工具准确定位瓶颈,避免过早优化和盲目猜测。
算法层面:从复杂度角度评估和选择合适的算法和数据结构。
实现层面:运用Python特定的优化技术,如生成器、向量化、内存优化等。
系统层面:合理使用并发和并行技术,充分利用硬件资源。
> 工程化开发的核心理念
代码质量先于性能:可读、可维护的代码是长期项目成功的基础。性能优化应该在保证代码质量的前提下进行。
测试驱动开发:完善的测试体系不仅保证功能正确性,更为重构和优化提供安全保障。
渐进式优化:从可工作的简单版本开始,通过测量和分析逐步优化,避免过度工程化。
文档和日志:良好的文档和日志系统是团队协作和问题诊断的重要工具。
> 实际项目应用指导
在实际的数据科学和AI项目中,性能优化往往决定了解决方案的可行性:
数据预处理阶段:运用内存优化和并行处理技术处理大规模数据集。
模型训练阶段:合理利用GPU加速和分布式计算框架。
模型服务阶段:优化推理性能,确保实时响应需求。
监控和维护:建立完善的性能监控体系,及时发现和解决性能问题。
> 与后续课程的连接
本课程建立的工程化开发基础将在机器学习项目中发挥重要作用。从数据处理流水线的构建,到模型训练的性能优化,再到生产环境的部署和监控,每个环节都需要本课所学的技能。
特别是在处理大规模数据和复杂模型时,性能优化能力往往是区分业余项目和专业解决方案的关键因素。
附录:专业术语表
性能分析(Performance Profiling):通过测量程序运行时的各项指标来识别性能瓶颈的系统性方法
时间复杂度(Time Complexity):描述算法运行时间如何随输入规模增长而变化的数学表示
空间复杂度(Space Complexity):描述算法使用的额外内存空间如何随输入规模变化的度量
生成器(Generator):Python中实现惰性求值的机制,能够按需生成数据而不需要一次性存储所有结果
向量化操作(Vectorization):将操作应用于整个数组而不是逐个元素的编程技术,通常能显著提升性能
并发编程(Concurrent Programming):设计程序使多个任务能够在重叠的时间段内执行的编程范式
多进程(Multiprocessing):利用多个独立进程并行执行任务的并发方式,适用于CPU密集型任务
多线程(Multithreading):在单个进程内使用多个执行线程的并发方式,适用于I/O密集型任务
异步编程(Asynchronous Programming):基于事件循环和协程的非阻塞编程模式,特别适合高并发I/O操作
单元测试(Unit Testing):对程序中最小可测试单元进行检查和验证的软件测试方法
代码覆盖率(Code Coverage):衡量测试代码执行覆盖程度的指标,包括行覆盖率、分支覆盖率等
内存映射(Memory Mapping):将文件或设备的内容映射到进程地址空间的技术,允许高效访问大文件
惰性求值(Lazy Evaluation):延迟计算直到真正需要结果时才执行的求值策略
GIL(Global Interpreter Lock):Python解释器中的全局锁,限制了多线程在CPU密集型任务中的效果

总结(89))
-图像修复与编辑)


)


![[react] react-router-dom是啥?](http://pic.xiahunao.cn/[react] react-router-dom是啥?)


深入无锁并发演进,AtomicInteger核心API详解与典型场景举例)