Juce实现Table自定义
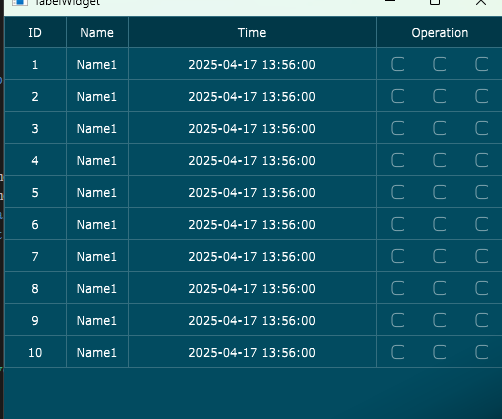
一.总体展示概及概述
在项目中Juce中TableList往往无法满足用户需求,头部和背景及背景颜色设置以及在Cell中添加自定义按钮,所以需要自己实现自定义TabelList,该示例是展示实现自定义TableList,实现自定义标题头及Item,程序员在使用过程中可以自己修改颜色皮肤,按需求实现相关功能。总体展示示例如下:
二.实现步骤
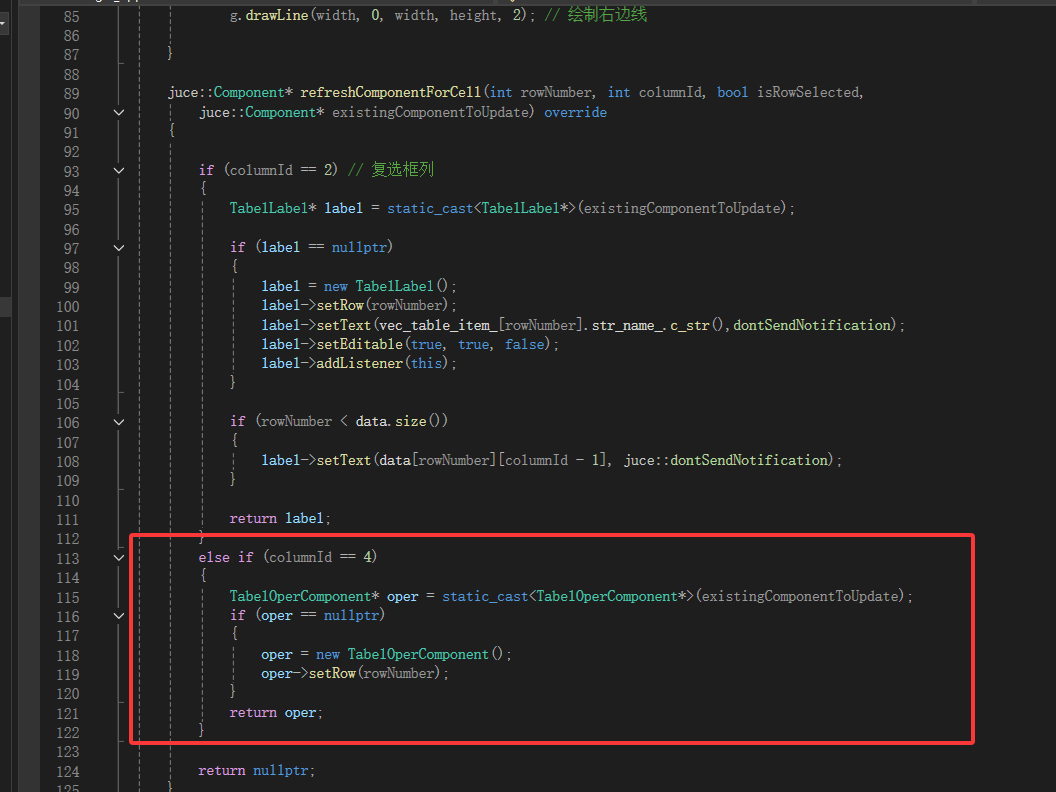
1.实现自定义TableListModel
实现TableListModel的背景绘制,绘制单元格,及重新实现单元格生成的控件函数,绘制单元格边线。
#pragma once#include <JuceHeader.h>
#include "TabelLookAndFeel.h"
#include "TableLabel.h"
#include "TabelOperCell.h"
#include <vector>
using namespace juce;class CustomTableModel :public juce::TableListBoxModel,public Label::Listener,public TabelOperComponent::Listener
{
public:struct TableItemInfo{std::string str_time_;std::string str_name_;bool b_checked = false;TableItemInfo(const std::string& str_time, const std::string& str_name,bool bChecked=false):str_time_(str_time), str_name_(str_name),b_checked(bChecked){}};public:CustomTableModel(std::vector<TableItemInfo>& items):vec_table_item_(items){}~CustomTableModel(){}int getNumRows() override{return vec_table_item_.size();}void paintRowBackground(juce::Graphics& g, int rowNumber, int width, int height, bool rowIsSelected) override{// 绘制行背景颜色juce::Colour bgColour(2,75,96);// = juce::Colour(8, 82.120);/* rowNumber % 2 ? juce::Colours::white//: juce::Colour(0xfff8f8f8);*/if (rowIsSelected)bgColour = Colour(127,191,127);g.fillAll(bgColour);// 绘制行底部分隔线//g.setColour(Colour(52,110,127));//g.drawLine(0, height - 1, width, height - 1);}void paintCell(juce::Graphics& g, int rowNumber, int columnId, int width, int height, bool rowIsSelected) override{//if (columnId != 1) // 非复选框列{// 设置文本样式g.setFont(juce::Font(14.0f));//g.setColour(rowIsSelected ? juce::Colours::black : juce::Colours::darkgrey);g.setColour(Colours::white);if (vec_table_item_.size() > rowNumber){if (columnId == 1){g.drawText(std::to_string(rowNumber+1), juce::Rectangle<int>(0, 0, width, height),juce::Justification::centred, true);}//else if (columnId == 2)//    g.drawText(vec_table_item_[rowNumber].str_name_.c_str(), juce::Rectangle<int>(0, 0, width, height),//        juce::Justification::centred, true);else if (columnId == 3)g.drawText(vec_table_item_[rowNumber].str_time_.c_str(), juce::Rectangle<int>(0, 0, width, height),juce::Justification::centred, true);}}// 绘制方格线g.setColour(Colour(52, 110, 127));//g.drawRect(0, 0, width, height);//g.drawLine(0, 0, width, 0, 2); // 绘制上边线g.drawLine(0, 0, 0, height, 2); // 绘制左边线g.drawLine(0, height, width, height, 2);// 绘制下边线if (columnId == 4)g.drawLine(width, 0, width, height, 2); // 绘制右边线}juce::Component* refreshComponentForCell(int rowNumber, int columnId, bool isRowSelected,juce::Component* existingComponentToUpdate) override{if (columnId == 2) // 复选框列{TabelLabel* label = static_cast<TabelLabel*>(existingComponentToUpdate);if (label == nullptr){label = new TabelLabel();label->setRow(rowNumber);label->setText(vec_table_item_[rowNumber].str_name_.c_str(),dontSendNotification);label->setEditable(true, true, false);label->addListener(this);}if (rowNumber < data.size()){label->setText(data[rowNumber][columnId - 1], juce::dontSendNotification);}return label;}else if (columnId == 4){TabelOperComponent* oper = static_cast<TabelOperComponent*>(existingComponentToUpdate);if (oper == nullptr){oper = new TabelOperComponent();oper->setRow(rowNumber);}return oper;}return nullptr;}// 设置 TableListBox 指针void setTable(juce::TableListBox* tableListBox){table = tableListBox;}// 处理标签文本更改事件void labelTextChanged(juce::Label* label) override{TabelLabel* label_new = static_cast<TabelLabel*>(label);int row = label_new->getRow();}void itemClicked(TabelOperComponent* oper, int type) override{int row = oper->getRow();}
private:juce::Array<juce::StringArray> data;juce::TableListBox* table = nullptr;std::vector<TableItemInfo>& vec_table_item_;juce::Array<bool> toggleStates;//CustomToggleLookAndFeel customToggleLookAndFeel;JUCE_DECLARE_NON_COPYABLE_WITH_LEAK_DETECTOR(CustomTableModel)
};
2.实现TableList的标题头
继承自LookAndFeel_V4 绘制Border,绘制列及绘制背景色
#pragma once
#include <JuceHeader.h>
using namespace juce;class CustomTableHeaderLookAndFeel : public juce::LookAndFeel_V4
{
public:void drawTableHeaderBackground(juce::Graphics& g, juce::TableHeaderComponent& header) override{// 绘制表头背景//auto color = ;auto color = Colours::black.fromFloatRGBA(0, 0, 0, 0.25);g.fillAll(color);}// 新增绘制表格边框的方法void drawTableBorder(juce::Graphics& g, juce::TableListBox& table){g.setColour(juce::Colour(52, 110, 127)); // 设置边框颜色juce::Rectangle<int> bounds = table.getLocalBounds();// 绘制上边框g.drawLine(bounds.getX(), bounds.getY(), bounds.getRight(), bounds.getY(), 1);// 绘制下边框//g.drawLine(bounds.getX(), bounds.getBottom(), bounds.getRight(), bounds.getBottom(), 1);// 绘制左边框//g.drawLine(bounds.getX(), bounds.getY(), bounds.getX(), bounds.getBottom(), 1);// 绘制右边框//g.drawLine(bounds.getRight(), bounds.getY(), bounds.getRight(), bounds.getBottom(), 1);}void drawTableHeaderColumn(juce::Graphics& g, juce::TableHeaderComponent& header,const juce::String& columnName, int columnId,int width, int height, bool isMouseOver,bool isMouseDown, int columnFlags) override{{// 其他列的文本绘制(与item文本样式一致)g.setFont(juce::Font(14.0f)); // 设置与item相同的字体大小g.setColour(juce::Colours::white);g.drawText(columnName, juce::Rectangle<int>(0, 0, width, height),juce::Justification::centred, true);}// 绘制列的边框线g.setColour(Colour(52, 110, 127)); // 设置边框线颜色//g.drawRect(0, 0, width, height, 1); // 绘制1px宽的边框线g.drawLine(0, 0, width, 0, 2); // 绘制上边线g.drawLine(0, 0, 0, height, 2); // 绘制左边线g.drawLine(0, height, width, height,2);if(columnId == 4)g.drawLine(width, 0, width, height, 2); // 绘制右边线}
};
3.在列中实现自定义button
在对应列中实现自定义component创建,如下所示:
对应自定义component的代码示例:简单实现了三个按钮,同学可以根据自己情况修改按钮,可以增加图标增加美观
class TabelOperComponent : public juce::Component,public juce::ToggleButton::Listener
{
public:static const int BTN_NUM = 3;class JUCE_API  Listener{public:/** Destructor. */virtual ~Listener() = default;virtual void itemClicked(TabelOperComponent* oper,int type) = 0;};void addListener(Listener* newListener) {const ScopedLock sl(listenerLock);listeners.addIfNotAlreadyThere(newListener);}void removeListener(Listener* listenerToRemove) {const ScopedLock sl(listenerLock);listeners.removeFirstMatchingValue(listenerToRemove);}TabelOperComponent();~TabelOperComponent() override {}void setRow(int row) { row_ = row; }int  getRow() { return row_; }void paint(juce::Graphics& g) override;void resized() override;virtual void buttonClicked(Button*) override;
private:int row_ = 0;CriticalSection listenerLock;Array<Listener*> listeners;juce::ToggleButton toggleButtons[BTN_NUM];JUCE_DECLARE_NON_COPYABLE_WITH_LEAK_DETECTOR(TabelOperComponent)
};
#include "TabelOperCell.h"
TabelOperComponent::TabelOperComponent()
{for (int i = 0; i < 3; ++i){addAndMakeVisible(toggleButtons[i]);}
}
void TabelOperComponent::paint(juce::Graphics& g)
{//g.fillAll(getLookAndFeel().findColour(juce::ResizableWindow::backgroundColourId));auto area = getLocalBounds().toFloat();g.setColour(Colour(52, 110, 127));int width = area.getWidth();int height = area.getHeight();g.drawLine(0, 0, 0, height, 2); g.drawLine(width, 0, width, height, 2); g.drawLine(0, height, width, height, 2);
}void TabelOperComponent::resized()
{auto area = getLocalBounds();int width = (area.getWidth()-6)/3;for (auto& button : toggleButtons){button.setBounds(area.removeFromLeft(width).withSizeKeepingCentre(16,16));area.removeFromLeft(2);}
}void TabelOperComponent::buttonClicked(Button* ptr_btn)
{for (int i = 0; i < BTN_NUM; i++){if (ptr_btn == &toggleButtons[i]){ScopedLock lock(listenerLock);for (int j = listeners.size(); --j >= 0;)if (auto* l = listeners[j])l->itemClicked(this,i);}}
}
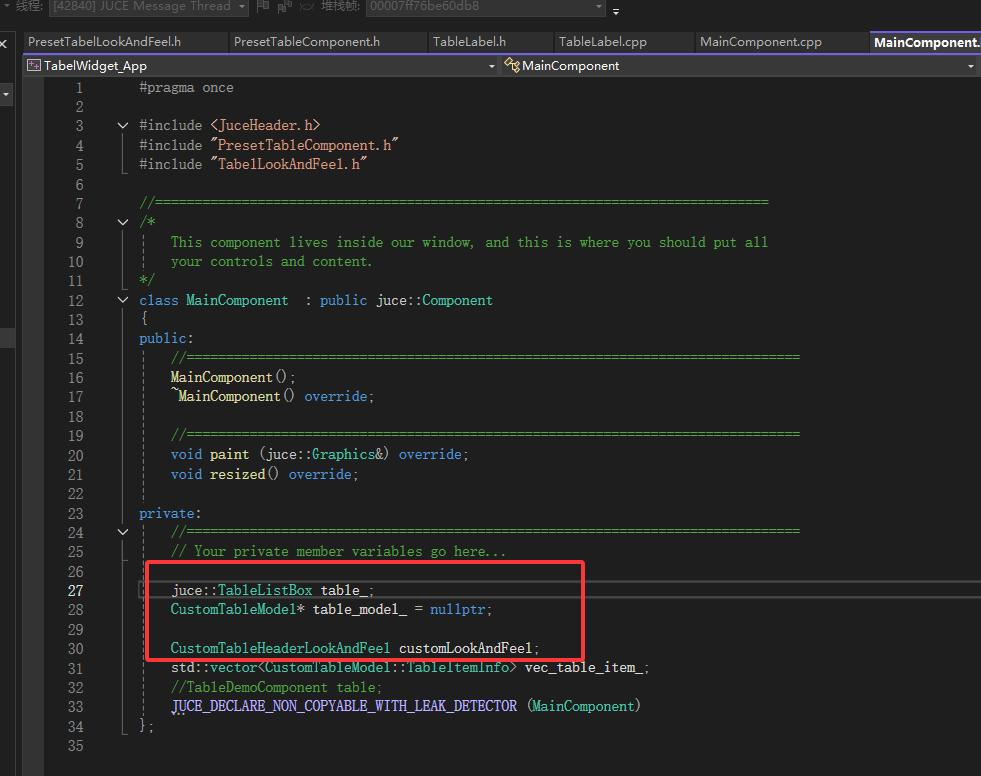
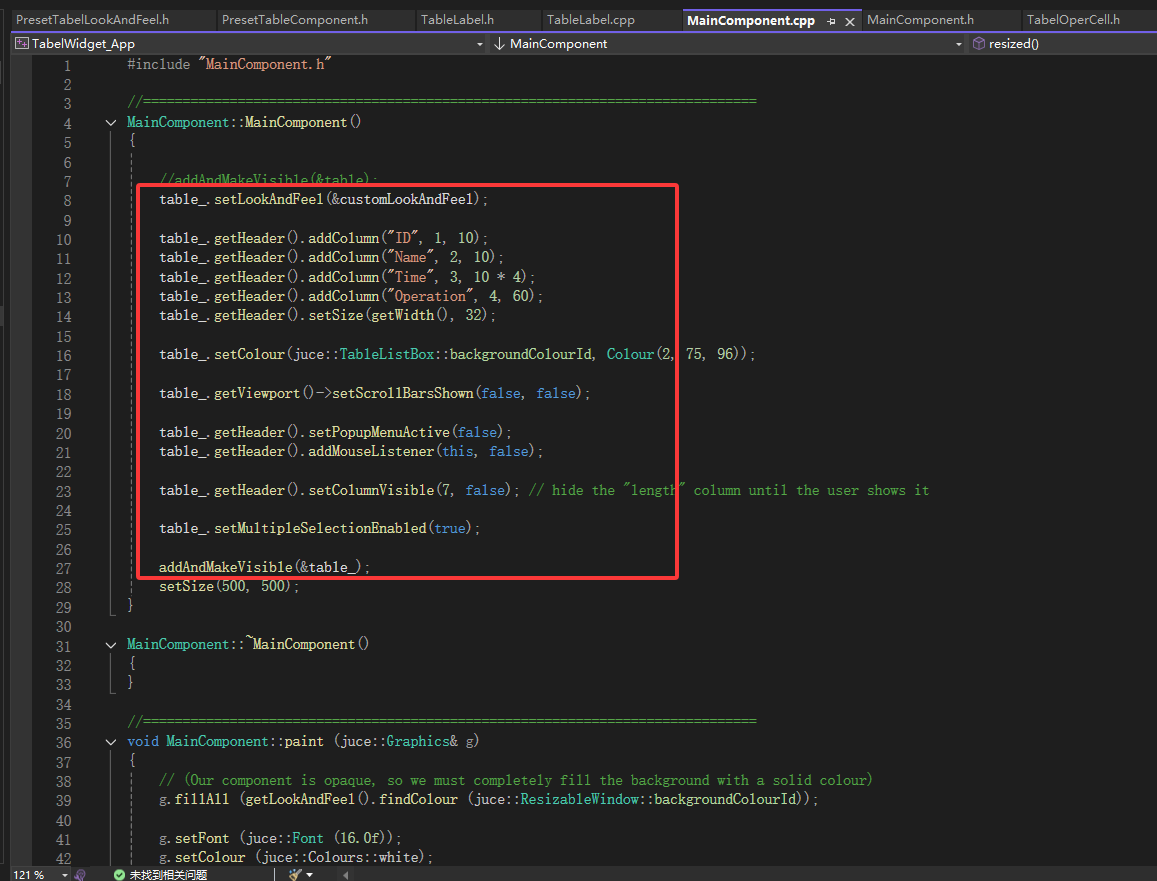
4.在MainCompoent中使用自定义TableList
使用Table和LookAndFeel并自定义了Item参数结构体,设置TableList的属性,并自定义添加Item条数。

示例代码如下:
#pragma once#include <JuceHeader.h>
#include "PresetTableComponent.h"
#include "TabelLookAndFeel.h"//==============================================================================
/*This component lives inside our window, and this is where you should put allyour controls and content.
*/
class MainComponent  : public juce::Component
{
public://==============================================================================MainComponent();~MainComponent() override;//==============================================================================void paint (juce::Graphics&) override;void resized() override;private://==============================================================================// Your private member variables go here...juce::TableListBox table_;CustomTableModel* table_model_ = nullptr;CustomTableHeaderLookAndFeel customLookAndFeel;std::vector<CustomTableModel::TableItemInfo> vec_table_item_;//TableDemoComponent table;JUCE_DECLARE_NON_COPYABLE_WITH_LEAK_DETECTOR (MainComponent)
};#include "MainComponent.h"//==============================================================================
MainComponent::MainComponent()
{//addAndMakeVisible(&table);table_.setLookAndFeel(&customLookAndFeel);table_.getHeader().addColumn("ID", 1, 10);table_.getHeader().addColumn("Name", 2, 10);table_.getHeader().addColumn("Time", 3, 10 * 4);table_.getHeader().addColumn("Operation", 4, 60);table_.getHeader().setSize(getWidth(), 32);table_.setColour(juce::TableListBox::backgroundColourId, Colour(2, 75, 96));table_.getViewport()->setScrollBarsShown(false, false);table_.getHeader().setPopupMenuActive(false);table_.getHeader().addMouseListener(this, false);table_.getHeader().setColumnVisible(7, false); // hide the "length" column until the user shows ittable_.setMultipleSelectionEnabled(true);addAndMakeVisible(&table_);setSize(500, 500);
}MainComponent::~MainComponent()
{
}//==============================================================================
void MainComponent::paint (juce::Graphics& g)
{// (Our component is opaque, so we must completely fill the background with a solid colour)g.fillAll (getLookAndFeel().findColour (juce::ResizableWindow::backgroundColourId));g.setFont (juce::Font (16.0f));g.setColour (juce::Colours::white);g.drawText ("Hello World!", getLocalBounds(), juce::Justification::centred, true);
}void MainComponent::resized()
{auto area = getLocalBounds();if (table_model_){table_.setModel(nullptr);delete table_model_;table_model_ = nullptr;}vec_table_item_.clear();for (int i = 0; i < 10; i++){vec_table_item_.emplace_back("2025-04-17 13:56:00", "Name1");}if (!table_model_){table_model_ = new CustomTableModel(vec_table_item_);table_.setModel(table_model_);table_model_->setTable(&table_);}auto tab_area = area;int colum_with = tab_area.getWidth() / 8;table_.setRowHeight(32);table_.getHeader().setColumnWidth(1, tab_area.removeFromLeft(colum_with).getWidth()); table_.getHeader().setColumnWidth(2, tab_area.removeFromLeft(colum_with).getWidth());table_.getHeader().setColumnWidth(3, tab_area.removeFromLeft(4 * colum_with).getWidth());table_.getHeader().setColumnWidth(4, tab_area.getWidth());table_.getHeader().setSize(getWidth(), 32);table_.getHeader().getProperties().set("allSelected", false);table_.setBounds(area);
}


)

)


:设计哲学是什么?)


)

:原理及源码解析)

![[Linux] MySQL源码编译安装](http://pic.xiahunao.cn/[Linux] MySQL源码编译安装)

