0. 前言
2025.6.11 NVIDIA Isaac GR00T N1 进化,英伟达发布了NVIDIA Isaac GR00T N1.5模型,效果比原先提高了不少,故来复现一下,看看能否应用于我的项目中:
代码页
项目页
模型页
以下是使用 GR00T N1.5 的一般步骤:
- 假设用户已经收集了机器人演示数据集,数据格式为(视频、状态、动作)三元组。
- 用户需要首先将演示数据转换为 LeRobot 兼容的数据格式(更多信息请参见
getting_started/LeRobot_compatible_data_schema.md, 该格式与上游的 Huggingface LeRobot兼容。 - 我们的代码库提供了针对不同机器人形态的训练配置示例。
- 我们的代码库提供了便捷的脚本,用于在用户数据上微调预训练的 GR00T N1.5 模型,以及运行推理。
- 用户需要将 Gr00tPolicy 连接到机器人控制器,以便在目标硬件上执行动作。
GR00T N1.5 主要面向人形机器人领域的研究人员和专业人士。代码库提供以下工具:
- 利用预训练的基础模型进行机器人控制
- 在小型自定义数据集上进行微调
- 使用最少的数据将模型适配到特定的机器人任务
- 部署模型用于推理
重点是能够通过微调来实现机器人行为的定制化。
1. 搭建环境
前置要求:
- 已在以下环境测试过代码:Ubuntu 20.04 and 22.04, GPU: H100, L40, RTX 4090 and A6000 for finetuning and Python==3.10, CUDA version 12.4.
- 对于推理任务,我们已在以下环境测试: Ubuntu 20.04 and 22.04, GPU: RTX 3090, RTX 4090 and A6000.
- 如果您尚未安装 CUDA 12.4,请按照此链接的说明进行安装。 here to install it.(如果没有安装可以按我下面的步骤)
- 如果您尚未安装 TensorRT,请按照此链接的说明进行安装。 here to install it.
- 请确保您的系统中已安装以下依赖项:
ffmpeg,libsm6,libxext6
# 正式步骤
git clone https://github.com/NVIDIA/Isaac-GR00T
cd Isaac-GR00Tconda create -n gr00t python=3.10
conda activate gr00t
pip install --upgrade setuptools
pip install -e .[base]## 安装cuda12.4
wget https://developer.download.nvidia.com/compute/cuda/12.4.0/local_installers/cuda_12.4.0_550.54.14_linux.run
sudo sh cuda_12.4.0_550.54.14_linux.run把驱动取消,只装下面3个
sudo vim ~/.bashrc文件末尾添加:
export PATH="/usr/local/cuda-12.4/bin:$PATH"
export LD_LIBRARY_PATH="/usr/local/cuda-12.4/lib64:$LD_LIBRARY_PATH"source ~/.bashrc
nvcc -V
显示:
nvcc: NVIDIA (R) Cuda compiler driver
Copyright (c) 2005-2024 NVIDIA Corporation
Built on Tue_Feb_27_16:19:38_PST_2024
Cuda compilation tools, release 12.4, V12.4.99
Build cuda_12.4.r12.4/compiler.33961263_0# 正式步骤
pip install --no-build-isolation flash-attn==2.7.1.post4
2. Getting started
他们提供了 Jupyter notebooks 和详细的文件在: ./getting_started 文件夹下. scripts 可以在 ./scripts 文件夹下找到. 另外,一个关于微调模型在 SO-101 robot 上的教程也是可用的。
2.1 数据格式和加载
为了加载和处理数据,使用了 Huggingface 的 LeRobot 数据,但采用了更为详细的模态和注释规范(我们称之为“LeRobot 兼容数据模式”)。
LeRobot 数据集的示例存放在:./demo_data/robot_sim.PickNPlace(其中包含一个额外的 modality.json 文件)。
关于数据集格式的详细说明,请参阅 getting_started/LeRobot_compatible_data_schema.md。
我们通过 EmbodimentTag 系统支持多种不同的实体(embodiments)。一旦您的数据按照该格式组织完毕,就可以使用 LeRobotSingleDataset 类来加载数据。
getting_started/0_load_dataset.ipynb 是一个可交互的教程在怎么去加载数据和运行他去和GR00T N1.5交互。
scripts/load_dataset.py 是一个可执行脚本,包括和ipynb中的相同内容。
0_load_dataset.ipynb
# # 数据集加载指南 for inference# ## LeRobot 格式
# * 本教程将演示如何使用我们的数据加载器加载 LeRobot 格式的数据。
# * 我们将以已经转换为 LeRobot 格式的 robot_sim.PickNPlace 数据集为例。
# * 如需了解如何转换你自己的数据集,请参考 [Gr00t's LeRobot.md](LeRobot_compatible_data_schema.md)# 用于数据结构的快速描述和可视化,通常用来打印或展示数据内容的结构和关键信息,便于调试和理解数据。
from gr00t.utils.misc import any_describe# 这是 LeRobot 格式数据集的主要加载类。用于加载、索引和访问机器人数据集中的样本,支持多模态数据(如视频、状态、动作、语言等)。
from gr00t.data.dataset import LeRobotSingleDataset# 用于配置每种数据模态(如视频、状态、动作、语言)的加载方式,包括指定哪些键、哪些帧(delta_indices)等。帮助灵活选择和组合数据输入。
from gr00t.data.dataset import ModalityConfig# 机体标签枚举,标识数据集或机器人属于哪种机体类型(如人形、机械臂等)。用于模型推理和微调时选择合适的动作头或策略。
from gr00t.data.schema import EmbodimentTag# ## 加载数据集
#
# 我们需要定义三样东西来加载数据集:
# 1. 数据集的路径
#
# 2. `ModalityConfigs`
#
# - `ModalityConfigs` 用于定义下游(如模型训练或推理)要使用哪些数据模态(如视频、状态、动作、语言)。
# - 每个模态通过 delta_indices 指定要加载哪一帧(例如 [0] 表示仅当前帧,[-1,0] 表示前一帧和当前帧)
#
# 3. `EmbodimentTag`
# - `EmbodimentTag` 用于指定数据集的机体类型。所有机体标签的列表可在 `gr00t.data.embodiment_tags.EmbodimentTag`中找到。
# - GR00T 的架构针对不同的机器人类型(机体)有不同的动作头优化。 `EmbodimentTag` 告诉模型在微调和/或推理时使用哪个动作头。在我们的例子中,由于我们使用的是类人手臂,所以指定 `EmbodimentTag.GR1_UNIFIED` 以获得类人动作头的最佳性能。
# # 1. 数据集路径
import os
import gr00t# REPO_PATH 是 pip install gr00t repo 的路径
# DATA_PATH 是 REPO_PATH+/demo_data/robot_sim.PickNPlace
REPO_PATH = os.path.dirname(os.path.dirname(gr00t.__file__))
DATA_PATH = os.path.join(REPO_PATH, "demo_data/robot_sim.PickNPlace")print("Loading dataset... from", DATA_PATH)# 2. modality configs
# 定义一个名为 modality_configs 的字典,用于存储不同模态(如视频、状态、动作、语言)的配置。
modality_configs = {"video": ModalityConfig(delta_indices=[0], #表示只取当前帧。modality_keys=["video.ego_view"], # 指定要加载的数据键为“video.ego_view”(即第一人称视角视频)。),"state": ModalityConfig(delta_indices=[0],modality_keys=["state.left_arm", # 表示要加载的状态信息,包括左臂的状态。"state.left_hand", # 表示要加载的状态信息,包括左手的状态。"state.left_leg", # 表示要加载的状态信息,包括左腿的状态。"state.neck", # 表示要加载的状态信息,包括脖子的状态。"state.right_arm", # 表示要加载的状态信息,包括右臂的状态。"state.right_hand", # 表示要加载的状态信息,包括右手的状态。"state.right_leg", # 表示要加载的状态信息,包括右腿的状态。"state.waist", # 表示要加载的状态信息,包括腰部的状态。],),"action": ModalityConfig(delta_indices=[0],modality_keys=["action.left_hand",# 表示要加载的动作信息,包括左手的动作。"action.right_hand",# 表示要加载的动作信息,包括右手的动作。],),"language": ModalityConfig(delta_indices=[0],# 指定要加载的语言信息,包括任务描述(annotation.human.action.task_description)和有效性标注(annotation.human.validity)。modality_keys=["annotation.human.action.task_description", "annotation.human.validity"],),
}# 3. gr00t embodiment tag
embodiment_tag = EmbodimentTag.GR1# 然后三个需要的东西都准备好了,可以加载数据集了。
dataset = LeRobotSingleDataset(DATA_PATH, modality_configs,  embodiment_tag=embodiment_tag)print('\n'*2)
print("="*100)
print(f"{' Humanoid Dataset ':=^100}")
print("="*100)# print the 7th data point
# 从数据集中取出第8个(下标为7,Python索引从0开始)样本,并将其赋值给变量 resp。
resp = dataset[7]
# 调用 any_describe 函数,对 resp 这个数据样本进行结构化描述和可视化,通常会输出该样本的主要内容、字段和数据类型,便于理解数据结构
any_describe(resp)
print("="*100)
# 打印 resp 这个数据样本的所有键(即包含哪些字段),帮助你快速了解该数据点包含哪些信息。
print(resp.keys())# 在数据中展示图像帧
# # show img
import matplotlib.pyplot as pltimages_list = [] # 新建一个空列表,用于存储采集到的图像帧。for i in range(100): # 循环遍历数据集的前 100 个样本,每隔 10 个取一个样本(即 i 为 0, 10, 20, ...),if i % 10 == 0:resp = dataset[i] # 赋值给 resp。img = resp["video.ego_view"][0] # 从 resp 中提取出第一人称视角的视频帧(即“video.ego_view”键对应的第一个元素),images_list.append(img) # 并将其添加到 images_list 列表中。fig, axs = plt.subplots(2, 5, figsize=(20, 10)) # 创建一个 2 行 5 列的子图窗口,整体大小为 20x10 英寸。
for i, ax in enumerate(axs.flat): # 遍历每个子图,将 images_list 中的图像显示在对应的子图上。ax.imshow(images_list[i])ax.axis("off") # 隐藏坐标轴,并设置每个子图的标题为 "Image i"。ax.set_title(f"Image {i}")
plt.tight_layout() # 调整子图以适应图形区域。
plt.show()# ## 数据转换
#
# 我们也可以对 LeRobotSingleDataset 类中的数据应用一系列变换。下面展示了如何对数据进行变换。from gr00t.data.transform.base import ComposedModalityTransform # 用于组合多个模态变换。
from gr00t.data.transform import VideoToTensor, VideoCrop, VideoResize, VideoColorJitter, VideoToNumpy # 视频模态的各种变换操作。
from gr00t.data.transform.state_action import StateActionToTensor, StateActionTransform # 状态和动作模态的变换操作。
from gr00t.data.transform.concat import ConcatTransform # 用于将不同模态的数据进行拼接的变换操作。video_modality = modality_configs["video"]
state_modality = modality_configs["state"]
action_modality = modality_configs["action"]# 创建一个组合变换对象 to_apply_transforms,里面包含一系列要应用到数据上的变换
to_apply_transforms = ComposedModalityTransform(transforms=[# video transformsVideoToTensor(apply_to=video_modality.modality_keys), # 将视频数据转为张量格式。VideoCrop(apply_to=video_modality.modality_keys, scale=0.95), # 对视频进行裁剪,保留 95% 的原始尺寸。# 将视频帧缩放到 224x224 像素,使用线性插值。VideoResize(apply_to=video_modality.modality_keys, height=224, width=224, interpolation="linear"),# 对视频帧进行颜色扰动(亮度、对比度、饱和度、色调)。VideoColorJitter(apply_to=video_modality.modality_keys, brightness=0.3, contrast=0.4, saturation=0.5, hue=0.08),# 将视频数据转为 numpy 数组。VideoToNumpy(apply_to=video_modality.modality_keys),# 状态模态的变换:StateActionToTensor(apply_to=state_modality.modality_keys),StateActionTransform(apply_to=state_modality.modality_keys, normalization_modes={key: "min_max" for key in state_modality.modality_keys}),# action transformsStateActionToTensor(apply_to=action_modality.modality_keys),StateActionTransform(apply_to=action_modality.modality_keys, normalization_modes={key: "min_max" for key in action_modality.modality_keys}),# 最后,将所有模态的数据按照指定顺序进行拼接,得到一个统一的数据结构,便于模型输入。ConcatTransform(video_concat_order=video_modality.modality_keys,state_concat_order=state_modality.modality_keys,action_concat_order=action_modality.modality_keys,),]
)# 现在可以观察数据在经过这些变换后的不同之处。
#
# 例如,状态和动作数据被归一化并拼接,视频图像被裁剪、缩放和颜色扰动。dataset = LeRobotSingleDataset(DATA_PATH,modality_configs,transforms=to_apply_transforms,embodiment_tag=embodiment_tag
)# print the 7th data point
resp = dataset[7] # 从数据集中取出第8个样本(索引为7),赋值给 resp。
any_describe(resp) # 调用 any_describe 函数,对 resp 这个样本进行结构化描述和可视化,输出其主要内容和字段信息。
print(resp.keys())# 第一次打印 resp 时,数据还没有经过 transform 处理,resp 是一个包含多个键(如 state.left_arm、state.left_hand、state.right_arm 等)的字典,每个身体部位的状态都是单独的字段。
# 这次打印时,数据已经经过了 transform(特别是 ConcatTransform 和 StateActionTransform),这些单独的状态字段已经被归一化并拼接成一个整体,通常会合并为一个 "state" 键,里面是一个统一的张量或数组,包含所有身体部位的状态信息。所以有44个值
尝试运行以下脚本去加载数据集:
python scripts/load_dataset.py --dataset-path ./demo_data/robot_sim.PickNPlace
2.2 GR00T 推理
本教程展示了如何使用 GR00T 推理模型,根据测试数据集中的观测值预测动作。
import os
import torch
import gr00tfrom gr00t.data.dataset import LeRobotSingleDataset
from gr00t.model.policy import Gr00tPolicy# 注释说明:需要根据实际情况修改下面的路径。
MODEL_PATH = "nvidia/GR00T-N1.5-3B"# REPO_PATH:获取 gr00t 包的安装路径的上一级目录,作为项目根目录。
REPO_PATH = os.path.dirname(os.path.dirname(gr00t.__file__))
DATASET_PATH = os.path.join(REPO_PATH, "demo_data/robot_sim.PickNPlace") # 拼接得到数据集的完整路径
EMBODIMENT_TAG = "gr1"device = "cuda" if torch.cuda.is_available() else "cpu"
加载预训练策略:
策略模型的加载方式与其他 huggingface 模型类似。
在 GR00T 模型中有两个新概念:
- modality config: 定义模型使用的数据字典中的键(如 action、state、annotation、video 等)
- modality_transform: 在数据加载过程中使用的一系列变换
这里看到有很多种具体机器人或机械臂的数据配置
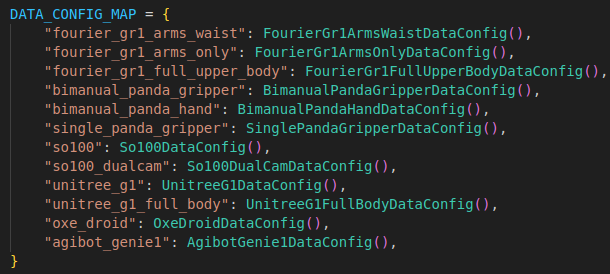
# 导入 GR00T 项目中的数据配置映射表 DATA_CONFIG_MAP,用于获取不同实验的数据配置。
from gr00t.experiment.data_config import DATA_CONFIG_MAP# 从 DATA_CONFIG_MAP 中获取名为 "fourier_gr1_arms_only" 的数据配置对象,通常对应某种特定的实验或数据处理方案。
data_config = DATA_CONFIG_MAP["fourier_gr1_arms_only"]
# 调用 data_config 的 modality_config 方法,获取模型需要的数据模态配置(如哪些键、数据结构等)。
modality_config = data_config.modality_config()
modality_transform = data_config.transform()device = "cuda:1" # 我这里有两个GPU,这是选择第二个
# 创建 Gr00tPolicy 策略模型对象,参数包括:
policy = Gr00tPolicy(model_path=MODEL_PATH,embodiment_tag=EMBODIMENT_TAG,modality_config=modality_config,modality_transform=modality_transform,device=device,
)# print out the policy model architecture
print(policy.model)
这是最后打印出的模型架构:
 分块解释一下:
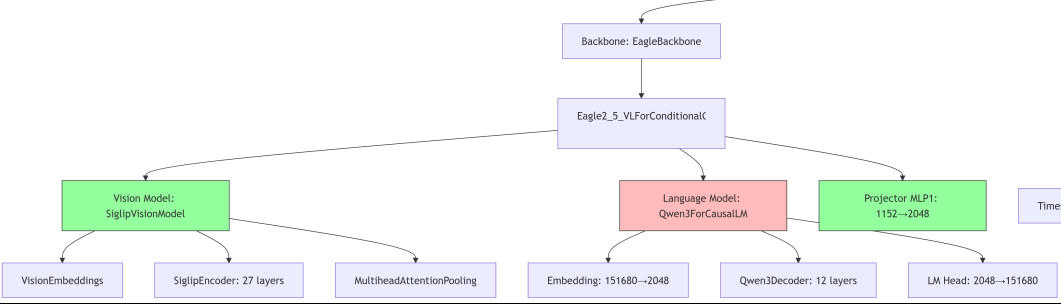 视觉部分:
视觉部分:
(vision_model): SiglipVisionModel((vision_model): SiglipVisionTransformer((embeddings): SiglipVisionEmbeddings((patch_embedding): Conv2d(3, 1152, kernel_size=(14, 14), stride=(14, 14), padding=valid)(position_embedding): Embedding(256, 1152))(encoder): SiglipEncoder((layers): ModuleList((0-26): 27 x SiglipEncoderLayer((layer_norm1): LayerNorm((1152,), eps=1e-06, elementwise_affine=True)(self_attn): SiglipAttention((k_proj): Linear(in_features=1152, out_features=1152, bias=True)(v_proj): Linear(in_features=1152, out_features=1152, bias=True)(q_proj): Linear(in_features=1152, out_features=1152, bias=True)(out_proj): Linear(in_features=1152, out_features=1152, bias=True))(layer_norm2): LayerNorm((1152,), eps=1e-06, elementwise_affine=True)(mlp): SiglipMLP((activation_fn): PytorchGELUTanh()(fc1): Linear(in_features=1152, out_features=4304, bias=True)(fc2): Linear(in_features=4304, out_features=1152, bias=True)))))(post_layernorm): LayerNorm((1152,), eps=1e-06, elementwise_affine=True)(head): SiglipMultiheadAttentionPoolingHead((attention): MultiheadAttention((out_proj): NonDynamicallyQuantizableLinear(in_features=1152, out_features=1152, bias=True))(layernorm): LayerNorm((1152,), eps=1e-06, elementwise_affine=True)(mlp): SiglipMLP((activation_fn): PytorchGELUTanh()(fc1): Linear(in_features=1152, out_features=4304, bias=True)(fc2): Linear(in_features=4304, out_features=1152, bias=True)))))
语言部分:
(language_model): Qwen3ForCausalLM((model): Qwen3Model((embed_tokens): Embedding(151680, 2048)(layers): ModuleList((0-11): 12 x Qwen3DecoderLayer((self_attn): Qwen3Attention((q_proj): Linear(in_features=2048, out_features=2048, bias=False)(k_proj): Linear(in_features=2048, out_features=1024, bias=False)(v_proj): Linear(in_features=2048, out_features=1024, bias=False)(o_proj): Linear(in_features=2048, out_features=2048, bias=False)(q_norm): Qwen3RMSNorm((128,), eps=1e-06)(k_norm): Qwen3RMSNorm((128,), eps=1e-06))(mlp): Qwen3MLP((gate_proj): Linear(in_features=2048, out_features=6144, bias=False)(up_proj): Linear(in_features=2048, out_features=6144, bias=False)(down_proj): Linear(in_features=6144, out_features=2048, bias=False)(act_fn): SiLU())(input_layernorm): Qwen3RMSNorm((2048,), eps=1e-06)(post_attention_layernorm): Qwen3RMSNorm((2048,), eps=1e-06)))(norm): Qwen3RMSNorm((2048,), eps=1e-06)(rotary_emb): Qwen3RotaryEmbedding())(lm_head): Linear(in_features=2048, out_features=151680, bias=False))(mlp1): Sequential((0): Linear(in_features=1152, out_features=2048, bias=True)))(eagle_linear): Identity())
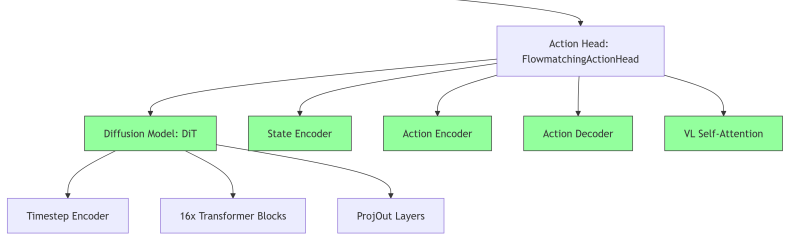
(action_head): FlowmatchingActionHead((model): DiT((timestep_encoder): TimestepEncoder((time_proj): Timesteps()(timestep_embedder): TimestepEmbedding((linear_1): Linear(in_features=256, out_features=1536, bias=True)(act): SiLU()(linear_2): Linear(in_features=1536, out_features=1536, bias=True)))(transformer_blocks): ModuleList((0): BasicTransformerBlock((norm1): AdaLayerNorm((silu): SiLU()(linear): Linear(in_features=1536, out_features=3072, bias=True)(norm): LayerNorm((1536,), eps=1e-05, elementwise_affine=False))(attn1): Attention((to_q): Linear(in_features=1536, out_features=1536, bias=True)(to_k): Linear(in_features=2048, out_features=1536, bias=True)(to_v): Linear(in_features=2048, out_features=1536, bias=True)(to_out): ModuleList((0): Linear(in_features=1536, out_features=1536, bias=True)(1): Dropout(p=0.2, inplace=False)))(norm3): LayerNorm((1536,), eps=1e-05, elementwise_affine=False)(ff): FeedForward((net): ModuleList((0): GELU((proj): Linear(in_features=1536, out_features=6144, bias=True))(1): Dropout(p=0.2, inplace=False)(2): Linear(in_features=6144, out_features=1536, bias=True)(3): Dropout(p=0.2, inplace=False)))(final_dropout): Dropout(p=0.2, inplace=False))......(15): BasicTransformerBlock((norm1): AdaLayerNorm((silu): SiLU()(linear): Linear(in_features=1536, out_features=3072, bias=True)(norm): LayerNorm((1536,), eps=1e-05, elementwise_affine=False))(attn1): Attention((to_q): Linear(in_features=1536, out_features=1536, bias=True)(to_k): Linear(in_features=1536, out_features=1536, bias=True)(to_v): Linear(in_features=1536, out_features=1536, bias=True)(to_out): ModuleList((0): Linear(in_features=1536, out_features=1536, bias=True)(1): Dropout(p=0.2, inplace=False)))(norm3): LayerNorm((1536,), eps=1e-05, elementwise_affine=False)(ff): FeedForward((net): ModuleList((0): GELU((proj): Linear(in_features=1536, out_features=6144, bias=True))(1): Dropout(p=0.2, inplace=False)(2): Linear(in_features=6144, out_features=1536, bias=True)(3): Dropout(p=0.2, inplace=False)))(final_dropout): Dropout(p=0.2, inplace=False)))(norm_out): LayerNorm((1536,), eps=1e-06, elementwise_affine=False)(proj_out_1): Linear(in_features=1536, out_features=3072, bias=True)(proj_out_2): Linear(in_features=1536, out_features=1024, bias=True))(state_encoder): CategorySpecificMLP((layer1): CategorySpecificLinear()(layer2): CategorySpecificLinear())(action_encoder): MultiEmbodimentActionEncoder((W1): CategorySpecificLinear()(W2): CategorySpecificLinear()(W3): CategorySpecificLinear()(pos_encoding): SinusoidalPositionalEncoding())(action_decoder): CategorySpecificMLP((layer1): CategorySpecificLinear()(layer2): CategorySpecificLinear())(vlln): LayerNorm((2048,), eps=1e-05, elementwise_affine=True)(vl_self_attention): SelfAttentionTransformer((transformer_blocks): ModuleList((0-3): 4 x BasicTransformerBlock((norm1): LayerNorm((2048,), eps=1e-05, elementwise_affine=True)(attn1): Attention((to_q): Linear(in_features=2048, out_features=2048, bias=True)(to_k): Linear(in_features=2048, out_features=2048, bias=True)(to_v): Linear(in_features=2048, out_features=2048, bias=True)(to_out): ModuleList((0): Linear(in_features=2048, out_features=2048, bias=True)(1): Dropout(p=0.2, inplace=False)))(norm3): LayerNorm((2048,), eps=1e-05, elementwise_affine=True)(ff): FeedForward((net): ModuleList((0): GELU((proj): Linear(in_features=2048, out_features=8192, bias=True))(1): Dropout(p=0.2, inplace=False)(2): Linear(in_features=8192, out_features=2048, bias=True)(3): Dropout(p=0.2, inplace=False)))(final_dropout): Dropout(p=0.2, inplace=False))))(position_embedding): Embedding(1024, 1536))
)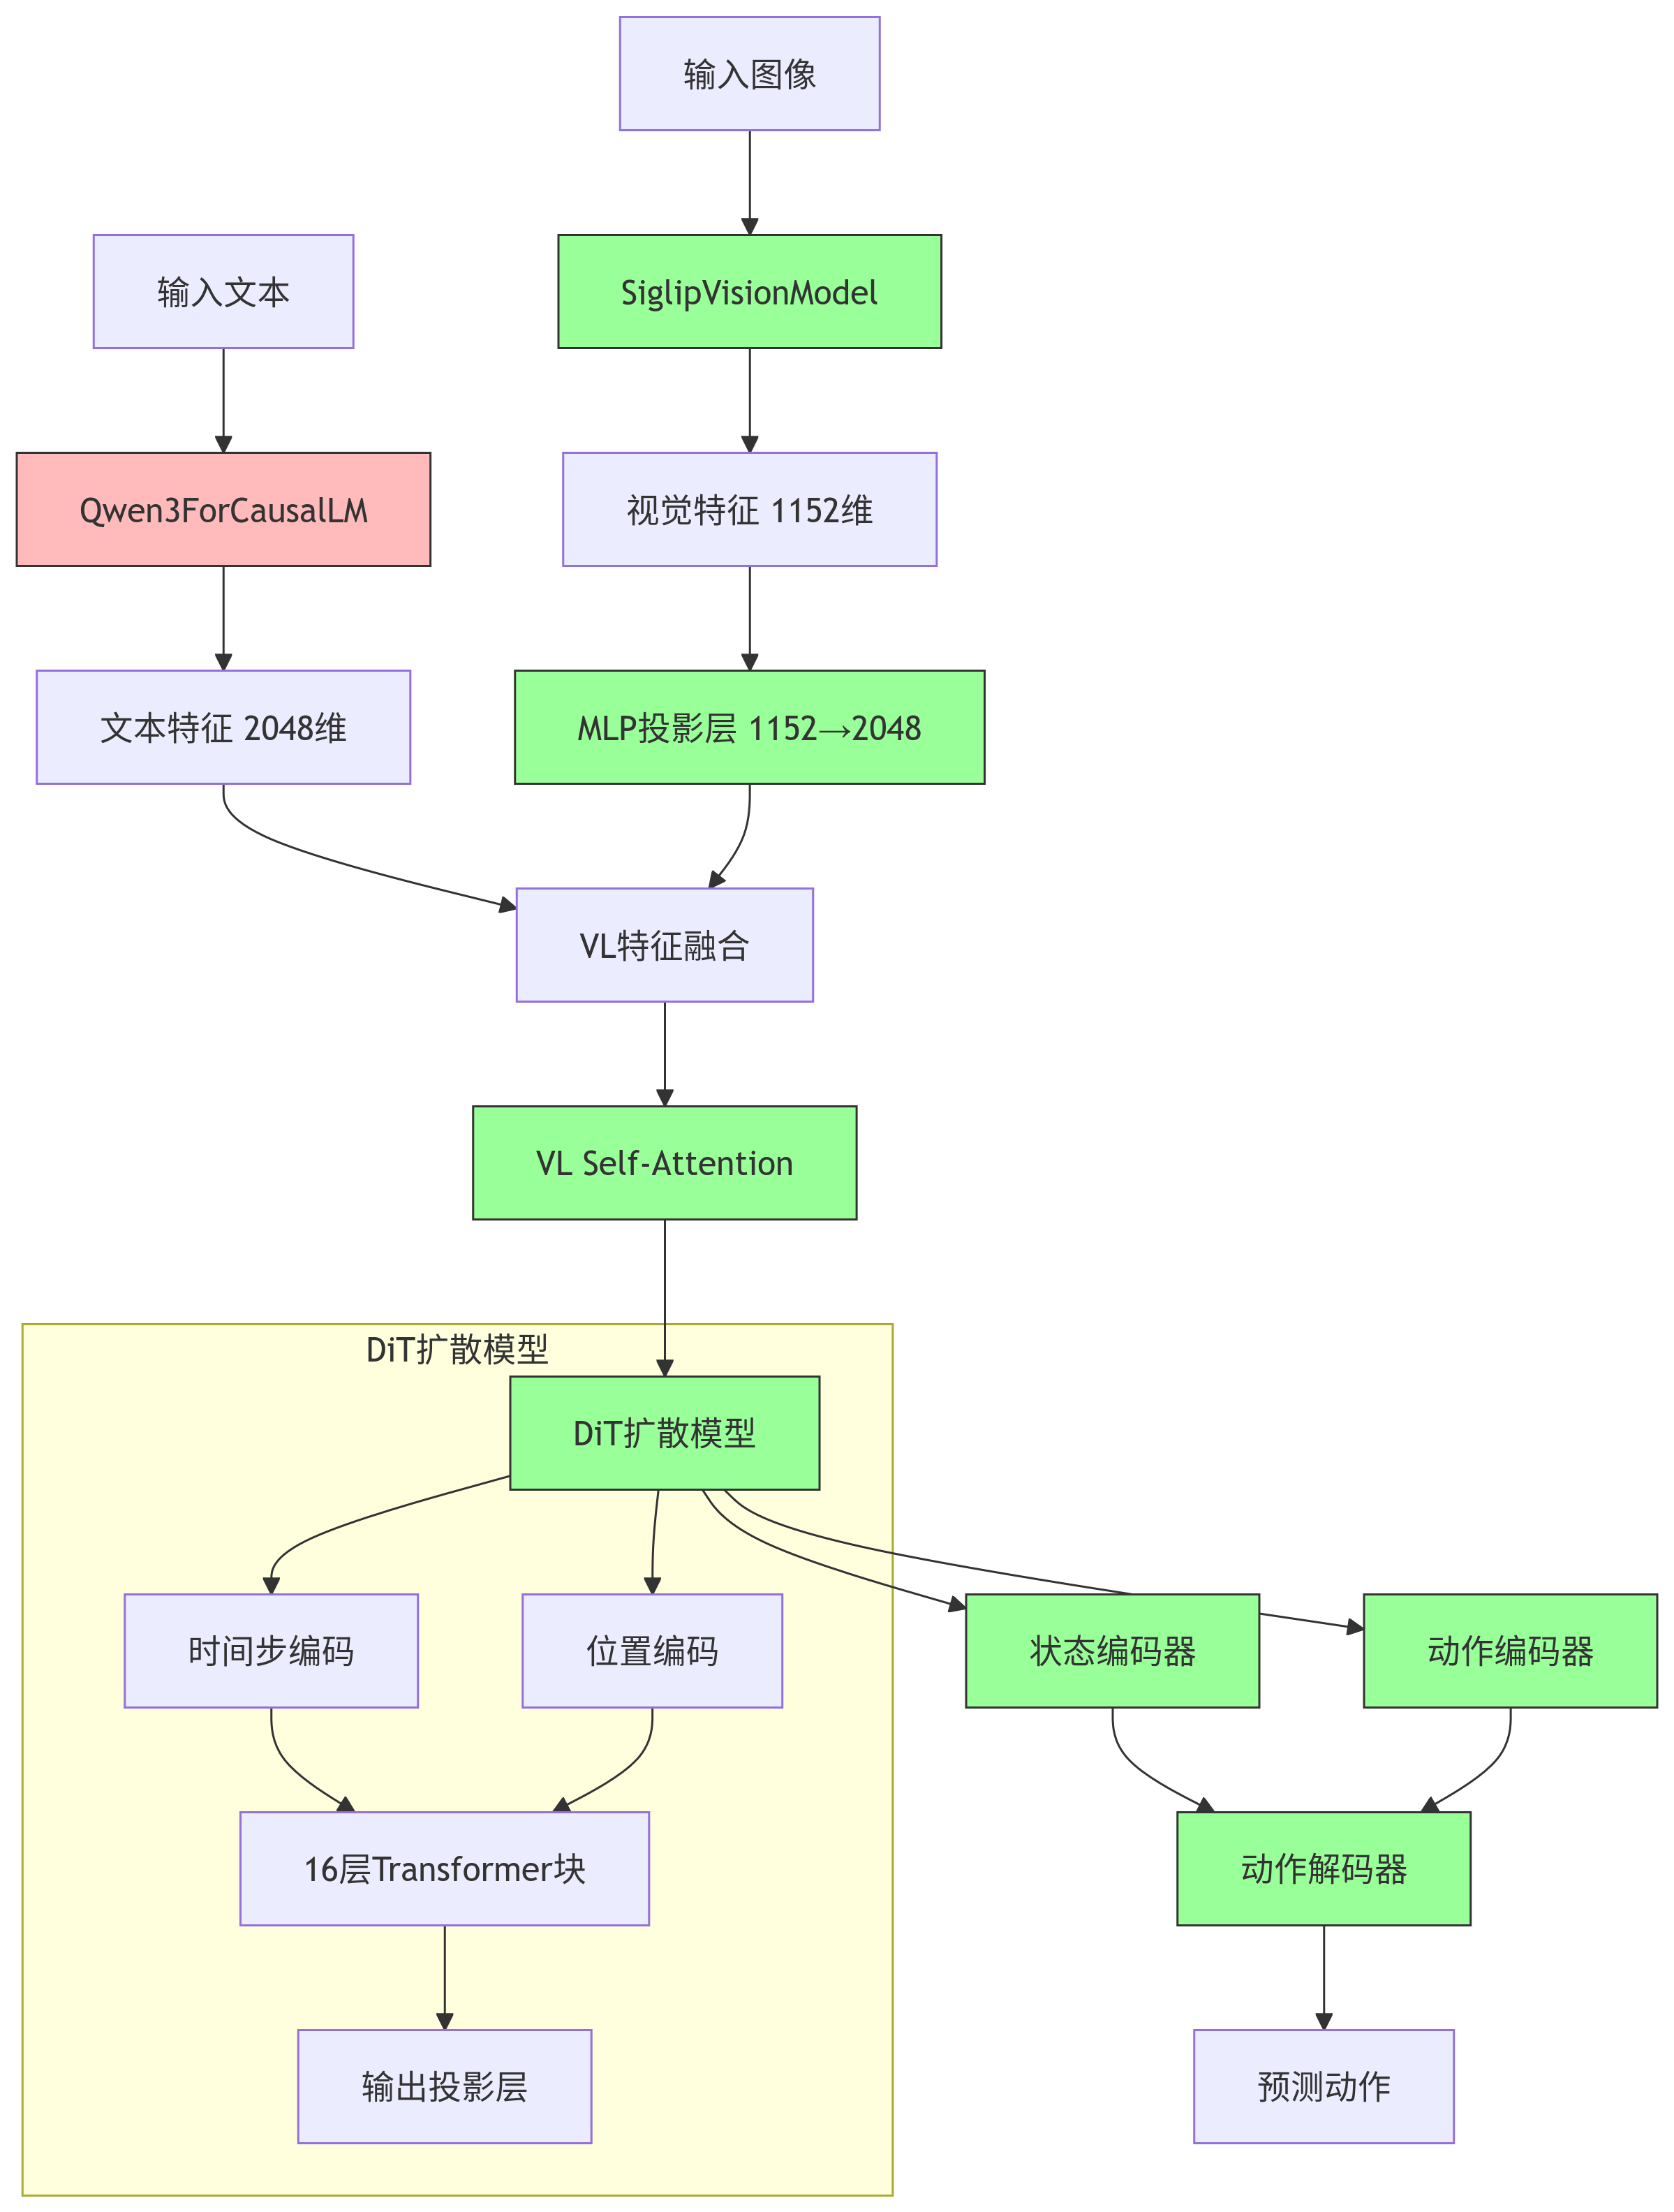 DiT负责"理解和推理",Action Decoder负责"具体执行",两者分工明确。
加载数据集
import numpy as npmodality_config = policy.modality_configprint(modality_config.keys())# 开始遍历模态配置字典中的每一个键值对,key 是模态名称,value 是对应的配置信息。
for key, value in modality_config.items():# 检查当前的 value 是否为 NumPy 数组类型。某些配置信息可能以数组形式存储。if isinstance(value, np.ndarray): # 如果是数组,则打印数组的形状。print(key, value.shape)else:print(key, value) # 如果是其他类型,则直接打印键值对。# 这段代码用于检查和显示 GR00T 策略模型的模态配置信息,帮助用户了解模型支持哪些输入模态(如视频、状态、动作、语言指令等)以及它们的具体配置。# 创建数据集
dataset = LeRobotSingleDataset(dataset_path=DATASET_PATH,modality_configs=modality_config,video_backend="decord", # 指定视频解码后端为 "decord"。Decord 是一个高效的视频解码库,用于从视频文件中提取帧数据。video_backend_kwargs=None, #视频后端的额外参数设置为 None,表示使用默认配置,不传递特殊参数给视频解码器。transforms=None,  # 我们将在策略中单独处理变换,而不在数据集加载阶段进行。embodiment_tag=EMBODIMENT_TAG,
)
我们来打印一个数据样本:
import numpy as npstep_data = dataset[0] # 获取的是 episode_index=0(梨的轨迹)的 第0个时间步,该轨迹总共有 416个时间步print(step_data)print("\n\n ====================================")
for key, value in step_data.items():if isinstance(value, np.ndarray):print(key, value.shape)else:print(key, value)
显示结果:
数据...====================================
video.ego_view (1, 256, 256, 3)
state.left_arm (1, 7)
state.right_arm (1, 7)
state.left_hand (1, 6)
state.right_hand (1, 6)
action.left_arm (16, 7)
action.right_arm (16, 7)
action.left_hand (16, 6)
action.right_hand (16, 6)
annotation.human.action.task_description ['pick the pear from the counter and place it in the plate']
- vedio:1: 时间步数量(当前时刻的1帧);256, 256: 图像的高度和宽度(像素);3: RGB三个颜色通道
- state:1: 时间步数量(当前时刻);7: 左/右臂的7个关节角度;6: 左/右手的6个手指关节角度
- action:16: 动作预测视野(Action Horizon)预测的未来16个时间步的动作;7: 同状态,7个手臂关节的目标角度;6:6个手指关节角度
- task_description:自然语言描述的任务指令自然语言描述的任务指令
注意:数据集包含多个轨迹(trajectories),比如:
trajectory_ids: [0, 1, 2] # 3个轨迹
trajectory_lengths: [3, 2, 4] # 每个轨迹的长度
all_steps将所有轨迹的所有时间步展平成一个列表
all_steps: [
(0, 0), (0, 1), (0, 2), # 轨迹0的3个时间步
(1, 0), (1, 1), # 轨迹1的2个时间步
(2, 0), (2, 1), (2, 2), (2, 3) # 轨迹2的4个时间步
]
dataset[0] 实际调用的方法→ dataset.getitem(0) → all_steps[0] → (trajectory_id=0, base_index=0)
def __getitem__(self, index: int) -> dict:"""Get the data for a single step in a trajectory.Args:index (int): The index of the step to get.Returns:dict: The data for the step."""trajectory_id, base_index = self.all_steps[index]return self.transforms(self.get_step_data(trajectory_id, base_index))
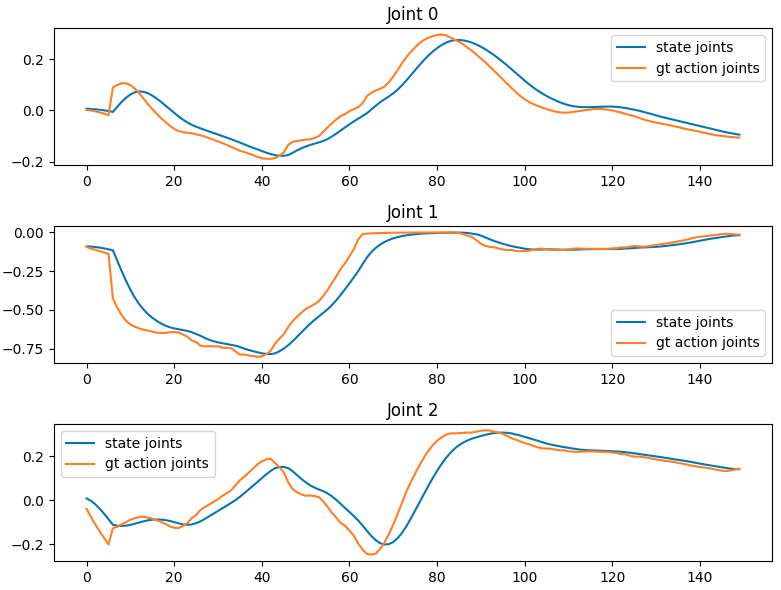
让我们只绘制"右手"的状态和动作数据,看看它们是什么样子的。同时显示右手状态对应的图像。
import matplotlib.pyplot as plttraj_id = 0 # 设置轨迹ID为0,表示要分析数据集中的第0条轨迹(第一条演示轨迹)。
max_steps = 150 # 设置最大步数为150,表示要分析这条轨迹的前150个时间步。state_joints_across_time = [] # 创建空列表,用于存储不同时间步的状态关节数据。
gt_action_joints_across_time = [] # 创建空列表,用于存储不同时间步的真实动作关节数据(ground truth)。
images = [] # 创建空列表,用于存储采样的图像数据。sample_images = 6 # 设置要采样的图像数量为6。for step_count in range(max_steps): # 遍历每个时间步。data_point = dataset.get_step_data(traj_id, step_count) # 从数据集中获取指定轨迹和时间步的数据点。state_joints = data_point["state.right_arm"][0] # 从数据点中提取右手臂的状态关节数据,[0] 表示取第一个(通常是当前时刻)。gt_action_joints = data_point["action.right_arm"][0] # 提取右手臂的真实动作关节数据。state_joints_across_time.append(state_joints) # 将当前时间步的状态关节数据添加到列表中。gt_action_joints_across_time.append(gt_action_joints)# We 可以获取图像数据。if step_count % (max_steps // sample_images) == 0: # 判断是否需要采样图像。每隔 max_steps // sample_images(约25步)采样一次。image = data_point["video.ego_view"][0] # 获取第一人称视角(ego view)的图像数据。images.append(image) # 将采样的图像添加到图像列表中。# Size is (max_steps, num_joints == 7) 150个时间步 × 7个关节。
state_joints_across_time = np.array(state_joints_across_time) #将状态关节列表转换为NumPy数组,便于后续处理。
gt_action_joints_across_time = np.array(gt_action_joints_across_time) #将真实动作关节列表转换为NumPy数组,便于后续处理。# 接下来要绘制关节角度随时间的变化。
# 创建包含7个子图的图形,每个关节一个子图,图形大小为8×14英寸。
fig, axes = plt.subplots(nrows=7, ncols=1, figsize=(8, 2*7))for i, ax in enumerate(axes):ax.plot(state_joints_across_time[:, i], label="state joints")ax.plot(gt_action_joints_across_time[:, i], label="gt action joints")ax.set_title(f"Joint {i}")ax.legend()plt.tight_layout()
plt.show()# 创建1行6列的子图,用于显示6张采样图像,图形大小为16×4英寸。
fig, axes = plt.subplots(nrows=1, ncols=sample_images, figsize=(16, 4))for i, ax in enumerate(axes):ax.imshow(images[i])ax.axis("off")# 状态数据 (State):
# 表示机器人当前的实际状态
# 即机器人关节的当前位置/角度
# 是观测到的真实值
# 回答"机器人现在在哪里?"# 动作数据 (Action):
# 表示机器人要执行的动作指令
# 即机器人关节的目标位置/角度
# 是要执行的命令值
# 回答"机器人接下来要去哪里?"# 数据集中已经准备好了当前的状态和应该是什么状态,然后让模型去学习/调整参数去预测这种变化,使得模型在之后相同的情况下就可以正确的预测动作

理解动作输出
动作输出中的每个关节都有形状为 (16, N) 的张量,其中 N 是该关节的自由度。
- 16 代表动作视野(对时间步 t, t+1, t+2, …, t+15 的预测)
对于每个手臂(左手臂和右手臂):
- 7个手臂关节:
- 肩部俯仰
- 肩部侧摆
- 肩部偏航
- 肘部俯仰
- 腕部偏航
- 腕部侧摆
- 腕部俯仰
对于每只手(左手和右手):
- 6个手指关节:
- 小指
- 无名指
- 中指
- 食指
- 拇指旋转
- 拇指弯曲
对于腰部:
- 3个关节:
- 躯干腰部偏航
- 躯干腰部俯仰
- 躯干腰部侧摆
2.3 微调
本教程展示了如何在使用相同机器人实体的后训练数据集上微调 GR00T-N1.5 预训练检查点。这展示了后训练的好处,将通用模型转换为专用模型,并展示了性能提升。
GR00T-N1.5 公开支持以下机器人实体:
| 实体标签 | 描述 |
|---|---|
| gr1 | The GR1 dataset |
| oxe_droid | The OxE Droid dataset |
| agibot_genie1 | The AgiBot Genie-1 with gripper dataset |
| new_embodiment | Any new embodiment for finetuning |
详情请参考 (…/gr00t/data/embodiment_tags.py)
在本教程中,我们将使用来自 demo_data 文件夹的演示数据集 robot_sim.PickNPlace。
我们将首先加载预训练模型并在数据集上进行评估。然后我们将在数据集上微调模型并评估性能。
评估预训练模型
# 这个函数用于计算单个轨迹的均方误差(MSE),是评估模型预测准确性的重要指标。
from gr00t.utils.eval import calc_mse_for_single_trajectory
import warnings
from gr00t.experiment.data_config import DATA_CONFIG_MAP
from gr00t.model.policy import Gr00tPolicy
from gr00t.data.schema import EmbodimentTag
from gr00t.data.dataset import LeRobotSingleDataset
import numpy as np
import torchdevice = "cuda" if torch.cuda.is_available() else "cpu"device = "cuda:1"
warnings.simplefilter("ignore", category=FutureWarning)PRE_TRAINED_MODEL_PATH = "/home/strawberry/zzy/VLA/GR00T-N1.5-3B" # 设置预训练模型路径
EMBODIMENT_TAG = EmbodimentTag.GR1
DATASET_PATH = "../demo_data/robot_sim.PickNPlace"# 数据配置和变换
data_config = DATA_CONFIG_MAP["fourier_gr1_arms_only"]
modality_config = data_config.modality_config()
modality_transform = data_config.transform()# 加载预训练模型
pre_trained_policy = Gr00tPolicy(model_path=PRE_TRAINED_MODEL_PATH,embodiment_tag=EMBODIMENT_TAG,modality_config=modality_config,modality_transform=modality_transform,device=device,
)# 数据集创建
dataset = LeRobotSingleDataset(dataset_path=DATASET_PATH,modality_configs=modality_config,video_backend="decord",video_backend_kwargs=None,transforms=None,  # We'll handle transforms separately through the policyembodiment_tag=EMBODIMENT_TAG,
)# 计算MSE损失
mse = calc_mse_for_single_trajectory(pre_trained_policy,dataset,traj_id=0,modality_keys=["right_arm", "right_hand"],   # 评估的模态键,只评估右臂和右手,6+7个关节steps=150, # 评估150个时间步action_horizon=16, # 动作预测视野为16步plot=True # 生成可视化图表
)print("MSE loss for trajectory 0:", mse)
每次预测16步,每16步预测之后的16步,
inferencing at step: 0
inferencing at step: 16
inferencing at step: 32
inferencing at step: 48
inferencing at step: 64
inferencing at step: 80
inferencing at step: 96
inferencing at step: 112
inferencing at step: 128
inferencing at step: 144
Unnormalized Action MSE across single traj: 1.0060755334984017
state_joints vs time (150, 13)
gt_action_joints vs time (150, 13)
pred_action_joints vs time (150, 13)
每个时间步都有当前的状态,目标动作,预测出的动作。
这样的图共有13张,对应每个关节。
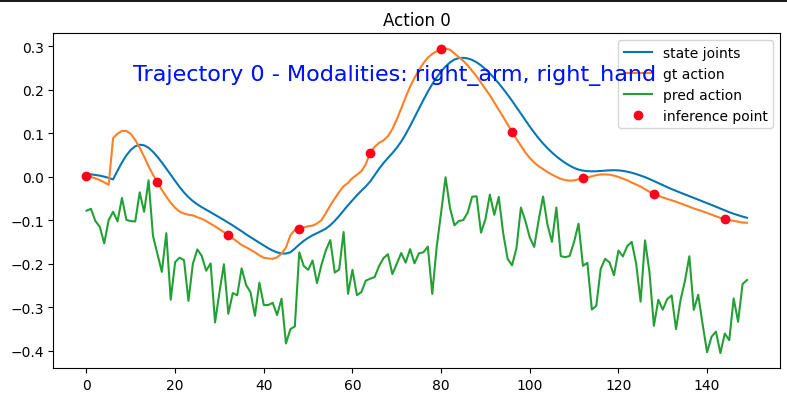
MSE 就是在计算模型预测动作与真实动作之间的均方误差。
mse = np.mean((gt_action_across_time - pred_action_across_time) ** 2)
预测波动大 vs 真实动作稳定会导致:机器人抖动:执行时关节会出现不必要的震颤
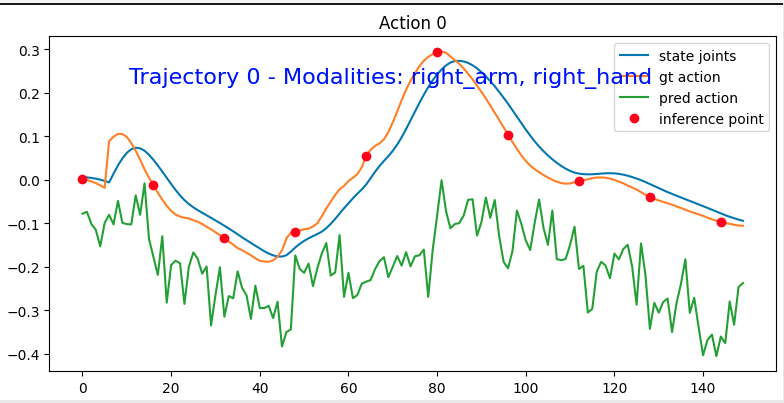
我们可以看到预测动作和真实动作的对比。预测动作虽然不完美,但与真实动作非常接近。这表明预训练检查点运行良好。
现在让我们随机采样10条轨迹并计算平均MSE,以获得更全面的结果。
total_trajectories = len(dataset.trajectory_lengths) # 我们这一共就5条print("Total trajectories:", total_trajectories)sampled_trajectories = np.random.choice(total_trajectories, 10) # 取10条轨迹则肯定有重复的
print("Sampled trajectories:", sampled_trajectories)all_mses = []
# 遍历10条轨迹,计算每条轨迹的MSE
for traj_id in sampled_trajectories:mse = calc_mse_for_single_trajectory(pre_trained_policy,dataset,traj_id=traj_id,modality_keys=["right_arm", "right_hand"],   # we will only evaluate the right arm and right handsteps=150,action_horizon=16,plot=False)print(f"Trajectory {traj_id} MSE: {mse:.4f}")all_mses.append(mse)print("====================================")
print("Mean MSE:", np.mean(all_mses))
print("Std MSE:", np.std(all_mses))
inferencing at step:  0
inferencing at step:  16
inferencing at step:  32
inferencing at step:  48
inferencing at step:  64
inferencing at step:  80
inferencing at step:  96
inferencing at step:  112
inferencing at step:  128
inferencing at step:  144
Unnormalized Action MSE across single traj: 0.8985705050788622
state_joints vs time (150, 13)
gt_action_joints vs time (150, 13)
pred_action_joints vs time (150, 13)
Trajectory 0 MSE: 0.8986
====================================
Mean MSE: 1.3990972988547066
Std MSE: 0.2701583052723699
微调模型
现在我们在数据集上微调这个模型. 不深入讨论微调过程的细节,我们将使用 gr00t_finetune.py 脚本来微调模型。你可以运行以下命令来微调模型。
我们这里来剖析一下微调的脚本:
def main(config: ArgsConfig):"""Main training function."""# ------------ step 1: 加载数据集 ------------embodiment_tag = EmbodimentTag(config.embodiment_tag)# 1.1 modality configs and transformsdata_config_cls = DATA_CONFIG_MAP[config.data_config]modality_configs = data_config_cls.modality_config()transforms = data_config_cls.transform()# 1.2 data loader: we will use either single dataset or mixture datasetif len(config.dataset_path) == 1:# 如果只有一个数据集路径:train_dataset = LeRobotSingleDataset( # 创建LeRobotSingleDataset实例dataset_path=config.dataset_path[0],modality_configs=modality_configs,transforms=transforms,embodiment_tag=embodiment_tag, # This will override the dataset's embodiment tag to "new_embodiment"video_backend=config.video_backend,)else:# 如果有多于一个数据集路径:single_datasets = [] # 创建一个空列表,用于存储单个数据集for p in config.dataset_path: # 遍历所有数据集路径assert os.path.exists(p), f"Dataset path {p} does not exist" # 确保数据集路径存在## 这里统一使用相同的配置## 实际应用中可以使用不同的模态和机器人形态# 为每个数据集创建LeRobotSingleDataset实例dataset = LeRobotSingleDataset(dataset_path=p,modality_configs=modality_configs,transforms=transforms,embodiment_tag=embodiment_tag,video_backend=config.video_backend,)single_datasets.append(dataset)# 创建混合数据集:train_dataset = LeRobotMixtureDataset(data_mixture=[(dataset, 1.0) # 每个数据集权重设为1.0(等权重)for dataset in single_datasets],mode="train", # 要微调,肯定是设置训练模式balance_dataset_weights=config.balance_dataset_weights, # 配置是否平衡数据集权重和轨迹权重balance_trajectory_weights=config.balance_trajectory_weights,seed=42, # 设置随机种子为42metadata_config={"percentile_mixing_method": "weighted_average", # 使用加权平均法混合数据集},)print(f"Loaded {len(single_datasets)} datasets, with {config.dataset_path} ") # 打印加载的数据集数量和路径# ------------ step 2: 加载模型 ------------model = GR00T_N1_5.from_pretrained(pretrained_model_name_or_path=config.base_model_path,tune_llm=config.tune_llm, # 是否微调语言模型部分--Ftune_visual=config.tune_visual, # 是否微调视觉编码器--Ftune_projector=config.tune_projector, # 是否微调动作头投影层--Ttune_diffusion_model=config.tune_diffusion_model, # 是否微调DiT扩散模型--T)# 设置计算精度,将模型计算精度设置为bfloat16,节省内存并加速训练model.compute_dtype = "bfloat16"model.config.compute_dtype = "bfloat16"# 如果配置了LoRA,则使用LoRA模型if config.lora_rank > 0:model = get_lora_model(model,rank=config.lora_rank,lora_alpha=config.lora_alpha,lora_dropout=config.lora_dropout,action_head_only=not config.lora_full_model,)# 2.1 配置训练参数training_args = TrainingArguments(# 配置基础训练参数:output_dir=config.output_dir,run_name=None,remove_unused_columns=False,deepspeed="",gradient_checkpointing=False,bf16=True,tf32=True,per_device_train_batch_size=config.batch_size,gradient_accumulation_steps=1,dataloader_num_workers=config.dataloader_num_workers,dataloader_pin_memory=False,dataloader_persistent_workers=config.dataloader_num_workers > 0,# 配置优化器参数:optim="adamw_torch",adam_beta1=0.95,adam_beta2=0.999,adam_epsilon=1e-8,learning_rate=config.learning_rate,weight_decay=config.weight_decay,warmup_ratio=config.warmup_ratio,lr_scheduler_type="cosine",#配置训练流程参数:logging_steps=10.0,num_train_epochs=300,max_steps=config.max_steps,save_strategy="steps",save_steps=config.save_steps,# evaluation_strategy="no",save_total_limit=8,report_to=config.report_to,seed=42,do_eval=False,ddp_find_unused_parameters=False,ddp_bucket_cap_mb=100,torch_compile_mode=None,)# 2.2 运行训练experiment = TrainRunner(# 传入训练数据集、模型、训练参数train_dataset=train_dataset,model=model,training_args=training_args,resume_from_checkpoint=config.resume, # 配置是否从检查点恢复)# 2.3 run experimentexperiment.train()
如果遇到wanb连接不上导致无法开始,可以直接设置离线模式,GPU0占满了,可以用GPU1
WANDB_MODE=offline CUDA_VISIBLE_DEVICES=1 python scripts/gr00t_finetune.py \--dataset-path ./demo_data/robot_sim.PickNPlace \--num-gpus 1 \--max-steps 500 \--output-dir /tmp/gr00t-1/finetuned-model \--data-config fourier_gr1_arms_only \
如果将模型下载到本地了记得修改路径
 要获取所有可用参数的完整列表,你可以运行 python scripts/gr00t_finetune.py --help。_
该脚本将把微调后的模型保存在 /tmp/gr00t-1/finetuned-model 目录中。我们将加载第 500 个检查点步骤的微调模型。
评估微调后的模型
现在我们可以通过让策略在数据集上运行来评估微调后的模型,看看它的表现如何。我们将使用一个实用函数来评估数据集上的策略。这与之前教程中1_pretrained_model.ipynb的类似。
from gr00t.utils.eval import calc_mse_for_single_trajectory
import warningsfinetuned_model_path = "/tmp/gr00t-1/finetuned-model/checkpoint-500"
finetuned_policy = Gr00tPolicy(model_path=finetuned_model_path,embodiment_tag="new_embodiment",modality_config=modality_config,modality_transform=modality_transform,device=device,
)warnings.simplefilter("ignore", category=FutureWarning)mse = calc_mse_for_single_trajectory(finetuned_policy,dataset,traj_id=0,modality_keys=["right_arm", "right_hand"],   # we will only evaluate the right arm and right handsteps=150,action_horizon=16,plot=True
)print("MSE loss for trajectory 0:", mse)
这是微调模型之前对关节0动作进行的预测:
这是微调后的模型的表现:
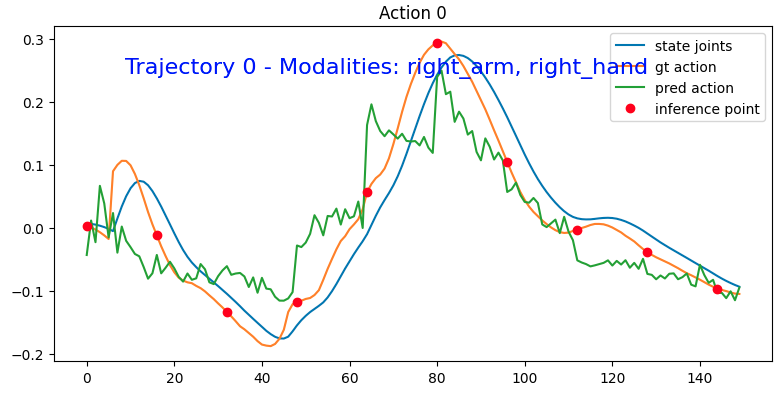
可以看到贴合了很多,只不过还是非常抖就是了。
MSE loss for trajectory 0: 0.004842538017719437
2.4 新机器人形态微调教程
本教程将逐步指导你如何使用我们的Python API对GR00T-N1.5进行微调,示例数据集为G1积木堆叠数据集。
这是 3_0_new_embodiment_finetuning.md 教程的更详细版本,将深入讲解数据集配置、数据变换和微调的具体细节。
Step 1: 数据集
我们可以用两步加载任意数据集去微调:
- 1.1: 为数据集定义模态配置和归一化
- 1.2: 使用
LeRobotSingleDataset类加载数据集
Step: 1.0 下载数据集
- 从 Hugging Face 获取: https://huggingface.co/datasets/unitreerobotics/G1_BlockStacking_Dataset
strawberry@strawberry-E500-G9-WS760T:~/zzy/project/Isaac-GR00T/G1_BlockStacking_Dataset$ git clone https://huggingface.co/datasets/unitreerobotics/G1_BlockStacking_Dataset
- 将示例里的
examples/unitree_g1_blocks__modality.json覆盖到数据集的 meta 目录下:<DATASET_PATH>/meta/modality.json- 这样做的作用是让这个数据集「符合 GR00T 要求」,也就是让后续训练时能正确地拆分和解析每一块状态(state)和动作(action)数据。
- 命令如下:
cp examples/unitree_g1_blocks__modality.json datasets/G1_BlockStacking_Dataset/meta/modality.json
理解 Modality 配置文件
这个文件就像一本字典,告诉我们:
- Separate Data Storage and Interpretation:
- 状态(state)和动作(action) 在硬盘里它们都是「一串连续的 float32 数组」,但我们需要把它拆成「位置、速度、力矩」之类的有意义字段。配置文件里定义了每个字段在大数组里的起止下标 (start、end),训练时就能自动切分、归一化…各种花样操作。
- Video: 真正的视频文件各自独立存储,配置里只需要列出名称(key),留一个空字典 {},方便统一管理和标准化文件名。
- Annotations: 如果有标注字段,也用同样方式列在这里;若无,配置里可以不写这一节。
- Fine-Grained Splitting: 把大数组「切」成一个个小字段,让训练管道对每种信息(位置、角度、图像帧、附加标签)都能做特定处理。
- Clear Mapping: Explicit mapping of data dimensions.
- Sophisticated Data Transformations: Supports field-specific normalization and rotation transformations during training.
Schema 配置文件格式示例
{"state": {"<state_name>": {"start": <int>,         // 在状态数组里的起始索引"end": <int>,           // 在状态数组里的结束索引(不含)}},"action": {"<action_name>": {"start": <int>,         // Starting index in the action array"end": <int>,           // Ending index in the action array}},"video": {"<video_name>": {}  // 仅需键名,占位即可},"annotation": {"<annotation_name>": {}  // Empty dictionary to maintain consistency with other modalities}
}
在getting_started/examples/unitree_g1_blocks__modality.json中有展示实际样例. This file is located in the meta folder of the lerobot dataset.
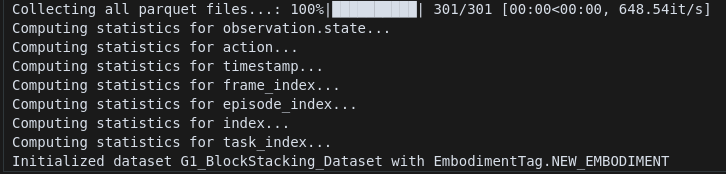
执行下面的脚本,它会扫描整个数据集、计算每段状态/动作长度、视频帧数等统计信息,结果存入 (meta/metadata.json) ,供后续训练脚本快速读取:
python scripts/load_dataset.py --data_path /datasets/G1_BlockStacking_Dataset/ --embodiment_tag new_embodiment
Step: 1.1 模态配置和transformers
模态配置允许你在微调过程中,为每种输入类型(视频、状态、动作、语言等)选择使用哪些特定的数据流,从而精确控制数据集的哪些部分被利用。
from gr00t.data.schema import EmbodimentTag
dataset_path = "/home/strawberry/zzy/project/Isaac-GR00T/G1_BlockStacking_Dataset/G1_BlockStacking_Dataset"  # change this to your dataset path
embodiment_tag = EmbodimentTag.NEW_EMBODIMENTfrom gr00t.data.dataset import ModalityConfig
# 选择你想用于微调的模态的键
video_modality = ModalityConfig(delta_indices=[0], # delta_indices=[0] 表示当前时刻,只使用当前时刻的摄像头图像modality_keys=["video.cam_right_high"],
)state_modality = ModalityConfig(delta_indices=[0], # 只使用当前时刻的机器人关节状态modality_keys=["state.left_arm", "state.right_arm", "state.left_hand", "state.right_hand"],
)action_modality = ModalityConfig(delta_indices=[0, 1, 2, 3, 4, 5, 6, 7, 8, 9, 10, 11, 12, 13, 14, 15], # 未来16个时间步的动作modality_keys=["action.left_arm", "action.right_arm", "action.left_hand", "action.right_hand"],
)language_modality = ModalityConfig(delta_indices=[0], # 任务描述在时间上不变化modality_keys=["annotation.human.task_description"],
)modality_configs = {"video": video_modality,"state": state_modality,"action": action_modality,"language": language_modality,
}
#假设当前是时间步t:
# 输入:时间步t的图像 + 时间步t的关节状态 + 任务描述
# 输出:时间步t, t+1, t+2, ..., t+15的16个动作序列
from gr00t.data.transform.base import ComposedModalityTransform
from gr00t.data.transform import VideoToTensor, VideoCrop, VideoResize, VideoColorJitter, VideoToNumpy
from gr00t.data.transform.state_action import StateActionToTensor, StateActionTransform
from gr00t.data.transform.concat import ConcatTransform
from gr00t.model.transforms import GR00TTransform# select the transforms you want to apply to the data
to_apply_transforms = ComposedModalityTransform(transforms=[# video transformsVideoToTensor(apply_to=video_modality.modality_keys, backend="torchvision"),VideoCrop(apply_to=video_modality.modality_keys, scale=0.95, backend="torchvision"),VideoResize(apply_to=video_modality.modality_keys, height=224, width=224, interpolation="linear", backend="torchvision" ),VideoColorJitter(apply_to=video_modality.modality_keys, brightness=0.3, contrast=0.4, saturation=0.5, hue=0.08, backend="torchvision"),VideoToNumpy(apply_to=video_modality.modality_keys),# state transformsStateActionToTensor(apply_to=state_modality.modality_keys),StateActionTransform(apply_to=state_modality.modality_keys, normalization_modes={"state.left_arm": "min_max","state.right_arm": "min_max","state.left_hand": "min_max","state.right_hand": "min_max",}),# action transformsStateActionToTensor(apply_to=action_modality.modality_keys),StateActionTransform(apply_to=action_modality.modality_keys, normalization_modes={"action.right_arm": "min_max","action.left_arm": "min_max","action.right_hand": "min_max","action.left_hand": "min_max",}),# ConcatTransformConcatTransform(video_concat_order=video_modality.modality_keys,state_concat_order=state_modality.modality_keys,action_concat_order=action_modality.modality_keys,),# model-specific transformGR00TTransform(state_horizon=len(state_modality.delta_indices),action_horizon=len(action_modality.delta_indices),max_state_dim=64,max_action_dim=32,),]
)
Step 1.2 加载数据集
首先我们将会可视化数据集然后使用 LeRobotSingleDataset class 加载它. (without transforms)
from gr00t.data.dataset import LeRobotSingleDatasettrain_dataset = LeRobotSingleDataset(dataset_path=dataset_path,modality_configs=modality_configs,embodiment_tag=embodiment_tag,video_backend="torchvision_av",
)
# use matplotlib to visualize the images
import matplotlib.pyplot as plt
import numpy as npprint(train_dataset[0].keys())images = []
for i in range(5):image = train_dataset[i]["video.cam_right_high"][0]# image is in HWC format, convert it to CHW formatimage = image.transpose(2, 0, 1)images.append(image)   fig, axs = plt.subplots(1, 5, figsize=(20, 5))
for i, image in enumerate(images):axs[i].imshow(np.transpose(image, (1, 2, 0)))axs[i].axis("off")
plt.show()
 现在,我们将会用我们的模态配置和transforms去初始化数据集
train_dataset = LeRobotSingleDataset(dataset_path=dataset_path,modality_configs=modality_configs,embodiment_tag=embodiment_tag,video_backend="torchvision_av",transforms=to_apply_transforms,
)
Extra Notes:
- 我们使用缓存数据加载器来加速训练速度。缓存数据加载器将所有数据加载到内存中,这显著提高了训练性能。但是,如果你的数据集很大或遇到内存不足(OOM)错误,你可以切换到标准的lerobot数据加载器(gr00t.data.dataset.LeRobotSingleDataset)。它使用与缓存数据加载器相同的API,因此你可以在不更改代码的情况下来回切换。
- 我们使用torchvision_av作为视频后端,视频编码是av格式而不是标准的h264格式。
Step 2: 加载模型
训练过程分以下三步
- 2.1: 加载基础模型从HF或者本地路径
- 2.2: 准备训练参数
- 2.3: 运行训练loop
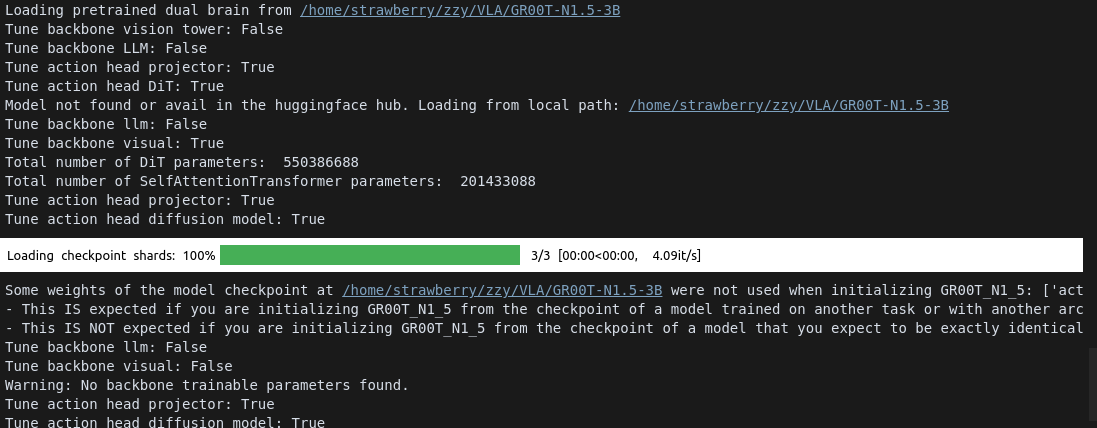
Step 2.1 加载基础模型
我们使用from_pretrained_for_tuning 方法去加载模型。这种方法可以让我们特定模型的哪一部分进行微调。
import os
import torch
os.environ["CUDA_VISIBLE_DEVICES"] = "0"
device = "cuda" if torch.cuda.is_available() else "cpu"from gr00t.model.gr00t_n1 import GR00T_N1_5BASE_MODEL_PATH = "/home/strawberry/zzy/VLA/GR00T-N1.5-3B"
TUNE_LLM = False            # Whether to tune the LLM
TUNE_VISUAL = False          # Whether to tune the visual encoder
TUNE_PROJECTOR = True       # Whether to tune the projector
TUNE_DIFFUSION_MODEL = True # Whether to tune the diffusion modelmodel = GR00T_N1_5.from_pretrained(pretrained_model_name_or_path=BASE_MODEL_PATH,tune_llm=TUNE_LLM,  # backbone's LLMtune_visual=TUNE_VISUAL,  # backbone's vision towertune_projector=TUNE_PROJECTOR,  # action head's projectortune_diffusion_model=TUNE_DIFFUSION_MODEL,  # action head's DiT
)# Set the model's compute_dtype to bfloat16
model.compute_dtype = "bfloat16"
model.config.compute_dtype = "bfloat16"
model.to(device)
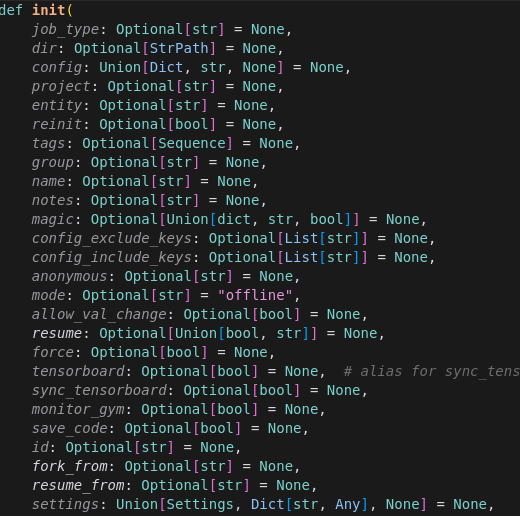
Step 2.2 准备训练参数
我们使用 huggingface TrainingArguments 去配置训练过程,这是主要参数:
from transformers import TrainingArgumentsoutput_dir = "/home/strawberry/zzy/finetuned-model/gr00t-1.5/G1_blocks"    # CHANGE THIS ACCORDING TO YOUR LOCAL PATH
per_device_train_batch_size = 32     # CHANGE THIS ACCORDING TO YOUR GPU MEMORY
max_steps = 300                      # CHANGE THIS ACCORDING TO YOUR NEEDS
report_to = "wandb"
dataloader_num_workers = 8training_args = TrainingArguments(output_dir=output_dir,run_name=None,remove_unused_columns=False,deepspeed="",gradient_checkpointing=False,bf16=True,tf32=True,per_device_train_batch_size=per_device_train_batch_size,gradient_accumulation_steps=1,dataloader_num_workers=dataloader_num_workers,dataloader_pin_memory=False,dataloader_persistent_workers=True,optim="adamw_torch",adam_beta1=0.95,adam_beta2=0.999,adam_epsilon=1e-8,learning_rate=1e-4,weight_decay=1e-5,warmup_ratio=0.05,lr_scheduler_type="cosine",logging_steps=10.0,num_train_epochs=300,max_steps=max_steps,save_strategy="steps",save_steps=500,save_total_limit=8,report_to=report_to,seed=42,do_eval=False,ddp_find_unused_parameters=False,ddp_bucket_cap_mb=100,torch_compile_mode=None,
)
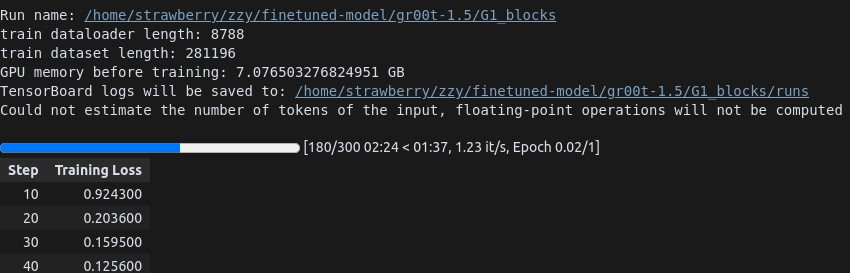
Step 2.3 初始化训练器并运行训练
from gr00t.experiment.runner import TrainRunnerexperiment = TrainRunner(train_dataset=train_dataset,model=model,training_args=training_args,
)experiment.train()
设置wanb的offline模式:

mode摄制成offline,然后就正常开始训练了:
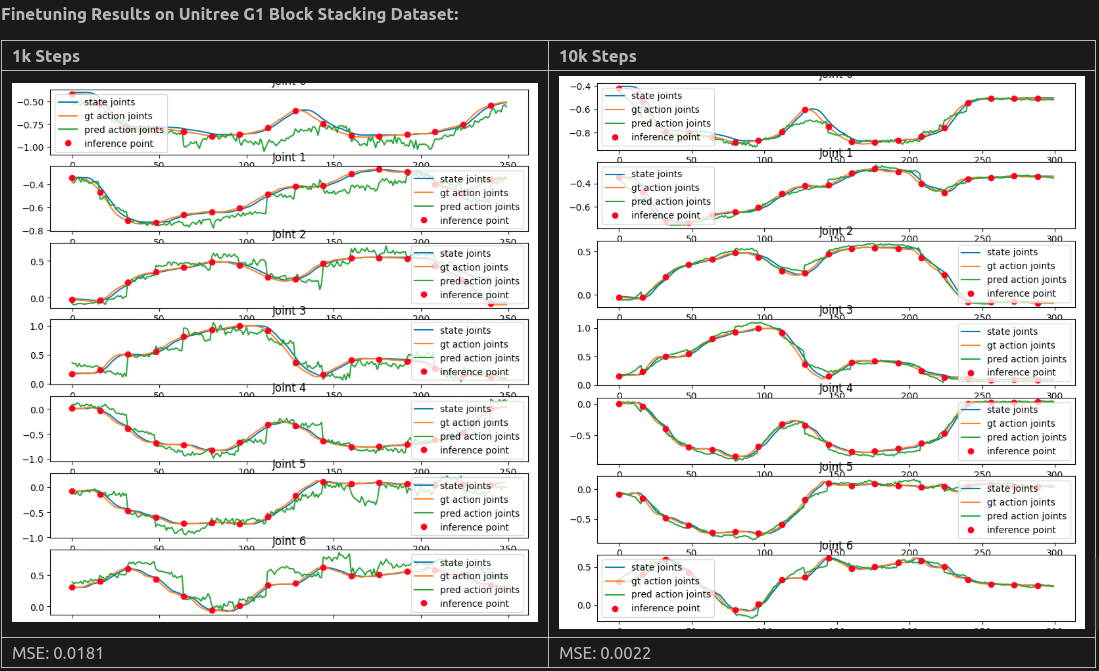
这是官方给出的微调结果:


视频的处理与保存)


