🚀 Spring Boot + ShardingSphere 实现分库分表 + 读写分离(涵盖99%真实场景)
🏷️ 标签:ShardingSphere、分库分表、读写分离、MySQL 主从、Spring Boot 实战
分库分表 vs 读写分离 vs 主从配置与数据库高可用架构区别
📚 目录导航
- 🔍 一、场景说明
- 🧱 二、架构图
- ⚙️ 三、核心配置
- 🗃️ 四、数据库建表SQL
- 👨💻 五、关键代码
- 🧪 六、测试验证
- 🧠 七、总结与建议
🔍 一、场景说明
🚨 实际项目中,数据库面临两类瓶颈:
- 📌 数据量太大 → 单库单表撑不住 → 使用 分库分表 拆解压力
- 📌 读操作压力太大 → 单库处理不过来 → 使用 读写分离 转移压力
⚡ 本项目整合了这两类方案,构建如下特性系统:
- 两个逻辑库
ds0、ds1 ds0搭建一主两从(主库:ds0,从库:ds0_slave1,ds0_slave2)- 表按照用户 ID 分片(user_id % 2)
- 主写从读,轻松实现读写分离
🧱 二、架构图
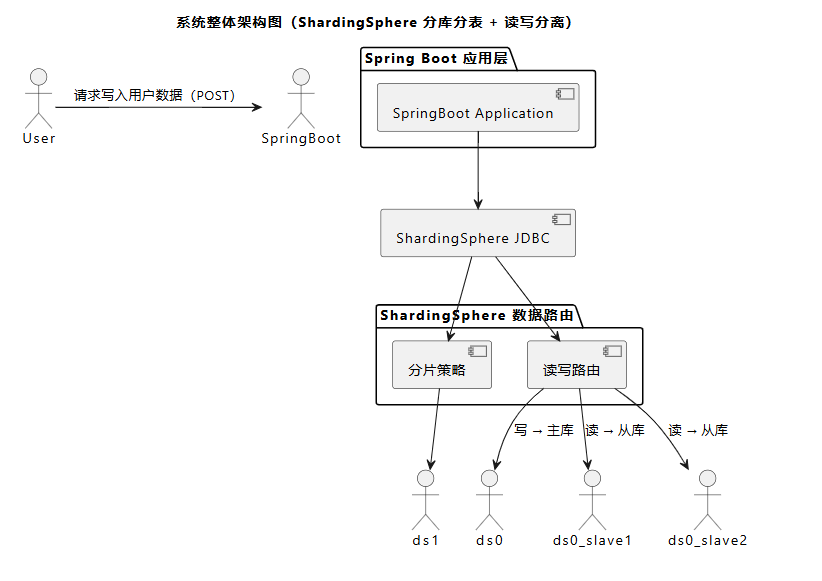
📝 说明:
- 用户通过 Controller 发起请求
- ShardingSphere JDBC 根据操作类型选择库、表
- 如果是写入操作,走
ds0或ds1的主库 - 如果是读取操作,优先走
ds0_slave1或ds0_slave2从库,减轻主库压力
⚙️ 三、核心配置(application.yml)
🧩 我们通过配置 ShardingSphere 的两类规则:
sharding与readwrite-splitting实现业务目标。
spring:shardingsphere:datasource:names: ds0, ds1, ds0_slave1, ds0_slave2ds0:type: com.zaxxer.hikari.HikariDataSourcejdbc-url: jdbc:mysql://mysql-master:3307/testdb?useSSL=false&serverTimezone=Asia/Shanghai&allowPublicKeyRetrieval=trueusername: rootpassword: rootds0_slave1:type: com.zaxxer.hikari.HikariDataSourcejdbc-url: jdbc:mysql://mysql-slave1:3308/testdb?useSSL=false&serverTimezone=Asia/Shanghai&allowPublicKeyRetrieval=trueusername: rootpassword: rootds0_slave2:type: com.zaxxer.hikari.HikariDataSourcejdbc-url: jdbc:mysql://mysql-slave2:3309/testdb?useSSL=false&serverTimezone=Asia/Shanghai&allowPublicKeyRetrieval=trueusername: rootpassword: rootds1:type: com.zaxxer.hikari.HikariDataSourcejdbc-url: jdbc:mysql://mysql-master:3306/testdb?useSSL=false&serverTimezone=Asia/Shanghai&allowPublicKeyRetrieval=trueusername: rootpassword: root123456rules:sharding:tables:t_user:# 注意:此处使用物理库名(ds0、ds1)来定义 actual-data-nodesactual-data-nodes: ds$->{0..1}.t_user_$->{0..1}database-strategy:standard:sharding-column: user_idsharding-algorithm-name: database_inlinetable-strategy:standard:sharding-column: user_idsharding-algorithm-name: table_inlinekey-generate-strategy:column: idkey-generator-name: snowflakesharding-algorithms:database_inline:type: INLINEprops:algorithm-expression: ds${user_id % 2}table_inline:type: INLINEprops:algorithm-expression: t_user_${user_id % 2}key-generators:snowflake:type: SNOWFLAKEreadwrite-splitting:data-sources:rw_ds0:static-strategy:write-data-source-name: ds0read-data-source-names: [ds0_slave1,ds0_slave2]load-balancer-name: round_robinrw_ds1:static-strategy:write-data-source-name: ds1read-data-source-names: [ds1]load-balancer-name: round_robinload-balancers:round_robin:type: ROUND_ROBINprops:sql-show: truelogging:level:org.apache.shardingsphere: DEBUG1. 数据源配置 (datasource)
定义了 4 个 MySQL 数据源(2 个主库 ds0/ds1 和 2 个从库 ds0_slave1/ds0_slave2)。
| 配置项 | 说明 |
|---|---|
spring.shardingsphere.datasource.names | 数据源名称列表:ds0, ds1, ds0_slave1, ds0_slave2 |
ds0.jdbc-url | 主库 ds0 的 JDBC 连接 URL(端口 3307) |
ds0.username | 主库 ds0 用户名(root) |
ds0.password | 主库 ds0 密码(root) |
ds0_slave1.jdbc-url | 从库 ds0_slave1 的 JDBC URL(端口 3308) |
ds0_slave2.jdbc-url | 从库 ds0_slave2 的 JDBC URL(端口 3309) |
ds1.jdbc-url | 主库 ds1 的 JDBC URL(端口 3306,与 ds0 不同实例) |
2. 分片规则 (sharding)
配置表 t_user 的分片策略和分布式 ID 生成。
分片表配置
| 配置项 | 作用 | 示例值 | 说明 |
|---|---|---|---|
tables.t_user.actual-data-nodes | 定义物理节点 | ds$->{0..1}.t_user_$->{0..1} | 表达式生成所有物理表,如 ds0.t_user_0、ds1.t_user_1。 |
tables.t_user.database-strategy.standard.sharding-column | 分库列 | user_id | 根据 user_id 计算数据存储的库。 |
tables.t_user.database-strategy.standard.sharding-algorithm-name | 分库算法名称 | database_inline | 引用 sharding-algorithms 中定义的算法。 |
tables.t_user.table-strategy.standard.sharding-column | 分表列 | user_id | 根据 user_id 计算数据存储的表。 |
tables.t_user.table-strategy.standard.sharding-algorithm-name | 分表算法名称 | table_inline | 引用 sharding-algorithms 中定义的算法。 |
tables.t_user.key-generate-strategy.column | 主键列 | id | 指定自动生成主键的列。 |
tables.t_user.key-generate-strategy.key-generator-name | 主键生成器名称 | snowflake | 使用 Snowflake 算法生成分布式 ID。 |
分片算法
| 配置项 | 作用 | 示例值 | 说明 |
|---|---|---|---|
sharding-algorithms.database_inline.type | 算法类型 | INLINE | 使用行表达式(Inline)分片算法。 |
sharding-algorithms.database_inline.props.algorithm-expression | 分库表达式 | ds${user_id % 2} | 根据 user_id % 2 计算库索引(0 或 1)。 |
sharding-algorithms.table_inline.type | 算法类型 | INLINE | 使用行表达式分片算法。 |
sharding-algorithms.table_inline.props.algorithm-expression | 分表表达式 | t_user_${user_id % 2} | 根据 user_id % 2 计算表索引(0 或 1)。 |
分布式 ID
| 配置项 | 作用 | 示例值 | 说明 |
|---|---|---|---|
key-generators.snowflake.type | 主键生成器类型 | SNOWFLAKE | 使用 Snowflake 算法生成分布式唯一 ID。 |
3. 读写分离规则 (readwrite-splitting)
配置读写分离数据源和负载均衡策略。
数据源 rw_ds0
| 配置项 | 说明 |
|---|---|
write-data-source-name | 写库数据源:ds0(主库) |
read-data-source-names | 读库数据源列表:[ds0_slave1, ds0_slave2](两个从库) |
load-balancer-name | 负载均衡算法:round_robin(轮询) |
数据源 rw_ds1
| 配置项 | 说明 |
|---|---|
write-data-source-name | 写库数据源:ds1(主库) |
read-data-source-names | 读库数据源列表:([ds1]),表示仅使用写库读 |
load-balancer-name | 负载均衡算法:round_robin(未实际生效) |
负载均衡器
| 配置项 | 说明 |
|---|---|
round_robin.type | 算法类型:ROUND_ROBIN(轮询调度) |
4. 属性配置 (props)
| 配置项 | 说明 |
|---|---|
sql-show: true | 打印 SQL 日志(便于调试) |
配置逻辑总结
spring:shardingsphere:datasource:names: ds0, ds1, ds0_slave1, ds0_slave2
-
定义三个数据源
ds0: 主库ds0_slave: 从库(ds0 复制)ds1: 第二个分片主库
rules:sharding:tables:t_user:actual-data-nodes: rw_ds$->{0..1}.t_user_$->{0..1}
t_user分片规则:共有2 库 x 2 表结构
table-strategy:standard:sharding-column: user_idsharding-algorithm-name: user_inline
- 按照
user_id做分片(水平拆表)
sharding-algorithms:user_inline:type: INLINEprops:algorithm-expression: t_user_${user_id % 2}
- 表名后缀 =
user_id % 2,如t_user_0、t_user_1
readwrite-splitting:data-sources:rw_ds0:static-strategy:write-data-source-name: ds0read-data-source-names: [ds0_slave1,ds0_slave1]
- 配置
rw_ds0为读写分离库 ds0负责写入,ds0_slave1,ds0_slave2负责读取
rw_ds1:static-strategy:write-data-source-name: ds1read-data-source-names: [ds1]
ds1暂无从库,只支持主库写读
潜在问题
-
rw_ds1无读库- 配置中
rw_ds1.read-data-source-names为ds1,可能导致读请求全部发往主库ds1,增加压力。
- 配置中
-
分片与读写分离结合
- 实际数据节点
rw_ds0.t_user_0和rw_ds1.t_user_1的分片逻辑需确保数据均匀分布。
- 实际数据节点
🗃️ 四、数据库建表SQL
在 db0 和 db1 上执行以下语句,创建两个分表:
CREATE TABLE t_user_0 (id BIGINT PRIMARY KEY,username VARCHAR(100),user_id INT
);CREATE TABLE t_user_1 LIKE t_user_0;
📌 ds0_slave1, ds0_slave2 是主库 ds0 的复制库,MySQL 自动同步,无需手动建表。
👨💻 五、关键代码
✅ 项目概览
sharding-demo/
├── src/
│   ├── main/
│   │   ├── java/com/example/shardingdemo/
│   │   │   ├── controller/
│   │   │   ├── entity/
│   │   │   ├── mapper/
│   │   │   ├── ShardingDemoApplication.java
│   └── resources/
│       ├── application.yml
├── pom.xml
✅ User 实体类
import com.baomidou.mybatisplus.annotation.TableName;
import lombok.AllArgsConstructor;
import lombok.Data;
import lombok.NoArgsConstructor;@Data
@AllArgsConstructor
@NoArgsConstructor
@TableName("t_user")
public class User {private Long id;private String username;private Integer userId; // 分片键
}
✅ Mapper 接口
import com.baomidou.mybatisplus.core.mapper.BaseMapper;
import com.example.shardingdemo.entity.User;
import org.apache.ibatis.annotations.Mapper;@Mapper
public interface UserMapper extends BaseMapper<User> {}
✅ Controller 控制器
import com.example.shardingdemo.entity.User;
import com.example.shardingdemo.mapper.UserMapper;
import lombok.RequiredArgsConstructor;
import org.springframework.web.bind.annotation.*;import java.util.List;@RestController
@RequestMapping("/user")
@RequiredArgsConstructor
public class UserController {private final UserMapper userMapper;@PostMapping("/add")public String addUser(@RequestParam String name, @RequestParam Integer userId) {User user = new User(System.currentTimeMillis(), name, userId);userMapper.insert(user);return "User added.";}@GetMapping("/list")public List<User> selectList() {return userMapper.selectList(null);}@GetMapping("/selectById")public User selectById(Long id){return userMapper.selectById(id);}}
🧪 六、测试验证
✅ 添加用户
http://localhost:8080/user/add?name=Alice&userId=11
控制台输出:
Actual SQL: rw_ds1 ::: INSERT INTO t_user_1 ...
✅ 说明:
userId = 11,落到rw_ds1(ds1)- 且表名为
t_user_1,符合% 2 = 1的路由逻辑
🧠 七、总结与建议
| 特性 | 说明 |
|---|---|
| 💡 分库分表 | 扩展写能力,解决单表瓶颈 |
| 💡 读写分离 | 减轻主库压力,提高系统吞吐 |
| ✅ 可扩展性 | 新增库或表只需扩展路由规则,无需修改业务代码 |
| ✅ 高性能 | 多线程批量插入、查询等场景提升明显 |
| 🔒 安全性 | 通过主从架构,规避读阻塞或死锁导致系统不可用 |
📢 建议配合 Docker + MySQL 主从配置部署验证,效果最佳。
❤️ 如果你觉得这篇文章有帮助:
- 点赞 👍
- 收藏 ⭐
- 留言 💬

:轻松爬取图片网站内容)


)


