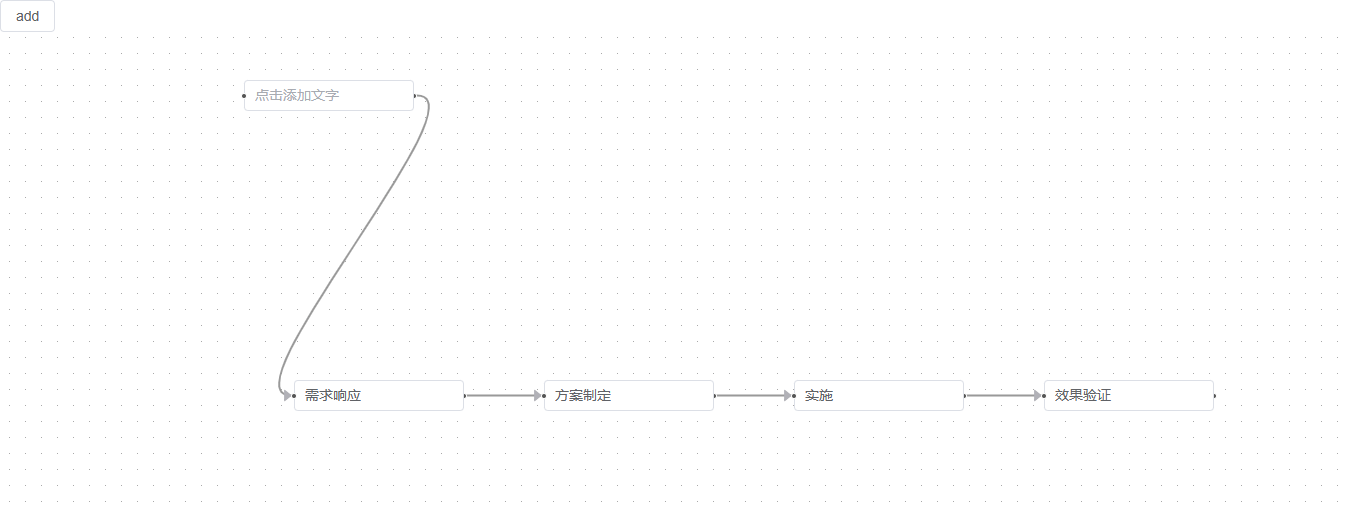
实现效果
实现代码
准备工作
安装依赖
npm install @vue-flow/core
npm install @vue-flow/minimap //小地图
npm install @vue-flow/controls //自带的缩放、居中、加锁功能
我这里只用到上述三个,还有其余的可根据实际情况配合官方文档使用。
npm install @vue-flow/background //背景
npm install @vue-flow/node-toolbar //工具栏
npm install @vue-flow/node-resizer //缩放
创建<初始元素>js文件 initial-elements.js
import { MarkerType } from '@vue-flow/core'export const initialNodes = [{id: '1',position: { x: 100, y: 250 },type: 'custom',data: {value: '需求响应',icon1: false,icon2: false,icon3: false,icon4: false,icon5: false,},},{id: '2',position: { x: 350, y: 250 },type: 'custom',data: {value: '方案制定',icon1: false,icon2: false,icon3: false,icon4: false,icon5: false,},},{id: '3',position: { x: 600, y: 250 },type: 'custom',data: {value: '实施',icon1: false,icon2: false,icon3: false,icon4: false,icon5: false,},},{id: '4',position: { x: 850, y: 250 },type: 'custom',data: {value: '效果验证',icon1: false,icon2: false,icon3: false,icon4: false,icon5: false,},},
]export const initialEdges = [{ id: 'e1-2', source: '1', target: '2', markerEnd: MarkerType.ArrowClosed, updatable: true, EdgeMarkerType: { strokeWidth: 10 }, style: { stroke: '#999', strokeWidth: 2, strokeLinecap: 'round' } },{ id: 'e2-3', source: '2', target: '3', markerEnd: MarkerType.ArrowClosed, updatable: true, EdgeMarkerType: { strokeWidth: 10 }, style: { stroke: '#999', strokeWidth: 2, strokeLinecap: 'round' } },{ id: 'e3-4', source: '3', target: '4', markerEnd: MarkerType.ArrowClosed, updatable: true, EdgeMarkerType: { strokeWidth: 10 }, style: { stroke: '#999', strokeWidth: 2, strokeLinecap: 'round' } },
]
创建<使用拖拽>js文件 useDnD.js
import { useVueFlow } from '@vue-flow/core'
import { ref, watch } from 'vue'/*** In a real world scenario you'd want to avoid creating refs in a global scope like this as they might not be cleaned up properly.* @type {{draggedType: Ref<string|null>, isDragOver: Ref<boolean>, isDragging: Ref<boolean>}}*/
const state = {/*** The type of the node being dragged.*/draggedType: ref(null),isDragOver: ref(false),isDragging: ref(false),
}export default function useDragAndDrop() {const { draggedType, isDragOver, isDragging } = stateconst { addNodes, screenToFlowCoordinate, onNodesInitialized, updateNode } = useVueFlow()watch(isDragging, (dragging) => {document.body.style.userSelect = dragging ? 'none' : ''})function onDragStart(event, type) {console.log("onDragStart", type);if (event.dataTransfer) {event.dataTransfer.setData('application/vueflow', type)event.dataTransfer.effectAllowed = 'move'}draggedType.value = typeisDragging.value = truedocument.addEventListener('drop', onDragEnd)}/*** Handles the drag over event.** @param {DragEvent} event*/function onDragOver(event) {event.preventDefault()if (draggedType.value) {isDragOver.value = trueif (event.dataTransfer) {event.dataTransfer.dropEffect = 'move'}}}function onDragLeave() {isDragOver.value = false}function onDragEnd() {console.log("onDragEnd");isDragging.value = falseisDragOver.value = falsedraggedType.value = nulldocument.removeEventListener('drop', onDragEnd)}/*** Handles the drop event.** @param {DragEvent} event*/function onDrop(event, node) {const position = screenToFlowCoordinate({x: event.clientX,y: event.clientY,})node.position = position// /**//  * Align node position after drop, so it's centered to the mouse//  *//  * We can hook into events even in a callback, and we can remove the event listener after it's been called.//  */const { off } = onNodesInitialized(() => {updateNode(node.id, (node) => ({position: { x: node.position.x - node.dimensions.width / 2, y: node.position.y - node.dimensions.height / 2 },}))off()})addNodes(node)}return {draggedType,isDragOver,isDragging,onDragStart,onDragLeave,onDragOver,onDrop,}
}
创建<单个流程图节点>vue文件 ValueNode.vue
<template><div class="nodeItem relative"><!-- @contextmenu="handleRightClick($event, props.id)" --><!-- 开始节点的位置 --><Handle type="source" position="right" /><el-input:id="`${id}-input`"v-model="value"placeholder="点击添加文字"style="width: 170px; font-size: 14px"type="textarea"autosizemaxlength="20"resize="none"/><!-- 结束节点的位置 --><Handle type="target" position="left" /><el-icon:size="20"class="absolute red pointer"style="right: -10px; top: -10px"@click="handleDel($event, id)"><CircleCloseFilled/></el-icon></div>
</template><script setup>
import { computed } from "vue";
import { Handle, Position, useVueFlow } from "@vue-flow/core";
const { proxy } = getCurrentInstance();// 定义传递给父组件的事件
const emit = defineEmits(["updateNodes"]);
const props = defineProps(["id","data","length",
]);const { updateNodeData, removeNodes } = useVueFlow();const value = computed({get: () => props.data.value,set: (value) => {updateNodeData(props.id, { value });emit("updateNodes");},
});function handleDel(event, id) {event.preventDefault();if (props.length == 1) {proxy.$modal.msgWarning("至少保留一个节点");} else {removeNodes([id]);emit("updateNodes");}
}function handleRightClick(event, id) {console.log("右键被点击了");event.preventDefault(); // 阻止默认的右键菜单显示// 在这里可以添加更多逻辑,比如显示自定义的右键菜单等console.log("右键被点击");removeNodes([id]);
}
</script>
<style scoped lang="scss">
.nodeItem {padding: 6px 20px;background: rgba(219, 227, 247, 1);border-radius: 8px;
}
</style>
具体实现
<template><div class="w100 h100 flex1 size-15" @drop="onDrop($event, getNewNode())"><!-- <el-button @click="addNode">add</el-button> --><div class="bg-white h100 pd-16" style="width: 340px"><div class="mb-12 bold">流程图组件</div><el-buttonstyle="width: 100%; cursor: grab"plain:draggable="true"@dragstart="onDragStart($event, 'custom')">拖转至画布</el-button></div><div class="flex-1 h100"><VueFlow:key="key"ref="vueFlowRef":nodes="nodes":edges="edges"auto-connect:default-viewport="{ zoom: 1.0 }":min-zoom="0.2":max-zoom="4"@edge-update="onEdgeUpdate"@connect="onConnect"@edge-update-start="onEdgeUpdateStart"@edge-update-end="onEdgeUpdateEnd"@dragover="onDragOver"@dragleave="onDragLeave"><template #node-custom="props"><ValueNode:id="props.id":data="props.data"@updateNodes="updateNodes":length="nodes.length"/></template><MiniMap /></VueFlow></div></div>
</template><script setup>
import { ref, computed, nextTick, watch } from "vue";
import { VueFlow, useVueFlow, MarkerType } from "@vue-flow/core";
import { initialEdges, initialNodes } from "./initial-elements.js";
import { MiniMap } from "@vue-flow/minimap";
import ValueNode from "./ValueNode.vue";
import "@vue-flow/core/dist/style.css";
import "@vue-flow/core/dist/theme-default.css";const { proxy } = getCurrentInstance();import useDragAndDrop from "./useDnD.js";
import { Sunny } from "@element-plus/icons-vue";const { onDragStart, onDrop, onDragOver, onDragLeave } = useDragAndDrop();
/*** `useVueFlow` provides:* 1. a set of methods to interact with the VueFlow instance (like `fitView`, `setViewport`, `addEdges`, etc)* 2. a set of event-hooks to listen to VueFlow events (like `onInit`, `onNodeDragStop`, `onConnect`, etc)* 3. the internal state of the VueFlow instance (like `nodes`, `edges`, `viewport`, etc)*/
const {onInit,onNodeDragStop,onConnect,addEdges,updateEdge,getNodes,getEdges,
} = useVueFlow();const props = defineProps({nodes: {type: Object,default: initialNodes,},edges: {type: Object,default: initialEdges,},iconShow: {type: Object,default: () => {},},
});
const nodes = ref(null);
const edges = ref(null);const abc = "需求响应";
nodes.value = props.nodes || initialNodes;
edges.value = props.edges || initialEdges;
proxy.$emit("updateList", nodes.value, edges.value);const vueFlowRef = ref(null);
const nodeOptions = ref([]);
nodeOptions.value = handleNodesOption();// 创建一个新的节点对象
function getNewNode() {return {id: new Date().getTime().toString(),type: "custom",data: {value: "",},position: { x: 50, y: 50 },};
}// 更新节点列表
function updateNodes() {nodes.value = getNodes.value;nodeOptions.value = handleNodesOption();proxy.$emit("updateList", getNodes.value, getEdges.value);
}// 处理节点下拉数据
function handleNodesOption() {return nodes.value.filter((item) => (item.data.value ?? "") !== "").map((r) => ({label: r.data.value,value: r.data.value,}));
}/*** onNodeDragStop is called when a node is done being dragged** Node drag events provide you with:* 1. the event object* 2. the nodes array (if multiple nodes are dragged)* 3. the node that initiated the drag* 4. any intersections with other nodes*/
onNodeDragStop(({ event, nodes, node }) => {console.log("Node Drag Stop", { event, nodes, node });
});function onEdgeUpdateStart(edge) {console.log("start update", edge);
}function onEdgeUpdateEnd(edge) {console.log("end update", edge);
}function onEdgeUpdate({ edge, connection }) {console.log("onEdgeUpdate", edge, connection);updateEdge(edge, connection);console.log("onEdgeUpdate", getEdges.value);
}/*** onConnect is called when a new connection is created.** You can add additional properties to your new edge (like a type or label) or block the creation altogether by not calling `addEdges`*/
onConnect((connection) => {console.log("onConnect", connection, [connection]);const newEdges = {...connection,markerEnd: MarkerType.ArrowClosed,updatable: true,style: { stroke: "#999", strokeWidth: 2, strokeLinecap: "round" },};addEdges([newEdges]);console.log("onConnect", getEdges.value);
});watchEffect(() => {nodes.value = props.nodes || initialNodes;edges.value = props.edges || initialEdges;proxy.$emit("updateList", nodes.value, edges.value);
});function multipleChange(keyArr, type) {console.log(keyArr, type);nodes.value.forEach((node) => {let item = keyArr.find((r) => r === node.data.value);node.data[type] = item ? true : false;});console.log(nodes.value);
}
const key = ref(0);
// 重新生成
const init = (nodeArr, edgeArr) => {edges.value = edgeArr || initialEdges;nodes.value = nodeArr || initialNodes;key.value++;
};// 下一步前的校验
const checkNodesEdges = () => {console.log("checkNodesEdges", getEdges.value);let hasNoTarget = getEdges.value.length < getNodes.value.length - 1;if (hasNoTarget) {proxy.$modal.msgWarning("画布中存在节点未连线");return false;} else {proxy.$emit("updateList", getNodes.value, getEdges.value);return true;}
};// 使用defineExpose暴露方法给父组件
defineExpose({checkNodesEdges,init,
});
</script><style scoped>
:deep(.vue-flow__handle) {width: 12px !important;height: 12px !important;border: 1px solid #666 !important;background: #fff !important;
}
</style>
:windows安装使用node.js 安装express,suquelize,mysql,nodemon)


 的效果)


)


 安装与使用介绍)


:轻松爬取图片网站内容)
