先看效果:
一、设计思路:
根据所需要的最终效果,最终设计如下:
(1)整体设计了4个模块,这里分别标记为:A1,A2,B1,B2。具体说明如下:
A模块:这是底层模块。对应效果图的蓝色区域(67数字)。需要在翻转后完全展示出来。
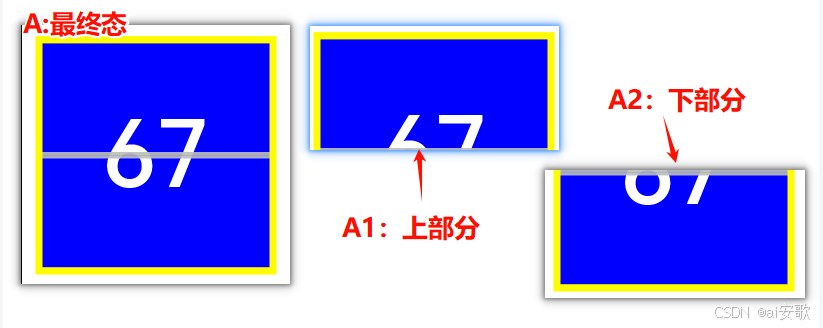
A模块又详细拆分成了上下两个部分:
A1:蓝色区域的上半部分(也就是67的上半部分)
按照逻辑,A1部分是最晚展示的,所以它应该在最底层,保持正面显示的方式。
A2:蓝色区域的下半部分。(也就是67的下半部分)
A2部分,起始位置,应该需要沿着中心线往上翻转,覆盖A1部分,在A1部分之上。
B模块:这是上层模块。对应效果图中的红色区域(66数字)。初始状态下,B模块需要完全展示出来。
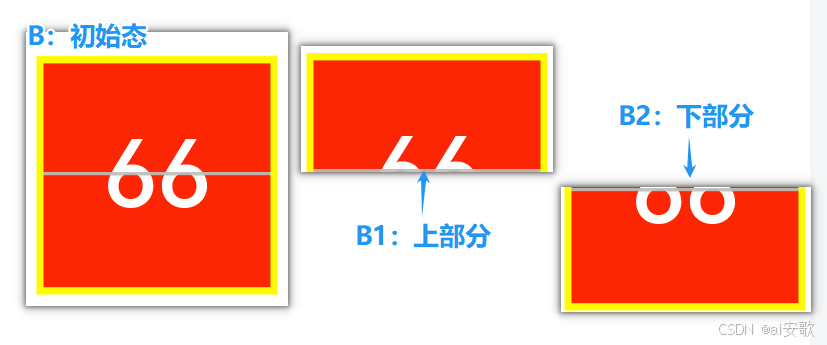
同样,B模块也详细拆分成了上下两部分:
B1:红色区域上半部分(也就是66的上半部分)
按照设计逻辑,B1部分应该在A2部分上层,这样初始状态下才能展示出来。
B2:红色区域下半部分(也就是66的下半部分)
初始状态时,B2部分在固定位置展现,待上半部分翻转过来后,覆盖在B2上方。
实现过程中,为了能更好的实现各个部分的层次关系,可以使用zIndex来设置,但是容易出问题。所以,换个思路,把需要覆盖的那些部分采用透明度的方式来间接实现隐藏(即覆盖)。
二、框架布局:
按照设计思路,我们需要一个容器把A、B模块,按照层次方式放置。所以在最外层,需要使用到Stack来实现层次结构。
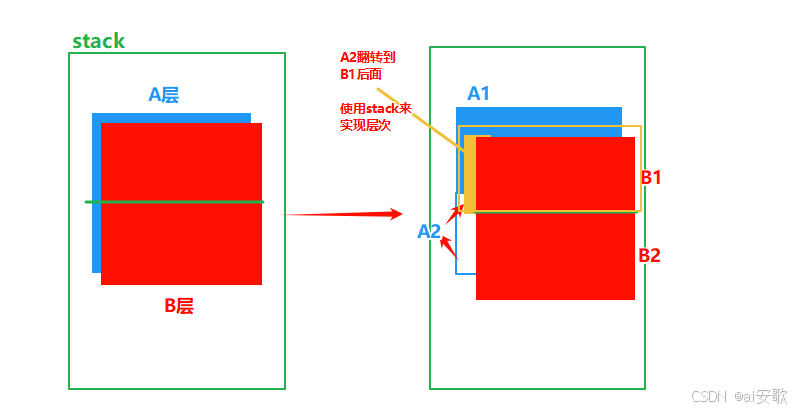
由于还需要把A2和B1也要按照层次来实现,所以,仍然需要使用一个stack来实现包裹。如上图右边所示。这就是整体的一个布局。
三、代码实现:
import { RectShape } from '@kit.ArkUI';@Entry
@Component
struct Index {@State private currentStr:string='66';@State private nextStr:string = '67'@State private rotateAngle: number = 0;uiContext: UIContext | undefined = undefined;aboutToAppear() {this.uiContext = this.getUIContext();if (!this.uiContext) {console.warn("no uiContext");return;}}build() {Column() {Row() {Stack() {// 未来数字==上部分:固定,不翻转Column() {Text(this.nextStr).fontSize(130).fontColor('#ffffff').fontWeight(FontWeight.Medium)}.width('100%').height('100%').backgroundColor('#0000ff').borderRadius(12).justifyContent(FlexAlign.Center).alignItems(HorizontalAlign.Center).opacity(1)//裁剪上半部分.clipShape(new RectShape({ width: '100%', height: '50%' }))//翻转部分===两个半部分:未来下部分、当前上部分Stack() {// 背景面板Column() {// 未来数字==下部分Text(this.nextStr).fontSize(130).fontColor('#ffffff').fontWeight(FontWeight.Medium)}.width('100%').height('100%').backgroundColor('#0000ff').borderRadius(12).justifyContent(FlexAlign.Center).alignItems(HorizontalAlign.Center).opacity(this.rotateAngle < 90 ? 0 : 1)  //通过旋转角的变化,来设置显示还是隐藏//裁剪下半部分.clipShape(new RectShape({ width: '100%', height: '50%' }).position({ x: 0, y: '50%' }))//初始态,翻转到上方.rotate({ x: 1, angle: this.rotateAngle + 180, perspective: 15 })Divider().backgroundColor('#e8bcbebc').width('100%').height(9).zIndex(10)// 主要内容Column() {// 当前数==上部分Text(this.currentStr).fontSize(130).fontColor('#FFFFFF').fontWeight(FontWeight.Medium)}.width('100%').height('100%').backgroundColor('#fffd2603').padding(20).borderRadius(12).justifyContent(FlexAlign.Center).alignItems(HorizontalAlign.Center).opacity(this.rotateAngle < 90 ? 1 : 0) //通过旋转角的变化,来设置显示还是隐藏.clipShape(new RectShape({ width: '100%', height: '50%' }))}.width('100%').height('100%')// .border({ width: 1, color: '#444444' }).onAppear(() => {// 组件出现时开始做动画this.uiContext?.animateTo({duration: 1000,curve: Curve.Friction,delay: 3000,iterations: 1, // 设置-1表示动画无限循环playMode: PlayMode.Normal,expectedFrameRateRange: { //刷新频率min: 10,max: 120,expected: 60,}}, () => {this.rotateAngle = 180;});})// 当前数字==下部分:固定,不翻转Column() {Text(this.currentStr).fontSize(130).fontColor('#ffffff').fontWeight(FontWeight.Medium)}.width('100%').height('100%').backgroundColor('#fffd2603').borderRadius(12).justifyContent(FlexAlign.Center).alignItems(HorizontalAlign.Center).opacity(this.rotateAngle < 90 ? 1 : 0)  //通过旋转角的变化,来设置显示还是隐藏.clipShape(new RectShape({ width: '100%', height: '50%' }).position({ x: 0, y: '50%' }))}.width('100%').height('100%').backgroundColor('#fffffb00').padding(10)}.width('90%').height('45%')}.width('100%').height('100%').justifyContent(FlexAlign.Center).alignItems(HorizontalAlign.Center)}
}

)

)


——四元数、延迟函数、协同程序)

)
)


)


