注意:如果是使用 PyCharm 编程工具就不用创建虚拟化,直接打开 PyCharm 选择新建的目录
直接调过下面的步骤1
1. 项目初始化
如果不是用 PyCharm 编辑器就需要手动创建虚拟环境
在项目目录cmd,自定义名称的虚拟环境
# 激活虚拟环境
python -m venv django_env
# 激活虚拟环境
django_env\Scripts\activate.bat  # Windows
# source django_env/bin/activate  # Linux/Mac
# 验证虚拟环境是否激活(提示符前应显示 (django_env))
(django_env) F:\git\project\serverAdmin\Django>
2. 安装依赖
# 安装 Django 及必要组件
pip install django django-cors-headers djangorestframework django-redis redis djangorestframework-simplejwt mysqlclient
如果提示升级pip,是新项目建议更新
# 验证安装版本
python -m django --version  # 应显示 Django 版本号
3. 创建项目与多应用结构
# 创建 Django 项目
django-admin startproject backend
# 进入项目目录
cd backend
# 创建多个应用,自行创建
python manage.py startapp accounts  # 用户认证
python manage.py startapp products  # 商品管理
python manage.py startapp orders    # 订单系统
python manage.py startapp utils     # 工具类
4. 核心配置(backend/settings.py)
"""
Django settings for backend project.Generated by 'django-admin startproject' using Django 5.2.4.For more information on this file, see
https://docs.djangoproject.com/en/5.2/topics/settings/For the full list of settings and their values, see
https://docs.djangoproject.com/en/5.2/ref/settings/
"""
import os
from pathlib import Path# Build paths inside the project like this: BASE_DIR / 'subdir'.
BASE_DIR = Path(__file__).resolve().parent.parent# Quick-start development settings - unsuitable for production
# See https://docs.djangoproject.com/en/5.2/howto/deployment/checklist/# SECURITY WARNING: keep the secret key used in production secret!
SECRET_KEY = "django-insecure-e6)+pcowg#7$$t=mfje93!%186-qa6=8f5$i86l8gjpyl&yukx"# SECURITY WARNING: don't run with debug turned on in production! 生产环境中禁用调试模式
DEBUG = True # 开发环境
# DEBUG = False  # 生产环境ALLOWED_HOSTS = ['*'] # 开发环境
# ALLOWED_HOSTS = ['api.your-domain.com']  # 生产环境# Application definition  应用注册
INSTALLED_APPS = ["django.contrib.admin","django.contrib.auth","django.contrib.contenttypes","django.contrib.sessions","django.contrib.messages","django.contrib.staticfiles",'corsheaders',  # 跨域支持'rest_framework',  # REST API'django_redis',  # Redis缓存'accounts',  # 权限'utils',  # 工具应用
]# 中间件
MIDDLEWARE = ['corsheaders.middleware.CorsMiddleware',  # 跨域必须在CommonMiddleware之前"django.middleware.security.SecurityMiddleware","django.contrib.sessions.middleware.SessionMiddleware","django.middleware.common.CommonMiddleware","django.middleware.csrf.CsrfViewMiddleware","django.contrib.auth.middleware.AuthenticationMiddleware","django.contrib.messages.middleware.MessageMiddleware","django.middleware.clickjacking.XFrameOptionsMiddleware",
]# 跨域配置(开发环境)
CORS_ALLOW_ALL_ORIGINS = True  # 允许所有域名跨域(开发环境)
# 生产环境使用白名单:
# CORS_ALLOWED_ORIGINS = [
#     "http://localhost:3000",  # 前端开发服务器
#     "https://your-frontend.com",  # 生产环境域名
# ]# 允许携带凭证(如cookies、HTTP认证)
CORS_ALLOW_CREDENTIALS = True  # 允许跨域请求携带凭证
# 允许的请求方法
CORS_ALLOW_METHODS = ['DELETE','GET','OPTIONS','PATCH','POST','PUT',
]
# 允许的请求头
CORS_ALLOW_HEADERS = ['accept','accept-encoding','authorization',  # 用于JWT认证'content-type','dnt','origin','user-agent','x-csrftoken','x-requested-with','token',  # 自定义token头'openid',  # 自定义openid头'sessionkey',  # 自定义session头
]# DRF 配置
REST_FRAMEWORK = {# ... 已有配置 ...'DEFAULT_AUTHENTICATION_CLASSES': ['rest_framework_simplejwt.authentication.JWTAuthentication',  # 示例:JWT认证'rest_framework.authentication.SessionAuthentication',  # 会话认证],'DEFAULT_PERMISSION_CLASSES': ['rest_framework.permissions.IsAuthenticated',  # 默认需要登录]
}# Redis 配置
CACHES = {"default": {"BACKEND": "django_redis.cache.RedisCache","LOCATION": "redis://127.0.0.1:6379/0",  # Redis 服务器地址和数据库编号"OPTIONS": {"CLIENT_CLASS": "django_redis.client.DefaultClient","CONNECTION_POOL_KWARGS": {"max_connections": 100}, # 连接池最大连接数"PASSWORD": "",  # 如果 Redis 有密码,添加到这里}}
}
# Session 存储(可选:使用 Redis 存储会话)
SESSION_ENGINE = "django.contrib.sessions.backends.cache"
ROOT_URLCONF = "backend.urls"# 数据库配置(示例:MySQL)
DATABASES = {'default': {'ENGINE': 'django.db.backends.mysql','NAME': 'your_database','USER': 'root','PASSWORD': 'your_password','HOST': 'localhost','PORT': '3306',}
}TEMPLATES = [{"BACKEND": "django.template.backends.django.DjangoTemplates","DIRS": [],"APP_DIRS": True,"OPTIONS": {"context_processors": ["django.template.context_processors.request","django.contrib.auth.context_processors.auth","django.contrib.messages.context_processors.messages",],},},
]WSGI_APPLICATION = "backend.wsgi.application"# Database
# https://docs.djangoproject.com/en/5.2/ref/settings/#databases# DATABASES = {
#     "default": {
#         "ENGINE": "django.db.backends.sqlite3",
#         "NAME": BASE_DIR / "db.sqlite3",
#     }
# }# Password validation
# https://docs.djangoproject.com/en/5.2/ref/settings/#auth-password-validatorsAUTH_PASSWORD_VALIDATORS = [{"NAME": "django.contrib.auth.password_validation.UserAttributeSimilarityValidator",},{"NAME": "django.contrib.auth.password_validation.MinimumLengthValidator",},{"NAME": "django.contrib.auth.password_validation.CommonPasswordValidator",},{"NAME": "django.contrib.auth.password_validation.NumericPasswordValidator",},
]# Internationalization
# https://docs.djangoproject.com/en/5.2/topics/i18n/
# 改中国
LANGUAGE_CODE = "zh-hans"
TIME_ZONE = 'Asia/Shanghai'
# 确保默认字符编码是 UTF-8
DEFAULT_CHARSET = 'utf-8'USE_I18N = True
USE_L10N = True
USE_TZ = True# Static files (CSS, JavaScript, Images)
# https://docs.djangoproject.com/en/5.2/howto/static-files/# 生产 静态文件配置
STATIC_URL = '/static/'
STATIC_ROOT = os.path.join(BASE_DIR, 'staticfiles')# STATICFILES_DIRS = [BASE_DIR / 'static']  # 开发 时静态文件存放路径# 媒体文件配置
MEDIA_URL = '/media/'
MEDIA_ROOT = os.path.join(BASE_DIR, 'media')# Default primary key field type
# https://docs.djangoproject.com/en/5.2/ref/settings/#default-auto-fieldDEFAULT_AUTO_FIELD = "django.db.models.BigAutoField"
5.项目级路由(backend/urls.py)
"""
URL configuration for backend project.The `urlpatterns` list routes URLs to views. For more information please see:https://docs.djangoproject.com/en/5.2/topics/http/urls/
Examples:
Function views1. Add an import:  from my_app import views2. Add a URL to urlpatterns:  path('', views.home, name='home')
Class-based views1. Add an import:  from other_app.views import Home2. Add a URL to urlpatterns:  path('', Home.as_view(), name='home')
Including another URLconf1. Import the include() function: from django.urls import include, path2. Add a URL to urlpatterns:  path('blog/', include('blog.urls'))
"""from django.contrib import admin
from django.urls import path, include
from .Index import loginurlpatterns = [path("admin/", admin.site.urls),# 公共路由path('index/login/', Index.login), # 用户登录# 所有API路由统一入口path('api/utils/', include('utils.urls')),  # 工具类应用
]
在公共目录,创建需要登录API的 Index 文件 login方法
比如 path('index/login/', Index.login), # 用户登录
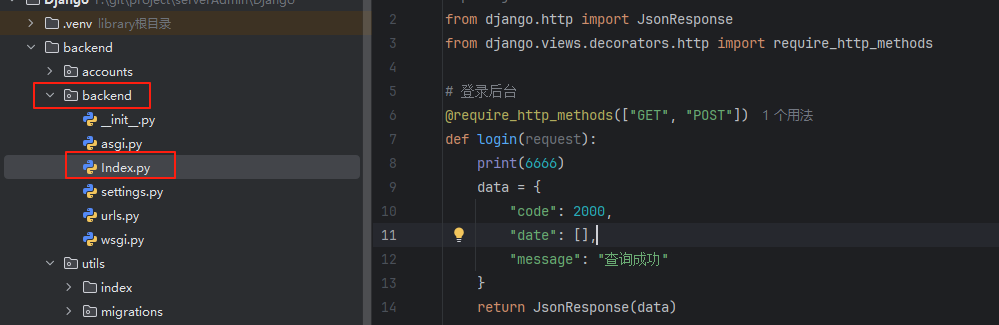
import json
from django.http import JsonResponse
from django.views.decorators.http import require_http_methods# 登录后台
@require_http_methods(["GET", "POST"])
def login(request):print(666)data = {"code": 2000,"date": [],"message": "登录验证"}return JsonResponse(data)
其它子应用路由 分发
比如 path('api/utils/', include('utils.urls')), # 工具类应用
在utils创建路由文件
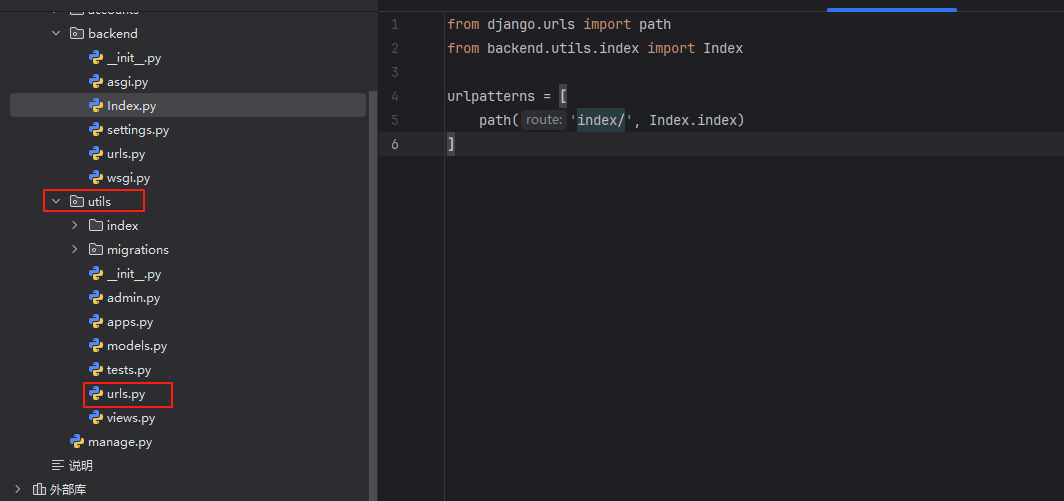
from django.urls import path
from .index import Indexurlpatterns = [path('index/', Index.index)
]
创建子应用的文件和方法 path('index/', Index.index)
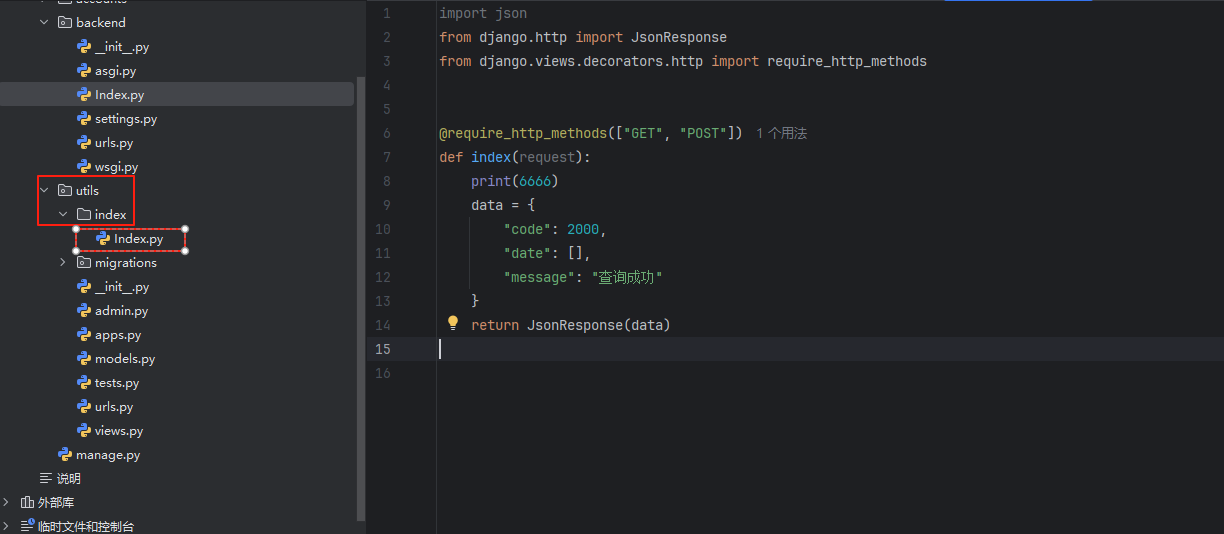
import json
from django.http import JsonResponse
from django.views.decorators.http import require_http_methods@require_http_methods(["GET", "POST"])
def index(request):print(666)data = {"code": 2000,"date": [],"message": "我是子应用"}return JsonResponse(data)
这样就是多应用的前后分离了,也可以在nginx那做负载均衡
6.运行项目
# 迁移数据库
python manage.py makemigrations
python manage.py migrate# 创建超级用户
python manage.py createsuperuser# 启动开发服务器
python manage.py runserver
# 指定端口
python manage.py runserver 8100
访问地址:
公告API接口
http://127.0.0.1:8100/index/login/  子应用
http://127.0.0.1:8100/api/utils/index/
如果像要psot请求要携带 CSRF 令牌
import json
from django.http import JsonResponse
from django.views.decorators.http import require_http_methods
# 生成CSRF 令牌
from django.middleware.csrf import get_token# 登录后台
@require_http_methods(["GET", "POST"])
def login(request):print(6666)token = get_token(request)data = {"code": 2000,"date": [],'csrf_token': token,"message": "查询成功"}return JsonResponse(data)
前端必须带 X-CSRFToken 头,必须是这个名X-CSRFToken
// 1. 获取 CSRF 令牌
axios.get('/api/csrf/').then(response => {const csrfToken = response.data.csrf_token;// 2. 发送 POST 请求时,在请求头中携带令牌axios.post('/api/utils/index/', {}, {headers: {'X-CSRFToken': csrfToken  // 关键:必须用 X-CSRFToken 头}}).then(res => console.log(res.data)).catch(err => console.error(err));});
或者settings.py文件注释django.middleware.csrf.CsrfViewMiddleware,关闭CSRF防护
# 中间件
MIDDLEWARE = ['corsheaders.middleware.CorsMiddleware',  # 跨域必须在CommonMiddleware之前"django.middleware.security.SecurityMiddleware","django.contrib.sessions.middleware.SessionMiddleware","django.middleware.common.CommonMiddleware",# "django.middleware.csrf.CsrfViewMiddleware", # 关闭 CSRF 防护 前端不用携带 CSRF 令牌 可以post访问"django.contrib.auth.middleware.AuthenticationMiddleware","django.contrib.messages.middleware.MessageMiddleware","django.middleware.clickjacking.XFrameOptionsMiddleware",
]的根与源)


)


0715)

)

