完整服务器搭建流程
环境说明
-
主服务器:192.168.102.128 - DNS + Web
-
从服务器:192.168.102.133 - 从DNS
-
网站:www.zhangsan.com (HTTPS加密)、www.lisi.com (HTTP)
手动配置主服务器和从服务器的ip地址,dns,网关,并将网络编辑器改为nat模式
对主服务器192.168.102.128(手动配置),将dns改为自己的dns

修改网卡配置: nmcli connection modify ens160 ipv4.addresses 192.168.102.128/24 ipv4.dns 192.168.102.128 ipv4.gateway 192.168.102.2 connection.autoconnect yes ipv4.method manual
重启网卡:nmcli connection up ens160
查看DNS端口 cat /etc/resolv.conf
nmcli device show | grep DNS
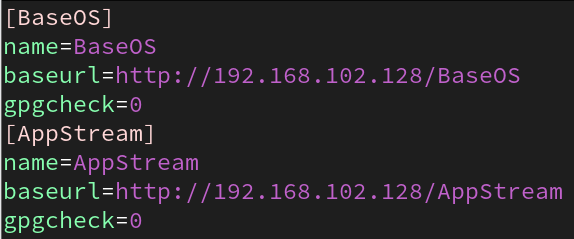
搭建本地仓库和网络仓库并挂载
本地: vim /etc/yum.repos.d/rpm.repo
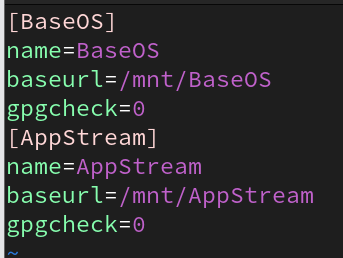
挂载:mount /dev/sr0 /mnt
下载并启动httpd ,将/dev/sr0挂载到/var/www/html
dnf install httpd -y
systemctl restart httpd
mount /dev/sr0 /var/www/html,修改仓库配置
第1步:在主服务器(128)上安装软件
# 安装DNS和Web服务
dnf install bind httpd mod_ssl -y# 关闭防火墙和SELinux(测试环境)
systemctl stop firewalld
setenforce 0
第2步:配置DNS主服务器
2.1 配置主配置文件 /etc/named.conf
启动DNS服务 systemctl restart named
vim /etc/named.conf
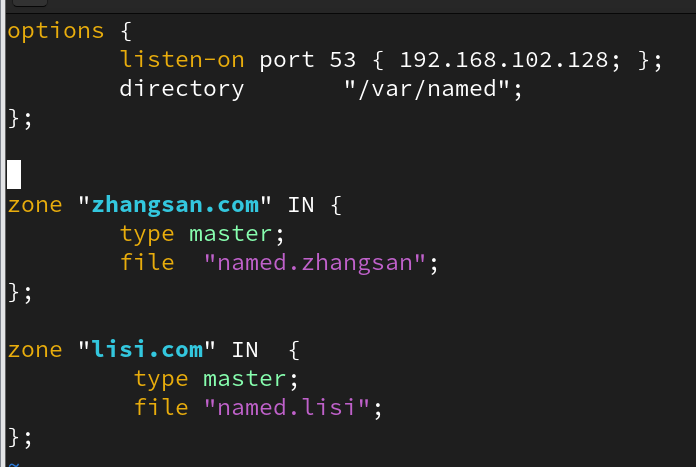
options {listen-on port 53 { 192.168.102.128; };directory       "/var/named";zone "zhangsan.com" IN {type master;file "named.zhangsan";
};zone "lisi.com" IN {type master;file "named.lisi";
};
2.2 创建named.zhangsan区域文件
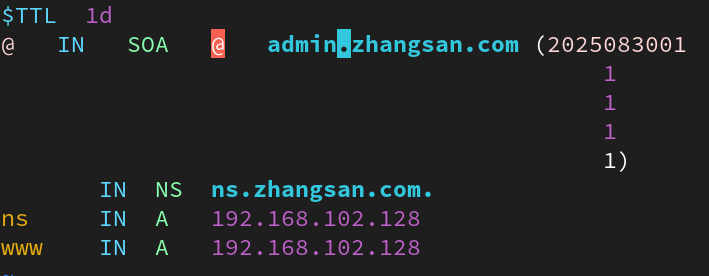
vim /var/named/named.zhangsan
$TTL  1d
@   IN   SOA   @   admin.zhangsan.com (20250830011111)IN  NS  ns.zhangsan.com.
ns     IN  A   192.168.102.128
www    IN  A   192.168.102.128
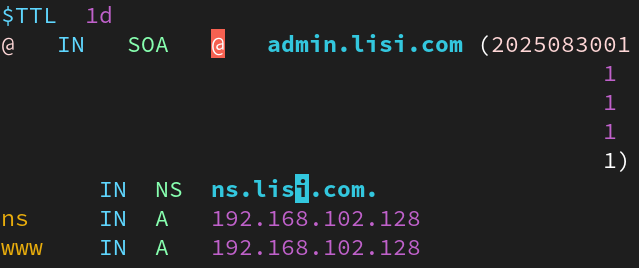
vim /var/named/named.lisi
$TTL 1d
@ IN SOA @ admin.lisi.com (2025083001
1
1
1
1)
IN NS ns.lisi.com.
ns IN A 192.168.102.128
www IN A 192.168.102.128
2.4 启动DNS
systemctl restart named
systemctl enable named
第3步:配置Web服务器和SSL加密
3.1 创建网站目录和内容
mkdir -p /www/zhangsan
mkdir -p /www/lisiecho "zhangsan website" > /www/zhangsan/index.html
echo "lisi website" > /www/lisi/index.html

3.2 生成SSL证书(zhangsan加密)
# 生成私钥
openssl genrsa > /etc/pki/tls/private/zhangsan.key# 生成证书(按照提示输入信息,Common Name填www.zhangsan.com)
openssl req -utf8 -new -key /etc/pki/tls/private/zhangsan.key -x509 -days 100 -out /etc/pki/tls/certs/zhangsan.crt
3.3 配置Apache虚拟主机
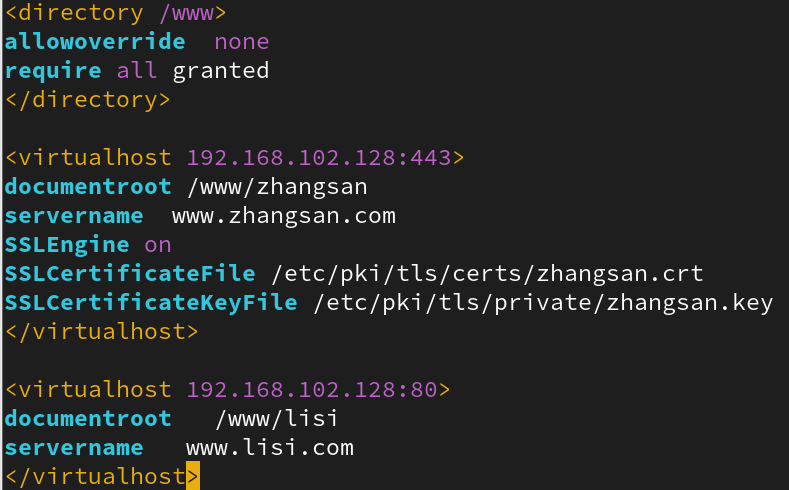
vim /etc/httpd/conf.d/vhost.conf
apache
<Directory /www>AllowOverride NoneRequire all granted
</Directory><VirtualHost *:443>DocumentRoot /www/zhangsanServerName www.zhangsan.comSSLEngine onSSLCertificateFile /etc/pki/tls/certs/zhangsan.crtSSLCertificateKeyFile /etc/pki/tls/private/zhangsan.keyErrorLog /var/log/httpd/zhangsan_error.logCustomLog /var/log/httpd/zhangsan_access.log combined
</VirtualHost><VirtualHost *:80>DocumentRoot /www/lisiServerName www.lisi.comErrorLog /var/log/httpd/lisi_error.logCustomLog /var/log/httpd/lisi_access.log combined
</VirtualHost>
3.4 启动Web服务
systemctl start httpd
systemctl enable httpd
实验验证
在主服务器上测试
dig -t A ns.zhangsan.com
dig -t A www.zhangsan.com
curl -k https://www.zhangsan.com
curl http://www.lisi.com

在从服务器192.168.102.133也是同样的道理改为nat模式
将手动改DNS为192.168.102.128
nmcli connection modify ens160 ipv4.dns 192.168.102.128
nmcli connection up ens160
curl http://www.lisi.com
curl -k https://www.zhangsan.com


VideoMaker:零样本定制化视频生成,依托于视频扩散模型的内在力量)

)


反序列化漏洞)

)


![【光照】[光照模型]发展里程碑时间线](http://pic.xiahunao.cn/【光照】[光照模型]发展里程碑时间线)


