本教程适用于使用 uni-app + Vue3 (script setup) 开发的跨平台 App(支持微信小程序、H5、Android/iOS 等)
🎯 功能目标
- ✅ 获取蓝牙权限
- ✅ 扫描周围蓝牙设备
- ✅ 连接指定蓝牙设备
- ✅ 获取服务和特征值
- ✅ 向设备发送数据包(ArrayBuffer)
- ✅ 页面 UI 展示设备列表 + 操作按钮
项目结构概览
/pages/bluetooth/
├── index.vue         # 主页面(本教程重点)
└── utils/Common.ts   # 公共方法(获取系统信息等)
其中的公共方法代码:
export async function getSystemInfo() {return await uni.getSystemInfo();
}
第一步:申请蓝牙权限并初始化蓝牙适配器
在 onShow() 生命周期中检查并申请蓝牙权限:
import { onShow } from "@dcloudio/uni-app";
import { ref } from "vue";let btOpenStatus = ref<boolean>(false);
let devicesList = ref<UniApp.BluetoothDeviceInfo[]>([]);onShow(() => {uni.authorize({scope: 'scope.bluetooth',success() {console.log('蓝牙权限已授权');initBluetooth();},fail() {showToast('请开启蓝牙权限!');}});
});
初始化蓝牙模块
function initBluetooth() {uni.onBluetoothAdapterStateChange(function (res) {btOpenStatus.value = res.available;if (res.available) startBluetoothScan(); // 蓝牙打开后开始扫描});uni.openBluetoothAdapter({success: () => {startBluetoothScan();},fail: (err) => {if (err.errCode == 10001) {btOpenStatus.value = false;showToast('蓝牙未打开!');}}});
}
🔍 第二步:扫描蓝牙设备
function startBluetoothScan() {uni.startBluetoothDevicesDiscovery({success: (res) => {console.log("开始扫描蓝牙设备...", res);},fail: (err) => {console.error("启动扫描失败", err);showToast("启动蓝牙扫描失败");}});uni.onBluetoothDeviceFound((res) => {res.devices.forEach((device) => {const exists = devicesList.value.some(d => d.deviceId === device.deviceId);if (!exists) devicesList.value.push(device);});});
}
🔗 第三步:连接蓝牙设备
const connectedDevice = ref({serviceOrFeature: [] as Array<{ service: any, characteristics?: any }>,devicesInfo: {} as UniApp.BluetoothDeviceInfo
});async function createBLEConnection(device: UniApp.BluetoothDeviceInfo) {uni.showToast({duration: 30000,icon: "loading",title: '蓝牙正在连接中!'});uni.createBLEConnection({deviceId: device.deviceId,success(connectionRes) {if (connectionRes.errCode === 0) {showToast('蓝牙连接成功');connectedDevice.value.devicesInfo = device;getBLEDeviceServices(device.deviceId).then(res => {if (res.code === 200) console.log('蓝牙服务初始化完成');});}},fail(connectionRes) {if (connectionRes.errCode === 10000) {showToast('请检查蓝牙是否开启!');} else if (connectionRes.errCode === 10010 || connectionRes.errCode === -1) {console.log('已经连接');}},complete() {uni.hideToast();}});
}
⚙️ 第四步:获取服务与特征值
function getBLEDeviceServices(deviceId: string): Promise<{ code: number }> {return new Promise(ok => {uni.getBLEDeviceServices({deviceId,success: (res) => {res.services.forEach(async (item) => {let characteristicsRes = await getBLEDeviceCharacteristics(deviceId, item.uuid);if (characteristicsRes.code === 200) {connectedDevice.value.serviceOrFeature.push({service: item,characteristics: characteristicsRes.data});ok({ code: 200 });}});},fail: (err) => {ok({ code: 201 });}});});
}function getBLEDeviceCharacteristics(deviceId: string, serviceId: string): Promise<{ code: number, data?: any }> {return new Promise(ok => {uni.getBLEDeviceCharacteristics({deviceId,serviceId,success: (res) => {ok({ code: 200, data: res.characteristics });},fail: () => {ok({ code: 201 });}});});
}
💬 第五步:向蓝牙设备发送数据
function getBluetoothServiceFeature(propertyName: string): { serviceUUID: string, feature: any } {let result = { serviceUUID: '', feature: {} };connectedDevice.value.serviceOrFeature.forEach(item => {let found = item.characteristics.find(f => f.properties[propertyName]);if (found) {result.serviceUUID = item.service.uuid;result.feature = found;}});return result;
}function sendMsg(msg: any, isBuffer?: boolean) {let writeFeature = getBluetoothServiceFeature('write');if (!writeFeature) {console.log('蓝牙没有对应的写服务权限!');return;}uni.writeBLECharacteristicValue({deviceId: connectedDevice.value.devicesInfo.deviceId,serviceId: writeFeature.serviceUUID,characteristicId: writeFeature.feature.uuid,value: isBuffer ? msg : stringToArrayBuffer(msg),success(res) {console.log('消息发送成功', res);},fail(res) {console.log('消息发送失败', res);}});
}function stringToArrayBuffer(str: string): ArrayBuffer {const buffer = new ArrayBuffer(str.length);const view = new Uint8Array(buffer);for (let i = 0; i < str.length; i++) {view[i] = str.charCodeAt(i);}return buffer;
}
完整代码
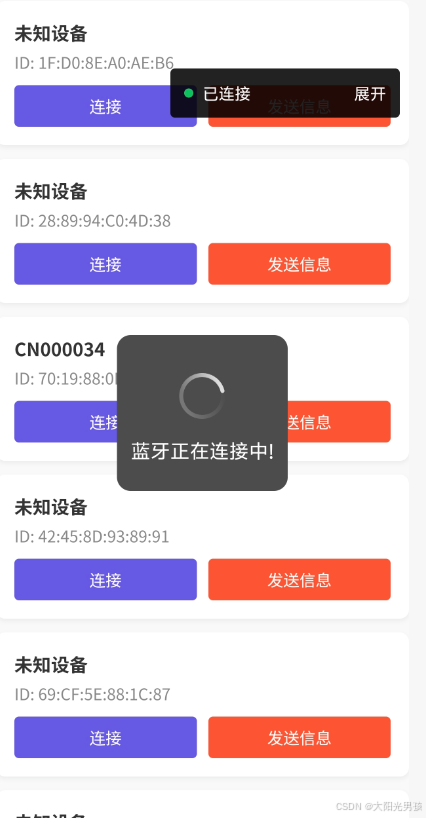
<template><template><scroll-view scroll-y style="height: 100vh;background: #f9f9f9;" class="device-list"><!-- 设备列表 --><view v-for="device in devicesList" :key="device.deviceId" class="device-card"><!-- 设备信息 --><view class="device-info"><text class="name">{{ device.name || '未知设备' }}</text><text class="id">ID: {{ device.deviceId }}</text></view><!-- 操作按钮 --><view class="actions"><text class="btn connect" @click.stop="createBLEConnection(device)">连接</text><text class="btn send" @click.stop="sendMsg('测试发送信息')">发送信息</text></view></view><!-- 空状态提示 --><view v-if="devicesList.length === 0" class="empty-state">正在搜索附近的蓝牙设备...</view></scroll-view></template>
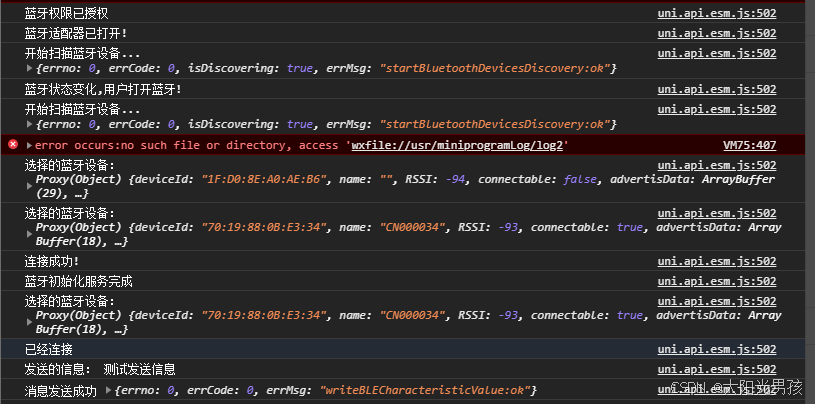
</template><script setup lang="ts">import { onShow } from "@dcloudio/uni-app";import { ref , watch } from "vue";import { getSystemInfo } from "@/utils/Common";let systemInfo = ref(); let btOpenStatus = ref<boolean>();let devicesList = ref<UniApp.BluetoothDeviceInfo[]>([]); // 用于存储搜索到的设备onShow( async () => {systemInfo.value = await getSystemInfo();uni.authorize({scope: 'scope.bluetooth',success() {console.log('蓝牙权限已授权');initBluetooth();},fail() {showToast('请开启蓝牙权限!');}});});function initBluetooth() {uni.onBluetoothAdapterStateChange(function (res) {console.log(`蓝牙状态变化,用户${res.available ? '打开' : '关闭'}蓝牙!`);btOpenStatus.value = res.available;if(res.available) {startBluetoothScan();}});uni.openBluetoothAdapter({success: () => {console.log("蓝牙适配器已打开!");startBluetoothScan(); // 开始扫描设备},fail: (err) => {if (err.errCode == 10001) {btOpenStatus.value = false;showToast('蓝牙未打开!');}}});}function startBluetoothScan() {uni.startBluetoothDevicesDiscovery({success: (res) => {console.log("开始扫描蓝牙设备...",res);},fail: (err) => {console.error("启动扫描失败", err);showToast("启动蓝牙扫描失败");}});// 监听新发现的设备uni.onBluetoothDeviceFound((res) => {// 遍历发现的设备res.devices.forEach((device) => {// 去重:根据 deviceId 判断是否已存在const exists = devicesList.value.some(d => d.deviceId === device.deviceId);if (!exists) {devicesList.value.push(device);}});});}const connectedDevice = ref({serviceOrFeature: [] as Array<{ service: any, characteristics ? : any }>,devicesInfo: {} as UniApp.BluetoothDeviceInfo});/*** 连接蓝牙设备*/async function createBLEConnection(device: UniApp.BluetoothDeviceInfo) {await uni.getLocation({});if(devicesList.value.length <= 0) {showToast('正在搜索附近的蓝牙设备');return;}uni.showToast({duration: 30000,icon: "loading",title: '蓝牙正在连接中!'});console.log('选择的蓝牙设备:',device);if(device) {connectedDevice.value.devicesInfo = device;uni.createBLEConnection({deviceId: device.deviceId,async success(connectionRes) {if(connectionRes.errCode == 0) {console.log('连接成功!');showToast('蓝牙连接成功');let servicesRes = await getBLEDeviceServices(device.deviceId);if(servicesRes.code == 200) {console.log('蓝牙初始化服务完成');}}},fail(connectionRes) {if(connectionRes.errCode == 10000) {showToast('请检查蓝牙是否开启!');}else if(connectionRes.errCode == 10000) {showToast('蓝牙连接失败,可以重试!');}else if(connectionRes.errCode == 10010 || connectionRes.errCode == -1) {console.log('已经连接');}},complete() {uni.hideToast();}});}}/*** 获取蓝牙设备的服务(service)*/function getBLEDeviceServices(deviceId: string) : Promise<{code : number}> {return new Promise( ok => {uni.getBLEDeviceServices({deviceId,success: (res) => {res.services.forEach(async (item) => {let characteristicsRes = await getBLEDeviceCharacteristics(deviceId,item.uuid);if(characteristicsRes.code == 200) {connectedDevice.value.serviceOrFeature.push({service: item,characteristics: characteristicsRes.data});ok({ code : 200 });}});},fail: (err) => {console.log("获取服务失败", err);ok({ code : 201 });}});});}/*** 获取蓝牙设备的特征值(characteristic)*/async function getBLEDeviceCharacteristics(deviceId: string, serviceId: string) : Promise<{ code : number , data ? : any }> {return new Promise( ok => {uni.getBLEDeviceCharacteristics({deviceId,serviceId,success: (res) => {ok({code: 200,data: res.characteristics});},fail: () => {ok({code : 201})}});});}/*** 获取连接设备的写特征值(wirteCharacteristic)*/function getBluetoothServiceFeature(propertyName: string): { serviceUUID: string, feature: any } {let serviceFeatureInfo: { serviceUUID: string, feature: any } = { serviceUUID: '', feature: {} };connectedDevice.value.serviceOrFeature.forEach(item => {let foundFeature = item.characteristics.find((feature: any) => feature.properties[propertyName]);if (foundFeature) {serviceFeatureInfo.serviceUUID = item.service.uuid;serviceFeatureInfo.feature = foundFeature;return;}});return serviceFeatureInfo;}// 向蓝牙写数据function sendMsg(msg: any, isBuffer ? : boolean ) {console.log('发送的信息:',msg); let writeServiceFeature = getBluetoothServiceFeature('write');if (!writeServiceFeature) {console.log('蓝牙没有对应的写服务权限!');return;}uni.writeBLECharacteristicValue({deviceId: connectedDevice.value.devicesInfo.deviceId,serviceId: writeServiceFeature.serviceUUID,characteristicId: writeServiceFeature.feature.uuid, value: isBuffer ? msg : stringToArrayBuffer(msg) as any,writeType: systemInfo.value.osName == 'ios' ? 'write' : 'writeNoResponse',success(res) {console.log('消息发送成功', res);},fail(res) {console.log('消息发送失败', res);}});}function stringToArrayBuffer(str: string): ArrayBuffer {const buffer = new ArrayBuffer(str.length);const view = new Uint8Array(buffer);for (let i = 0; i < str.length; i++) {view[i] = str.charCodeAt(i);}return buffer;}function showToast(title: string) {uni.showToast({icon: 'none',title});}</script><style lang="scss" scoped>.device-card {background-color: #fff;border-radius: 8px;padding: 16px;margin-bottom: 12px;box-shadow: 0 2px 4px rgba(0, 0, 0, 0.05);display: flex;flex-direction: column;gap: 10px;}.device-info {.name {font-weight: bold;font-size: 16px;color: #333;}.id {font-size: 14px;color: #888;display: block;margin-top: 4px;}}.actions {display: flex;gap: 10px;.btn {flex: 1;text-align: center;padding: 8px 0;border-radius: 4px;font-size: 14px;}.connect {color: #fff;background-color: #6659E5;}.send {color: #fff;background-color: #FC5531;}}.empty-state {text-align: center;padding: 20px;color: #999;}
</style>🛠️ 补充建议
| 功能 | 实现方式 |
|---|---|
| 显示 RSSI 信号强度 | 在设备项中显示 {{ device.RSSI }} dBm |
| 自动刷新设备列表 | 使用定时器每隔几秒重新扫描 |
| 防止重复点击连接 | 添加 connectingDeviceId 状态控制 |
| 发送自定义数据包 | 使用 buildBluetoothPacket() 构造特定格式数据 |
📦 最终效果预览
📌 总结
✅ 本教程实现了从蓝牙权限申请 → 设备扫描 → 连接设备 → 获取服务 → 特征值读写 → 数据发送的一整套流程。
🎯 适用于智能门锁、手环、打印机、IoT 等需要蓝牙通信的场景。
💡 如果你需要对接具体蓝牙协议(如 BLE 服务 UUID、数据格式),欢迎继续提问,我可以帮你定制!


)


--Rasa成型可用 rasa服务化部署及识别意图后的决策及行为)
)

)
技术应用解析:从原理到落地场景)

- 进制转换)


