✔零知IDE 是一个真正属于国人自己的开源软件平台,在开发效率上超越了Arduino平台并且更加容易上手,大大降低了开发难度。零知开源在软件方面提供了完整的学习教程和丰富示例代码,让不懂程序的工程师也能非常轻而易举的搭建电路来创作产品,测试产品。快来动手试试吧!
✔访问零知实验室,获取更多实战项目和教程资源吧!
www.lingzhilab.com
目录
一、硬件设计部分
1.1 硬件清单
1.2 接线方案
1.3 连接硬件图
1.4 接线实物图
二、软件架构部分
2.1 初始化结构
2.2 卡尔曼滤波
2.3 平均滤波及校准算法
2.4 Processing可视化代码
2.5 加速度计完整代码
三、校准过程及展示
3.1 校准过程
3.2 上位机界面展示
3.3 视频演示
四、ADXL345寄存器工作原理
4.1 DATA_FORMAT寄存器(0x31)
4.2 BW_RATE寄存器(0x2C)
4.3 POWER_CTL寄存器(0x2D)
4.4 加速度计I2C通信
五、常见问题解答
Q1: 传感器数据出现NaN值怎么办?
Q2: 如何提高角度计算精度?
Q3: 为什么三维立方体显示不全或位置不正确?
(1)项目概述
本项目基于零知增强板(主控芯片STM32F407VET6)和ADXL345三轴加速度计,开发了一套完整的实时姿态监测系统。通过先进的滤波算法和自动校准技术,实现了高精度的姿态角度解算,并通过Processing平台实现了三维可视化界面。该系统能够实时显示设备的滚转、俯仰角度,并记录历史数据变化趋势。
(2)项目亮点
>结合卡尔曼滤波和移动平均滤波,有效降低传感器噪声
>智能六点校准算法,无需手动干预
>Processing三维实时显示,支持历史数据回溯
(3)项目难点及解决方案
问题描述:传感器存在明显噪声和动态漂移
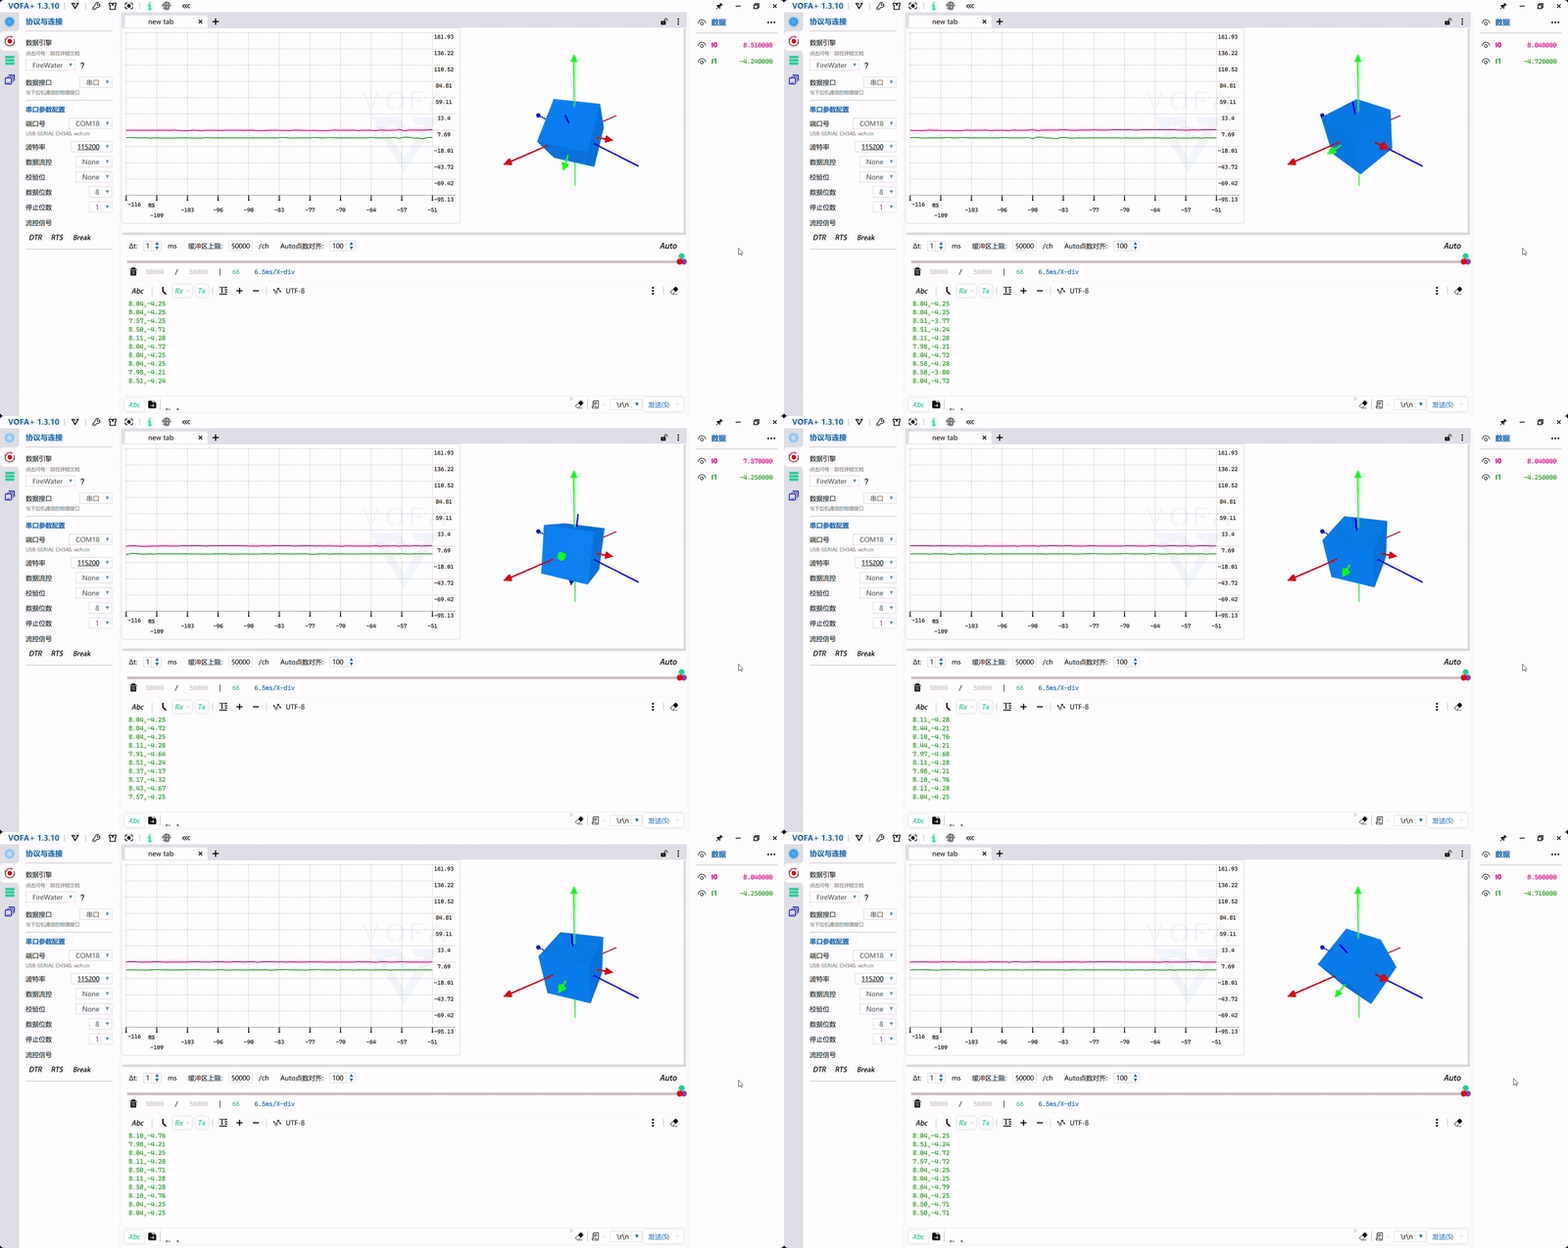
解决方案:采用双重滤波算法(卡尔曼滤波+移动平均滤波),设置合理的滤波参数,有效抑制噪声同时保持响应速度。
一、硬件设计部分
1.1 硬件清单
| 组件名称 | 规格型号 | 数量 | 备注 |
|---|---|---|---|
| 零知增强板 | STM32F407VET6主控 | 1 | 核心控制器 |
| ADXL345模块 | 三轴加速度计 | 1 | 姿态传感器 |
| 杜邦线 | 20cm | 4 | 连接线材 |
| 微型USB线 | / | 1 | 供电与编程 |
1.2 接线方案
| ADXL345引脚 | 零知增强板引脚 | 功能说明 |
|---|---|---|
| VCC | 5V | 电源正极 |
| GND | GND | 电源地 |
| SDA | 20/SDA | I2C数据线 |
| SCL | 21/SCL | I2C时钟线 |
1.3 连接硬件图
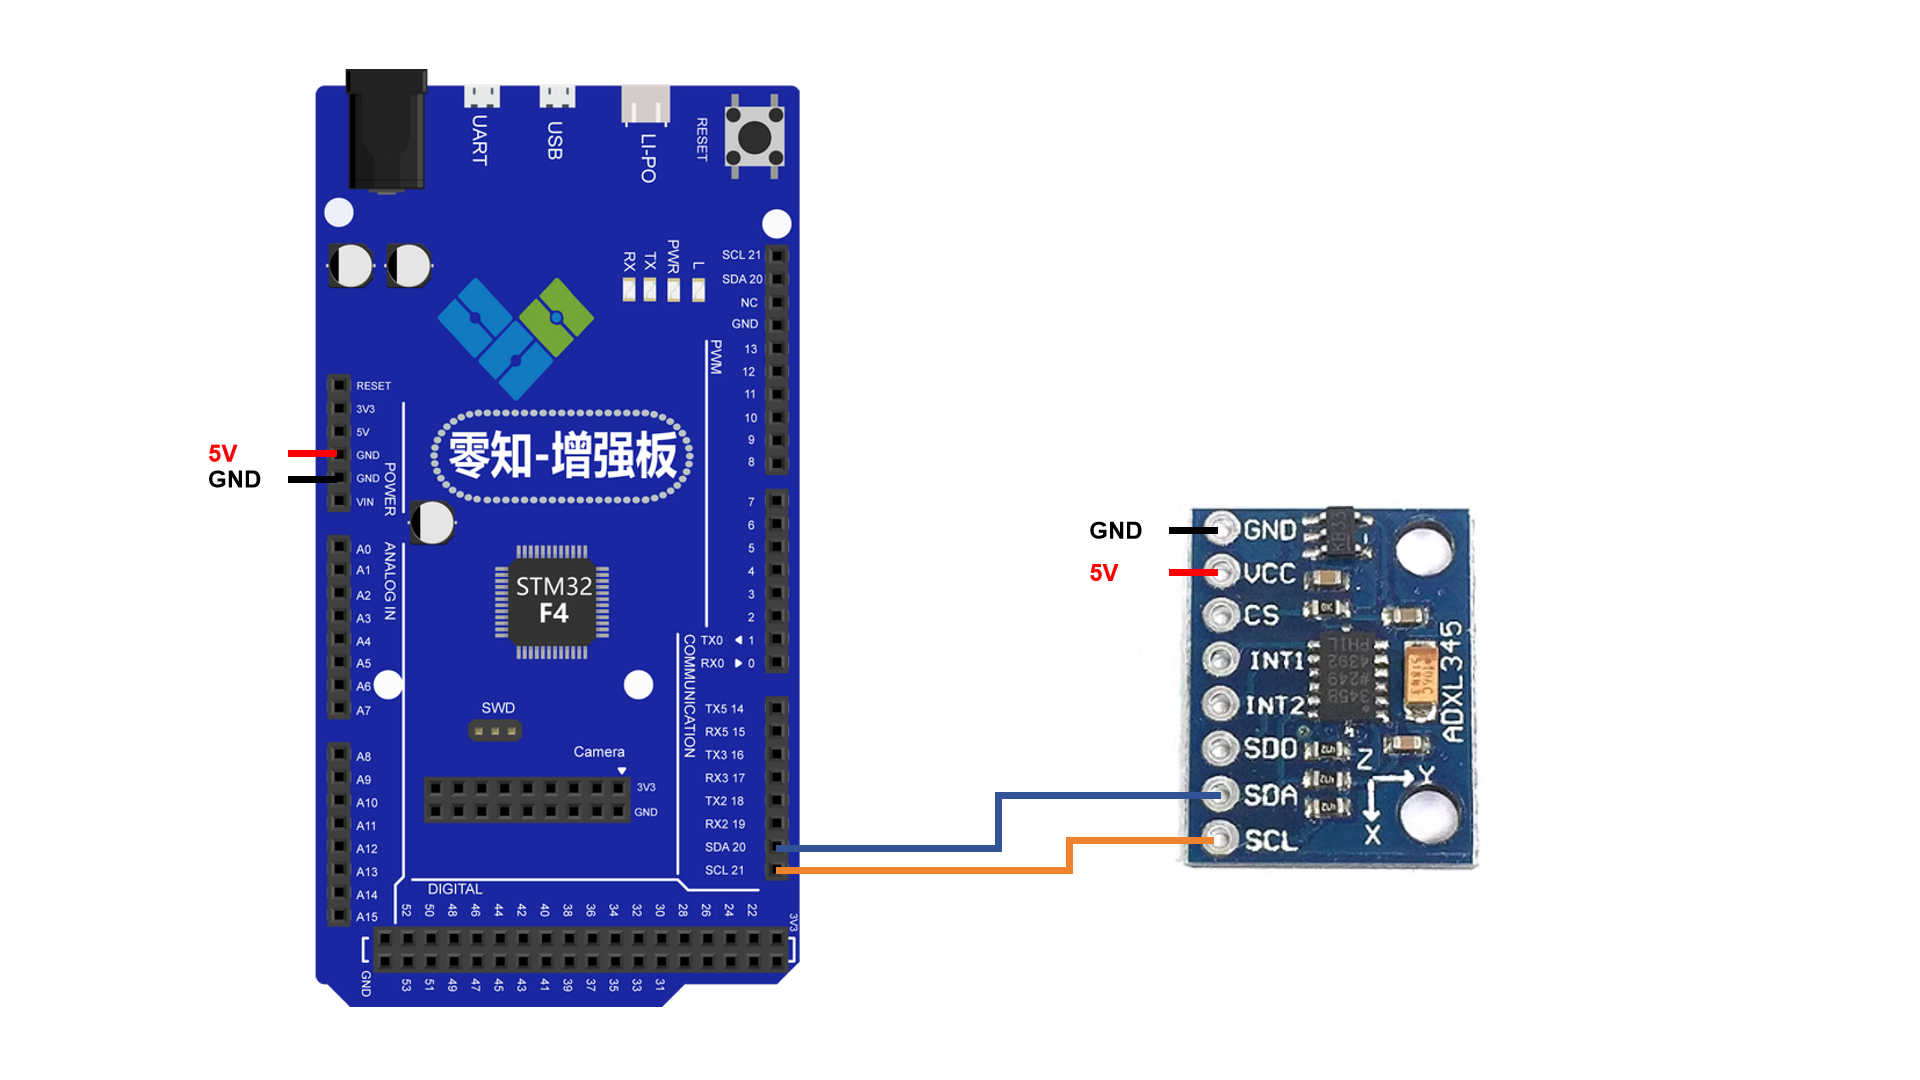
ADXL345模块通过I2C接口与零知增强板连接,使用5V供电
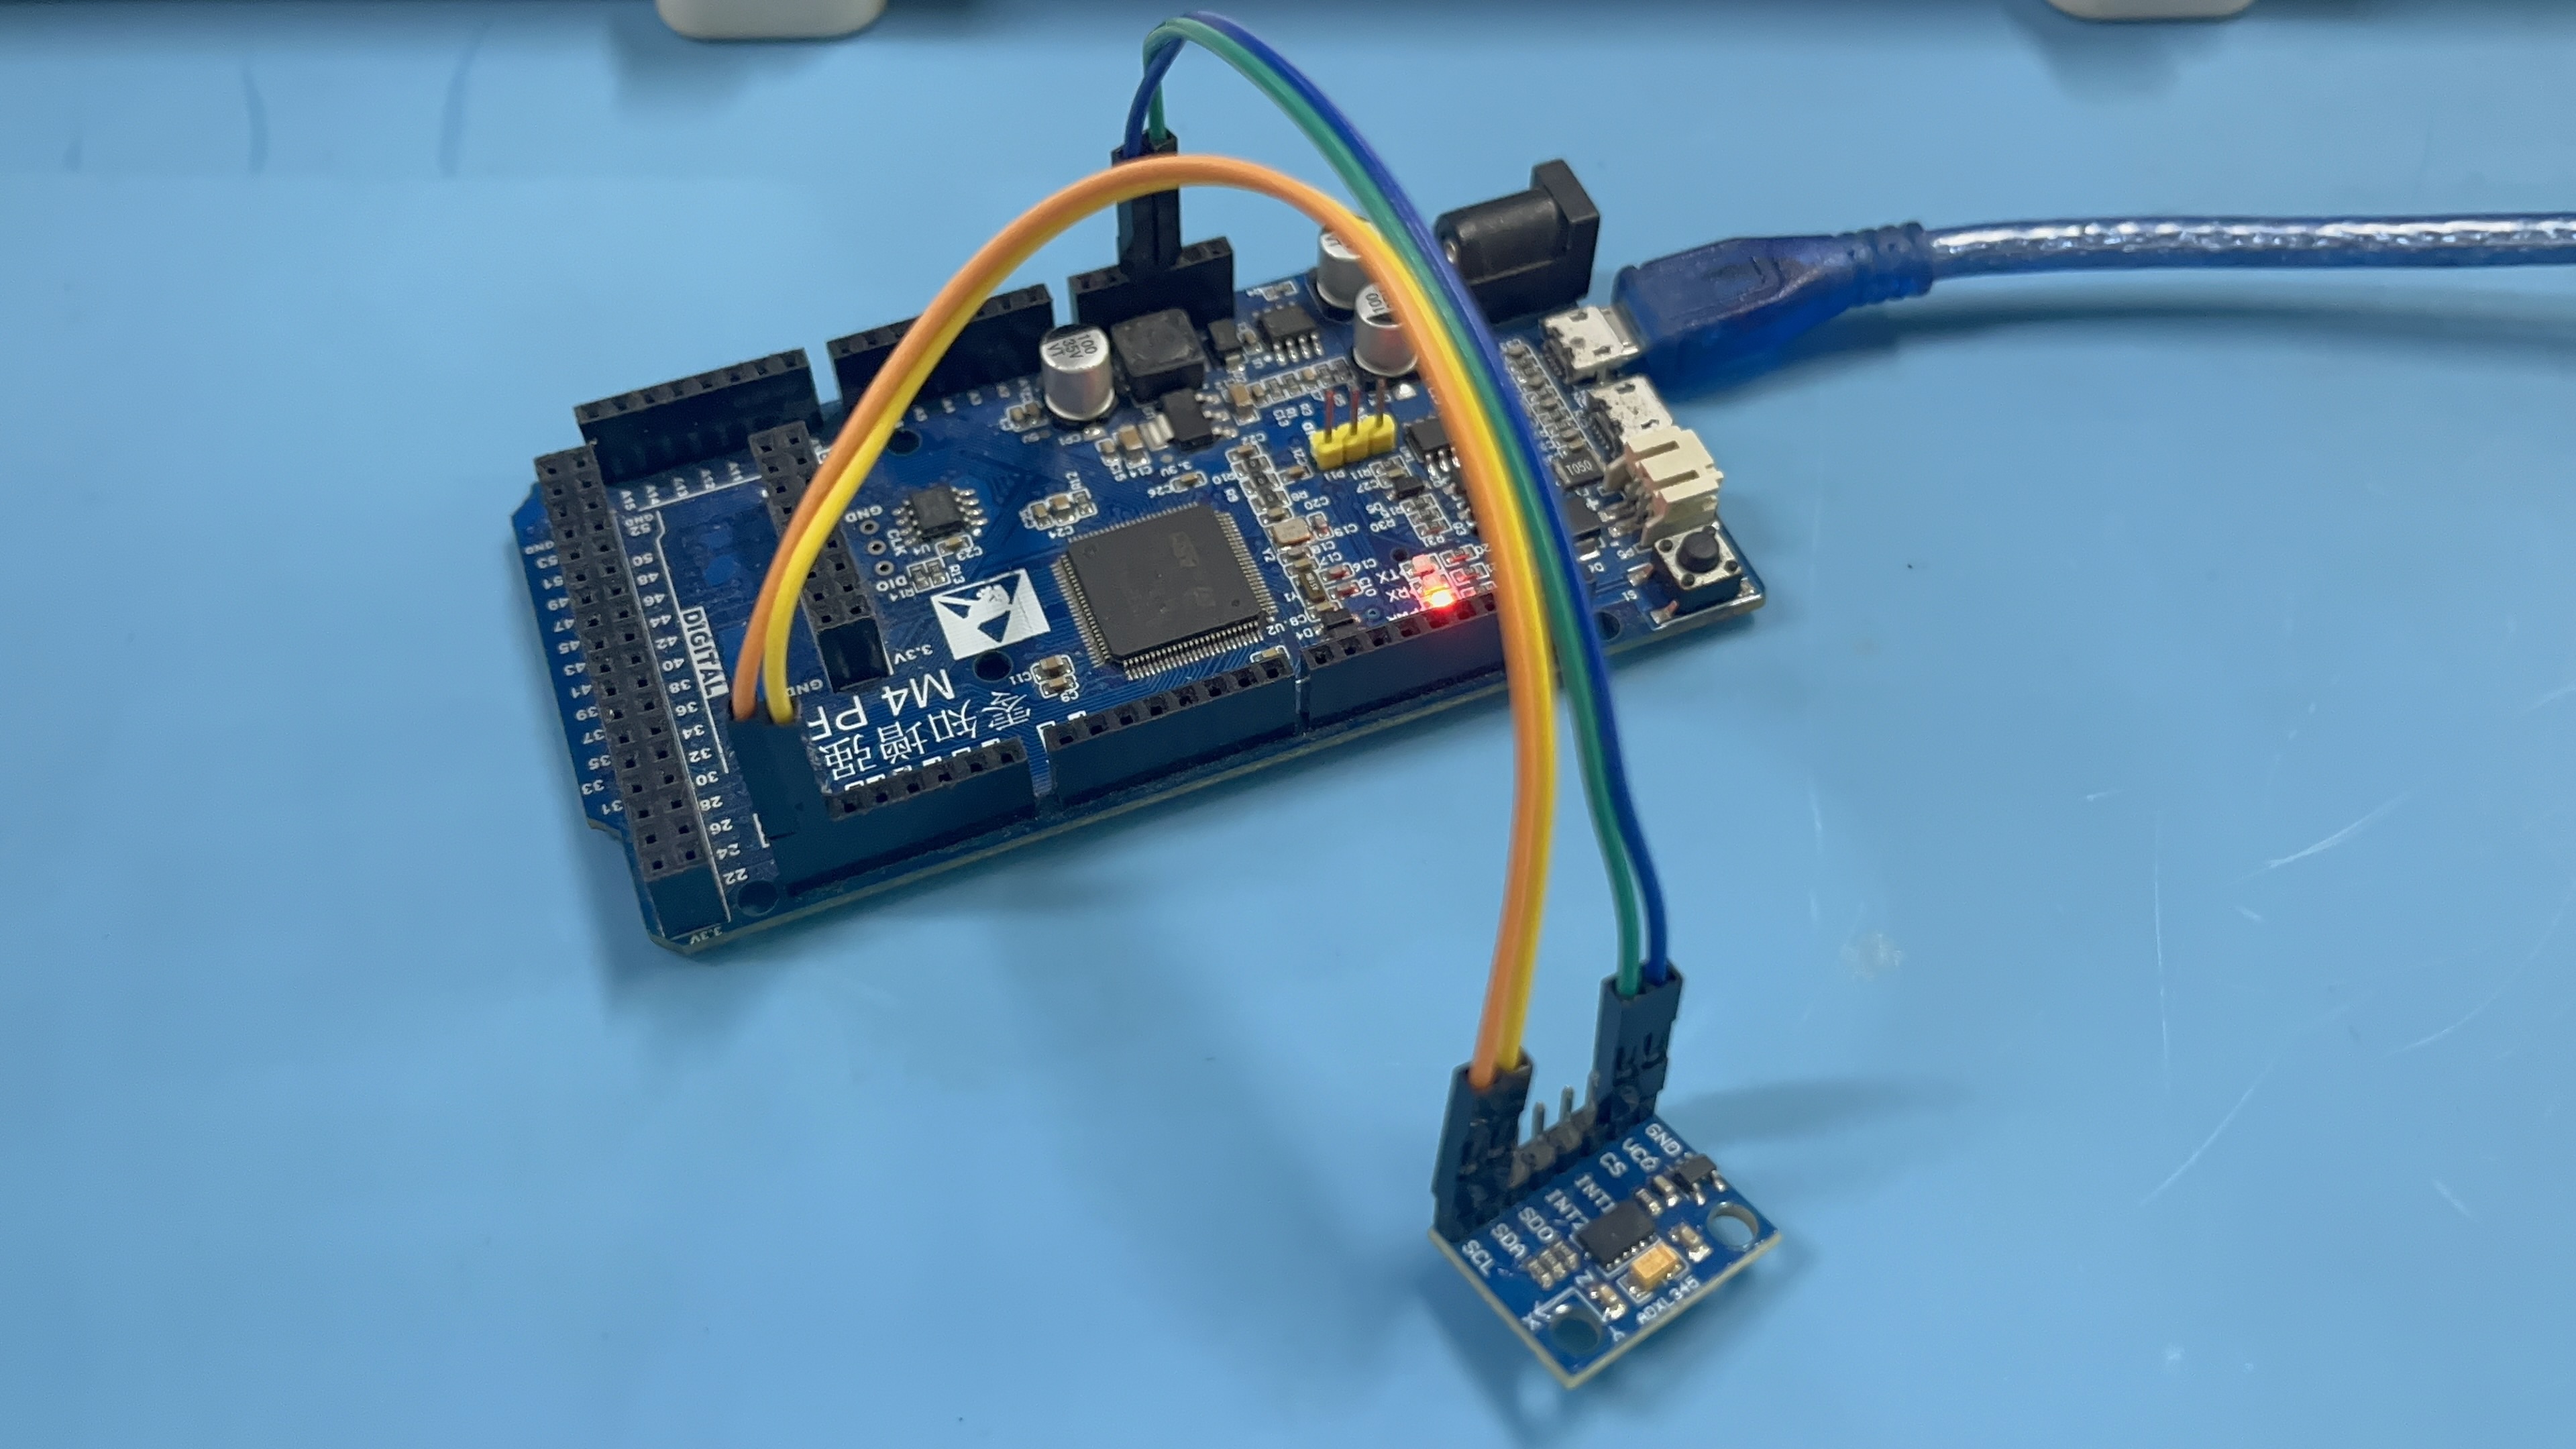
1.4 接线实物图
二、软件架构部分
2.1 初始化结构
#include <Wire.h>// ADXL345 I2C地址
#define ADXL345_ADDRESS 0x53// ADXL345寄存器地址
#define ADXL345_REG_DEVID 0x00
#define ADXL345_REG_POWER_CTL 0x2D
#define ADXL345_REG_DATA_FORMAT 0x31
#define ADXL345_REG_DATAX0 0x32
#define ADXL345_REG_BW_RATE 0x2C
#define ADXL345_REG_OFSX 0x1E
#define ADXL345_REG_OFSY 0x1F
#define ADXL345_REG_OFSZ 0x20// 高级滤波参数
#define MOVING_AVG_SIZE 7    // 移动平均窗口大小
#define KALMAN_Q 0.01        // 卡尔曼滤波过程噪声
#define KALMAN_R 0.1         // 卡尔曼滤波测量噪声
#define STABILITY_THRESHOLD 0.02 // 稳定性阈值(g)// 校准参数
float xOffset = 0, yOffset = 0, zOffset = 0;
bool calibrated = false;// 滤波结构体
typedef struct {float q; // 过程噪声协方差float r; // 测量噪声协方差float x; // 估计值float p; // 估计误差协方差float k; // 卡尔曼增益
} KalmanFilter;KalmanFilter kalmanX, kalmanY, kalmanZ;// ADXL345初始化函数
void initADXL345() {Wire.begin();// 检查设备IDbyte deviceID = readRegister(ADXL345_REG_DEVID);if (deviceID != 0xE5) {Serial.println("Error: ADXL345 not found");while(1);}// 设置数据速率和带宽为100HzwriteRegister(ADXL345_REG_BW_RATE, 0x0B);// 设置数据格式为±4g,全分辨率模式writeRegister(ADXL345_REG_DATA_FORMAT, 0x09);// 启用测量模式writeRegister(ADXL345_REG_POWER_CTL, 0x08);Serial.println("ADXL345 initialized successfully");
}
MOVING_AVG_SIZE = 7:移动平均窗口大小,影响平滑度和响应速度
STABILITY_THRESHOLD = 0.02:稳定性判断阈值,小于此值认为设备稳定
2.2 卡尔曼滤波
// 移动平均滤波
float movingAvgBufferX[MOVING_AVG_SIZE];
float movingAvgBufferY[MOVING_AVG_SIZE];
float movingAvgBufferZ[MOVING_AVG_SIZE];
int movingAvgIndex = 0;// 稳定性检测
unsigned long lastStableTime = 0;
bool isStable = false;// 初始化卡尔曼滤波器
void initKalmanFilter(KalmanFilter *kf, float q, float r, float initialValue) {kf->q = q;kf->r = r;kf->x = initialValue;kf->p = 1.0;kf->k = 0;
}// 卡尔曼滤波更新
float updateKalmanFilter(KalmanFilter *kf, float measurement) {// 预测kf->p = kf->p + kf->q;// 更新kf->k = kf->p / (kf->p + kf->r);kf->x = kf->x + kf->k * (measurement - kf->x);kf->p = (1 - kf->k) * kf->p;return kf->x;
}// 应用卡尔曼滤波
void applyKalmanFilter(float &x, float &y, float &z) {x = updateKalmanFilter(&kalmanX, x);y = updateKalmanFilter(&kalmanY, y);z = updateKalmanFilter(&kalmanZ, z);
}
2.3 平均滤波及校准算法
// 应用移动平均滤波
void applyMovingAverageFilter(float &x, float &y, float &z) {// 更新缓冲区movingAvgBufferX[movingAvgIndex] = x;movingAvgBufferY[movingAvgIndex] = y;movingAvgBufferZ[movingAvgIndex] = z;movingAvgIndex = (movingAvgIndex + 1) % MOVING_AVG_SIZE;// 计算平均值float xSum = 0, ySum = 0, zSum = 0;for (int i = 0; i < MOVING_AVG_SIZE; i++) {xSum += movingAvgBufferX[i];ySum += movingAvgBufferY[i];zSum += movingAvgBufferZ[i];}x = xSum / MOVING_AVG_SIZE;y = ySum / MOVING_AVG_SIZE;z = zSum / MOVING_AVG_SIZE;
}// 自动校准函数
void autoCalibrate() {Serial.println("Start automatic calibration...");Serial.println("Please ensure that the sensor is placed horizontally and stationary");// 等待2秒让用户放置传感器delay(2000);float xSum = 0, ySum = 0, zSum = 0;const int samples = 200;int validSamples = 0;// 采集多个样本求平均值for (int i = 0; i < samples; i++) {float x, y, z;readAcceleration(x, y, z);// 检查数据有效性if (!isnan(x) && !isnan(y) && !isnan(z)) {xSum += x;ySum += y;zSum += z;validSamples++;}delay(10); // 每10ms采集一次}if (validSamples > 0) {// 计算偏移量xOffset = xSum / validSamples;yOffset = ySum / validSamples;zOffset = zSum / validSamples - 1.0; // 减去重力加速度// 设置硬件偏移寄存器writeRegister(ADXL345_REG_OFSX, (byte)(xOffset / 0.0156));writeRegister(ADXL345_REG_OFSY, (byte)(yOffset / 0.0156));writeRegister(ADXL345_REG_OFSZ, (byte)(zOffset / 0.0156));calibrated = true;Serial.println("Automatic calibration completed!");Serial.print("XOffset: "); Serial.print(xOffset, 6);Serial.print(" g, YOffset: "); Serial.print(yOffset, 6);Serial.print(" g, ZOffset: "); Serial.print(zOffset, 6);Serial.println(" g");} else {Serial.println("Calibration failure: No valid data can be obtained");}
}// 处理串口命令
void processSerialCommands() {if (Serial.available()) {char command = Serial.read();if (command == 'c' || command == 'C') {autoCalibrate();} else if (command == 'r' || command == 'R') {// 重置校准数据calibrated = false;xOffset = 0;yOffset = 0;zOffset = 0;writeRegister(ADXL345_REG_OFSX, 0);writeRegister(ADXL345_REG_OFSY, 0);writeRegister(ADXL345_REG_OFSZ, 0);Serial.println("The calibration data has been reset");} else if (command == 's' || command == 'S') {// 显示状态Serial.print("校准状态 : ");Serial.println(calibrated ? "Calibrated Resistance" : "Uncalibrated");Serial.print("XOffset: "); Serial.println(xOffset, 6);Serial.print("YOffset: "); Serial.println(yOffset, 6);Serial.print("ZOffset: "); Serial.println(zOffset, 6);}}
}
2.4 Processing可视化代码
import processing.serial.*;// 传感器数据
float roll, pitch, yaw;
PVector accelerometer = new PVector();
PVector gyroscope = new PVector(0, 0, 0);
PVector magneticField = new PVector(0, 0, 0);// 3D模型
PShape model;
PImage bgImage;// 串口配置
Serial port;
String[] serialPorts;
int selectedPort = 0;
boolean printSerial = true;
boolean connected = false;// 历史数据
float[] rollHistory = new float[200];
float[] pitchHistory = new float[200];
int historyIndex = 0;// UI颜色主题
color backgroundColor = color(30, 30, 40);
color panelColor = color(40, 40, 50, 200);
color textColor = color(220, 220, 220);
color accentColor = color(65, 105, 225); // 皇家蓝
color rollColor = color(220, 80, 80);    // 红色
color pitchColor = color(80, 220, 80);   // 绿色
color yawColor = color(80, 80, 220);     // 蓝色// 字体
PFont dataFont, titleFont;void setup() {size(1400, 900, P3D);frameRate(60);// 创建字体dataFont = createFont("Arial", 16);titleFont = createFont("Arial Bold", 20);// 创建默认背景bgImage = createGradientBackground();// 创建默认模型 - 更大的立方体model = createEnhancedCube();// 初始化串口serialPorts = Serial.list();if (serialPorts.length > 0) {connectSerial(serialPorts[0]);}// 初始化历史数据for (int i = 0; i < rollHistory.length; i++) {rollHistory[i] = 0;pitchHistory[i] = 0;}println("等待数据...");
}PImage createGradientBackground() {PGraphics pg = createGraphics(width, height);pg.beginDraw();pg.background(backgroundColor);// 添加渐变效果for (int i = 0; i < height; i++) {float inter = map(i, 0, height, 0, 1);color c = lerpColor(color(20, 20, 30), color(40, 40, 60), inter);pg.stroke(c);pg.line(0, i, width, i);}// 添加网格线pg.stroke(50, 100);for (int x = 0; x < width; x += 50) {pg.line(x, 0, x, height);}for (int y = 0; y < height; y += 50) {pg.line(0, y, width, y);}pg.endDraw();return pg.get();
}PShape createEnhancedCube() {// 创建一个更详细、更大的立方体模型PShape cube = createShape(GROUP);// 立方体主体 (100x100x100)PShape mainBody = createShape(BOX, 150, 150, 150);mainBody.setFill(color(180, 100, 100, 200));mainBody.setStroke(false);cube.addChild(mainBody);// 添加边缘高光PShape edges = createShape();edges.beginShape(LINES);edges.stroke(255, 150);edges.strokeWeight(2);// 立方体边缘float s = 75; // 半边长edges.vertex(-s, -s, -s); edges.vertex(s, -s, -s);edges.vertex(-s, -s, -s); edges.vertex(-s, s, -s);edges.vertex(-s, -s, -s); edges.vertex(-s, -s, s);edges.vertex(s, s, s); edges.vertex(-s, s, s);edges.vertex(s, s, s); edges.vertex(s, -s, s);edges.vertex(s, s, s); edges.vertex(s, s, -s);edges.vertex(-s, s, -s); edges.vertex(s, s, -s);edges.vertex(-s, s, -s); edges.vertex(-s, s, s);edges.vertex(s, -s, -s); edges.vertex(s, s, -s);edges.vertex(s, -s, -s); edges.vertex(s, -s, s);edges.vertex(-s, -s, s); edges.vertex(s, -s, s);edges.vertex(-s, -s, s); edges.vertex(-s, s, s);edges.endShape();cube.addChild(edges);// 添加方向指示器PShape xIndicator = createShape(SPHERE, 10);xIndicator.setFill(rollColor);xIndicator.setStroke(false);xIndicator.translate(85, 0, 0);cube.addChild(xIndicator);PShape yIndicator = createShape(SPHERE, 10);yIndicator.setFill(pitchColor);yIndicator.setStroke(false);yIndicator.translate(0, 85, 0);cube.addChild(yIndicator);PShape zIndicator = createShape(SPHERE, 10);zIndicator.setFill(yawColor);zIndicator.setStroke(false);zIndicator.translate(0, 0, 85);cube.addChild(zIndicator);return cube;
}void draw() {// 绘制背景image(bgImage, 0, 0);// 绘制3D场景 (占据左侧大部分区域)draw3DScene();// 绘制数据面板 (右侧)drawDataPanel();// 绘制波形图 (右下角)drawWaveformGraph();// 绘制连接状态drawConnectionStatus();
}void draw3DScene() {pushMatrix();// 将3D场景移到左侧中心,占据更大空间translate(width/3, height/2, 0);// 设置灯光 - 增强照明lights();directionalLight(150, 150, 150, 0, 0, -1);directionalLight(100, 100, 100, 0, 1, 0);directionalLight(80, 80, 80, 1, 0, 0);lightSpecular(255, 255, 255);shininess(20.0);// 应用旋转 - 调整Z轴方向// 注意: Processing默认Y向上,我们需要调整使Z向上rotateX(radians(0)); // 先旋转使Z轴向上rotateZ(radians(-roll));rotateX(radians(-pitch));rotateY(radians(-yaw)); // 调整yaw旋转方向// 绘制参考坐标系 (更大)drawCoordinateSystem();// 绘制模型shape(model);popMatrix();
}void drawCoordinateSystem() {float axisLength = 120;// 绘制X轴 (红色)strokeWeight(3);stroke(rollColor);line(0, 0, 0, axisLength, 0, 0);pushMatrix();translate(axisLength + 15, 0, 0);fill(rollColor);textFont(titleFont);text("Y", 0, 0);popMatrix();// 绘制Y轴 (绿色)stroke(pitchColor);line(0, 0, 0, 0, axisLength, 0);pushMatrix();translate(0, axisLength + 15, 0);fill(pitchColor);text("Z", 0, 0);popMatrix();// 绘制Z轴 (蓝色) - 现在向上stroke(yawColor);line(0, 0, 0, 0, 0, axisLength);pushMatrix();translate(0, 0, axisLength + 15);fill(yawColor);text("X", 0, 0);popMatrix();strokeWeight(1);
}void drawDataPanel() {// 绘制数据面板背景 (右侧)float panelWidth = 400;float panelX = width - panelWidth - 20;fill(panelColor);noStroke();rect(panelX, 20, panelWidth, 280, 10);// 面板标题fill(accentColor);textFont(titleFont);textAlign(LEFT, TOP);text("Sensor Data Panel", panelX + 15, 30);// 显示传感器数据textFont(dataFont);fill(textColor);String accelX = Float.isNaN(accelerometer.x) ? "N/A" : nfp(accelerometer.x, 1, 3);String accelY = Float.isNaN(accelerometer.y) ? "N/A" : nfp(accelerometer.y, 1, 3);String accelZ = Float.isNaN(accelerometer.z) ? "N/A" : nfp(accelerometer.z, 1, 3);String yawStr = Float.isNaN(yaw) ? "N/A" : nfp(yaw, 1, 1);String pitchStr = Float.isNaN(pitch) ? "N/A" : nfp(pitch, 1, 1);String rollStr = Float.isNaN(roll) ? "N/A" : nfp(roll, 1, 1);// 使用表格形式显示数据float startY = 70;float rowHeight = 30;// 表头fill(accentColor);text("parameter:", panelX + 20, startY);text("value:", panelX + 200, startY);// 加速度数据drawDataRow("accelerate X:", accelX + " g", startY + rowHeight, rollColor);drawDataRow("accelerate Y:", accelY + " g", startY + rowHeight * 2, pitchColor);drawDataRow("accelerate Z:", accelZ + " g", startY + rowHeight * 3, yawColor);// 姿态数据drawDataRow("Roll:", rollStr + "°", startY + rowHeight * 5, rollColor);drawDataRow("Pitch:", pitchStr + "°", startY + rowHeight * 6, pitchColor);drawDataRow("Yaw:", yawStr + "°", startY + rowHeight * 7, yawColor);
}void drawDataRow(String label, String value, float y, color c) {float panelX = width - 400 - 20;fill(textColor);text(label, panelX + 20, y);fill(c);text(value, panelX + 200, y);
}void drawWaveformGraph() {float graphX = width - 420;float graphY = 320;float graphWidth = 400;float graphHeight = 250;// 绘制波形图背景fill(panelColor);noStroke();rect(graphX, graphY, graphWidth, graphHeight, 10);// 标题fill(accentColor);textFont(titleFont);text("Angle Waveform Diagram", graphX + 15, graphY + 15);// 绘制网格drawWaveformGrid(graphX, graphY, graphWidth, graphHeight);// 绘制零线stroke(150, 150);float zeroY = graphY + graphHeight / 2;line(graphX, zeroY, graphX + graphWidth, zeroY);// 绘制Roll历史stroke(rollColor);drawWaveformLine(graphX, graphY, graphWidth, graphHeight, rollHistory, -90, 90);// 绘制Pitch历史stroke(pitchColor);drawWaveformLine(graphX, graphY, graphWidth, graphHeight, pitchHistory, -90, 90);// 绘制标签fill(textColor);textFont(dataFont);textAlign(LEFT);text("Roll", graphX, graphY + graphHeight + 40);fill(rollColor);rect(graphX + 40, graphY + graphHeight + 30, 15, 5);fill(textColor);text("Pitch", graphX, graphY + graphHeight + 70);fill(pitchColor);rect(graphX + 40, graphY + graphHeight + 62, 15, 5);// 绘制刻度fill(150);textAlign(CENTER);text("-90°", graphX, graphY + graphHeight + 20);text("0°", graphX + graphWidth / 2, graphY + graphHeight + 20);text("90°", graphX + graphWidth, graphY + graphHeight + 20);
}void drawWaveformGrid(float x, float y, float w, float h) {stroke(80, 100);// 水平网格线for (int i = 1; i < 4; i++) {float lineY = y + h * i / 4;line(x, lineY, x + w, lineY);}// 垂直网格线for (int i = 1; i < 5; i++) {float lineX = x + w * i / 5;line(lineX, y, lineX, y + h);}
}void drawWaveformLine(float x, float y, float w, float h, float[] history, float minVal, float maxVal) {noFill();beginShape();for (int i = 0; i < history.length; i++) {float xPos = x + map(i, 0, history.length - 1, 0, w);float yPos = y + h/2 - map(history[i], minVal, maxVal, -h/2, h/2);vertex(xPos, yPos);}endShape();
}void drawConnectionStatus() {float statusX = 20;float statusY = height - 80;// 连接状态背景fill(panelColor);noStroke();rect(statusX, statusY, 300, 60, 8);// 连接状态指示器fill(connected ? color(0, 200, 0) : color(200, 0, 0));ellipse(statusX + 20, statusY + 20, 15, 15);fill(textColor);textFont(dataFont);textAlign(LEFT, CENTER);text("UART: " + (connected ? serialPorts[selectedPort] : "No connection"), statusX + 45, statusY + 20);text("Data receiving: " + (millis() - lastDataTime < 1000 ? "Normal" : "No found"), statusX + 45, statusY + 40);// 指令提示text("Press the space bar to switch the serial port | C:Calibration | R:Reset", statusX, statusY + 70);
}void checkDataReceiving() {// 检查数据接收状态if (millis() - lastDataTime > 1000) {dataReceived = 0;}
}void serialEvent(Serial p) {try {String rawData = p.readStringUntil('\n');if (rawData == null) return;rawData = rawData.trim();if (printSerial) println("Raw: " + rawData);String[] parts = split(rawData, ' ');if (parts.length >= 4) {if (parts[0].equals("Or:")) {// 解析姿态数据: Or: yaw pitch rolltry {yaw = float(parts[1]);pitch = float(parts[2]);roll = float(parts[3]);// 检查NaN值if (Float.isNaN(yaw)) yaw = 0;if (Float.isNaN(pitch)) pitch = 0;if (Float.isNaN(roll)) roll = 0;// 更新历史数据rollHistory[historyIndex] = roll;pitchHistory[historyIndex] = pitch;historyIndex = (historyIndex + 1) % rollHistory.length;dataReceived |= 1;lastDataTime = millis();} catch (Exception e) {println("Error parsing orientation data: " + e.getMessage());}} else if (parts[0].equals("Accel:")) {// 解析加速度数据: Accel: x y ztry {float accelX = float(parts[1]);float accelY = float(parts[2]);float accelZ = float(parts[3]);// 检查NaN值if (Float.isNaN(accelX)) accelX = 0;if (Float.isNaN(accelY)) accelY = 0;if (Float.isNaN(accelZ)) accelZ = 0;accelerometer.set(accelX, accelY, accelZ);dataReceived |= 2;lastDataTime = millis();} catch (Exception e) {println("Error parsing acceleration data: " + e.getMessage());}}}} catch(Exception e) {println("Serial Error: " + e.getMessage());}
}// 全局变量用于跟踪数据接收状态
int dataReceived = 0;
long lastDataTime = 0;void connectSerial(String portName) {if (port != null) {port.stop();}try {port = new Serial(this, portName, 115200);port.bufferUntil('\n');connected = true;println("Connected to: " + portName);} catch(Exception e) {println("Connection failed: " + e.getMessage());connected = false;}
}void keyPressed() {// 切换串口if (key == ' ') {if (serialPorts.length > 0) {selectedPort = (selectedPort + 1) % serialPorts.length;connectSerial(serialPorts[selectedPort]);}}// 切换调试输出if (key == 'P' || key == 'p') {printSerial = !printSerial;println("Serial print: " + (printSerial ? "ON" : "OFF"));}// 重置视角if (key == 'R' || key == 'r') {yaw = pitch = roll = 0;println("View reset");}// 发送校准命令if (key == 'C' || key == 'c') {if (port != null) {port.write('c');println("Sent calibration command");}}
}
UI设计界面:左侧3D实时渲染区域,右侧数据展示、实时波形图显示历史数据趋势
2.5 加速度计完整代码
#include <Wire.h>// ADXL345 I2C地址
#define ADXL345_ADDRESS 0x53// ADXL345寄存器地址
#define ADXL345_REG_DEVID 0x00
#define ADXL345_REG_POWER_CTL 0x2D
#define ADXL345_REG_DATA_FORMAT 0x31
#define ADXL345_REG_DATAX0 0x32
#define ADXL345_REG_BW_RATE 0x2C
#define ADXL345_REG_OFSX 0x1E
#define ADXL345_REG_OFSY 0x1F
#define ADXL345_REG_OFSZ 0x20// 高级滤波参数
#define MOVING_AVG_SIZE 7    // 移动平均窗口大小
#define KALMAN_Q 0.01        // 卡尔曼滤波过程噪声
#define KALMAN_R 0.1         // 卡尔曼滤波测量噪声
#define STABILITY_THRESHOLD 0.02 // 稳定性阈值(g)// 校准参数
float xOffset = 0, yOffset = 0, zOffset = 0;
bool calibrated = false;// 滤波结构体
typedef struct {float q; // 过程噪声协方差float r; // 测量噪声协方差float x; // 估计值float p; // 估计误差协方差float k; // 卡尔曼增益
} KalmanFilter;KalmanFilter kalmanX, kalmanY, kalmanZ;// 移动平均滤波
float movingAvgBufferX[MOVING_AVG_SIZE];
float movingAvgBufferY[MOVING_AVG_SIZE];
float movingAvgBufferZ[MOVING_AVG_SIZE];
int movingAvgIndex = 0;// 稳定性检测
unsigned long lastStableTime = 0;
bool isStable = false;// 初始化卡尔曼滤波器
void initKalmanFilter(KalmanFilter *kf, float q, float r, float initialValue) {kf->q = q;kf->r = r;kf->x = initialValue;kf->p = 1.0;kf->k = 0;
}// 卡尔曼滤波更新
float updateKalmanFilter(KalmanFilter *kf, float measurement) {// 预测kf->p = kf->p + kf->q;// 更新kf->k = kf->p / (kf->p + kf->r);kf->x = kf->x + kf->k * (measurement - kf->x);kf->p = (1 - kf->k) * kf->p;return kf->x;
}// ADXL345初始化函数
void initADXL345() {Wire.begin();// 检查设备IDbyte deviceID = readRegister(ADXL345_REG_DEVID);if (deviceID != 0xE5) {Serial.println("Error: ADXL345 not found");while(1);}// 设置数据速率和带宽为100HzwriteRegister(ADXL345_REG_BW_RATE, 0x0B);// 设置数据格式为±4g,全分辨率模式writeRegister(ADXL345_REG_DATA_FORMAT, 0x09);// 启用测量模式writeRegister(ADXL345_REG_POWER_CTL, 0x08);Serial.println("ADXL345 initialized successfully");
}// 写入寄存器函数
void writeRegister(byte reg, byte value) {Wire.beginTransmission(ADXL345_ADDRESS);Wire.write(reg);Wire.write(value);Wire.endTransmission();
}// 读取寄存器函数
byte readRegister(byte reg) {Wire.beginTransmission(ADXL345_ADDRESS);Wire.write(reg);Wire.endTransmission();Wire.requestFrom(ADXL345_ADDRESS, 1);return Wire.read();
}// 读取加速度数据
void readAcceleration(float &x, float &y, float &z) {Wire.beginTransmission(ADXL345_ADDRESS);Wire.write(ADXL345_REG_DATAX0);Wire.endTransmission();// 检查是否有数据可用if (Wire.requestFrom(ADXL345_ADDRESS, 6) == 6) {// 读取原始数据int16_t xRaw = (Wire.read() | (Wire.read() << 8));int16_t yRaw = (Wire.read() | (Wire.read() << 8));int16_t zRaw = (Wire.read() | (Wire.read() << 8));// 转换为g值 (±4g范围,全分辨率模式)x = xRaw * 0.0078;y = yRaw * 0.0078;z = zRaw * 0.0078;// 应用校准偏移if (calibrated) {x -= xOffset;y -= yOffset;z -= zOffset;}} else {// 读取失败,设置为0x = y = z = 0;Serial.println("Error: Failed to read acceleration data");}
}// 应用移动平均滤波
void applyMovingAverageFilter(float &x, float &y, float &z) {// 更新缓冲区movingAvgBufferX[movingAvgIndex] = x;movingAvgBufferY[movingAvgIndex] = y;movingAvgBufferZ[movingAvgIndex] = z;movingAvgIndex = (movingAvgIndex + 1) % MOVING_AVG_SIZE;// 计算平均值float xSum = 0, ySum = 0, zSum = 0;for (int i = 0; i < MOVING_AVG_SIZE; i++) {xSum += movingAvgBufferX[i];ySum += movingAvgBufferY[i];zSum += movingAvgBufferZ[i];}x = xSum / MOVING_AVG_SIZE;y = ySum / MOVING_AVG_SIZE;z = zSum / MOVING_AVG_SIZE;
}// 应用卡尔曼滤波
void applyKalmanFilter(float &x, float &y, float &z) {x = updateKalmanFilter(&kalmanX, x);y = updateKalmanFilter(&kalmanY, y);z = updateKalmanFilter(&kalmanZ, z);
}// 检测稳定性
bool checkStability(float x, float y, float z, float prevX, float prevY, float prevZ) {float deltaX = abs(x - prevX);float deltaY = abs(y - prevY);float deltaZ = abs(z - prevZ);return (deltaX < STABILITY_THRESHOLD && deltaY < STABILITY_THRESHOLD && deltaZ < STABILITY_THRESHOLD);
}// 计算Roll和Pitch角度
void calculateAngles(float x, float y, float z, float &roll, float &pitch) {// 检查数据有效性,避免除零错误和NaNif (isnan(x) || isnan(y) || isnan(z)) {roll = pitch = 0;return;}// 使用改进的公式计算Roll和Pitchfloat denominator = sqrt(x*x + z*z);if (denominator < 0.001) denominator = 0.001; // 避免除零错误roll = atan2(y, denominator) * 180.0 / PI;denominator = sqrt(y*y + z*z);if (denominator < 0.001) denominator = 0.001; // 避免除零错误pitch = atan2(-x, denominator) * 180.0 / PI;
}// 自动校准函数
void autoCalibrate() {Serial.println("Start automatic calibration...");Serial.println("Please ensure that the sensor is placed horizontally and stationary");// 等待2秒让用户放置传感器delay(2000);float xSum = 0, ySum = 0, zSum = 0;const int samples = 200;int validSamples = 0;// 采集多个样本求平均值for (int i = 0; i < samples; i++) {float x, y, z;readAcceleration(x, y, z);// 检查数据有效性if (!isnan(x) && !isnan(y) && !isnan(z)) {xSum += x;ySum += y;zSum += z;validSamples++;}delay(10); // 每10ms采集一次}if (validSamples > 0) {// 计算偏移量xOffset = xSum / validSamples;yOffset = ySum / validSamples;zOffset = zSum / validSamples - 1.0; // 减去重力加速度// 设置硬件偏移寄存器writeRegister(ADXL345_REG_OFSX, (byte)(xOffset / 0.0156));writeRegister(ADXL345_REG_OFSY, (byte)(yOffset / 0.0156));writeRegister(ADXL345_REG_OFSZ, (byte)(zOffset / 0.0156));calibrated = true;Serial.println("Automatic calibration completed!");Serial.print("XOffset: "); Serial.print(xOffset, 6);Serial.print(" g, YOffset: "); Serial.print(yOffset, 6);Serial.print(" g, ZOffset: "); Serial.print(zOffset, 6);Serial.println(" g");} else {Serial.println("Calibration failure: No valid data can be obtained");}
}// 处理串口命令
void processSerialCommands() {if (Serial.available()) {char command = Serial.read();if (command == 'c' || command == 'C') {autoCalibrate();} else if (command == 'r' || command == 'R') {// 重置校准数据calibrated = false;xOffset = 0;yOffset = 0;zOffset = 0;writeRegister(ADXL345_REG_OFSX, 0);writeRegister(ADXL345_REG_OFSY, 0);writeRegister(ADXL345_REG_OFSZ, 0);Serial.println("The calibration data has been reset");} else if (command == 's' || command == 'S') {// 显示状态Serial.print("校准状态 : ");Serial.println(calibrated ? "Calibrated Resistance" : "Uncalibrated");Serial.print("XOffset: "); Serial.println(xOffset, 6);Serial.print("YOffset: "); Serial.println(yOffset, 6);Serial.print("ZOffset: "); Serial.println(zOffset, 6);}}
}void setup() {Serial.begin(115200);// 初始化I2CWire.begin();// 初始化滤波缓冲区for (int i = 0; i < MOVING_AVG_SIZE; i++) {movingAvgBufferX[i] = 0;movingAvgBufferY[i] = 0;movingAvgBufferZ[i] = 0;}// 初始化卡尔曼滤波器initKalmanFilter(&kalmanX, KALMAN_Q, KALMAN_R, 0);initKalmanFilter(&kalmanY, KALMAN_Q, KALMAN_R, 0);initKalmanFilter(&kalmanZ, KALMAN_Q, KALMAN_R, 1.0); // Z轴初始值为1ginitADXL345();Serial.println("The ADXL345 attitude sensor is ready");Serial.println("Available commands:");Serial.println("c - START CALIBRATION");Serial.println("r - RESET the Calibration Data");Serial.println("s - DISPLAY STATUS");Serial.println("DATA FORMAT: Or: yaw pitch roll");Serial.println("          Accel: x y z");
}void loop() {// 处理串口命令processSerialCommands();static float prevX = 0, prevY = 0, prevZ = 0;float x, y, z;// 读取加速度数据readAcceleration(x, y, z);// 检查数据有效性if (isnan(x) || isnan(y) || isnan(z)) {Serial.println("Warning: Invalid acceleration data");delay(100);return;}// 应用移动平均滤波applyMovingAverageFilter(x, y, z);// 应用卡尔曼滤波applyKalmanFilter(x, y, z);// 检测稳定性isStable = checkStability(x, y, z, prevX, prevY, prevZ);if (isStable) {lastStableTime = millis();}// 计算Roll和Pitch角度float roll, pitch;calculateAngles(x, y, z, roll, pitch);// 检查角度数据有效性if (isnan(roll) || isnan(pitch)) {Serial.println("Warning: Invalid angle data");roll = pitch = 0;}// 输出数据到ProcessingSerial.print("Or: ");Serial.print(0); // Yaw始终为0Serial.print(" ");Serial.print(pitch);Serial.print(" ");Serial.println(roll);Serial.print("Accel: ");Serial.print(x);Serial.print(" ");Serial.print(y);Serial.print(" ");Serial.println(z);prevX = x;prevY = y;prevZ = z;delay(20); // 50Hz更新率
}
三、校准过程及展示
3.1 校准过程
(1)将设备水平放置在稳定表面
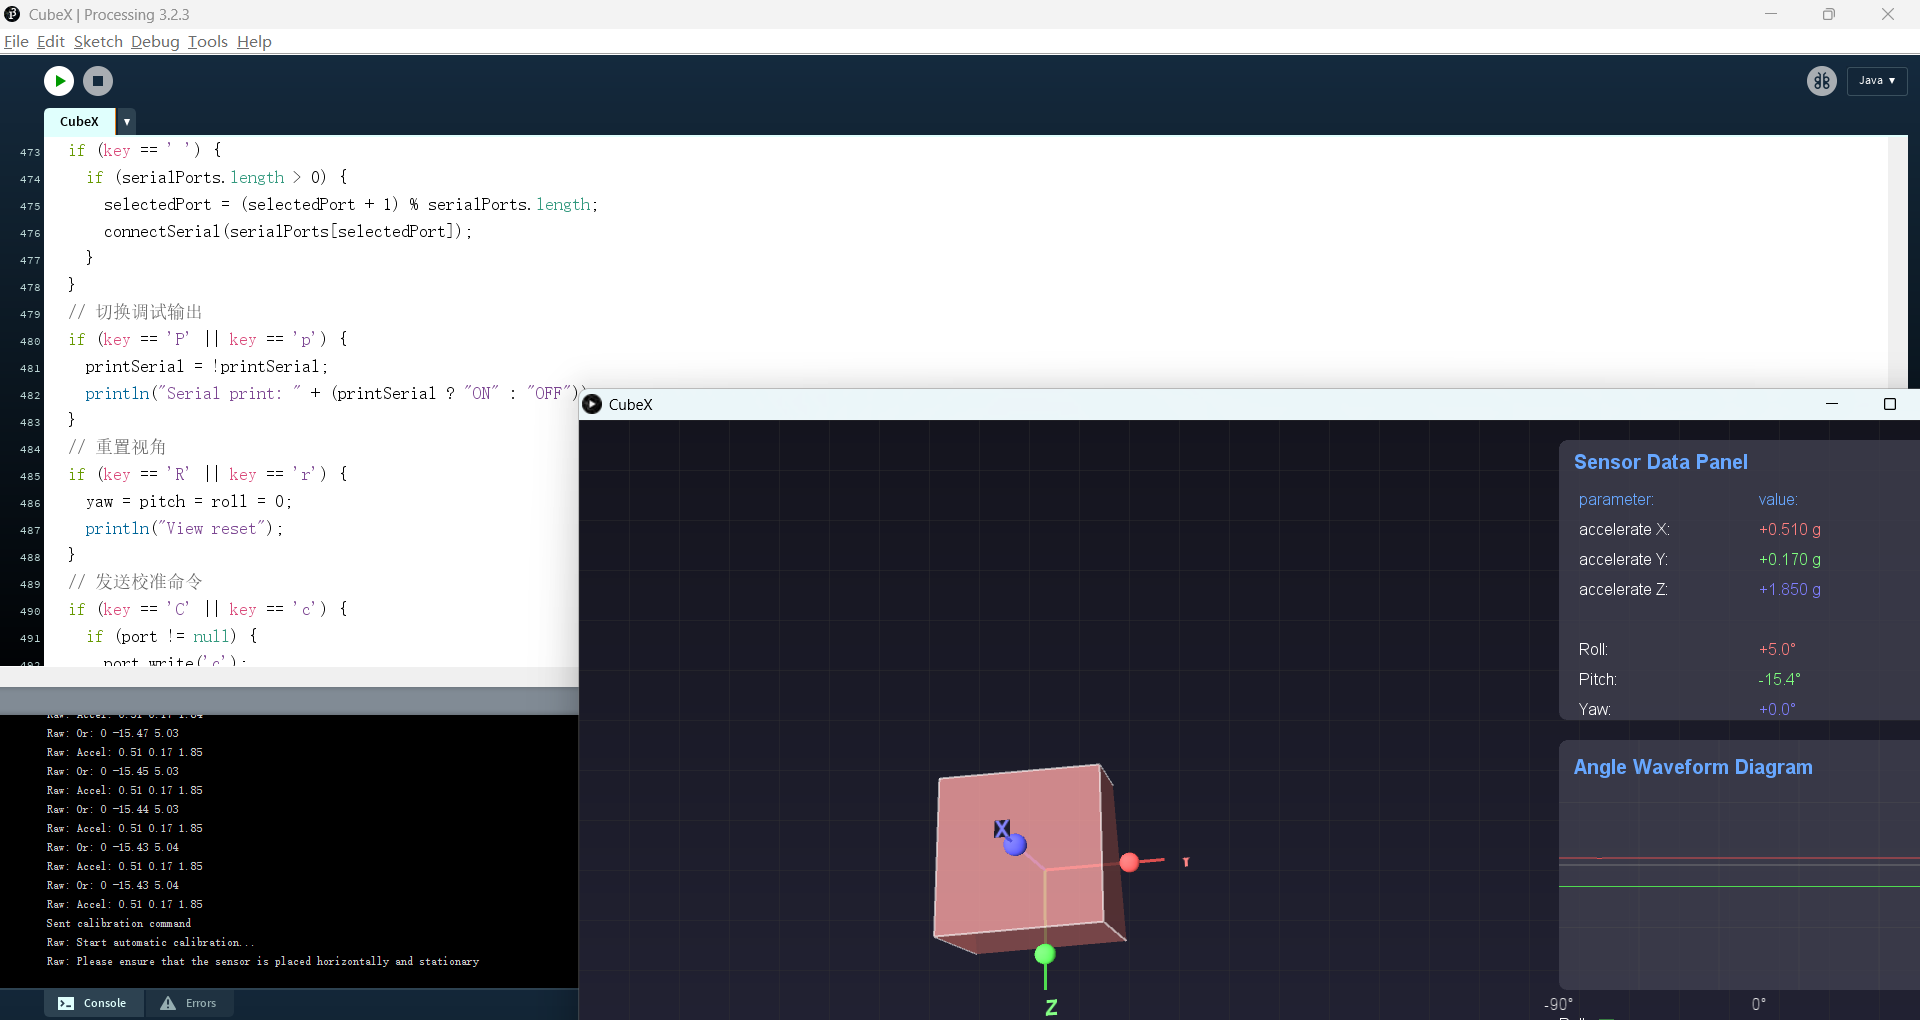
打开操作窗口,按下键盘'C'键发送校准命令
(2)等待校准完成提示和偏移量
Sent calibration command
Raw: Start automatic calibration...
Raw: Please ensure that the sensor is placed horizontally and stationary
Raw: Automatic calibration completed!
Raw: XOffset: 0.438828 g, YOffset: 0.470731 g, ZOffset: 1.747395 g
(3)查看串口输出校准后的加速度计数值
3.2 上位机界面展示
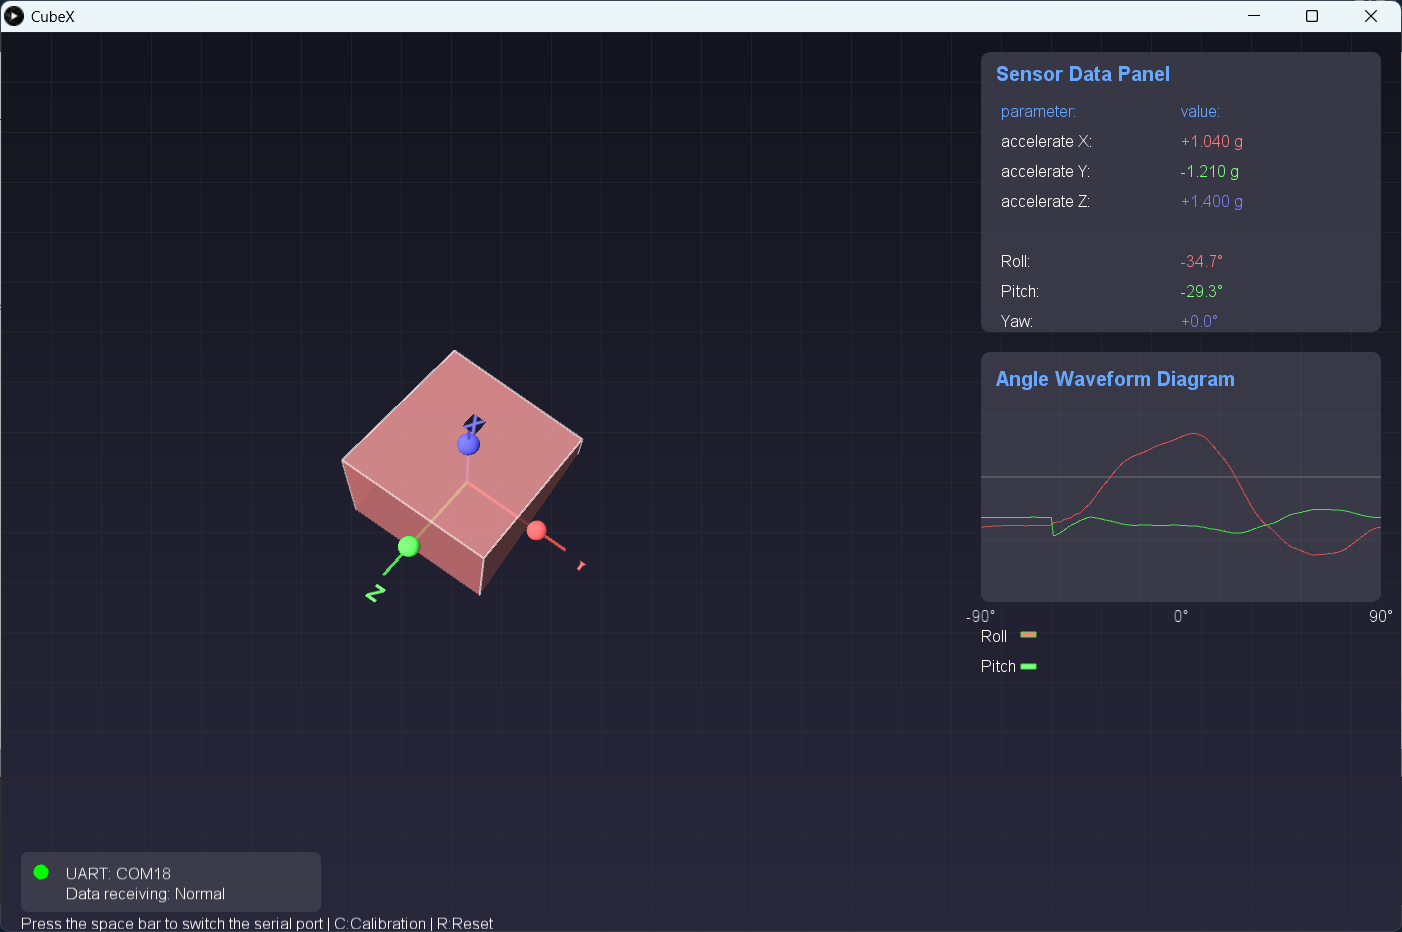
Processing上位机端代码运行后:
左侧显示三维立方体效果、右侧展示数据面板
3.3 视频演示
ADXL345加速度计进行Processing上位机展示
倾斜改变ADXL345传感器的不同方向实时观察上位机3D模型姿态变化
四、ADXL345寄存器工作原理
4.1 DATA_FORMAT寄存器(0x31)
控制数据的表示寄存器0x32到0x37,同时设置分辨率

4.2 BW_RATE寄存器(0x2C)
输出数据速率为200HZ(BW_RATE寄存器中的LOW_POWER位(D4) = 0,速率位(D3:D0) = 0xB)

4.3 POWER_CTL寄存器(0x2D)
设置POWER_CTL寄存器为0x08测量模式

4.4 加速度计I2C通信
若将 CS 引脚接至 V DD I/O,ADXL345 便会进入 I2C 模式,此时仅需简单的 2 线式连接即可。
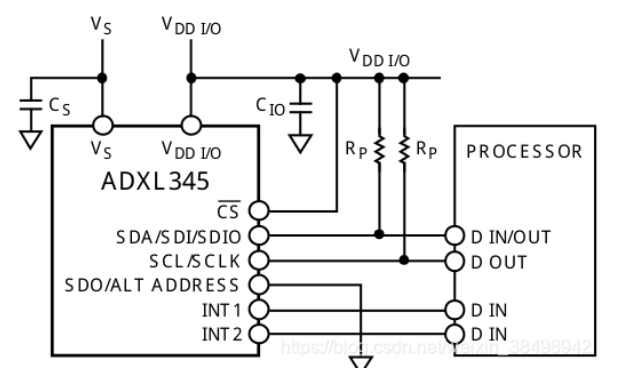
当 ALT ADDRESS 引脚为高电平时,器件的 7 位 I2C 地址为 0x1D,后续紧跟 R/W 位,对应写入地址为 0x3A,读取地址为 0x3B。若把 ALT ADDRESS 引脚(即引脚 12)接地,则可选用备用 I2C 地址 0x53(后续同样紧跟 R/W 位),相应的写入地址为 0xA6,读取地址为 0xA7。
五、常见问题解答
Q1: 传感器数据出现NaN值怎么办?
A: 检查硬件连接是否稳定,确保I2C通信正常。代码中已添加NaN检测和保护机制。
Q2: 如何提高角度计算精度?
A: 可以进行多次校准,确保校准时设备完全水平静止。也可以调整滤波参数优化性能。
Q3: 为什么三维立方体显示不全或位置不正确?
A: 需要调整Processing中的坐标系变换参数,确保模型在视图中心,并正确设置旋转顺序。
项目资源:
上位机平台下载:Processing官网
加速度计技术手册:ADXL345 (Rev. G)
结论: 通过精心设计的滤波算法和自动校准机制,有效解决了MEMS加速度计的噪声和漂移问题。


之如何在linux上正常使用R)


)