centos 7.9 升级ssh版本 7.4p1 升级到 8.2p1
- 1、安装包下载
- 2、安装telnet
- 3、安装openssl-OpenSSL_1_1_1f.tar.gz
- 4、安装openssh-8.2p1.tar.gz
- 5、修改ssh服务的相关配置文件
- 6、确定可以ssh连接服务器后,卸载telnet,因为telnet不安全
本文是离线环境下升级ssh,服务器不能联网。因此需要手动下载安装包 并编译安装,具体分为以下步骤
1、安装telnet 并确定可以通过telnet 连接centos 7.9服务器。
2、使用telnet连接centos 7.9服务器,编译安装新版openssl,卸载原版本ssh,并编译安装新版本的ssh,确定可以通过新版本的ssh连接centos 7.9服务器。
1、安装包下载
访问 链接: https://vault.centos.org/7.9.2009/os/x86_64/Packages/
下载telnet安装包:xinetd-2.3.15-14.el7.x86_64.rpm、telnet-server-0.17-65.el7_8.x86_64.rpm、pam-devel-1.1.8-23.el7.x86_64.rpm
访问链接: https://www.zlib.net/
下载zlib-1.3.1.tar.gz
访问链接: https://download.csdn.net/download/OceanWaves1993/90987539
下载openssl安装包:openssl-OpenSSL_1_1_1f.tar.gz
访问链接: https://mirrors.aliyun.com/pub/OpenBSD/OpenSSH/portable/openssh-8.2p1.tar.gz
下载openssh安装包:openssh-8.2p1.tar.gz
上传xinetd-2.3.15-14.el7.x86_64.rpm、telnet-server-0.17-65.el7_8.x86_64.rpm、openssl-OpenSSL_1_1_1f.tar.gz、openssh-8.2p1.tar.gz、zlib-1.3.1.tar.gz、pam-devel-1.1.8-23.el7.x86_64.rpm 到centos 7.9服务器,此例中上传到服务器的/data/package/upgradeSSH目录下
2、安装telnet
cd  /data/package/upgradeSSH
rpm -ivh xinetd-2.3.15-14.el7.x86_64.rpm
rpm -ivh telnet-server-0.17-65.el7_8.x86_64.rpm
systemctl status xinetd.service
systemctl enable xinetd.service --now
systemctl status telnet.socket
systemctl enable telnet.socket --now
netstat -antlp|gerp 23
修改telnet端口为52323(52323是举例,改成你想要的端口)
vi /usr/lib/systemd/system/telnet.socket
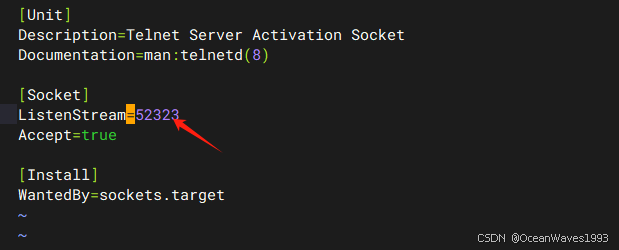
systemctl daemon-reload
systemctl restart telnet.socket
netstat -antlp|gerp 52323
使用telnet 52323端口连接centos 7.9服务器
3、安装openssl-OpenSSL_1_1_1f.tar.gz
cd  /data/package/upgradeSSH
tar -xzvf openssl-OpenSSL_1_1_1f.tar.gz
cd /data/package/upgradeSSH/openssl-OpenSSL_1_1_1f
./Configure linux-x86_64 --prefix=/usr/local/openssl-1.1.1f
make
make install
备份原来的openssl
mv /usr/bin/openssl /usr/bin/openssl.1.0.2k-fips
为新的openssl做软链接
ln -s /usr/local/openssl-1.1.1f/bin/openssl /usr/bin/openssl
ln -s /usr/local/openssl-1.1.1f/include/openssl/ /usr/include/openssl
ln -s /usr/local/openssl-1.1.1f/lib/libssl.so.1.1 /usr/lib64/libssl.so.1.1
ln -s /usr/local/openssl-1.1.1f/lib/libcrypto.so.1.1 /usr/lib64/libcrypto.so.1.1
查看openssl版本为:OpenSSL 1.1.1f 31 Mar 2020

4、安装openssh-8.2p1.tar.gz
cd /data/package/upgradeSSH
tar -xzvf openssh-8.2p1.tar.gz
cd openssh-8.2p1/
可能文件默认显示uid和aid数组是1000,这里重新改下目录和所有者为root
chown -R root:root /data/package/openssh-8.2p1
备份原来的ssh
mv /etc/ssh /etc/ssh.7.4p1
mv /etc/pam.d/sshd /etc/pam.d/sshd.7.4p1
安装依赖包zlib-1.3.1.tar.gz
cd /data/package/upgradeSSH
tar -xzvf zlib-1.3.1.tar.gz
cd zlib-1.3.1
./configure --prefix=/usr/local/zlib-1.3.1
make
make install
安装依赖包pam-devel-1.1.8-23.el7.x86_64.rpm
cd /data/package/upgradeSSH
rpm -ivh pam-devel-1.1.8-23.el7.x86_64.rpm
卸载原来的openssh 7.4p1
mv  /usr/lib/systemd/system/sshd.service /usr/lib/systemd/system/sshd.service.7.4p1
systemctl disable sshd.service --now
rpm -qa | grep openssh
rpm -e --nodeps `rpm -qa | grep openssh`
安装openssh-8.2p1.tar.gz
cd /data/package/upgradeSSH/openssh-8.2p1
./configure --prefix=/usr/local/openssh-8.2p1 --sysconfdir=/etc/ssh/ -with-openssl-includes=/usr/local/openssl-1.1.1f/include/openssl  --with-ssl-dir=/usr/local/openssl-1.1.1f --with-zlib=/usr/local/zlib-1.3.1 --with-md5-passwords --with-pam
make
make install
配置openssh-8.2p1
cd /data/package/upgradeSSH/openssh-8.2p1
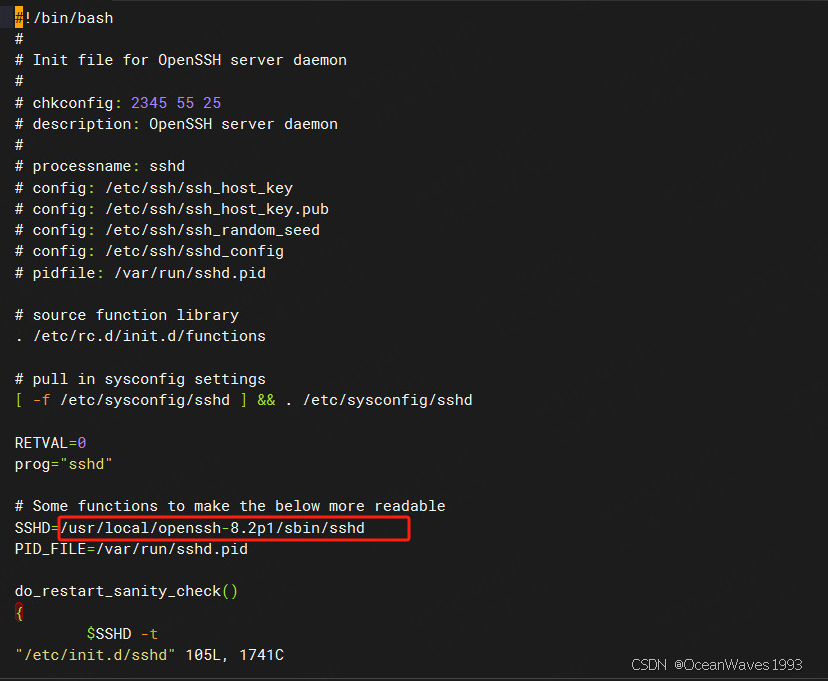
cp /data/package/upgradeSSH/openssh-8.2p1/contrib/redhat/sshd.init /etc/init.d/sshd
vi /etc/init.d/sshd
修改sshd路径为/usr/local/openssh-8.2p1/sbin/sshd
cp /data/package/upgradeSSH/openssh-8.2p1/contrib/redhat/sshd.pam /etc/pam.d/sshd.pamln -s /usr/local/openssh-8.2p1/bin/ssh-keygen /usr/bin/ssh-keygen
ln -s  /usr/local/openssh-8.2p1/bin/ssh /bin/sshchmod +x /etc/init.d/sshd
chkconfig --add sshd
chkconfig sshd on
systemctl restart sshd
5、修改ssh服务的相关配置文件
cp /etc/ssh/sshd_config /etc/ssh/sshd_config.bak
vi /etc/ssh/sshd_config
修改/etc/ssh/sshd_config文件内容如下
[root@localhost ~]# cat /etc/ssh/sshd_config
#       $OpenBSD: sshd_config,v 1.103 2018/04/09 20:41:22 tj Exp $# This is the sshd server system-wide configuration file.  See
# sshd_config(5) for more information.# This sshd was compiled with PATH=/usr/local/bin:/usr/bin:/usr/local/sbin:/usr/sbin# The strategy used for options in the default sshd_config shipped with
# OpenSSH is to specify options with their default value where
# possible, but leave them commented.  Uncommented options override the
# default value.# If you want to change the port on a SELinux system, you have to tell
# SELinux about this change.
# semanage port -a -t ssh_port_t -p tcp #PORTNUMBER
#
#Port 22
#AddressFamily any
#ListenAddress 0.0.0.0
#ListenAddress ::HostKey /etc/ssh/ssh_host_rsa_key
HostKey /etc/ssh/ssh_host_ecdsa_key
HostKey /etc/ssh/ssh_host_ed25519_key# Ciphers and keying
#RekeyLimit default none# Logging
#SyslogFacility AUTH
SyslogFacility AUTH
#LogLevel INFO# Authentication:#LoginGraceTime 2m
PermitRootLogin yes
#StrictModes yes
#MaxAuthTries 6
MaxAuthTries 5
#MaxSessions 10#PubkeyAuthentication yes# The default is to check both .ssh/authorized_keys and .ssh/authorized_keys2
# but this is overridden so installations will only check .ssh/authorized_keys
AuthorizedKeysFile      .ssh/authorized_keys#AuthorizedPrincipalsFile none#AuthorizedKeysCommand none
#AuthorizedKeysCommandUser nobody# For this to work you will also need host keys in /etc/ssh/ssh_known_hosts
#HostbasedAuthentication no
# Change to yes if you don't trust ~/.ssh/known_hosts for
# HostbasedAuthentication
#IgnoreUserKnownHosts no
# Don't read the user's ~/.rhosts and ~/.shosts files
#IgnoreRhosts yes# To disable tunneled clear text passwords, change to no here!
#PasswordAuthentication yes
#PermitEmptyPasswords no
PasswordAuthentication yes# Change to no to disable s/key passwords
#ChallengeResponseAuthentication yes
ChallengeResponseAuthentication no# Kerberos options
#KerberosAuthentication no
#KerberosOrLocalPasswd yes
#KerberosTicketCleanup yes
#KerberosGetAFSToken no
#KerberosUseKuserok yes# GSSAPI options
GSSAPIAuthentication yes
GSSAPICleanupCredentials no
#GSSAPIStrictAcceptorCheck yes
#GSSAPIKeyExchange no
#GSSAPIEnablek5users no# Set this to 'yes' to enable PAM authentication, account processing,
# and session processing. If this is enabled, PAM authentication will
# be allowed through the ChallengeResponseAuthentication and
# PasswordAuthentication.  Depending on your PAM configuration,
# PAM authentication via ChallengeResponseAuthentication may bypass
# the setting of "PermitRootLogin without-password".
# If you just want the PAM account and session checks to run without
# PAM authentication, then enable this but set PasswordAuthentication
# and ChallengeResponseAuthentication to 'no'.
# WARNING: 'UsePAM no' is not supported in kylin and may cause several
# problems.
UsePAM yes#AllowAgentForwarding yes
#AllowTcpForwarding yes
#GatewayPorts no
X11Forwarding no
#X11DisplayOffset 10
#X11UseLocalhost yes
#PermitTTY yes
PrintMotd no
#PrintLastLog yes
#TCPKeepAlive yes
#PermitUserEnvironment no
#Compression delayed
#ClientAliveInterval 0
ClientAliveInterval 300
#ClientAliveCountMax 3
ClientAliveCountMax 3
#UseDNS no
#PidFile /var/run/sshd.pid
#MaxStartups 10:30:100
#PermitTunnel no
#ChrootDirectory none
#VersionAddendum none# no default banner path
#Banner noneAcceptEnv LANG LC_CTYPE LC_NUMERIC LC_TIME LC_COLLATE LC_MONETARY LC_MESSAGES
AcceptEnv LC_PAPER LC_NAME LC_ADDRESS LC_TELEPHONE LC_MEASUREMENT
AcceptEnv LC_IDENTIFICATION LC_ALL LANGUAGE
AcceptEnv XMODIFIERS# override default of no subsystems
Subsystem sftp /usr/libexec/openssh/sftp-server -l INFO -f AUTH# Example of overriding settings on a per-user basis
#Match User anoncvs
#       X11Forwarding no
#       AllowTcpForwarding no
#       PermitTTY no
#       ForceCommand cvs server#CheckUserSplash yes# To modify the system-wide ssh configuration, create a  *.conf  file under
#  /etc/ssh/sshd_config.d/  which will be automatically included below
#Include /etc/ssh/sshd_config.d/*.conf
Protocol 2
LogLevel VERBOSE
PubkeyAuthentication yes
RSAAuthentication yes
IgnoreRhosts yes
RhostsRSAAuthentication no
HostbasedAuthentication no
PermitEmptyPasswords no
PermitUserEnvironment no
Ciphers aes128-ctr,aes192-ctr,aes256-ctr,aes128-gcm@openssh.com,aes256-gcm@openssh.com,chacha20-poly1305@openssh.com
ClientAliveCountMax 0
Banner /etc/issue.net
MACs hmac-sha2-512,hmac-sha2-512-etm@openssh.com,hmac-sha2-256,hmac-sha2-256-etm@openssh.com
StrictModes yes
AllowTcpForwarding no
AllowAgentForwarding no
GatewayPorts no
PermitTunnel no
KexAlgorithms curve25519-sha256,curve25519-sha256@libssh.org,diffie-hellman-group-exchange-sha256
[root@localhost ~]#
cp /etc/pam.d/sshd /etc/pam.d/sshd.bak
vi /etc/pam.d/sshd
修改/etc/pam.d/sshd文件内容如下
[root@localhost ~]# cat /etc/pam.d/sshd
#%PAM-1.0
auth       substack     password-auth
auth       include      postlogin
account    required     pam_sepermit.so
account    required     pam_nologin.so
account    include      password-auth
password   include      password-auth
# pam_selinux.so close should be the first session rule
session    required     pam_selinux.so close
session    required     pam_loginuid.so
# pam_selinux.so open should only be followed by sessions to be executed in the user context
session    required     pam_selinux.so open env_params
session    required     pam_namespace.so
session    optional     pam_keyinit.so force revoke
session    optional     pam_motd.so
session    include      password-auth
session    include      postlogin
[root@localhost ~]#
然后再次重启sshd服务
systemctl restart sshd
查看ssh版本为OpenSSH_8.2p1

验证可以通过ssh连接centos 7.9服务器
至此 升级openssh 为8.2p1 完成。
6、确定可以ssh连接服务器后,卸载telnet,因为telnet不安全
systemctl stop telnet.socket
systemctl disable telnet.socket
systemctl stop xinetd
systemctl disable xinetd
rpm -e --nodeps `rpm -qa | grep telnet-server`


)


:基于 PyTorch 的手写体识别案例手册)

频率求解与仿真实践(2))

)
,Hadoop, Spark, Hive 的关系)


)


