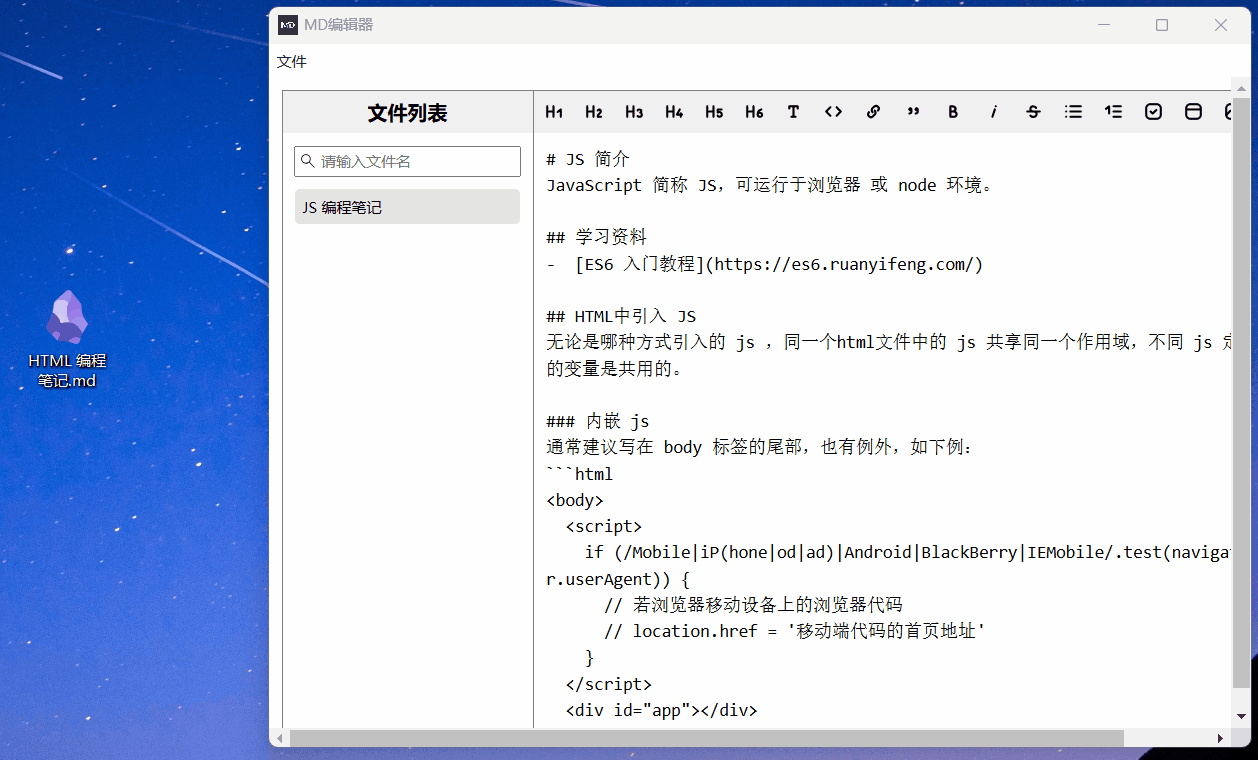
最终效果
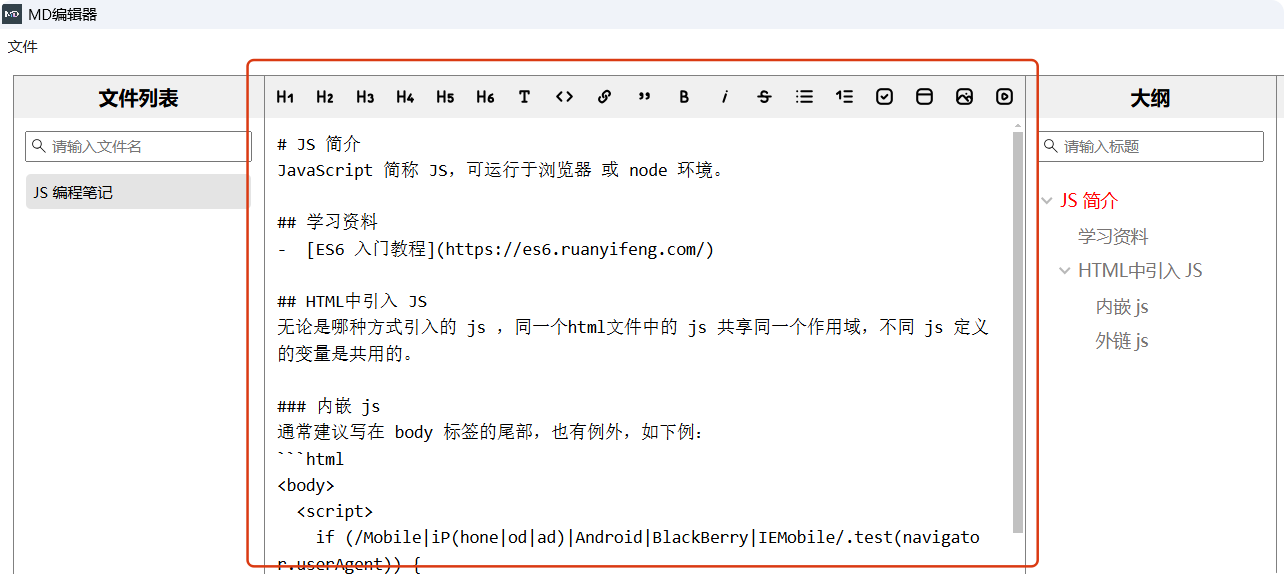
页面
src/renderer/src/App.vue
<div class="editorPanel"><div class="btnBox"><divv-for="(config, key) in actionDic":key="key"class="btnItem":title="config.label"@click="config.action"><Icon :icon="config.icon" /></div></div><textarearef="editorRef"v-model="markdownContent"spellcheck="false"class="editor":class="{ dragging: isDragging }"placeholder="请输入内容 ( Markdown语法 ) ..."@keydown="handleKeyDown"@contextmenu.prevent="show_edite_contextMenu"@dragover="handleDragOver"@dragleave="handleDragLeave"@drop="handleDrop"></textarea></div>
相关样式
.editorPanel {flex: 1;border: 1px solid gray;border-left: none;display: flex;flex-direction: column;width: 620px;
}
.editor {padding: 10px;border: none;box-sizing: border-box;flex: 1;word-break: break-all;resize: none;font-family: SFMono-Regular, Menlo, Monaco, Consolas, 'Liberation Mono', 'Courier New', monospace;font-size: 14px;line-height: 1.5;outline: none;
}
/* 滚动条样式优化 */
.editor,
.preview,
.outlineListBox {scrollbar-width: thin;scrollbar-color: #c1c1c1 #ffffff;scrollbar-gutter: stable;
}
.btnBox {display: flex;justify-content: space-evenly;background-color: #f0f0f0;height: 34px;
}
.btnItem {cursor: pointer;background-color: #f0f0f0;padding: 6px;font-size: 20px;display: inline-block;
}
.btnItem:hover {background-color: #e0e0e0;
}
相关依赖
实现图标
npm i --save-dev @iconify/vue
导入使用
import { Icon } from '@iconify/vue'
搜索图标
https://icon-sets.iconify.design/?query=home
相关变量
const editorRef = ref<HTMLTextAreaElement>()
const markdownContent = ref('')
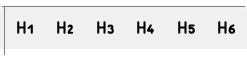
工具条
所有的功能都是插入 markdown 语法

<div class="btnBox"><divv-for="(config, key) in actionDic":key="key"class="btnItem":title="config.label"@click="config.action"><Icon :icon="config.icon" /></div></div>
// 操作字典
const actionDic: {[key: string]: {icon: stringlabel: stringcontextMenu?: booleanaction: () => void}
} = {h1: {icon: 'codex:h1',label: '一级标题 Ctrl+1',action: () => {addTag('#')}},h2: {icon: 'codex:h2',label: '二级标题 Ctrl+2',action: () => {addTag('##')}},h3: {icon: 'codex:h3',label: '三级标题 Ctrl+3',action: () => {addTag('###')}},h4: {icon: 'codex:h4',label: '四级标题 Ctrl+4',action: () => {addTag('####')}},h5: {icon: 'codex:h5',label: '五级标题 Ctrl+5',action: () => {addTag('#####')}},h6: {icon: 'codex:h6',label: '六级标题 Ctrl+6',action: () => {addTag('######')}},p: {icon: 'codex:text',label: '正文 Ctrl+0',action: () => {setParagraph()}},code: {icon: 'codex:brackets',label: '代码块 Ctrl+Shift+K',contextMenu: true,action: () => {insertCode()}},link: {icon: 'codex:link',label: '超链接 Ctrl+L',contextMenu: true,action: () => {inserthyperlink()}},quote: {icon: 'codex:quote',label: '引用 Ctrl+Q',contextMenu: true,action: () => {addTag('>')}},b: {icon: 'codex:bold',label: '加粗 Ctrl+B',action: () => {addStyle('bold')}},i: {icon: 'codex:italic',label: '斜体 Ctrl+I',action: () => {addStyle('italic')}},d: {icon: 'codex:strikethrough',label: '删除线  Ctrl+D',action: () => {addStyle('delLine')}},ul: {icon: 'codex:list-bulleted',label: '无序列表 Ctrl+Shift+U',action: () => {addTag('-')}},ol: {icon: 'codex:list-numbered',label: '有序列表 Ctrl+Shift+O',action: () => {addTag('1.')}},todo: {icon: 'codex:checklist',label: '待办列表 Ctrl+Shift+D',action: () => {addTag('- [ ]')}},table: {icon: 'codex:table-with-headings',label: '表格 Ctrl+Shift+T',action: () => {insertTable()}},img: {icon: 'codex:picture',label: '图片 Ctrl+Shift+I',action: () => {insertImg()}},video: {icon: 'codex:play',label: '视频 Ctrl+Shift+V',action: () => {insertVideo()}}
}
公共方法
// 根据新内容,重新渲染页面,并恢复光标位置和滚动位置
const restoreCursorAndScroll = async (newContent: string,newCursorPosition: number
): Promise<void> => {// 更新文本内容markdownContent.value = newContentif (!editorRef.value) returnconst textarea = editorRef.value// 记录当前编辑区的滚动位置const originalScrollTop = textarea.scrollTop// 等待 DOM 更新完成await nextTick()// 重新聚焦到 textareatextarea.focus()textarea.setSelectionRange(newCursorPosition, newCursorPosition)// 恢复编辑区的滚动位置textarea.scrollTop = originalScrollTop
}
标题
以一级标题为例
addTag('#')
// 光标所在行前添加标记
const addTag = async (type: string): Promise<void> => {if (!editorRef.value) returnconst content = markdownContent.valueconst selectionStart = editorRef.value.selectionStart// 找到光标所在行的起始和结束位置let lineStart = content.lastIndexOf('\n', selectionStart - 1) + 1let lineEnd = content.indexOf('\n', selectionStart)if (lineEnd === -1) {lineEnd = content.length}// 获取当前行的文本let lineText = content.slice(lineStart, lineEnd)// 移除行首原有标记lineText = lineText.replace(/^[#>-]+\s*/, '')// 添加新的标记lineText = `${type} ${lineText.trimStart()}`// 构造新的内容const newContent = content.slice(0, lineStart) + lineText + content.slice(lineEnd)// 设置新的光标位置const newCursorPosition = lineStart + lineText.lengthrestoreCursorAndScroll(newContent, newCursorPosition)
}
段落

setParagraph()
// 将光标所在行的文本设置为段落
const setParagraph = async (): Promise<void> => {if (!editorRef.value) returnconst content = markdownContent.valueconst selectionStart = editorRef.value.selectionStart// 找到光标所在行的起始和结束位置let lineStart = content.lastIndexOf('\n', selectionStart - 1) + 1let lineEnd = content.indexOf('\n', selectionStart)if (lineEnd === -1) {lineEnd = content.length}// 获取当前行的文本let lineText = content.slice(lineStart, lineEnd)// 移除行首的标题和引用标记(#>)lineText = lineText.replace(/^[#>]+\s*/, '')// 构造新的内容const newContent = content.slice(0, lineStart) + lineText + content.slice(lineEnd)// 设置新的光标位置const newCursorPosition = lineStart + lineText.lengthrestoreCursorAndScroll(newContent, newCursorPosition)
}
代码块

insertCode()
// 插入代码块
const insertCode = async (): Promise<void> => {if (!editorRef.value) returnconst start = editorRef.value.selectionStartconst end = editorRef.value.selectionEndconst content = markdownContent.valueconst selectedText = content.slice(start, end)const newContent = `${content.slice(0, start)}\n${'```js'}\n${selectedText}\n${'```'}\n${content.slice(end)}`const newCursorPosition = start + 7 + selectedText.lengthrestoreCursorAndScroll(newContent, newCursorPosition)
}
超链接

inserthyperlink()
// 在光标所在的位置插入超链接
const inserthyperlink = async (): Promise<void> => {if (!editorRef.value) returnconst textarea = editorRef.valueconst content = markdownContent.valueconst start = textarea.selectionStartconst end = textarea.selectionEnd// 获取选中的文本,若未选中则默认显示 '链接文本'const selectedText = content.slice(start, end) || '链接文本'// 构造超链接的 Markdown 语法const hyperlink = `[${selectedText}]()`// 构造新的内容const newContent = `${content.slice(0, start)}${hyperlink}${content.slice(end)}`// 设置新的光标位置const newCursorPosition = start + hyperlink.length - 1restoreCursorAndScroll(newContent, newCursorPosition)
}
引用

addTag('>')
// 光标所在行前添加标记
const addTag = async (type: string): Promise<void> => {if (!editorRef.value) returnconst content = markdownContent.valueconst selectionStart = editorRef.value.selectionStart// 找到光标所在行的起始和结束位置let lineStart = content.lastIndexOf('\n', selectionStart - 1) + 1let lineEnd = content.indexOf('\n', selectionStart)if (lineEnd === -1) {lineEnd = content.length}// 获取当前行的文本let lineText = content.slice(lineStart, lineEnd)// 移除行首原有标记lineText = lineText.replace(/^[#>-]+\s*/, '')// 添加新的标记lineText = `${type} ${lineText.trimStart()}`// 构造新的内容const newContent = content.slice(0, lineStart) + lineText + content.slice(lineEnd)// 设置新的光标位置const newCursorPosition = lineStart + lineText.lengthrestoreCursorAndScroll(newContent, newCursorPosition)
}
加粗,斜体,删除线

addStyle('bold')
addStyle('italic')
addStyle('delLine')
// 给所选内容添加样式
const addStyle = async (type: string): Promise<void> => {if (!editorRef.value) returnconst textarea = editorRef.valueconst content = markdownContent.valueconst start = textarea.selectionStartconst end = textarea.selectionEnd// 获取选中的文本let selectedText = content.slice(start, end)let defaultText = ''let tag = ''switch (type) {case 'bold':defaultText = '加粗文本'tag = '**'breakcase 'italic':defaultText = '斜体文本'tag = '*'breakcase 'delLine':defaultText = '删除线文本'tag = '~~'breakdefault:}if (!selectedText) {selectedText = defaultText}const newText = `${tag}${selectedText}${tag}`// 构造新的内容const newContent = `${content.slice(0, start)}${newText}${content.slice(end)}`// 设置新的光标位置const newCursorPosition = start + newText.lengthrestoreCursorAndScroll(newContent, newCursorPosition)
}
无序列表,有序列表,待办列表

addTag('-')
addTag('1.')
addTag('- [ ]')
// 光标所在行前添加标记
const addTag = async (type: string): Promise<void> => {if (!editorRef.value) returnconst content = markdownContent.valueconst selectionStart = editorRef.value.selectionStart// 找到光标所在行的起始和结束位置let lineStart = content.lastIndexOf('\n', selectionStart - 1) + 1let lineEnd = content.indexOf('\n', selectionStart)if (lineEnd === -1) {lineEnd = content.length}// 获取当前行的文本let lineText = content.slice(lineStart, lineEnd)// 移除行首原有标记lineText = lineText.replace(/^[#>-]+\s*/, '')// 添加新的标记lineText = `${type} ${lineText.trimStart()}`// 构造新的内容const newContent = content.slice(0, lineStart) + lineText + content.slice(lineEnd)// 设置新的光标位置const newCursorPosition = lineStart + lineText.lengthrestoreCursorAndScroll(newContent, newCursorPosition)
}
表格

insertTable()
// 插入表格
const insertTable = (): void => {const table = '|  |  |\n|:----:|:----:|\n|  |  |\n|  |  |\n'const editor = editorRef.valueif (editor) {const start = editor.selectionStartconst end = editor.selectionEndconst before = markdownContent.value.slice(0, start)const after = markdownContent.value.slice(end)restoreCursorAndScroll(before + table + after, start + 2)}
}
图片

insertImg()
// 在光标所在的位置插入图片
const insertImg = async (): Promise<void> => {if (!editorRef.value) returnconst textarea = editorRef.valueconst content = markdownContent.valueconst start = textarea.selectionStartconst end = textarea.selectionEndlet selectedText = content.slice(start, end) || '图片'// 构造图片的 Markdown 语法const hyperlink = `![${selectedText}]()`// 构造新的内容const newContent = `${content.slice(0, start)}${hyperlink}${content.slice(end)}`// 设置新的光标位置const newCursorPosition = start + hyperlink.length - 1restoreCursorAndScroll(newContent, newCursorPosition)
}
视频

insertVideo()
// 在光标所在的位置插入视频
const insertVideo = async (): Promise<void> => {if (!editorRef.value) returnconst textarea = editorRef.valueconst content = markdownContent.valueconst start = textarea.selectionStartconst end = textarea.selectionEnd// Markdown 语法无视频,可用html实现const hyperlink = `<video src="" controls width="100%">请升级浏览器以观看视频。
</video>`// 构造新的内容const newContent = `${content.slice(0, start)}${hyperlink}${content.slice(end)}`// 设置新的光标位置const newCursorPosition = start + 12restoreCursorAndScroll(newContent, newCursorPosition)
}
右键快捷菜单
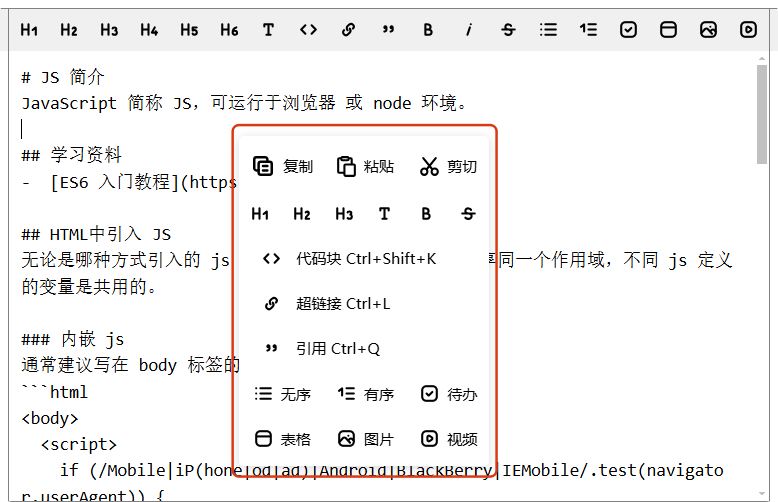
@contextmenu.prevent="show_edite_contextMenu"
// 显示右键菜单 -- 编辑器
const show_edite_contextMenu = (event): void => {// 阻止默认右键菜单event.preventDefault()// 获取鼠标位置menuX.value = event.clientXmenuY.value = event.clientY// 显示菜单isMenuVisible.value = true
}
构建页面
<!-- 右键快捷菜单--编辑器 --><divv-if="isMenuVisible"class="context-menu":style="{ left: `${menuX}px`, top: `${menuY}px` }"><div class="context-menu-btnBox"><div class="context-menu-btn" @click="copySelectedText"><Icon icon="codex:copy" width="24" style="margin-right: 4px" /><span>复制</span></div><div class="context-menu-btn" @click="paste"><Icon icon="mingcute:paste-line" width="20" style="margin-right: 4px" /><span>粘贴</span></div><div class="context-menu-btn" @click="cutSelectedText"><Icon icon="tabler:cut" width="20" style="margin-right: 4px" /><span>剪切</span></div></div><div class="context-menu-btnBox"><div class="context-menu-btn" @click="actionDic.h1.action"><Icon :icon="actionDic.h1.icon" width="20" /></div><div class="context-menu-btn" @click="actionDic.h2.action"><Icon :icon="actionDic.h2.icon" width="20" /></div><div class="context-menu-btn" @click="actionDic.h3.action"><Icon :icon="actionDic.h3.icon" width="20" /></div><div class="context-menu-btn" @click="actionDic.p.action"><Icon :icon="actionDic.p.icon" width="20" /></div><div class="context-menu-btn" @click="actionDic.b.action"><Icon :icon="actionDic.b.icon" width="20" /></div><div class="context-menu-btn" @click="actionDic.d.action"><Icon :icon="actionDic.d.icon" width="20" /></div></div><ul><template v-for="item in actionDic"><li v-if="item.contextMenu" :key="item.label" @click="item.action"><Icon :icon="item.icon" width="20" style="margin-right: 10px" /><span> {{ item.label }}</span></li></template></ul><div class="context-menu-btnBox"><div class="context-menu-btn" @click="actionDic.ul.action"><Icon :icon="actionDic.ul.icon" width="20" style="margin-right: 4px" /><span>无序</span></div><div class="context-menu-btn" @click="actionDic.ol.action"><Icon :icon="actionDic.ol.icon" width="20" style="margin-right: 4px" /><span>有序</span></div><div class="context-menu-btn" @click="actionDic.todo.action"><Icon :icon="actionDic.todo.icon" width="20" style="margin-right: 4px" /><span>待办</span></div></div><div class="context-menu-btnBox"><div class="context-menu-btn" @click="actionDic.table.action"><Icon :icon="actionDic.table.icon" width="20" style="margin-right: 4px" /><span>表格</span></div><div class="context-menu-btn" @click="actionDic.img.action"><Icon :icon="actionDic.img.icon" width="20" style="margin-right: 4px" /><span>图片</span></div><div class="context-menu-btn" @click="actionDic.video.action"><Icon :icon="actionDic.video.icon" width="20" style="margin-right: 4px" /><span>视频</span></div></div></div>
相关样式
/* 编辑器-右键菜单样式 */
.context-menu {position: fixed;z-index: 1000;width: 200px;background-color: white;border-radius: 4px;box-shadow: 0 2px 8px rgba(0, 0, 0, 0.15);padding: 4px 0;font-size: 12px;
}
.context-menu ul {list-style: none;margin: 0;padding: 0;
}
.context-menu li {padding: 8px 16px;cursor: pointer;display: flex;align-items: center;
}
.context-menu li:hover {background-color: #e0e0e0;
}
.context-menu li i {margin-right: 8px;text-align: center;
}
.context-menu-btnBox {display: flex;
}
.context-menu-btn {flex: 1;padding: 8px 4px;cursor: pointer;text-align: center;display: flex;align-items: center;justify-content: center;
}
.context-menu-btn:hover {background-color: #e0e0e0;
}
复制
const copySelectedText = (): void => {if (!editorRef.value) returnconst start = editorRef.value.selectionStartconst end = editorRef.value.selectionEndconst content = markdownContent.valueconst selectedText = content.slice(start, end)navigator.clipboard.writeText(selectedText)
}
剪切
const cutSelectedText = (): void => {if (!editorRef.value) returnconst start = editorRef.value.selectionStartconst end = editorRef.value.selectionEndconst content = markdownContent.valueconst selectedText = content.slice(start, end)navigator.clipboard.writeText(selectedText)const newContent = content.slice(0, start) + content.slice(end)restoreCursorAndScroll(newContent, start)
}
粘贴
const paste = (): void => {if (!editorRef.value) returnconst start = editorRef.value.selectionStartconst end = editorRef.value.selectionEndconst content = markdownContent.valuenavigator.clipboard.readText().then((text) => {const newContent = content.slice(0, start) + text + content.slice(end)restoreCursorAndScroll(newContent, start + text.length)})
}
其他快捷编辑相关的方法同工具栏
隐藏编辑器右键菜单
按ESC/点击鼠标时
onMounted 中
// 监听点击鼠标左键时隐藏编辑器右键菜单document.addEventListener('click', hide_editor_contextMenu)// 监听按下ESC键时隐藏编辑器右键菜单document.addEventListener('keydown', ESC_hide_editor_contextMenu)
// 按ESC时隐藏编辑器右键菜单
const ESC_hide_editor_contextMenu = ({ key }): void => {if (key === 'Escape') {hide_editor_contextMenu()}
}
onBeforeUnmount 中
document.removeEventListener('click', hide_editor_contextMenu)
document.removeEventListener('keydown', ESC_hide_editor_contextMenu)
显示其他快捷菜单时
const showContextMenu = (filePath: string): void => {window.electron.ipcRenderer.send('showContextMenu', filePath)// 隐藏其他右键菜单 -- 不能同时有多个右键菜单显示hide_editor_contextMenu()
}
快捷键编辑
除了响应工具栏的快捷键,还需支持按下回车键时
- 若当前行为无序列表且有内容,则下一行继续无序列表,若无内容,则不再继续无序列表
- 若当前行为有序列表且有内容,则下一行继续有序列表,且序号加 1,若无内容,则不再继续有序列表
- 若当前行为待办列表且有内容,则下一行继续待办列表,若无内容,则不再继续待办列表
- 若当前行为引用,则下一行继续为引用
@keydown="handleKeyDown"
// 编辑器按下键盘事件
const handleKeyDown = async (event: KeyboardEvent): Promise<void> => {// 同步预览滚动位置syncPreviewScroll()// 生成快捷键组合字符串const modifiers: string[] = []if (event.ctrlKey) modifiers.push('Ctrl')if (event.shiftKey) modifiers.push('Shift')if (event.altKey) modifiers.push('Alt')const key = event.key.toUpperCase()const shortcut = [...modifiers, key].join('+')// 检查是否有对应的快捷键处理函数if (shortcutMap[shortcut]) {event.preventDefault()await shortcutMap[shortcut]()return}if (event.key === 'Enter' && editorRef.value && !event.shiftKey) {const textarea = editorRef.valueconst content = markdownContent.valueconst cursorPosition = textarea.selectionStart// 找到当前行的起始位置const lineStart = content.lastIndexOf('\n', cursorPosition - 1) + 1const currentLine = content.slice(lineStart, cursorPosition)// 检查当前行是否为列表格式且不为空行const listMatch = currentLine.match(/^(\s*)([-*+]|\d+\.)\s/)const isLineEmpty =currentLine.trim().length === listMatch?.[0]?.trim().length || currentLine.trim() === ''// 检查当前行是否为引用格式const quoteMatch = currentLine.match(/^(\s*)>\s*/)// 检查当前行是否为待办列表格式const todoMatch = currentLine.match(/^(\s*)- \[[ xX]\]\s*/)const isTodoEmpty = currentLine.trim().length === todoMatch?.[0]?.trim().lengthif (listMatch && !isLineEmpty && !todoMatch) {event.preventDefault()const indentation = listMatch[1]const listMarker = listMatch[2]let newListMarker = listMarker// 若为有序列表,序号递增if (/^\d+\.$/.test(listMarker)) {const currentNumber = parseInt(listMarker.replace('.', ''), 10)newListMarker = `${currentNumber + 1}.`}const newContent = `${content.slice(0, cursorPosition)}\n${indentation}${newListMarker} ${content.slice(cursorPosition)}`// 设置新的光标位置const newCursorPosition = cursorPosition + indentation.length + newListMarker.length + 2textarea.setSelectionRange(newCursorPosition, newCursorPosition)restoreCursorAndScroll(newContent, newCursorPosition)} else if (quoteMatch) {event.preventDefault()const indentation = quoteMatch[1]const newContent =`${content.slice(0, cursorPosition)}\n${indentation}> ` + content.slice(cursorPosition)// 设置新的光标位置const newCursorPosition = cursorPosition + indentation.length + 3textarea.setSelectionRange(newCursorPosition, newCursorPosition)restoreCursorAndScroll(newContent, newCursorPosition)} else if (todoMatch && !isTodoEmpty) {event.preventDefault()const indentation = todoMatch[1]const newContent =`${content.slice(0, cursorPosition)}\n${indentation}- [ ] ` + content.slice(cursorPosition)// 设置新的光标位置const newCursorPosition = cursorPosition + indentation.length + 7textarea.setSelectionRange(newCursorPosition, newCursorPosition)restoreCursorAndScroll(newContent, newCursorPosition)}}
}
相关方法
// 同步预览区滚动
const syncPreviewScroll = (): void => {// 点击大纲项时,不触发同步预览区滚动if (editorRef.value && previewRef.value && !ifClickOutLine.value) {const editor = editorRef.valueconst preview = previewRef.valueconst editorScrollRatio = editor.scrollTop / (editor.scrollHeight - editor.clientHeight)const previewScrollTop = editorScrollRatio * (preview.scrollHeight - preview.clientHeight)preview.scrollTop = previewScrollTop}
}
相关变量
// 快捷键映射表
const shortcutMap = {'Ctrl+0': setParagraph,'Ctrl+1': () => addTag('#'),'Ctrl+2': () => addTag('##'),'Ctrl+3': () => addTag('###'),'Ctrl+4': () => addTag('####'),'Ctrl+5': () => addTag('#####'),'Ctrl+6': () => addTag('######'),'Ctrl+Shift+K': insertCode,'Ctrl+L': inserthyperlink,'Ctrl+Q': () => addTag('>'),'Ctrl+B': () => addStyle('bold'),'Ctrl+I': () => addStyle('italic'),'Ctrl+D': () => addStyle('delLine'),'Ctrl+Shift+U': () => addTag('-'),'Ctrl+Shift+O': () => addTag('1.'),'Ctrl+Shift+D': () => addTag('- [ ]'),'Ctrl+Shift+T': insertTable,'Ctrl+Shift+V': insertVideo,'Ctrl+Shift+I': insertImg
}
拖拽打开文件
响应拖拽
:class="{ dragging: isDragging }"
@dragover="handleDragOver"
@dragleave="handleDragLeave"
@drop="handleDrop"
// 文件拖拽到编辑器中时
const handleDragOver = (e: DragEvent): void => {e.preventDefault()if (e.dataTransfer) {e.dataTransfer.dropEffect = 'link'}dragMessage.value = '释放鼠标打开文件(仅支持 md 文件)'isDragging.value = true
}
// 拖拽文件离开编辑器后
const handleDragLeave = (e): void => {// 确保是真正离开容器而不是子元素if (e.relatedTarget === null || !e.currentTarget.contains(e.relatedTarget)) {isDragging.value = false}
}
// 拖拽文件到编辑器中松开鼠标后
const handleDrop = async (event: DragEvent): Promise<void> => {event.preventDefault()const files = event.dataTransfer?.files || []for (const file of files) {file.path = window.api.getDropFilePath(file)if (file.type === 'text/markdown' || file.name.endsWith('.md')) {try {const content = await file.text()markdownContent.value = contentcurrentFilePath.value = file.pathif (!isFileExists(file.path)) {fileList.value.unshift({content,fileName: file.name,filePath: file.path})}// 拖入文件后,立马打开文件openFile({content,fileName: file.name,filePath: file.path})} catch (error) {console.error('读取文件出错:', error)}}}isDragging.value = false
}
获取被拖拽文件的本地路径
通过预加载脚本实现
src/preload/index.ts
import { contextBridge, webUtils } from 'electron'
const api = {getDropFilePath: (file) => {return webUtils.getPathForFile(file)}
}
src/preload/index.d.ts
// 定义 api 的类型interface ApiType {getDropFilePath: (item: File) => string}
拖拽提示层
<!-- 拖拽提示层 --><div v-if="isDragging" class="drag-overlay"><div class="drag-message">{{ dragMessage }}</div></div>
相关样式
.editor.dragging {border-color: #2196f3;background-color: #f5f8ff;
}
.drag-overlay {position: absolute;top: 0;left: 0;width: 100vw;height: 100vh;background-color: rgba(33, 150, 243, 0.1);border: 1px dashed #2196f3;border-radius: 4px;display: flex;align-items: center;justify-content: center;pointer-events: none; /* 允许点击穿透到 textarea */box-sizing: border-box;
}
.drag-message {font-size: 16px;color: #2196f3;background-color: white;padding: 10px 20px;border-radius: 4px;box-shadow: 0 2px 8px rgba(0, 0, 0, 0.1);
}


![[Linux入门] Linux磁盘管理与文件系统](http://pic.xiahunao.cn/[Linux入门] Linux磁盘管理与文件系统)


![【STM32的通用定时器CR1的CKD[1:0]: 时钟分频因子 (Clock division)】](http://pic.xiahunao.cn/【STM32的通用定时器CR1的CKD[1:0]: 时钟分频因子 (Clock division)】)
)


山东大学软件学院项目实训-基于大模型的模拟面试系统-面试对话标题自动总结)


)